[DaVinci Resolve Tutorial] Effects and Keyframes
In this tutorial, we will uncover the magic of adding effects and keyframes in DaVinci Resolve to enhance your video projects.
Effects have the power to transform your shots, adding depth, interest, and professional polish. On the other hand, keyframes allow for dynamic changes over time, giving you control over these effects and creating smooth transitions.
By the end of this tutorial, you will know how to apply and manipulate effects, as well as use keyframes, turning your creative vision into reality. Let's get started!

In this article, you will learn:
- How to Add Effects in DaVinci Resolve?
- How to Crop Videos in DaVinci Resolve?
- How to Add Keyframes in DaVinci Resolve?
- Final Thoughts About Effects and Keyframes in DaVinci Resolve
How to Add Effects in DaVinci Resolve?
Spicing up your video projects with effects is an integral part of video editing, and DaVinci Resolve has an impressive arsenal of options at your disposal.
Whether you're looking to create a certain mood, emphasize a particular moment, or simply add a touch of cinematic flair, effects can make all the difference.
To begin, import the video clips you want to add effects to into the media library. After your material is imported, navigate to the "Edit" page located at the bottom of the interface.
Drag your desired footage onto the timeline and use DaVinci Resolve's editing tools to fine-tune your sequence, and organize your timeline, as well as your video and audio tracks. Now, you're all set to consider adding effects to your video.
In the upper left corner of the Edit page, click on the "Effects" tab. This will reveal a wide array of video transitions, audio effects, titles, and other visual enhancements that DaVinci Resolve has to offer.
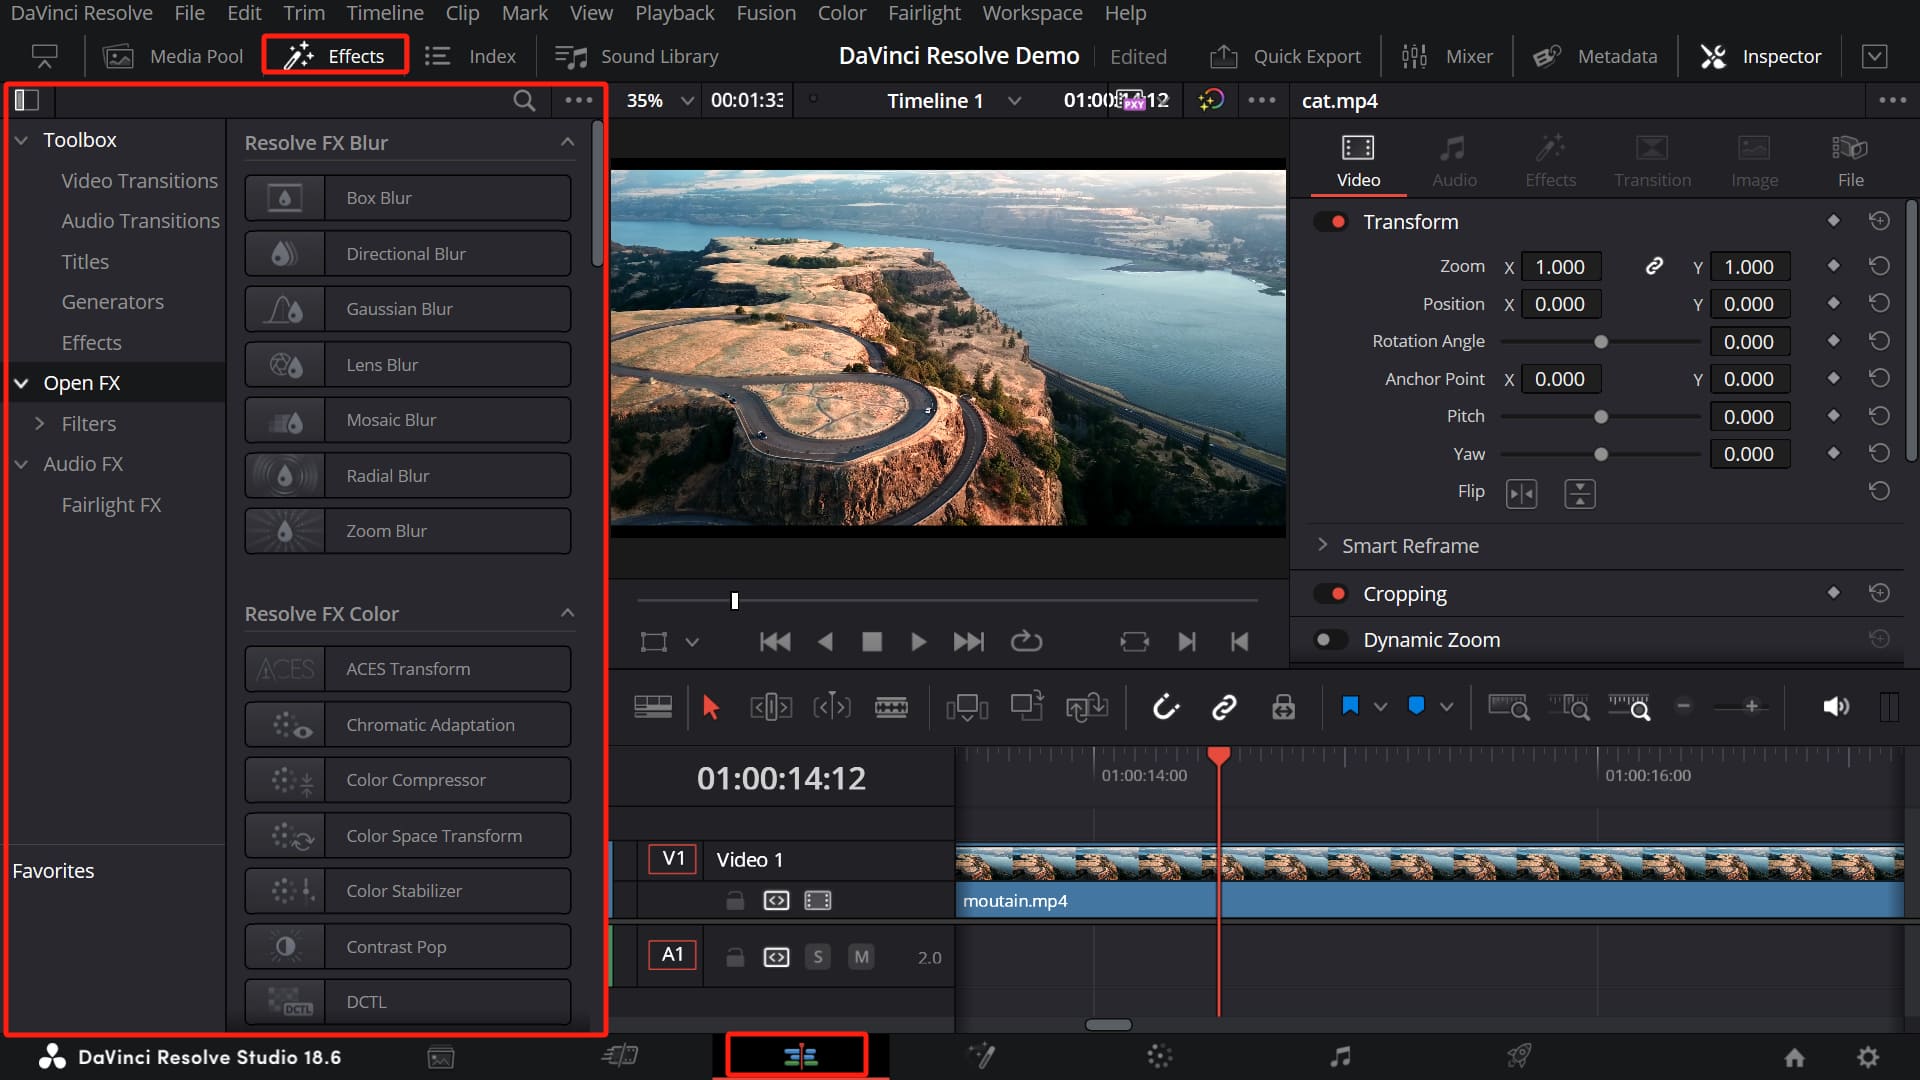
Take some time to explore the various effects available. Once you find an effect you want to use, simply click on it to preview. If it fits your project, drag and drop the effect onto the corresponding video clips on your timeline.
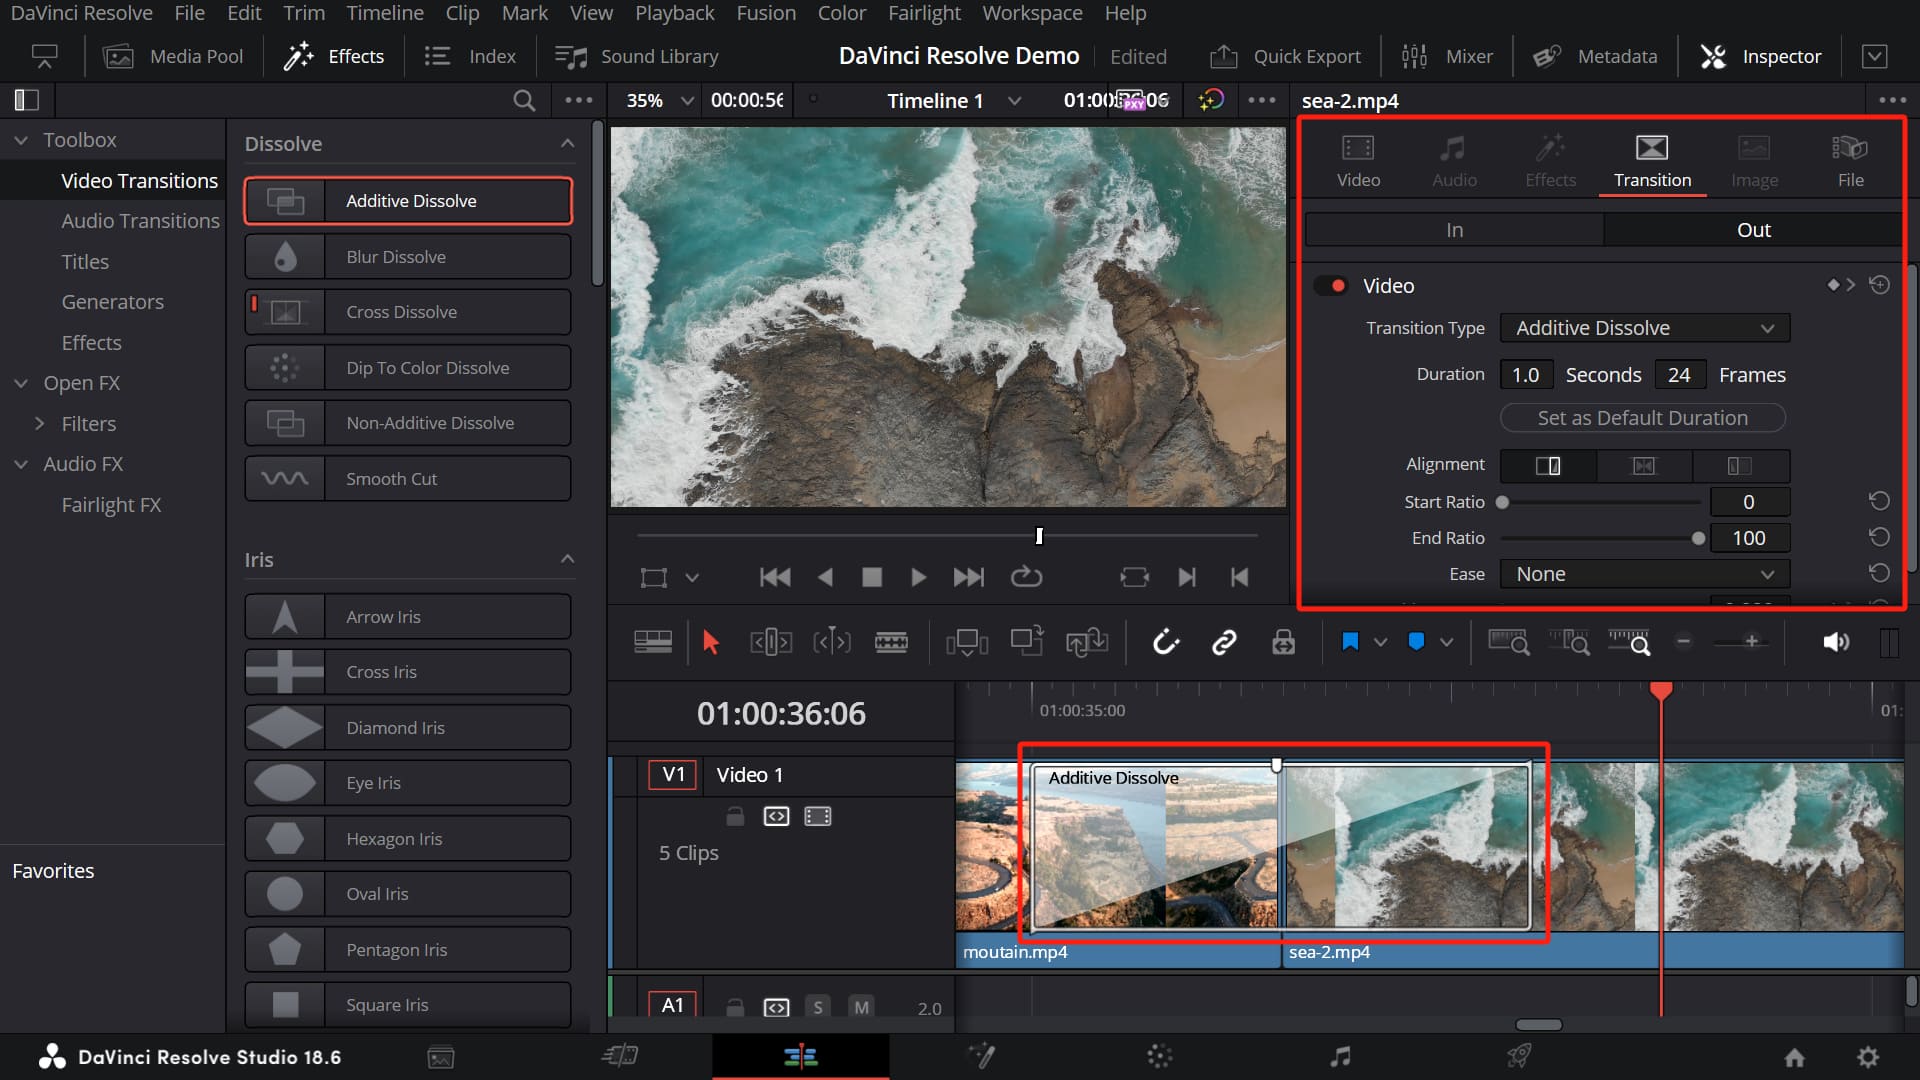
Video Transitions are also located within the same panel. You need to drag and drop the transition effect between two video clips for it to work. After adding a transition effect, you can drag it on the timeline to change the duration of the effect.
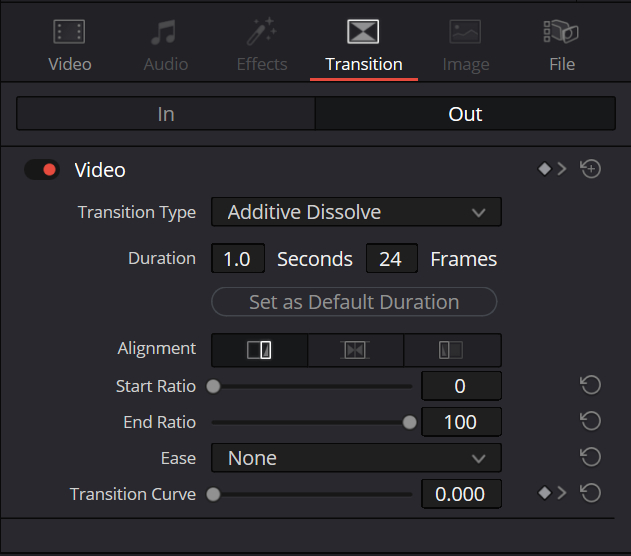
Once you've applied an effect to a clip, you can customize it to your liking. Select the clip, then go to the "Inspector" panel located in the upper right corner of the screen.
Here, you'll find a variety of controls and parameters that you can adjust to tweak the effect as per your preferences.
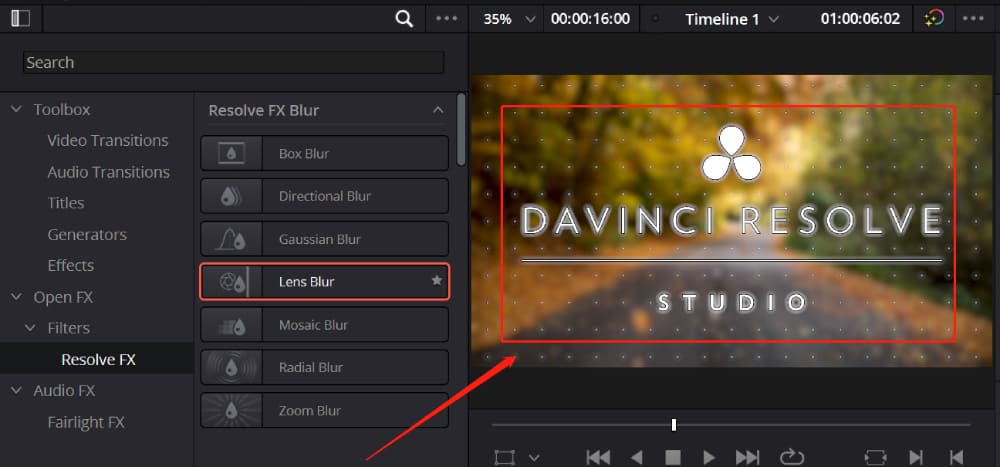
When you click on certain effects under the Open FX option in the Effects panel, you may notice a prominent DaVinci Resolve Studio watermark on the Viewer. This is actually the built-in Resolve FX plugin available in DaVinci Resolve Studio.
Additional Tip:
The free version of DaVinci Resolve comes with many built-in Resolve FX effects that you can use right away. However, note that some high-end effects — like advanced noise reduction, certain lens flares, or complex stylized looks — are only available in the Studio version.
In short, the free version offers most of the basic effects. But if you need more professional effects and better performance, you might need to upgrade to the Studio version.
OpenFX (OFX) is an open plugin standard that allows you to use the same visual effects across different applications. Its purpose is to make it easier to develop cross-platform visual effects plugins.
In DaVinci Resolve, you can add third-party OpenFX plugins or utilize the built-in ResolveFX plugins available in DaVinci Resolve Studio. This means you can apply filter effects such as mosaic, blur, lens flares, film grain, and more, to create stunning and unique cinematic visuals.
How to Crop Videos in DaVinci Resolve?
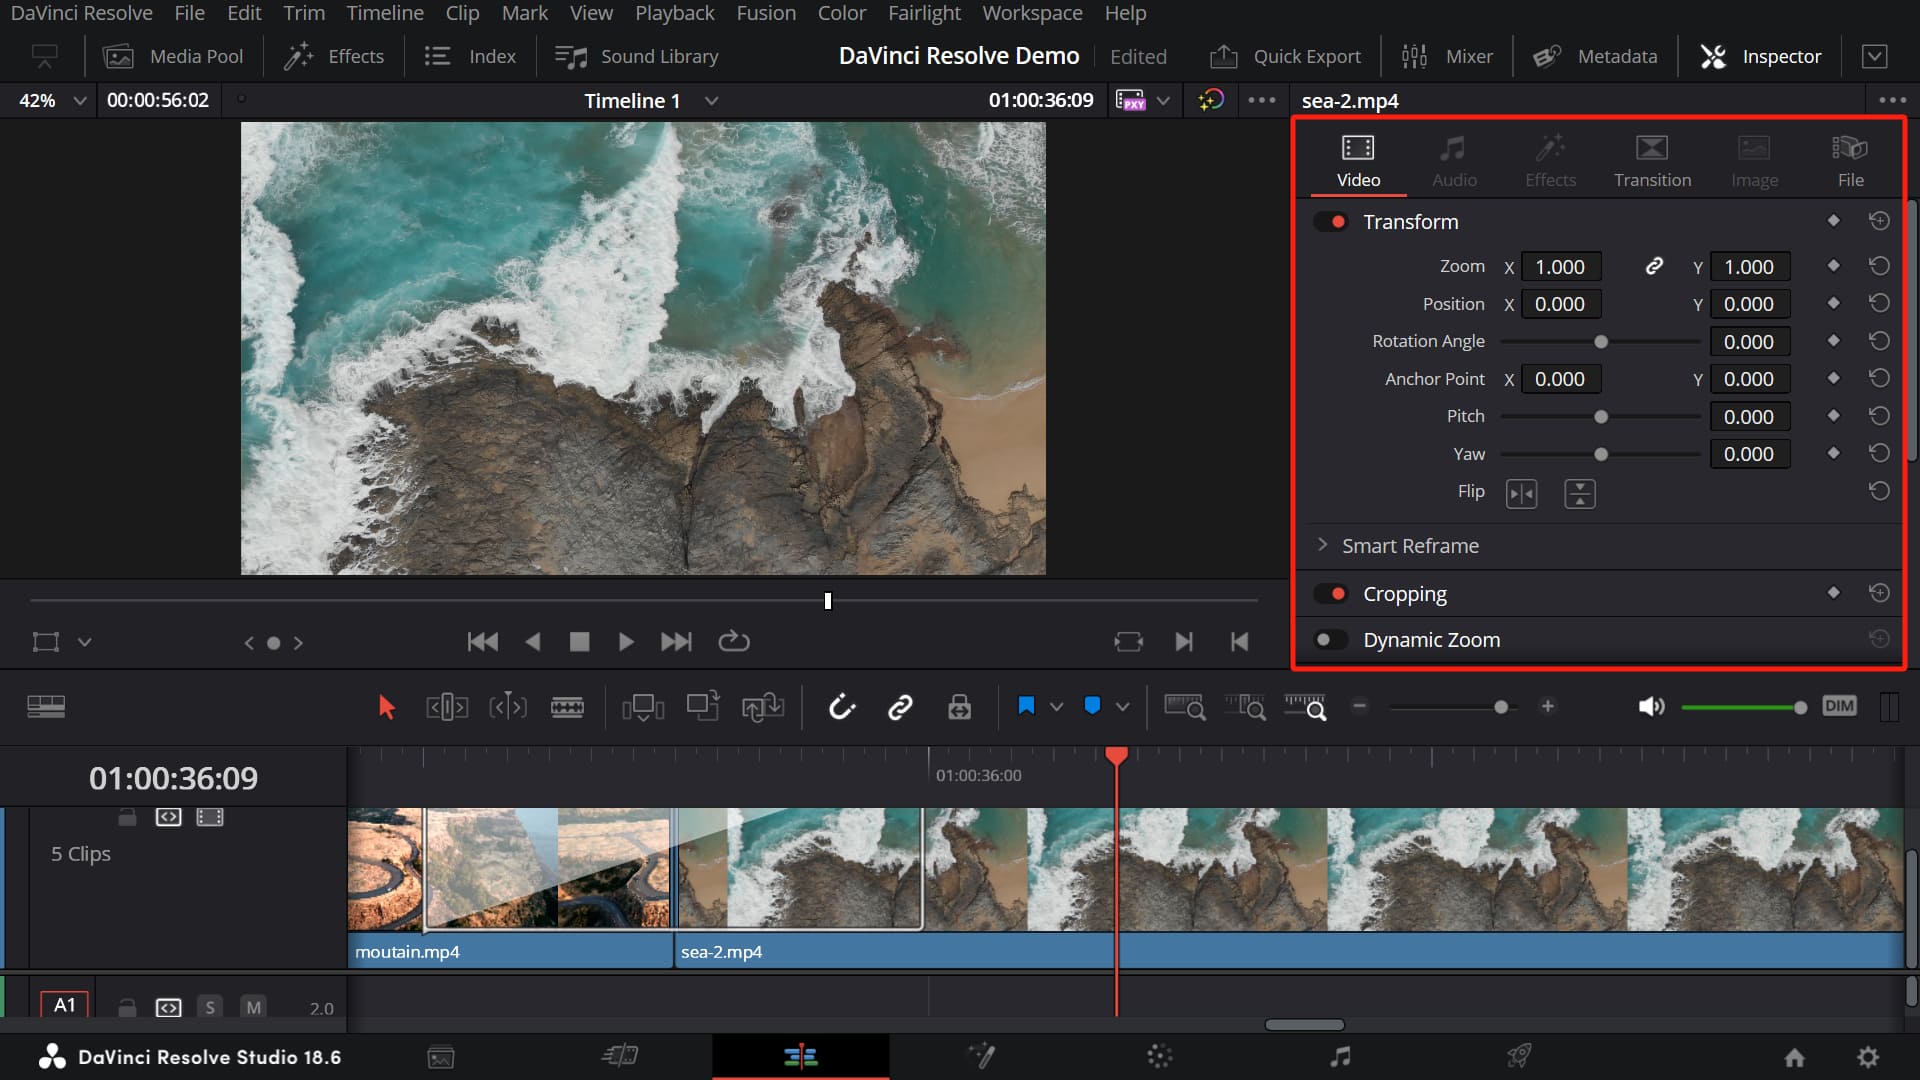
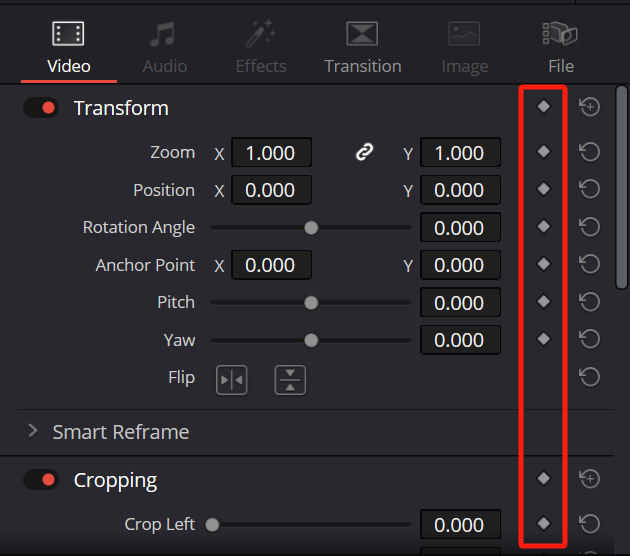
When you click on a clip on the timeline, the Inspector will show controls specific to that clip. In the Video workspace of the Inspector, you can control the clip's position, scale, rotation, and other settings.
If you want to adjust parameters, you can either directly input a number or drag the number with your mouse for a more visual adjustment.
Additional Tips:
When dragging your mouse normally, the numbers will change quickly. If you want to make precise adjustments, you can hold down the Alt key while dragging to slow down the rate of change.
Of course, a TourBox can make your operations more intuitive and convenient, especially when adjusting parameters. It's definitely worth checking out.

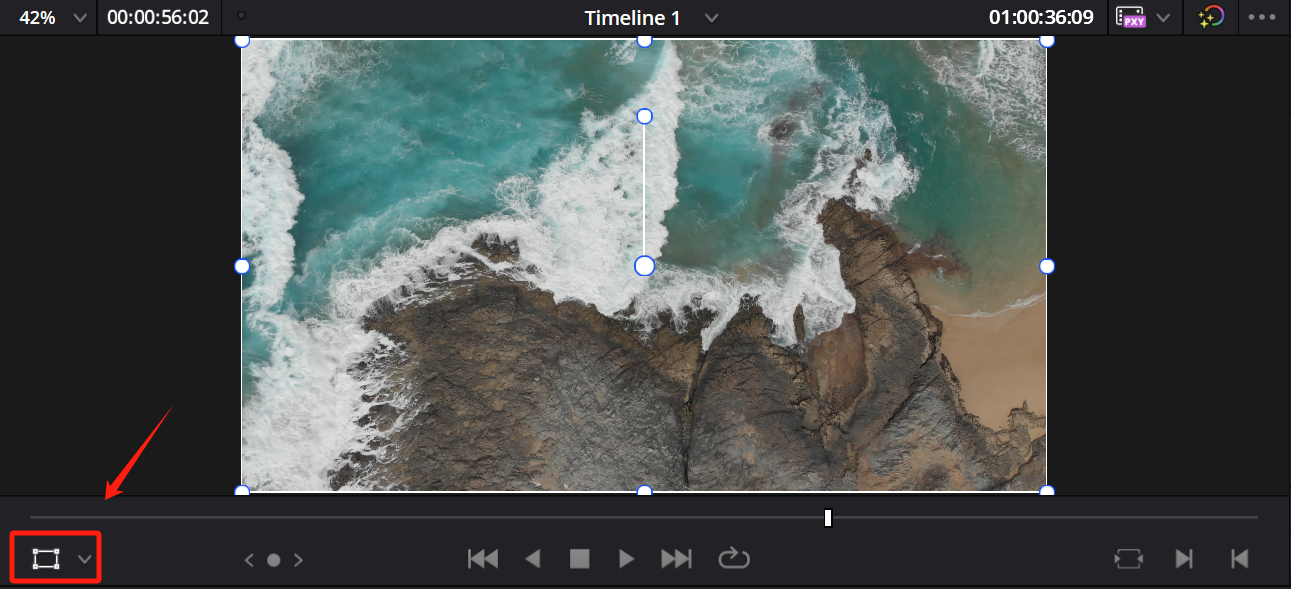
If you're looking for a more intuitive way to adjust your footage, click on the "Transform" button located in the lower-left corner of the timeline Viewer panel.
This allows you to freely drag various handles directly on the video preview to control the scaling and rotation of your footage.
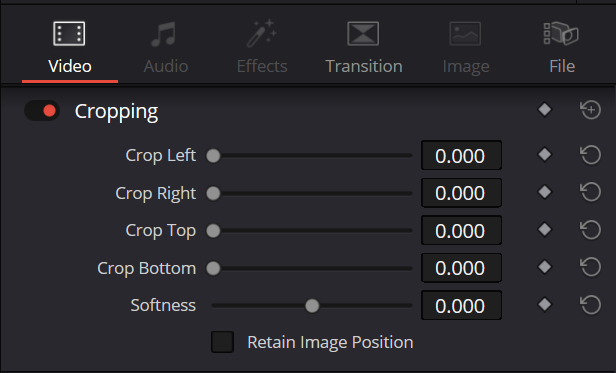
If you need to crop your footage, you can activate the cropping function by clicking on "Cropping" in the Inspector workspace. You can then adjust the parameters in the settings below.
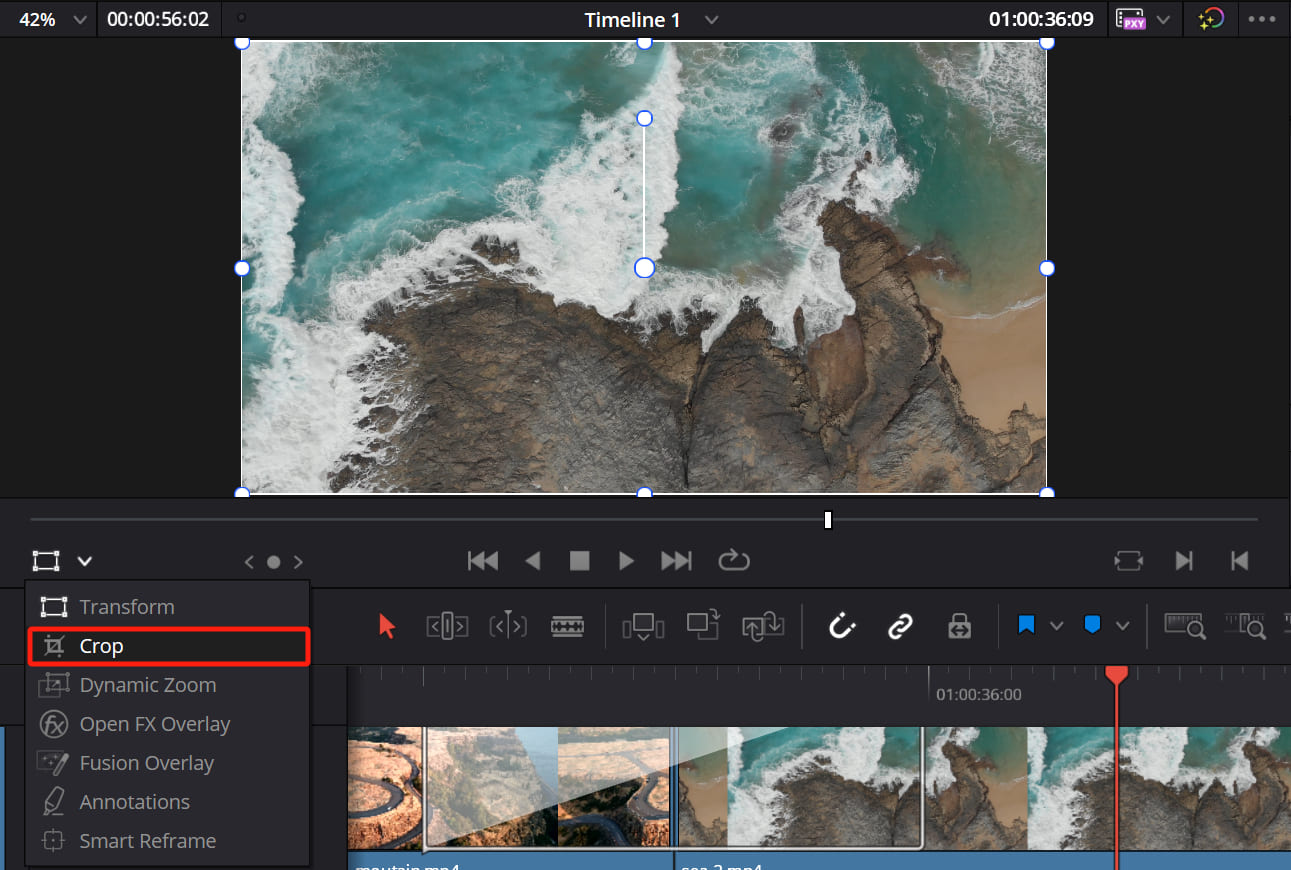
Alternatively, you can click on the downward-facing triangle next to the "Transform" button in the lower-left corner of the timeline Viewer and select the "Crop" tool from the dropdown menu.
How to Add Keyframes in DaVinci Resolve?
In the previous two sections, we discussed how to add effects and how to crop videos in DaVinci Resolve. However, strictly speaking, these are all static adjustments. If we want dynamic effects, we need to involve the dimension of time.
For instance, if we need the footage to slowly enlarge, we need to use keyframes. This is equivalent to telling DaVinci Resolve that we need a certain value to change from one to another within a certain time frame.
Adding keyframes in DaVinci Resolve is quite straightforward. Navigate to the Inspector panel, and you'll see a diamond icon next to each parameter. Click on it, and you've added a keyframe.
You can then drag the playhead on the timeline to another desired time point, change the corresponding parameters, and DaVinci Resolve will automatically add a second keyframe for you.
When you playback the clip now, you can see the animation you've just created.
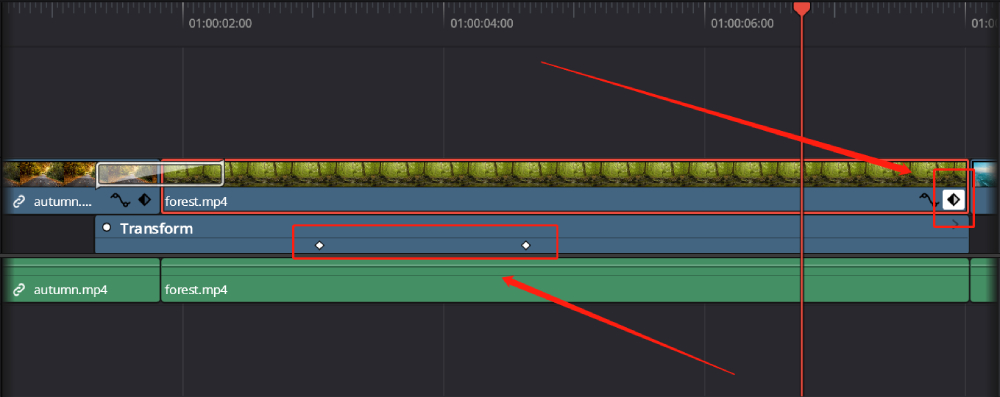
If you want to adjust the timing of the keyframes, navigate to the timeline, and you'll see the diamond markings as shown below. Simply click on one, and you'll see the keyframes you've set.
You can then drag these keyframes, according to your needs, to change the speed of the animation and when it specifically occurs.
At this point, you may notice a problem: your animation is too rigid. That's because we've set the animation to move in a linear manner, which is very dull. Now, we can add a gradient effect to this animation.
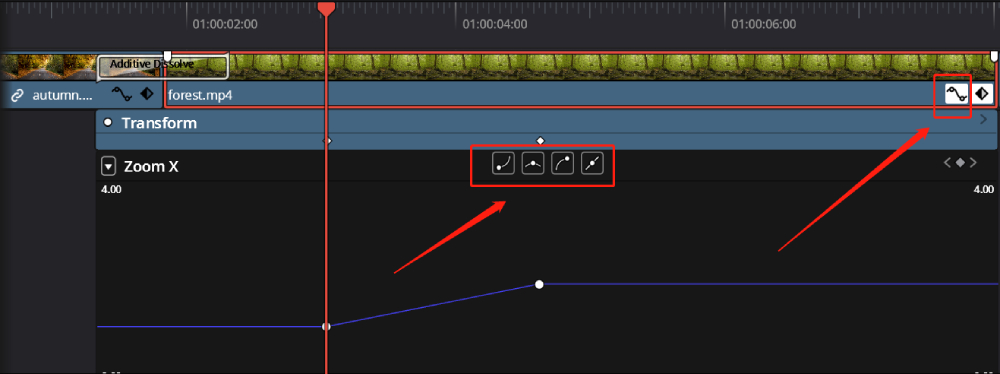
Click on the curve icon as shown below, and a curve control panel will pop out. The line on the curve panel represents the transformation effect of your animation.
You can try each of the four small icons at the top, using the default animation effects provided by DaVinci Resolve.
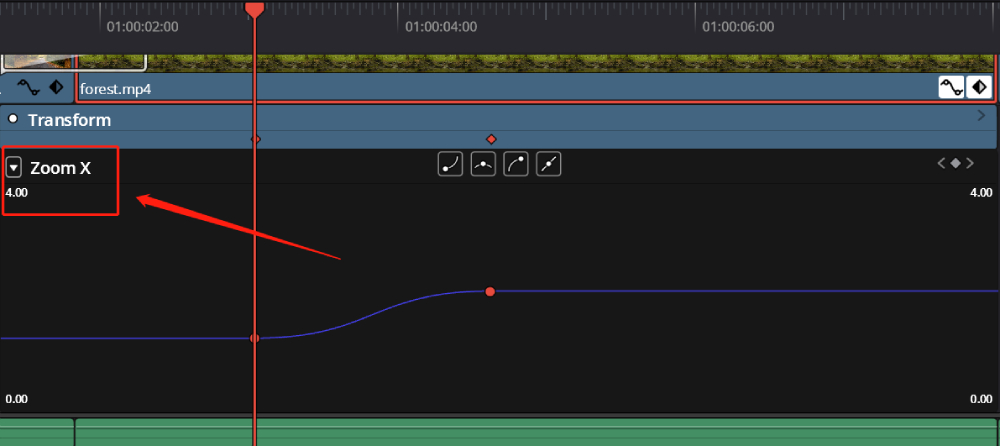
Of course, DaVinci Resolve also offers custom settings. You can drag the handles on the curve to further change the pace of the fade-in and fade-out. Refining these small details will make your footage stand out.
The curve panel also offers parameter settings. Click on the downward-facing triangle on the left, and you'll see various parameters. Select the parameters you need, and you can display the changes of multiple values on one screen.
Additional Tips:
Often when we import a piece of footage, we need it to animate from beginning to end. In this case, it would seem rather obtuse to set keyframes specifically at the start and end of the material, as it would be like explicitly instructing the computer where the animation should start and stop.
DaVinci Resolve offers a very practical feature called Dynamic Zoom. Once you activate this option in the Inspector panel, your footage will appear as if keyframes have been automatically set, creating a very natural scaling effect.
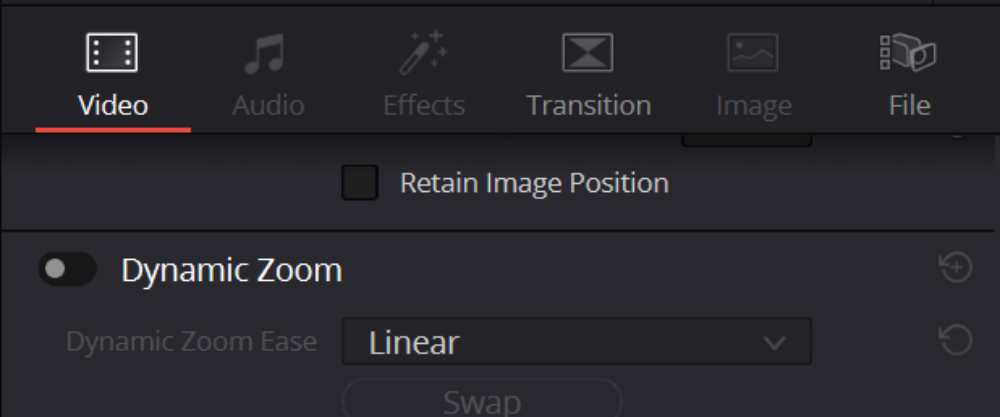
If you want to adjust the speed, you just need to change the length of the footage. You can also select different animation modes in the settings of the Dynamic Zoom dropdown menu.
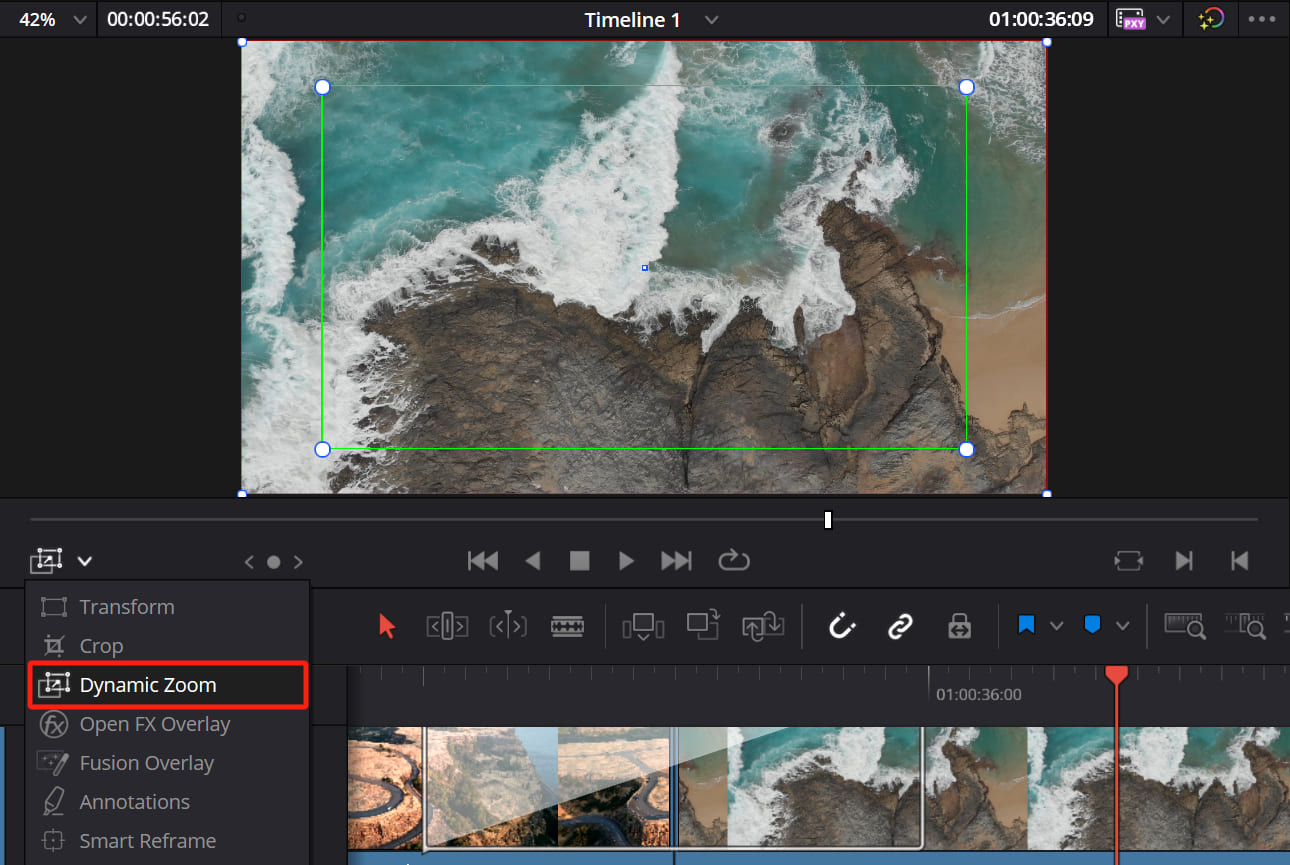
If you want to adjust the position and size of the Dynamic Zoom, you can return to the Viewer panel.
Click on the dropdown option in the lower-left corner and select Dynamic Zoom. You can then adjust the Dynamic Zoom box to control the starting position and size of the animation.
Final Thoughts About Effects and Keyframes in DaVinci Resolve
In this tutorial, we delved into the world of DaVinci Resolve, exploring its powerful effects and the crucial aspects of adding keyframes.
When editing videos in DaVinci Resolve, you might get distracted by switching between tools and dealing with complicated commands that break your creative flow. That's why we recommend the TourBox creative controller.

TourBox makes every step of video editing simpler, so you can work faster and enjoy a great editing experience.

Essentially, TourBox is not just a controller, but a game-changer. It simplifies your editing process, allowing you to focus more on your creativity and less on the editing. If you're interested in TourBox, please click on our video editing page to learn more.
We conclude our course on combining effects and keyframes in DaVinci Resolve. We hope this has been helpful to you.