How to Add Presets to Lightroom Classic?
Lightroom Classic is a powerful photo editing software that can help photographers transform their photos into stunning works of art. One of its most helpful features is the ability to apply pre-determined settings to a photo with just one click.
These settings are called presets, and they can save photographers a lot of time and effort in post-processing. With presets, photographers can achieve a consistent look and feel across a group of photos, making their work stand out.
In this article, we'll dive into the world of presets and explore how to add presets to Lightroom Classic. We'll also take a look at some of the best free and paid presets available for download.
By the end of this post, you'll have a thorough understanding of how to add presets to enhance your photos and streamline your post-processing workflow in Lightroom Classic.

In this article, you will learn:
- How to Add Presets to Lightroom Classic?
- How to Create a Preset in Lightroom Classic?
- The Correct Steps for Using Lightroom Classic Presets
- How to Be More Productive When Using Lightroom Classic?
- Final Thoughts About Adding Presets to Lightroom Classic
How to Add Presets to Lightroom Classic?
It is easy to add presets to Lightroom Classic with a few straightforward steps. Here's how to do it:
Step 1: Download the Presets
The first step is to download the preset that you want to use. Many websites offer free and paid presets for Lightroom Classic.
Some of the best websites to find free presets include:
- PresetLove: PresetLove offers a wide variety of free presets for Lightroom Classic, including black and white presets, vintage presets, and portrait presets. The website is easy to navigate. The presets are organized into categories. This makes it easy to find what you're looking for.
- FilterGrade: FilterGrade offers a curated collection of free presets for Lightroom Classic, including film presets, matte presets, and HDR presets. The website also offers paid presets, as well as tutorials and resources for photographers.
- Photonify: Photonify offers a range of free presets for Lightroom Classic, including landscape presets, portrait presets, and black and white presets. The website also offers paid presets, as well as Photoshop actions and other resources for photographers.
If you're looking for paid presets, some of the best websites to check out include:
- Mastin Labs: Mastin Labs offers a range of film-inspired presets for Lightroom Classic, including presets for Fuji, Kodak, and Ilford films. Presets replicate the look and feel of analog film. They are ideal for photographers seeking a classic and timeless look.
- Noble Presets: Noble Presets offers a range of presets for Lightroom Classic, including presets for weddings, portraits, and landscapes. Presets are designed to improve the colors and tones of photos. They are great for photographers who want a uniform and professional look.
Step 2: Install the Presets
Once you've downloaded the preset, you'll need to install it in Lightroom Classic. Here's how to do it:
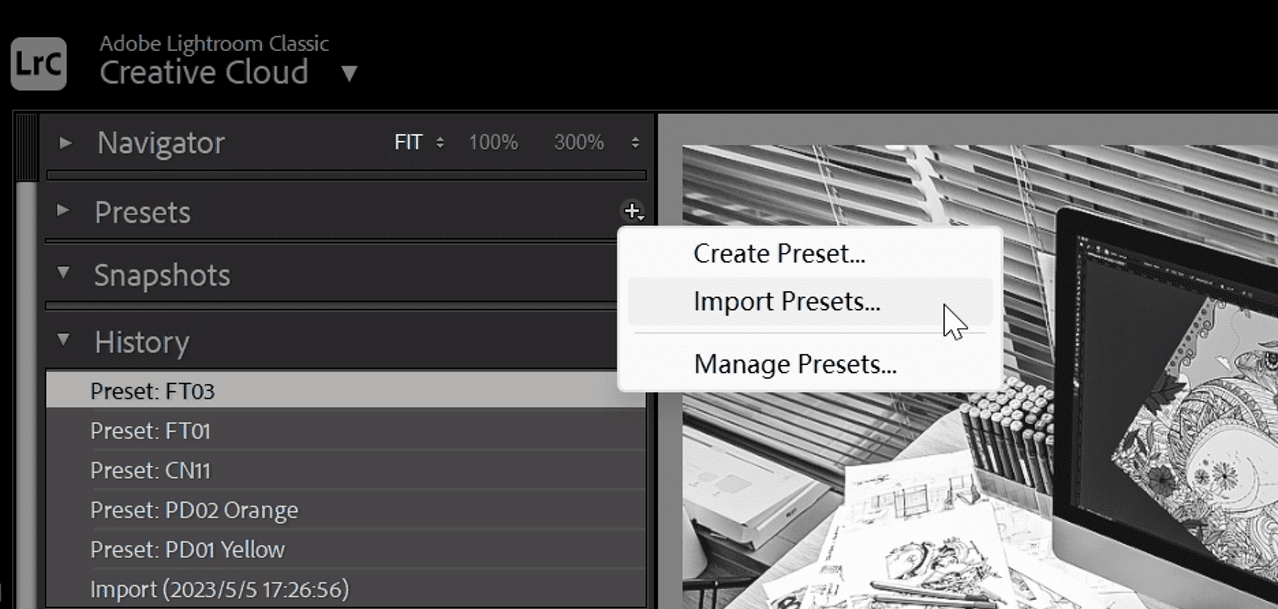
- Open Lightroom Classic and go to the Develop module.
- In the left-hand panel, click on the Presets tab to expand it.
- At the top of the Presets panel, click on the "+" icon and select "Import Presets".
- Navigate to the folder where you downloaded the presets and select them. (Presets typically have the file extension XMP. Simply select and import these files to use them.)
- Click "Import" to add the presets to Lightroom Classic.
Step 3: Apply the Presets
To apply the preset to your photo, simply click on it in the Presets panel. The adjustments contained in the preset will be applied to your photo. You can also adjust the intensity of the preset by using the slider in the right-hand panel.
How to Create a Preset in Lightroom Classic?
In addition to importing XMP preset files to add presets in Lightroom Classic, you can also import DNG files and create presets. While importing XMP preset files provides a one-step solution, the method of importing DNG files and creating presets is also commonly used.
What Are DNG Files?
DNG (Digital Negative) is a universally compatible format developed by Adobe for storing raw files without any loss of data. It is a commonly used raw file format in digital photography and is based on the TIFF 6.0 format.
- Universality: One of the biggest advantages of DNG is its universal compatibility. Not only can Adobe software open DNG files, but also built-in image viewers in Windows, Apple, and Android systems, as well as many third-party software on computers and smartphones, can preview this format.
- Lossless Quality: DNG files can store uncompressed image data and can be processed using various image editing software without any loss of quality.
- Smaller File Size: DNG format applies some lossless compression to the files, resulting in smaller file sizes, sometimes even less than 50% of the original raw files.
In summary, the DNG format is a highly practical file format that preserves all the information of the original image while providing excellent compatibility and smaller file sizes. It is well-suited for use in digital photography.
Here's how to do it:
- Import the DNG file into Lightroom Classic and open it in the Develop module (the photo now contains all the adjusted parameters).
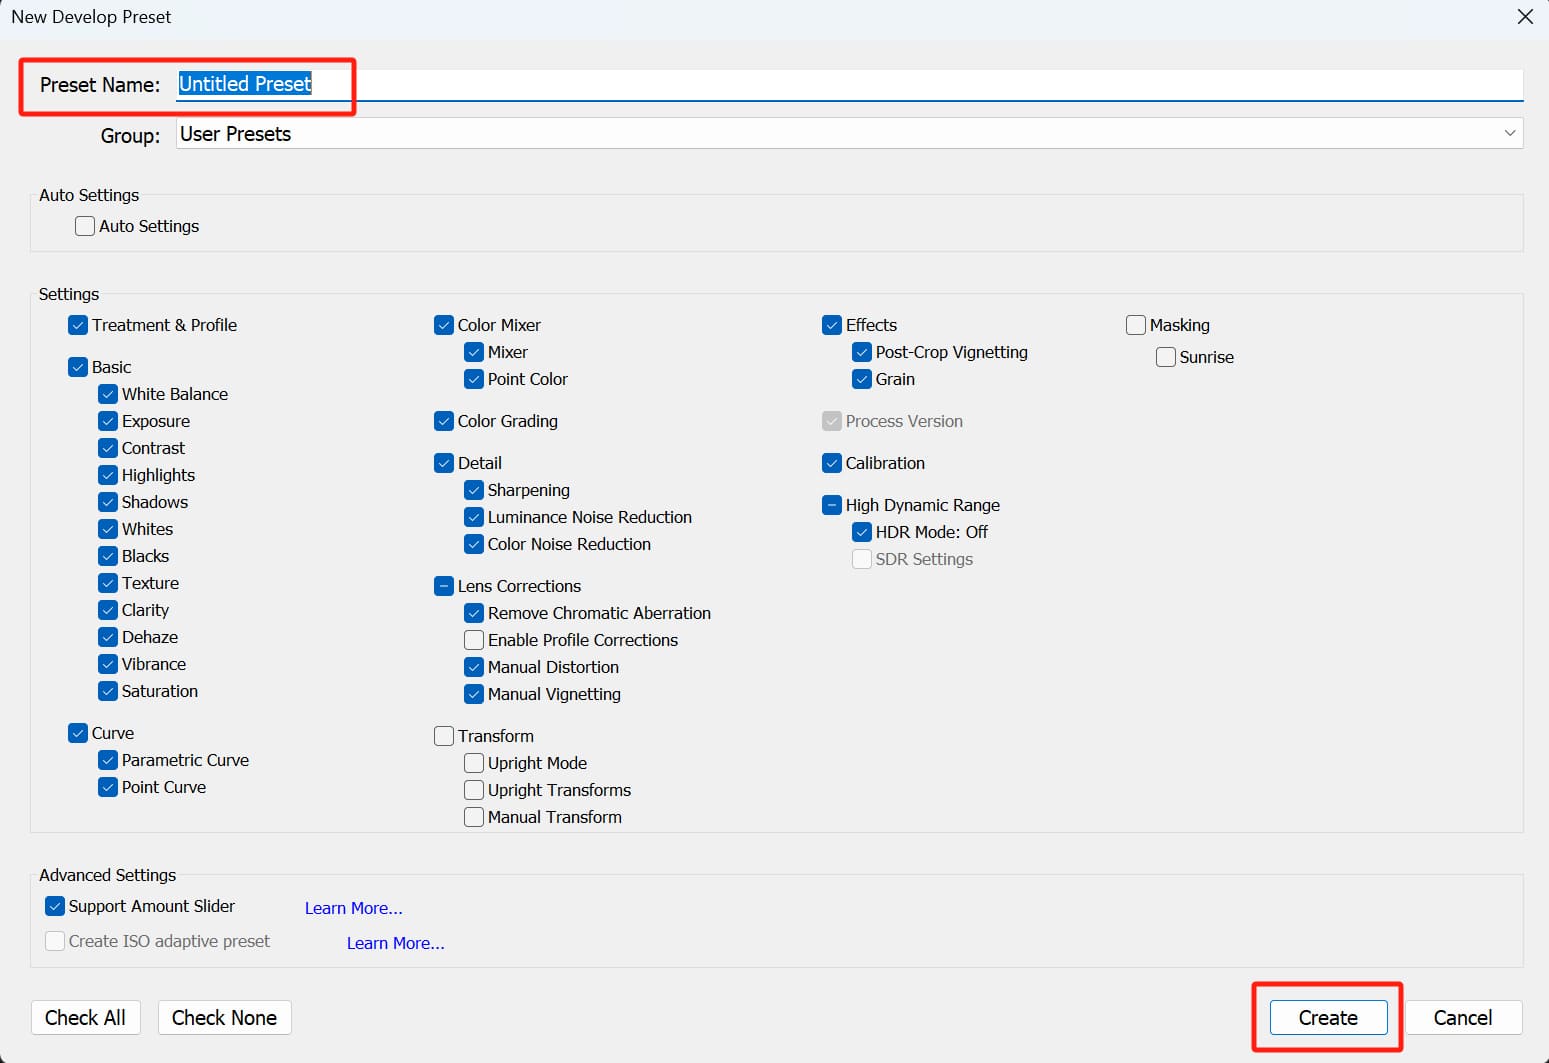
- Click the "+" icon on the left side of the Presets panel and select "Create Preset" from the pop-up menu.
- In the "New Develop Preset" window that appears, enter a name for your preset (to easily locate it) and click the Create button.
By creating presets using DNG format photos, you can not only create presets but also add them to Lightroom Classic. Additionally, because preset files are universally compatible, you can utilize this method to add presets in Adobe's Lightroom and Photoshop.
All you need to do is import the DNG photos into Lightroom or Photoshop and then save the adjusted parameters by creating a preset.
But you may wonder why bother with the cumbersome process of importing DNG format photos when it's more convenient to directly import XMP preset files, especially considering the wide range of paid and free presets available online.
The main reason is that the DNG format offers excellent compatibility. In the rare case where your software version is incompatible with the presets, using DNG ensures a 100% success rate.
The Correct Steps for Using Lightroom Classic Presets
Lightroom Classic presets are an effective way to improve your post-processing. You can use them to ensure a unified look in your photos. However, it's important to use presets correctly to get the best results. Here are some tips on how to use Lightroom Classic presets effectively:
- Choose the Right Preset: The first step is to choose the right preset for your photo. There are many different types of presets available, including black and white presets, film presets, and portrait presets. Choose a preset that matches the style and aesthetic you're trying to achieve.
- Adjust the Intensity: When using a preset, it's important to adjust the intensity to get the desired effect. Most presets come with a slider that allows you to adjust the intensity of the preset. Start with low intensity and gradually increase it until you get the desired effect.
- Fine-tune the Settings: Presets are a great starting point, but they're not always perfect. After applying a preset, take a closer look at the settings and make any necessary adjustments. This might include adjusting the exposure, contrast, or color temperature to get the best results.
- Create Your Own Presets: If you find yourself using the same settings over and over again, consider creating your own presets. Saving time and effort, in the long run, is possible with this. It also ensures your photos have a consistent look and feel.
- Try Different Presets: Don't be afraid to explore. You may find the perfect present for your photos. Try different black-and-white presets, film presets, and portrait presets to see which ones give you the desired effect.
Further Reading:
If you're interested in the efficient usage of presets in Lightroom Classic, check out our article: "How to Effectively Use Presets in Lightroom Classic?"
How to Be More Productive When Using Lightroom Classic?
In addition to using presets, other tools can help you be more productive with Lightroom Classic. One such tool is the TourBox controller.
This powerful and intuitive controller allows you to customize buttons and knobs to adjust different parameters more easily. With TourBox, you can streamline your post-processing workflow and achieve the perfect look and feel for your photos.

To use TourBox, simply download the software and connect the controller to your computer. Then, customize the buttons and knobs to suit your needs.
For example, you can map a knob to adjust contrast when using a preset. You can also use the buttons to quickly switch between different presets or apply specific adjustments to your photos.
We also created a built-in Dynamic Panel tailored to Lightroom Classic and Lightroom workflows. If you're interested, check out our Dedicated Page to learn more.
If you haven't experienced TourBox yet, consider trying our TourBox Lite. With its lower price and easier setup, TourBox Lite is undoubtedly the perfect companion for your creative journey.

Final Thoughts About Adding Presets to Lightroom Classic
In conclusion, knowing how to add Lightroom Classic presets to your workflow can greatly enhance your post-processing process and help you achieve a consistent look and feel across your photos.
With the added help of tools like TourBox, you can further streamline your workflow and make your post-processing tasks more efficient.
By incorporating these tips, experimenting with different presets, and learning how to add presets to Lightroom Classic, you can take your photos to the next level and achieve the perfect look every time.