How to Effectively Use Presets in Lightroom Classic?
You may often come across various Lightroom presets online (or see advertisements for websites offering these presets). These presets save editing time and help achieve color-grading effects that you may struggle with.
However, have you ever encountered a situation where even after using Lightroom presets, your photos still don't look like the ones shared by professional photographers, leaving you questioning everything?
Join us in this tutorial where we will guide you on how to use Lightroom presets effectively. We'll use Lightroom Classic to show how to use presets. You can apply similar steps in Lightroom CC as well.

In this article, you will learn:
- How to Use Lightroom Presets?
- How to Quickly Browse Lightroom Presets?
- How to Install Lightroom Presets?
- Frequently Asked Questions About Lightroom Presets
How to Use Lightroom Presets?
Firstly, we actually don't recommend buying those "500 color grading presets" or "400 Instagram presets" and similar ones when you first use Lightroom Classic.
Wait, 500 presets? Just choosing the right effect for each photo could take up to half an hour. And if you have decision anxiety, how do you even pick from those 500 presets that you like?
Moreover, many of these presets have truly unappealing color tones that you would never want to use in your lifetime. The main issues with these photos are excessive saturation that feels uncomfortable, heavy vignetting all around, and unnatural color styles, among others.
Therefore, when it comes to Lightroom presets, less is more. It's crucial to be selective from the start because some color tones simply won't stand the test of time. After a few months, you might not even bear to look at your photos.
While color grading is a highly subjective matter in photography with no fixed standards, our preferred approach is to keep the colors natural and comfortable, leaning towards warm tones and a slight greenish tint.
Let's take cityscape photos as an example. City buildings often have dark colors or a strong technological feel. To bring out the warm side of the city, you can use a lot of red and green tones in the color grading process.
For instance, you can apply a preset that mimics the colors of a sunrise to the sky and then increase the vibrance and saturation settings in the basic panel as needed.

So, if you think that simply taking a photo and applying a preset will make it identical to what a photographer captured, that's not the case. That's also why you might struggle to achieve similar results even when using someone else's presets.
The correct workflow for using Lightroom presets should be as follows:
- First, import the RAW files into Lightroom and make basic adjustments, including exposure, white balance, and straightening. Ensure that each photo is properly exposed in this step.
- Then, export the files as JPEG format. This exported version is the original JPEG, where corrections and format conversion are applied based on the RAW file.
- Next, re-import this set of JPEG files back into Lightroom for color grading. Whether you're editing individual photos or batch processing multiple ones, you can easily apply the preset with one click, although some photos may require manual adjustments.
Why go through the process of exporting and re-importing? First, it helps to keep a backup of the original files, allowing you to preserve all file formats for future use or re-editing. After all, our preferences for color tones can change every day.
The second reason is that if you apply the preset directly to the RAW file, photos with inaccurate exposure won't achieve the desired effect, and you'll have to readjust manually. It can be challenging to achieve the desired result if you're not proficient with Lightroom.
Further Reading:
If you're interested in how to add presets in Lightroom Classic, check out our article: "How to Add Presets to Lightroom?"
How to Quickly Browse Lightroom Presets?
As mentioned earlier, when you first start using Lightroom, it's not highly recommended to import a large number of presets because you can't control the quality and effects of each preset.
However, as you become more familiar with Lightroom, you will create your own presets and filter through the imported ones. Gradually, your collection of presets in Lightroom will grow. When using presets, continuously clicking and previewing each one can be cumbersome, especially if you have a large number of presets.
Here, we recommend using the TourBox controller. You can set a macro command on the Scroll wheel of the TourBox to quickly cycle through presets and apply them in real-time. All of this can be done with just one hand, without the need for repetitive mouse clicks.

Additionally, for presets that you frequently use, you can set up buttons on the TourBox to achieve one-click application of presets, making your workflow extremely convenient.
TourBox also offers built-in features like the Dynamic Panel, which let you completely break free from the keyboard and mouse and make color grading and photo editing easier. If you're interested, click our link to learn more.

How to Install Lightroom Presets?
Adding and installing presets in Lightroom Classic is a straightforward process. If you have purchased or downloaded some presets, you can easily add them by following these steps:
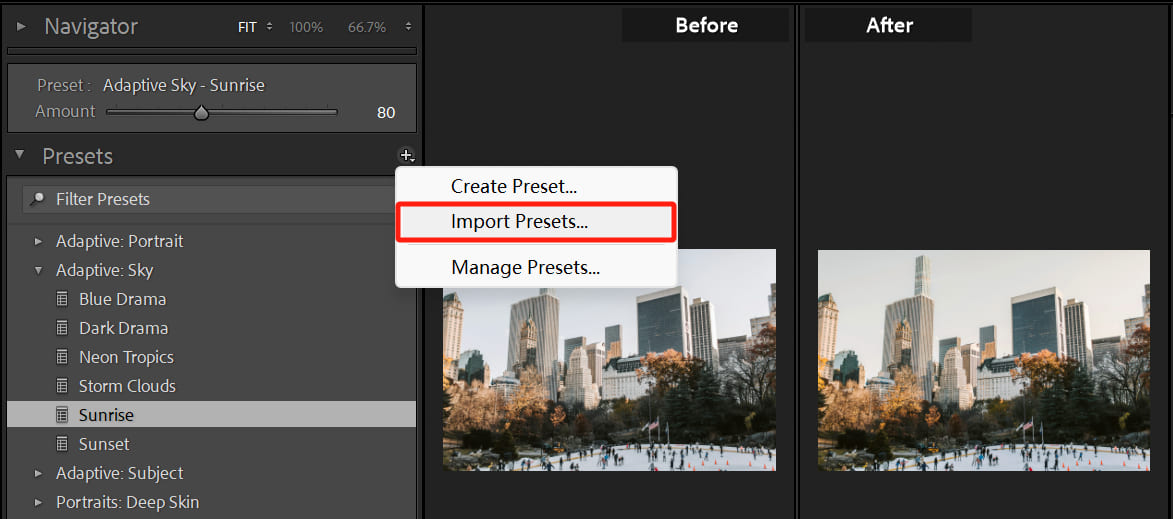
- First, open Adobe Lightroom Classic and make sure you are in the Develop module. On the left-hand side panel, you will see an option called "Presets".
- Click on the "+" button on the right side of the Presets panel and select "Import Presets". This will open a file browser, allowing you to choose the preset files you want to import.
- Once you import the presets, they will appear in the "Presets" panel. You can preview their effects on the current photo by clicking on the preset name.
- If you are satisfied with the preset's effect, simply click on the preset name, and it will be applied to your photo instantly.
- Please note that presets are just a starting point. After applying a preset, you can adjust various parameters of the photo as needed.
Further Reading:
We have shared how to add presets in Lightroom Classic. If you're interested, you can check out: "How to Add Presets to Lightroom?"
Frequently Asked Questions About Lightroom Presets
Question: What Is the Difference Between Irtemplate, XMP, and DNG formats?
Irtemplate is a preset format used in earlier versions of Lightroom and is only compatible with Lightroom. Lightroom versions before 7.3 can only use Irtemplate presets, so Irtemplate is considered outdated.
XMP is a preset format introduced by Adobe in 2018. It can be used in both Lightroom and Photoshop, bridging the gap between the two software seamlessly.
Both Irtemplate and XMP are essentially a set of parameters, so their file sizes are usually just a few KB. They can be imported directly into Lightroom or Photoshop for immediate use.
On the other hand, DNG is a raw file that contains all the adjustment parameters, so its file size is typically several MB to tens of MB. When importing presets with DNG, you need to import the DNG photo into Lightroom or Photoshop first, and then save the adjustment parameters as a preset.
Since importing presets with DNG requires an extra step compared to XMP, why do we mention DNG? It's because DNG has better compatibility. In the rare case that your software version is not compatible with the presets you have, DNG can ensure a 100% success rate.
Question: Can Presets Be Used in Lightroom and Photoshop?
Absolutely! It makes perfect sense since they are all developed by Adobe. There's no need to create a separate preset format for each software, which would increase the cost, don't you think?
Question: Why Are Only Some Presets Showing Up After Importing Them in Lightroom?
This issue typically occurs when your software version is too old or there are compatibility issues.
If you're using Lightroom, go to Preferences -> Presets menu and check the "Show Partially Compatible Develop Presets" option.
If the above steps don't resolve the issue, you can try importing the photos with DNG format and then creating presets. This method is almost foolproof.
Also, it's recommended to check your software version. If it's too outdated, consider upgrading to a newer version.
Question: Why Do Photos Look Worse After Applying Lightroom Presets?
This is a common confusion that almost all beginners face. We have already mentioned the correct way to use presets in the tutorial. However, if you find it troublesome, you can follow these steps:
- Choose a suitable photo to apply the preset. If you apply a landscape preset to a portrait photo, the results may not be ideal.
- After applying the preset, you must make further adjustments to the photo's parameters based on the actual tones and colors.