3 Methods: How to Add Vignette in Photoshop?
Ever wondered how to give your photos that professional, cinematic touch? A simple yet powerful technique used by photographers and designers across the globe is adding a vignette.
This subtle shading effect not only draws the viewer's eye toward the center of the image but also adds depth and focus to your composition. But how do you add a vignette in Photoshop?
If you’ve ever struggled with creating the perfect vignette, or if you're simply eager to learn a new Photoshop skill, you've come to the right place.
In this tutorial, we'll walk you through the process step-by-step, turning this seemingly complex task into an easy and efficient process.
Let's get started, and soon you'll be enhancing your images with professional quality vignettes in no time.

In this article, you will learn:
- What Is the Vignette Effect in Photograph?
- How to Add Vignette in Photoshop?
- Final Thoughts About Adding Vignette in Photoshop
What Is the Vignette Effect in Photograph?
Vignette, a term that might sound technical but has a straightforward concept behind it, refers to a reduction in brightness or saturation at the periphery of an image compared to the center.
This phenomenon often occurs due to the camera or shooting techniques, resulting in darker corners — a tell-tale sign of photographic issues in traditional circumstances.
However, as with many things in art and design, what was once considered a flaw has been creatively repurposed.
Photographers and designers now deliberately incorporate vignettes into their work to emphasize the central focus of an image and add an artistic flair. It's a way of subtly guiding the viewer's gaze toward the heart of the image, creating a natural frame without any intrusive lines or borders.
Vignettes can be produced intentionally by choosing specific lenses known for their vignetting effect, using particular filters, or manipulating the image in post-processing.
Photoshop, in particular, offers a range of options for adding and controlling the vignette effect, allowing for precision and customization to suit each unique image.
In the next section, we'll delve into how to create a vignette effect in Photoshop. If you're intrigued by the vignette effect in photography, we highly recommend watching the following YouTube video created by Mike Smith.
How to Add Vignette in Photoshop?
First off, fire up Photoshop and open the image to which you'd like to add a vignette. You can do this by clicking on File in the menu, then Open, and selecting your image.
Alternatively, you can simply drag and drop the image you want to adjust directly into Photoshop.
With that out of the way, we're all set to explore three different methods for adding a vignette effect in Photoshop. Without further ado, let's dive right in.

Method 1: Using a Curves Adjustment Layer
Click on the "Create new fill or adjustment layer" button located at the bottom of the Layers panel, then choose Curves. In the Curves panel that appears, drag the curve downward to darken your photo.
Don't worry about damaging your original image—all these changes are made within the Curves adjustment layer, making it a non-destructive edit. This is one of the great advantages of using adjustment layers in Photoshop.
For a practical look at this process, check out our demonstration video below.
Next, we'll select the Eraser tool. There are three key points to keep in mind:
- Ensure that your foreground color is set to white.
- Adjust the size of the eraser according to your needs, but make sure to set the hardness and opacity to 100%.
- Make sure you've selected the mask.
Then, click on the areas of the image you want to preserve. In our example, we're aiming to maintain the original state of the central figure. You can get a feel for this process by watching our demonstration video below.
At this point, you can press "Ctrl + T" to bring up the Free Transform tool. You can then adjust the area you want to keep as is according to your preferences. Once you're happy with it, hit the Enter key to confirm.
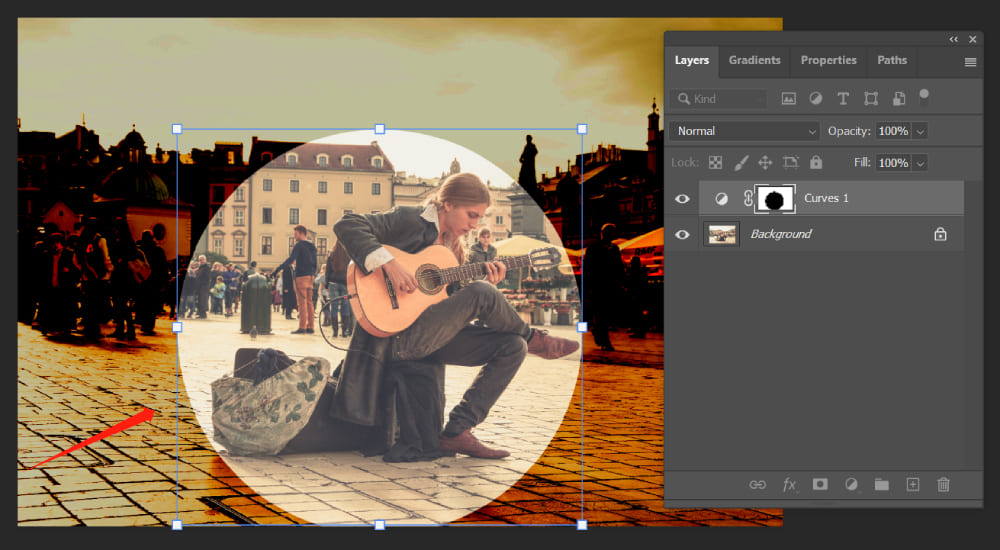
Clearly, the photo currently has a rather harsh transition. To soften this, click on the "Layer mask thumbnail" and adjust the Feather value until it's just right.
This will preserve the original state of the figure in the photo while also giving the vignette area a much more natural transition.
While we could further adjust the opacity of the Curves adjustment layer, the vignette effect still seems a bit unnatural, as if we've merely stuck a layer of vignette onto the photo.
So, how can we blend the vignette more naturally with the photo in Photoshop? Now, we're about to delve into the most complex and challenging part.
You can right-click on the Curves adjustment layer in the Layers panel and select Blending Options, or simply double-click the layer with your left mouse button. This will take you to the Layer Style panel.
Take a look at this panel. Toward the bottom, you'll find a "Blend If" slider, as shown below.
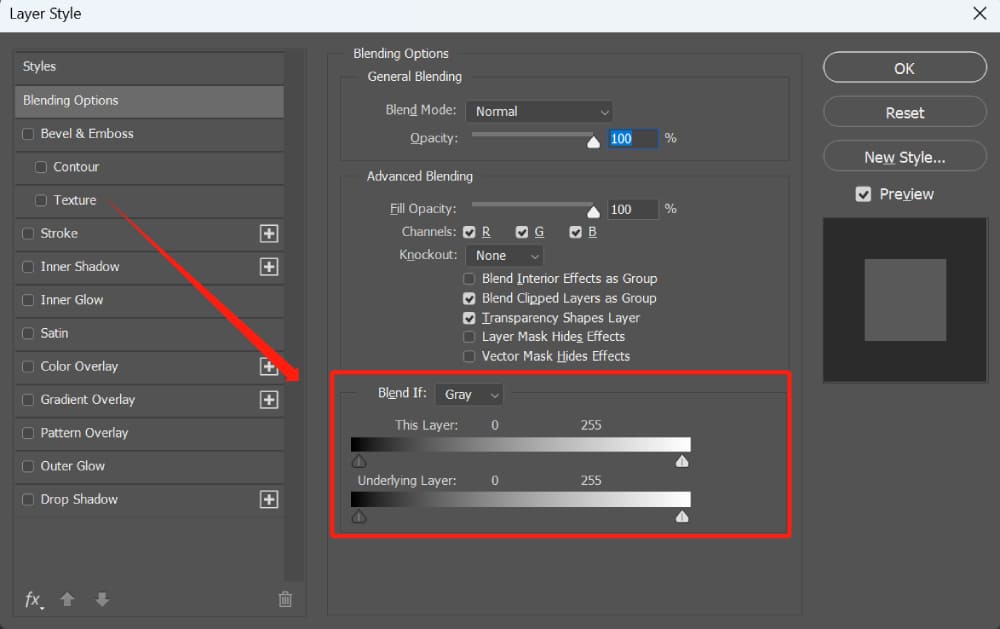
Here, you'll find two Blend If sliders, each with a gradient running from black on the left to white on the right, and small black and white sliders at each end.
You'll notice that above the top slider, it says "This Layer", and above the bottom slider it says "Underlying Layer".
As the name "This Layer" suggests, it refers to the layer currently selected in your Layers panel. Conversely, the "Underlying Layer" affects each layer beneath the currently selected one.
In our demo, "Underlying Layer" would only affect the background layer. However, if there were more than one layer beneath the Curves adjustment layer, the "Underlying Layer" would affect all those lower layers.
So, what's the principle behind the Blend If sliders? Moving the black and white sliders for "This Layer" will cause areas of your selected layer to disappear from view.
Moving the sliders for "Underlying Layer" will allow areas from layers beneath your selected layer to show through, as if you've punched holes in the selected layer.
Moving the white slider affects the brightest areas of your image while moving the black slider affects the darkest areas. The further you move a slider, the greater the range of tones it affects.
Let's explain this with the image below (the numbers here are just for illustration):
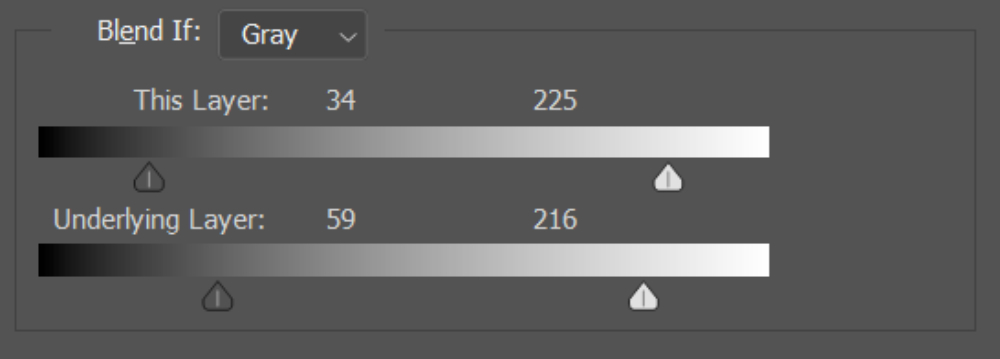
In the screenshot below, all pixels with tonal values below 34 and above 225 in the current layer will be hidden. All pixels with tonal values below 59 and above 216 in all layers beneath the current layer will be fully visible.
To define the tolerance range for blending pixels, you can hold down the Alt/Option key and drag to separate the halves of the slider triangle.
The two values displayed above the separated slider indicate the tolerance range for blending. The tonal range within this interval will have a gradient of hiding or showing.
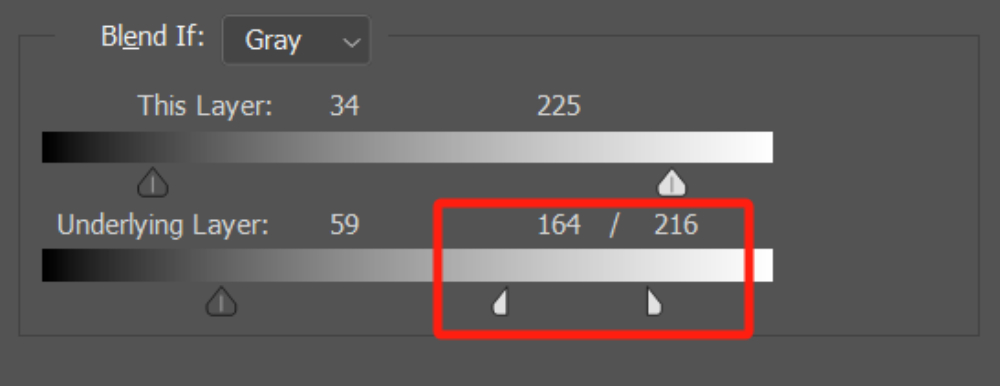
Let's clarify our requirement: we want the vignette effect to blend more naturally into our photo, rather than looking like it was pasted on top.
Therefore, we need the background layer beneath the Curves adjustment layer, which is the original photo we imported, to gradually show through the Curves adjustment layer from bottom to top.
By holding down the "Alt/Option" key, we can drag the white triangle on the right side of the "Underlying Layer" slider, pulling its left counterpart all the way to the left. This will gradually reveal pixels with tonal values from 0 to 255.
Feel free to adjust this to meet your specific needs. Let's take a look at the steps involved in the video below.
Let's take a look at the final result of adding a vignette to a photo using Photoshop.

Let's take a look at the before and after comparison of adding a vignette in Photoshop through the video below.
Method 2: Using a Gradient Fill Layer
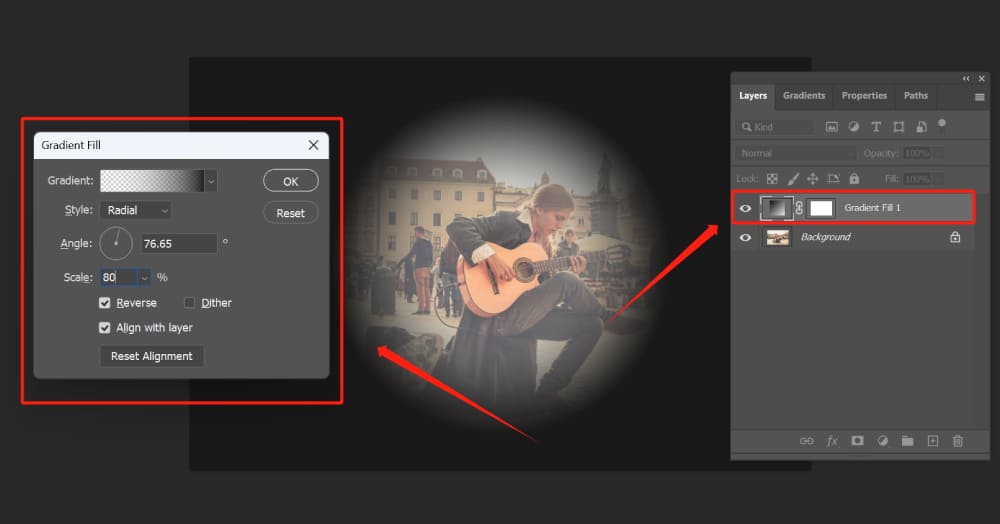
For the second method, we'll use a Gradient Fill layer to add a vignette. Click on "Gradient" from the "Create new fill or adjustment layer" option in the lower right corner. Photoshop will then bring up a Gradient Fill panel.
First, click on the Gradient bar to enter the Gradient Editor for gradient customization.
Next, change the Gradient Style to "Radial", check the "Reverse" box, and adjust the angle. Feel free to make changes according to your preferences or requirements.
Finally, you can adjust the opacity of the Gradient Fill layer, or use the "Blend If" layer blending technique that we mentioned in the first method.
Additional Tutorial: Mastering Gradients: 8 Photoshop Techniques You Can't Afford to Miss
Method 3: Using the Lens Correction Filter
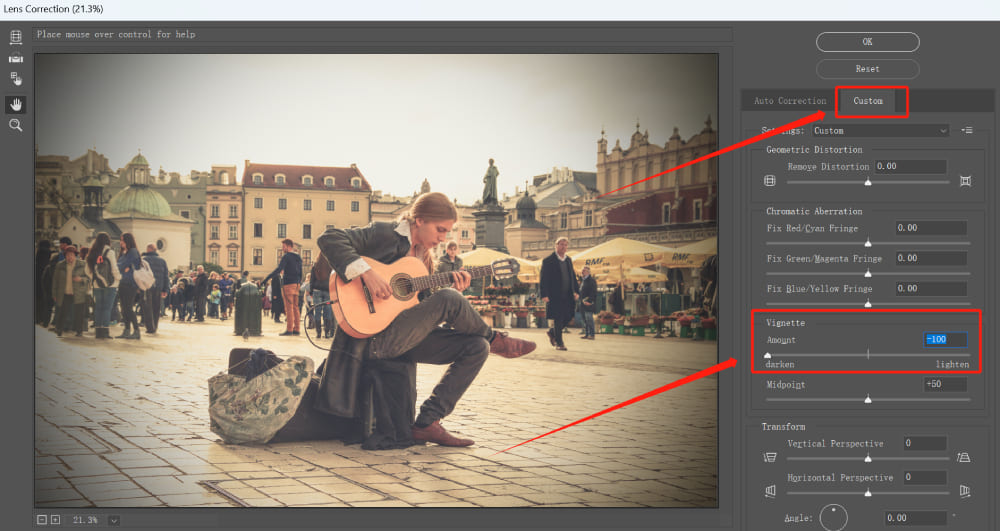
Photoshop offers a filter for adding a vignette. The operation is quite straightforward. First, click on the 'Filter' option at the top of Photoshop, then select 'Lens Correction'.
In the pop-up 'Lens Correction' panel, click on the 'Custom' workspace on the right.
In the Custom workspace, locate the vignette settings. Here, you can adjust the Amount of the vignette, decreasing it to darken the edges or increasing it to lighten them. According to our needs, we can minimize the amount of the vignette.
This method is convenient and easy to operate. The only downside might be that we can't adjust the opacity or range of the vignette as we could in the first two methods.
Final Thoughts About Adding Vignette in Photoshop
Now that you have mastered the art of how to add vignettes in Photoshop using different methods, let's discuss how you can make your editing process even smoother. we would like to introduce you to a game-changing tool: TourBox.

Need to adjust brush size, the opacity of your Gradient Fill layer, or the amount in the Lens Correction filter?
TourBox's Menu function allows you to configure shortcuts, macro commands, and built-in features. Imagine applying our vignette techniques with the twist of a knob or the slide of a dial.
Having a tool like TourBox at your disposal can significantly enhance your editing speed and precision, giving you more time to unleash your creativity.
If you're serious about photo editing and looking for ways to improve your experience and the quality of your work, we highly recommend giving TourBox a try.