Mastering Gradients: 8 Photoshop Techniques You Can't Afford to Miss
If you're seeking to add depth, interest, or a dash of creative flair to your Photoshop projects, mastering the art of gradients is a game-changer.
Gradients aren't just about transitioning from one color to another; they can be a powerful tool to elevate your designs to a whole new level.
In this tutorial, we'll explore 8 indispensable Photoshop gradient methods that can transform your approach to design.
Whether you're a seasoned Photoshop veteran or a beginner looking to expand your skills, these techniques will provide you with innovative ways to add dimension, create mood, and bring your creative visions to life.
Without further ado, let's dive into the vibrant world of Photoshop gradients!

In this article, you will learn:
- Method 1: Creating Linear Gradients
- Method 2: Creating Radial Gradient
- Method 3: Creating Angle Gradient
- Method 4: Creating Reflected Gradient
- Method 5: Creating Diamond Gradient
- Method 6: Creating Gradients With a Brush
- Method 7: Creating Gradients With the Eraser Tool
- Method 8: Creating Gradients With the Layer Mask
- Related Suggestion: Want to Achieve High-Quality Gradient Effects Faster?
Method 1: Creating Linear Gradient
Creating a linear gradient is a basic skill that most Photoshop users are familiar with. It simply involves drawing out a single, straightforward gradient.
There are two ways to access this feature, and the choice between them really comes down to personal preference—whichever feels quicker or more convenient for you.
The end result will be the same either way. So, let's take a closer look.
1. Using the Gradient Fill Layer
This non-destructive method is our recommended approach. Here's how you do it:
Navigate to your Layers panel. Click the "Create new fill or adjustment layer" button—it looks like a half-filled circle at the bottom of the panel. From the dropdown list, select "Gradient".

Here, you can customize your gradient's colors, style (make sure to set it to Linear), angle, and scale.
When you click on the gradient bar within the Gradient tool, the Gradient Editor panel will pop up, offering even more fine-tuning options for your gradient.

Once you're satisfied with your settings, hit "OK" to apply the gradient to the new layer. This will ensure that your original layer remains untouched.
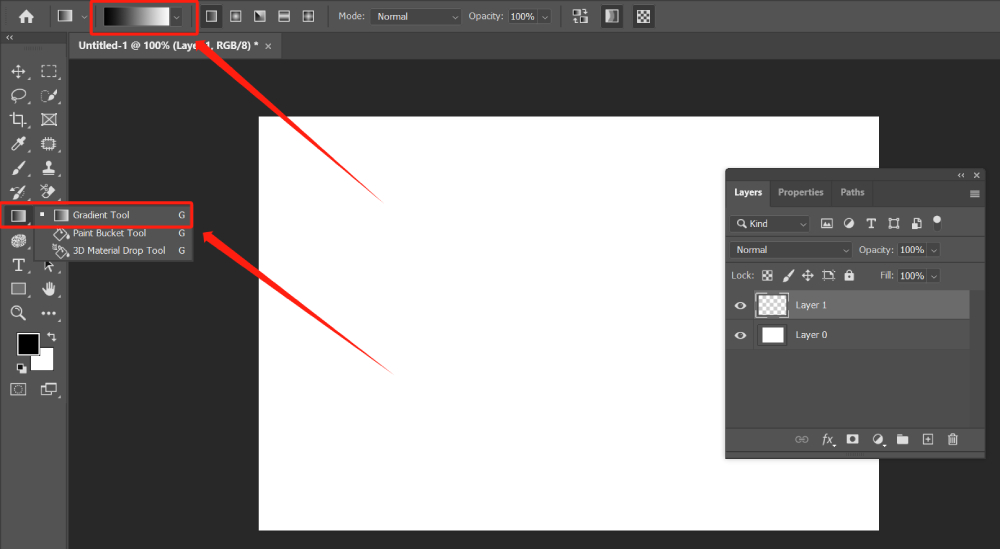
2. Using the Gradient Tool
This method provides a hands-on approach to creating gradients and can be applied to a new, empty layer to maintain non-destructiveness.
First, create a new layer (Layer > New > Layer...) to prevent any changes to your original image.
Select the Gradient Tool from your toolbar on the left—its icon looks like a square fading from solid to transparent.
At the top, you'll see the options bar. Click on the gradient preview (the long rectangle) to open the Gradient Editor.
In the Gradient Editor, you can customize your gradient's colors, opacity, and color midpoint. Click "OK" when you're done.
Back on your canvas, click and drag to create your gradient. The length and direction of your drag will determine the gradient's direction and transition speed.
When it comes to editing in Photoshop, it's always best to preserve your original layers. This allows for more flexibility and forgiveness as your project evolves.

How to Use Gradient Editor in Photoshop?
Both methods we discussed above will lead you to Photoshop's Gradient Editor, so the choice between them really doesn't affect the outcome.
Once you're in the Gradient Editor, the first thing you'll notice is a wide array of preset gradients provided by Photoshop. These typically include various shades of red, green, blue, purple, and more.
Photoshop has already fine-tuned these beautiful presets for you, and you can choose any that aligns with your personal preferences.

If you're looking to customize your gradient, the Gradient Editor provides a lengthy gradient bar for you to adjust your Photoshop gradient colors.
Above and below this gradient bar, you'll find controls that resemble dropper tools. The ones below are for selecting colors, while the ones above are for adjusting opacity.
For instance, if you want to create a gradient that transitions from red to transparent, first select red at the lower left end of the gradient bar.
For the lower right end, you might choose white, which will make the transition from red to transparent more natural. Of course, you're free to pick any colors based on your needs or personal preference.
Next, switch to the opacity controls above the gradient bar. Since we've decided on a gradient that goes from red to transparent, you don't need to adjust the left end of the opacity bar because its default opacity is 100%.
What you do need to change is the opacity on the right end—reduce it to 0% to achieve the transition to transparency.
You can get a feel for operating the gradient bar in the Gradient Editor by checking out our demonstration video below.
Method 2: Creating Radial Gradient
Creating a radial gradient in Photoshop is also straightforward. If you're using the Gradient Tool, you'll find the radial gradient option in the options bar at the top, right next to the linear gradient option.
Other types of gradients can be selected there as well.

If you're using the Gradient Fill layer method, you can switch to the radial gradient in the Style dropdown menu within the Gradient Fill panel.

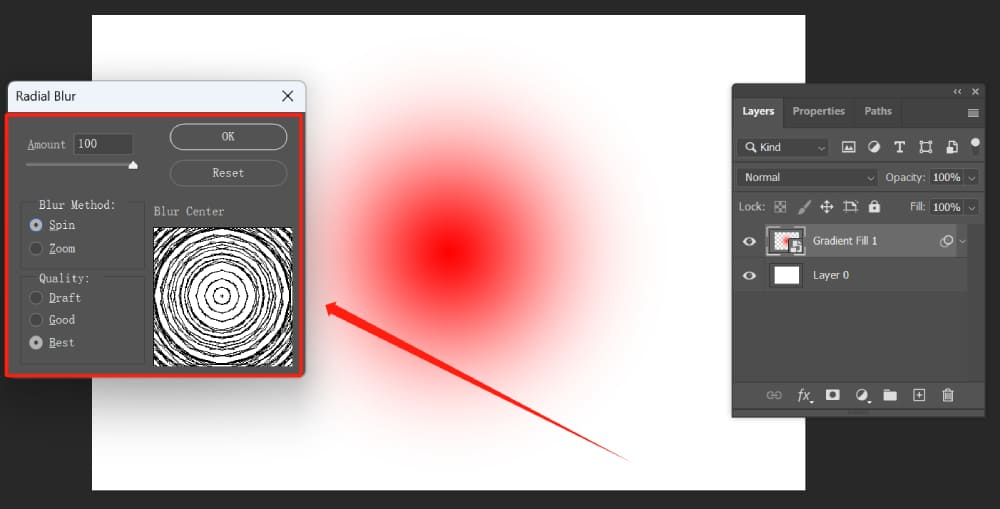
But what if you want to make your radial gradient smoother? While this method might not seem very obvious, it's worth giving it a try.
After applying the radial gradient, you can go to Filter > Blur > Radial Blur, located in the options bar at the top.
You'll find two radial settings: zoom and spin. The choice between them depends on personal preference—there's no definitive "better" option, so feel free to experiment with both.
For quality, if you want a high-quality look, opt for "Best". If you're simply sketching out an idea, "Draft" will do.
Method 3: Creating Angle Gradient
The angle gradient is the third type of gradient we'd like to introduce. Its presentation is the most unique among the gradient options provided in Photoshop.
While most gradients offer a straightforward transition effect, this one presents a 360° angle gradient effect.
This effect is often seen in text designs. Feel free to experiment with angle gradients in your own creations.

Method 4: Creating Reflected Gradient
The Reflected Gradient option is the fourth one in the options bar at the top of the Gradient Tool. You can also find it in the Style dropdown menu within the Gradient Fill panel.
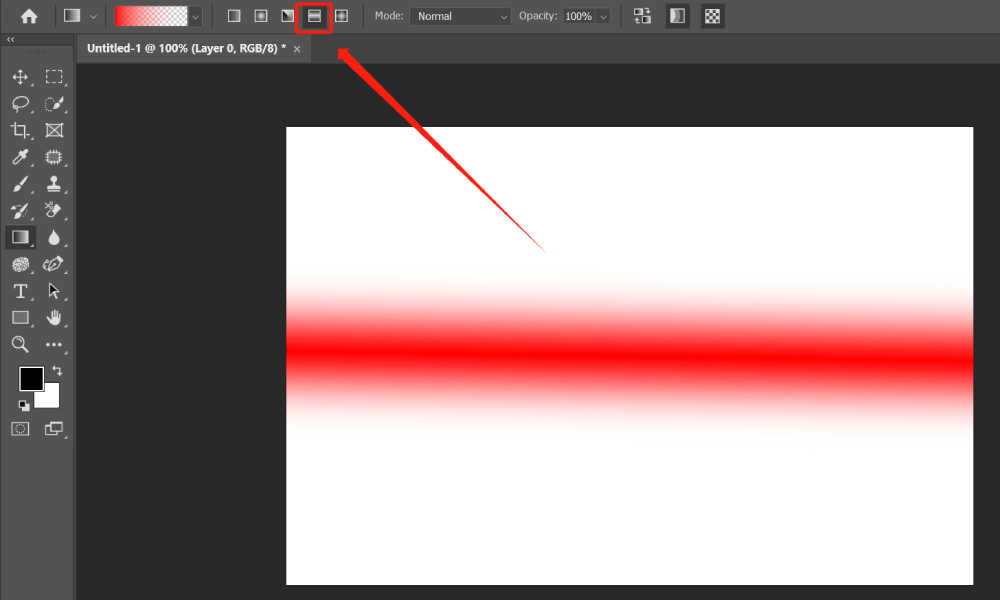
Despite its unusual name, the concept behind the Reflected Gradient is actually quite simple.
We're all familiar with linear gradients. The idea of a Reflected Gradient is essentially two linear gradients mirrored against each other.
So, if you're transitioning from red to transparent, the result will be a gradient that's very red in the middle and fades to transparent on both sides, as illustrated in the following image.
Method 5: Creating Diamond Gradient
The Diamond Gradient is the last default gradient effect provided by Adobe. This gradient is quite unique, as it transitions outward along the vertical and horizontal axes, giving it a somewhat square-like appearance.
Let's get a feel for the Diamond Gradient effect through the following image.

Method 6: Creating Gradients With a Brush
In Photoshop, using a brush can create a gradient effect that transitions from color to transparency, adding a unique flair to your designs.
Choose the Brush Tool from the toolbar on the left. In the options bar at the top, select a brush style that fits your needs. You could start by testing with the Soft Round brush provided by Photoshop.
Select a larger brush size and test your brush on the canvas. As you move the brush, you should see a gradient effect appear, transitioning from color to transparency.
The core of Photoshop is experimentation. Feel free to play around with different brush styles, colors, and settings to achieve the gradient effect you want.
The more you experiment, the more proficient you'll become at creating gradient effects with brushes.

Method 7: Creating Gradients With the Eraser Tool
This technique is similar to creating gradients with a brush, but it's essentially the reverse process. After filling a canvas with color, select the Eraser Tool from the toolbar.
Then, simply brush in a straight line over the areas you want to transition to transparency. You can get a feel for this gradient application method in Photoshop by watching the video below.
Method 8: Creating Gradients With the Layer Mask
Creating gradients with layer masks can be seen as an extension of the brush and eraser gradient methods.
The difference is that you have the opportunity to correct any mistakes without needing to use the eraser—you can simply fix them with the brush.
After filling an area with color, go ahead and enable the layer mask. Choose black as the foreground color, select an appropriate brush (such as Soft Round), and brush over the areas where you want to create a gradient effect.
For further reading, check out: How to Use Layer Masks to Create Stunning Effects in Photoshop?
Related Suggestion: Want to Achieve High-Quality Gradient Effects Faster?
While the above methods for creating gradient effects in Photoshop may be helpful, if you're looking to quickly achieve even more sophisticated gradients, we recommend a resource platform called Envato Elements.
Envato Elements can help you access high-quality gradients to use anywhere, whether it's for PowerPoint backgrounds or any type of graphic design. It's a versatile tool that can enhance your creative projects.

Product Recommendation:
Now that we've explored various methods for creating gradients in Photoshop, I'd like to introduce you to an innovative tool that can significantly enhance this process: the TourBox.

Imagine you're creating a gradient effect using a brush. With TourBox, you can intuitively control your brush's pressure and size, offering a smoother and more precise application than ever before.
But that's not all. The TourBox Menu feature allows you to configure shortcuts, macro commands, and built-in functions. This means you can pull up the Gradient Editor with just a single click.
Even better, you can automate your workload via TourBox's macro commands. This feature is a game-changer for batch processing, freeing up your time and energy for more creative tasks.
And the best part? All of these functionalities are incredibly intuitive. Whether you're a seasoned professional or a Photoshop beginner, TourBox can streamline your workflow and elevate the quality of your gradients.
So why not give TourBox a try and see how it can revolutionize your Photoshop experience?