An Ultimate Guide to Adjusting Volume in Premiere Pro
Undeniably, the quality of audio greatly influences our video editing projects. The sound quality directly determines our initial experience when watching a film or video.
Issues such as sound being too soft or too loud, or fluctuating abruptly, can be devastating to the quality of the work.
As video content creators, if we can resolve these audio challenges, our creations will undoubtedly be elevated to another level.
In this tutorial, we're going to delve into the world of audio editing in Adobe Premiere Pro. We'll provide four methods to adjust volume, ensuring your video carries a professional touch. So, let's get started!

In this article, you will learn:
- How to Adjust Volume in Premiere Pro?
- How to Efficiently Adjust Volume in Premiere Pro?
- Additional Tips for Volume Adjustment in Premiere Pro
How to Adjust Volume in Premiere Pro?
Kick things off by launching Adobe Premiere Pro. Open up your project and locate the sequence you want to adjust the volume for.
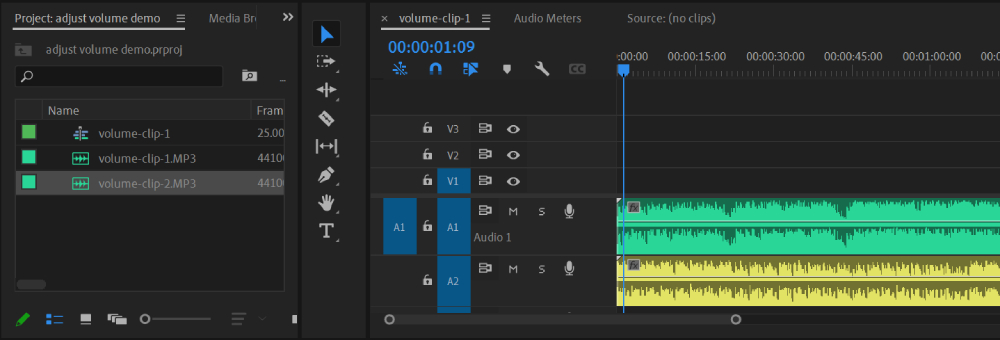
Once you've located your sequence, find the audio clip you want to adjust. You'll typically find this in the timeline at the bottom of your screen. The audio clip is usually represented as a waveform.
Alternatively, you can directly drag the audio file you want to adjust the volume of into the timeline.
For illustrative purposes, in this case, we will drag two music audio files into the timeline, as shown in the image below.
Once we've successfully imported the audio files, there are four methods to adjust the volume in Premiere Pro, which are:
Adjusting the Volume Level Line
Method 1: Adjusting the Volume Level Line
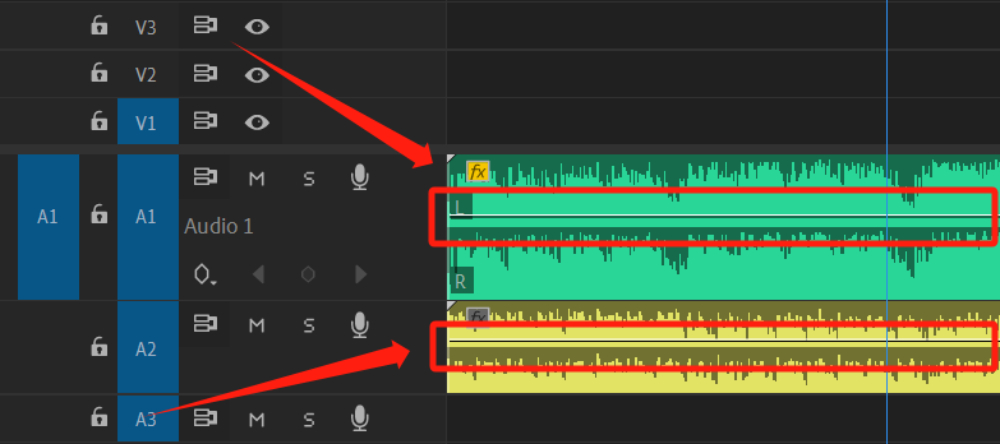
When examining the audio on your timeline, you'll clearly see a line running through the middle of the audio track.
By clicking and holding this line with your left mouse button, you can drag it up or down to adjust the volume. Dragging upwards increases the volume while pulling downwards decreases it.
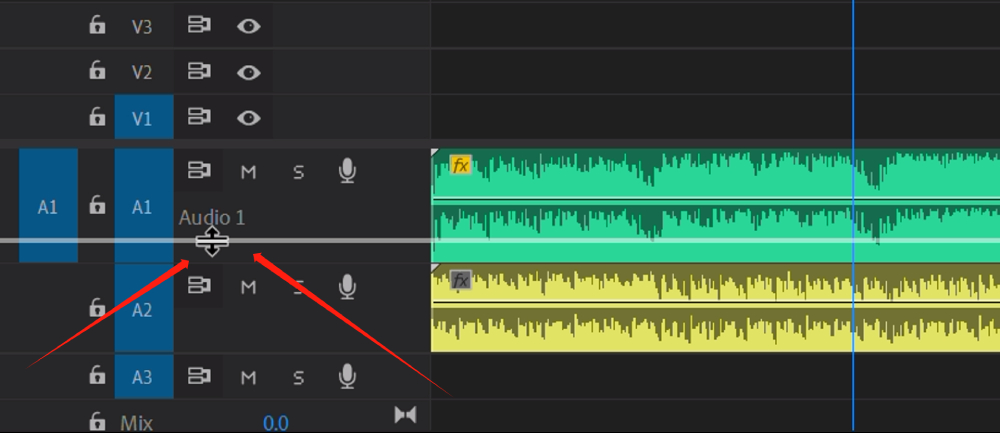
If you can't see this volume level line, you simply need to expand your audio track. Position your mouse between two audio tracks, click and hold the left mouse button, then move up or down to adjust the track size.
Alternatively, you can use the "[" and "]" shortcut keys to decrease and increase volume respectively.
First, select the audio in your timeline that you wish to adjust. Pressing the left bracket key will lower the volume, whereas the right bracket key will raise it.
Method 2: Adjusting the Audio Gain
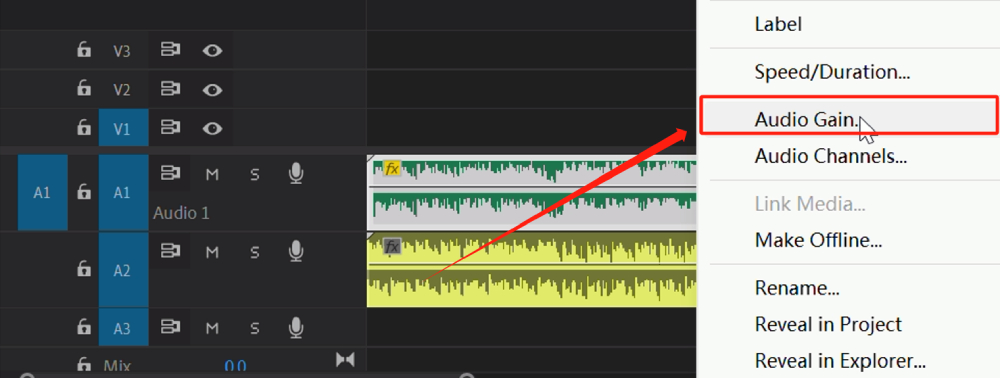
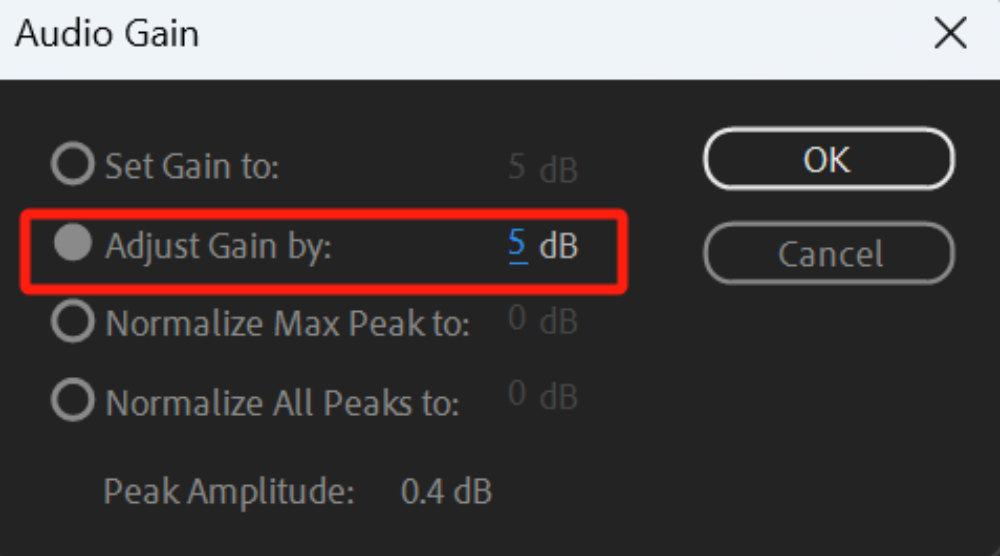
To adjust the volume of your chosen audio, right-click on it and select "Audio Gain".
In the dialog box that appears, enter a value in the "Adjust Gain by" field. If you want to increase the volume, enter a positive value. If you want to decrease the volume, input a negative value.
The "Adjust Gain by" function increases or decreases the volume by a certain number of decibels from its current level, rather than setting the volume to a specific decibel level.
For instance, to increase the volume by 5 decibels, simply input 5 and click OK.
You can also use the "G" shortcut key to bring up the "Audio Gain" panel.
Method 3: Adjusting the Audio Clip Mixer
Look towards the top left of your screen and you'll find the "Audio Clip Mixer" panel. If it's not there, don't fret. Simply go to Window > Audio Clip Mixer and it'll show up.
In the Audio Clip Mixer panel, you'll see different sliders for each audio track in your sequence. Identify the track your audio clip is in and you'll see a corresponding slider.
To adjust the volume, simply click and drag the volume slider up or down.
Moving the slider up increases the volume and moving it down decreases it. The volume level is measured in decibels (dB), and you'll see the dB level as you drag the slider.

Method 4: Using Keyframes
If you want the volume to change over time (such as gradually fading out), you can use keyframes to adjust the volume.
For instance, when you're editing a segment with background music, you'll need to reduce the volume of the music when there's a voiceover track, and increase it when there isn't.
The three methods we've mentioned previously can't accomplish this, but using keyframes can do the trick quite easily.
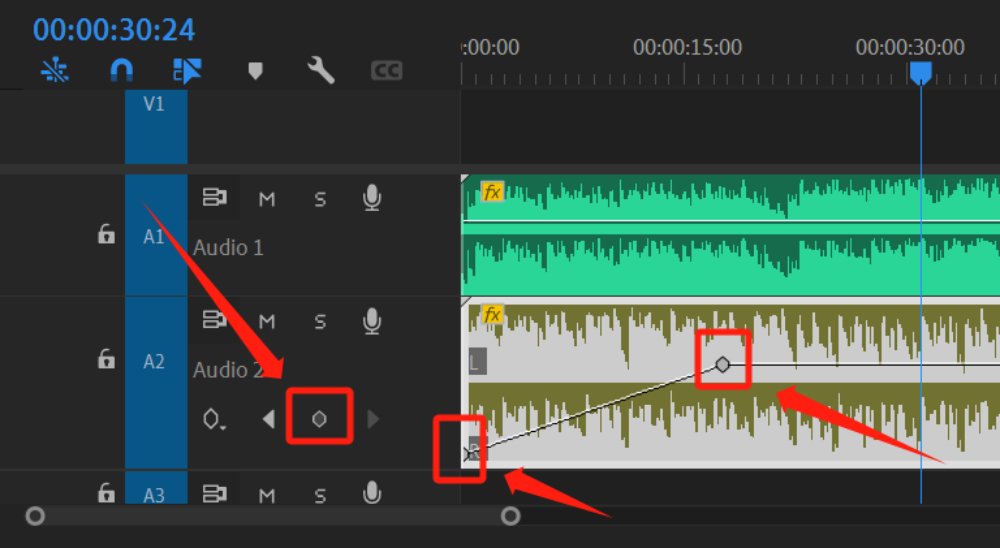
At the start of the background music, we want the music to slowly fade in from soft to loud. To achieve this, we need to add two keyframes at the beginning of the music.
Move the timeline marker to the point where you want to add a keyframe, click and select the audio track that needs volume adjustment, then click the activated "Add-Remove Keyframe" button on the left (which looks like a stopwatch icon). This adds your first keyframe.
Move the timeline marker to the second point where you want to add a keyframe, and repeat the previous operation to add a second keyframe.
Now, select the first keyframe and drag it to the bottom of the audio track. This will reduce the volume of this keyframe to zero, creating a fade-in effect.
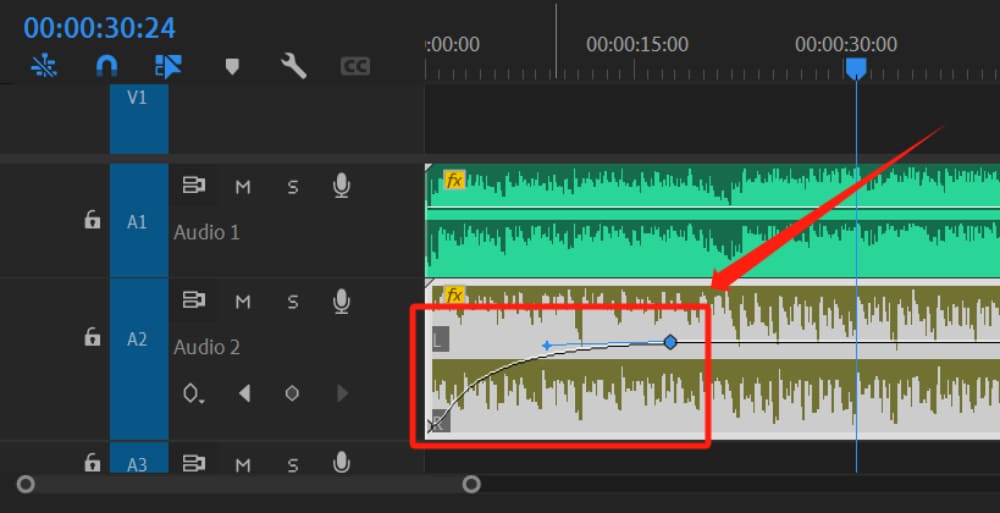
By understanding the principles of keyframes in Premiere Pro, you can achieve fade-in and fade-out effects on your required audio.
Additionally, you can right-click on a keyframe and set keyframe animation to make the transitions even smoother.
How to Efficiently Adjust Volume in Premiere Pro?
In the previous section, we shared methods and techniques for adjusting audio in Premiere Pro. But there's a creative tool that can make this process even simpler and more efficient—TourBox, beloved by digital artists and content creators.

TourBox is designed specifically for digital content creators like yourself. This handy console offers a new and intuitive way to control your editing software.
With its customizable shortcuts and ergonomic design, TourBox can greatly streamline your workflow in Premiere Pro, including volume adjustments.
You can assign the shortcut for adjusting clip volume in Premiere Pro to TourBox's rotation control. You'll love this operational experience because adjusting clip volume becomes as intuitive as adjusting the volume on your phone.
Furthermore, with just a press of a button on TourBox, you can quickly apply functions like fade-in and fade-out to your music. Scaling the audio timeline is a breeze too. Best of all, you can accomplish all these tasks with just one hand controlling TourBox.
Visit our video editing page to learn how TourBox simplifies every step of the video editing process.
Additional Tips for Volume Adjustment in Premiere Pro
In this tutorial, we have walked through several methods on how to adjust audio volume in Premiere Pro, offering you a comprehensive guide to enhance the audio quality of your video projects. Let's quickly recap what we've learned:
- Adjusting the volume line directly on the timeline for quick and simple volume changes.
- Using the Audio Gain function for precise dB adjustments.
- Employing the Audio Clip Mixer for volume control.
- Utilizing keyframes for creating dynamic volume changes over time, such as fade-in and fade-out effects.
As you continue to hone your video editing skills in Premiere Pro, remember these key points:
- Be mindful of your audio balance. Too loud or too soft can deter your viewers. Aim to strike a balance that complements your video content without overpowering it.
- Use keyframes for dynamic volume changes. This is especially useful when you need to adjust the volume of background music to accommodate for voiceovers or other audio elements.
- Don't forget the power of shortcuts. Utilizing keyboard shortcuts like "[" and "]" for volume adjustment or "G" for Audio Gain can speed up your workflow significantly.
- By providing quick and tactile control over software, TourBox can become an indispensable part of your editing setup. Give TourBox a try and make your work in Premiere Pro more efficient and enjoyable.
In conclusion, mastering audio levels is a skill that comes with practice. So don't be disheartened if you don't get it right the first time. Keep experimenting, keep learning, and in no time, you'll be adjusting volume in Premiere Pro like a pro.
Product Recommendation:
If you're looking to get started quickly with TourBox, consider TourBox's latest product, TourBox Lite.

With a lower price and simpler setup, TourBox Lite is perfect for video editing enthusiasts and content creators who want to experience TourBox for the first time. It's designed to be user-friendly and accessible for beginners.