How to Change the Color of An Object in Photoshop?
Welcome to our comprehensive guide on how to change the color of an object in Photoshop. In this tutorial, we will explore three different methods that will enable you to transform the color of any object with precision and control.
Without further ado, let's dive right into the instructions and learn how to effortlessly change the color of objects in Photoshop.
Preparation:
- Prepare the image you want to change the color.
- Open Photoshop and import the image into the software.

In this article, you will learn:
- Method 1: Using the Color Replacement Tool
- Method 2: Adjusting Layers With Hue/Saturation
- Method 3: Using the Replace Color Panel
- Product Recommendation: Enhance Your Color Editing Workflow
Method 1: Using the Color Replacement Tool
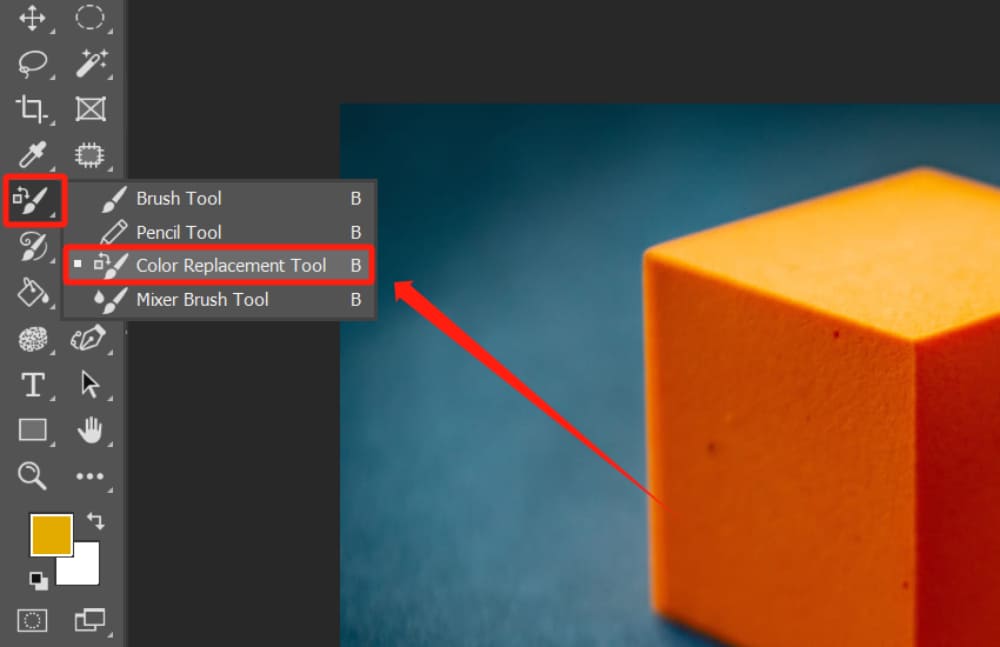
One of the methods we will explore to change the color of objects is using the Color Replacement Tool. You can find this tool in the left sidebar, as shown in the image below:
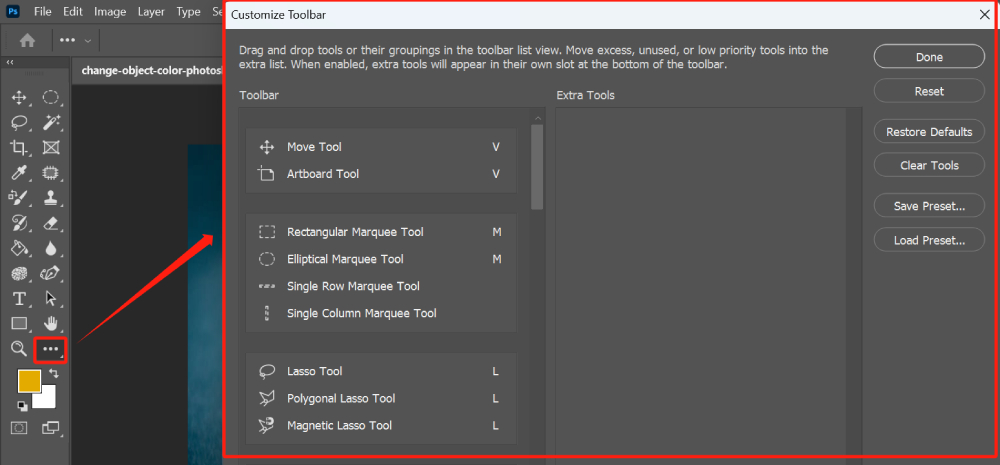
If you can't locate the Color Replacement Tool, click on the "Edit Toolbar" button at the bottom of the left toolbar. It's represented by an ellipsis icon and is located above the "Color Picker".
Right-click on the ellipsis icon and then left-click on the "Edit Toolbar" option to open the "Customize Toolbar" panel.
In this panel, you can check if the Color Replacement Tool is positioned under the "Extra Tool" section or customize the tool's placement according to your preference.
Since the Color Replacement Tool functions as a brush tool, the changes it makes directly affect the layer. To ensure a non-destructive workflow, it is recommended to create a duplicate layer of the imported image before using the Color Replacement Tool.
Next, select the object you want to change the color of. Here we use the Object Selection Tool to make the selection. However, feel free to use other tools based on your preference or specific requirements.
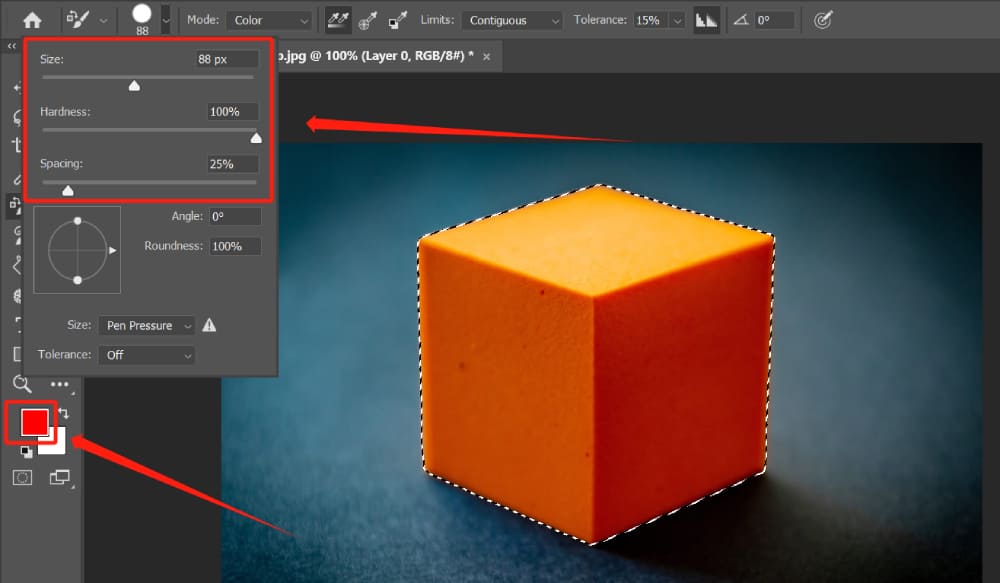
Now, set the desired color in the foreground color. For demonstration purposes, we will choose red.
Adjust the size, hardness, and spacing of the Photoshop color replacement brush according to your specific needs.
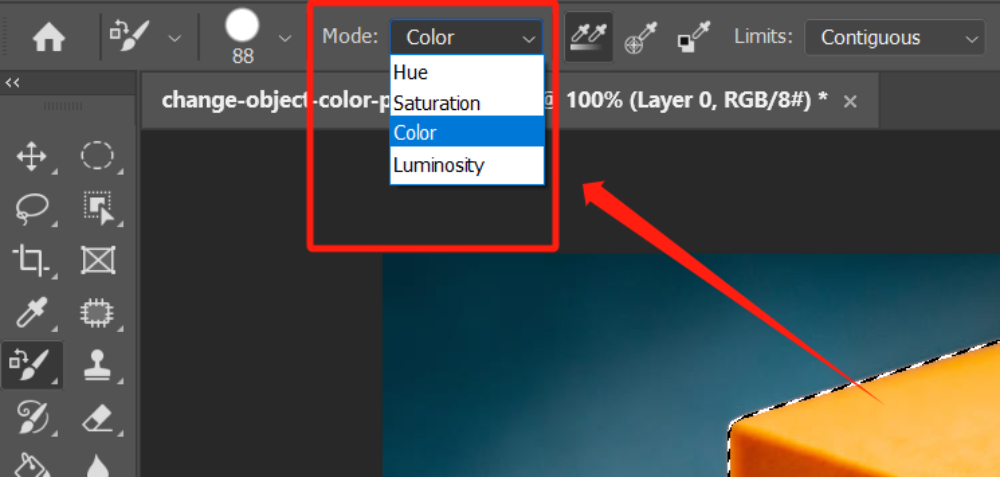
Next, you need to choose the blending mode. There are four blending modes available: Color, Hue, Saturation, and Luminosity:
- Color: The Color mode is the default setting, which changes both the hue and saturation.
- Hue: The Hue option affects only the hue.
- Saturation: It affects only the saturation.
- Luminosity: It simply matches the brightness of the original color with the brightness of the new color, leaving the hue and saturation unaffected.
If you intend to replace one color with another using Photoshop, choosing the Color blending mode is recommended as it will generally yield the best results.
Next, you can adjust the Sampling setting, where you can choose from three options: Continuous, Once, and Background Swatch:
- Continuous Sampling: It will constantly sample the color you are painting with as you move the brush.
- Once Sampling: It will use the color at the initial point where you started painting with the brush.
- Background Swatch Sampling: It will only paint on areas that match your background color.
Next, you have the Limits setting. This setting controls the "spread" of the color and affects the boundaries of the color change.
- Contiguous: It will only affect the pixels within the sampling area where the brush crosshair is located. It will not change the color of adjacent areas that match the same color.
- Discontiguous: It will change the color of adjacent areas that match the sampling color, extending beyond the boundaries of the brush crosshair.
- Find Edges: It will identify the edges in your image and stop the color change when approaching those edges. The color variation will only affect the edges.
The options in Sampling and Limits may seem complex and overwhelming at first. However, in most cases, using Continuous Sampling and Contiguous Limits will be your best choice.
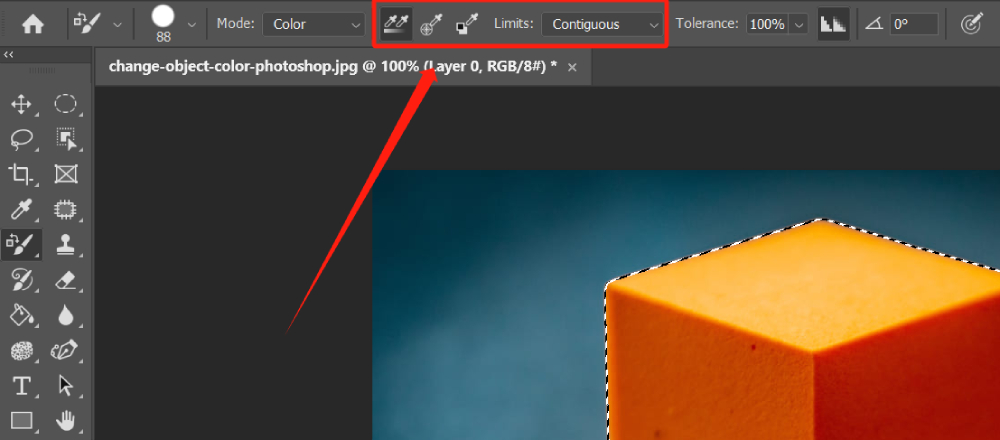
The Tolerance setting controls the similarity between colors and the sampled color. Choosing a lower percentage will replace colors that closely match the selected pixels, while increasing the percentage will replace a broader range of colors.
In this case, since we used the Object Selection Tool to make a selection of the object, we can set the Tolerance value to 100.
If you haven't made a selection, you can try using a smaller Tolerance value and brushing along the edges of the object. In doing so, you will notice that Photoshop only replaces colors that closely resemble the pixels you have selected.
After setting the Tolerance, we can simply use the Color Replacement Tool to brush within the selection. You can get a feel for using this tool through the video provided below.
While the Color Replacement Tool is suitable for quick edits, it may not produce the desired results when working with black or dark colors.
If you find that the Color Replacement Tool doesn't achieve the desired effect, you can try adjusting the hue and saturation to further refine the results.
This will be covered in the next section, where we will share another method for color changing.
Method 2: Adjusting Layers With Hue/Saturation
In Photoshop, using the Hue/Saturation adjustment layer is a common method to change the overall color and saturation of an image. Let's explain this method using a practical example.
First, we still select the object using the Object Selection Tool. Then, click on "Add layer mask" at the bottom of the Layers panel to create a layer mask (make sure you have the correct layer selected).
This will ensure that our color changes only affect the object within the layer mask. The video below should provide a clear demonstration.
Next, we need to create a "Hue/Saturation" adjustment layer. You can click on the "Create new fill or adjustment layer" button at the bottom of the Layers panel and select the "Hue/Saturation" option, or you can go to the menu bar and choose "Image" > "Adjustments" > "Hue/Saturation".
Additional tip: Using an adjustment layer will affect all the layers below it. If you want the color changes to only affect the layer with the layer mask (the layer below the Hue/Saturation adjustment layer), you'll need to use a clipping mask.
To learn more about using clipping masks, please refer to our tutorial here: The Complete Guide to Clipping Masks in Photoshop.
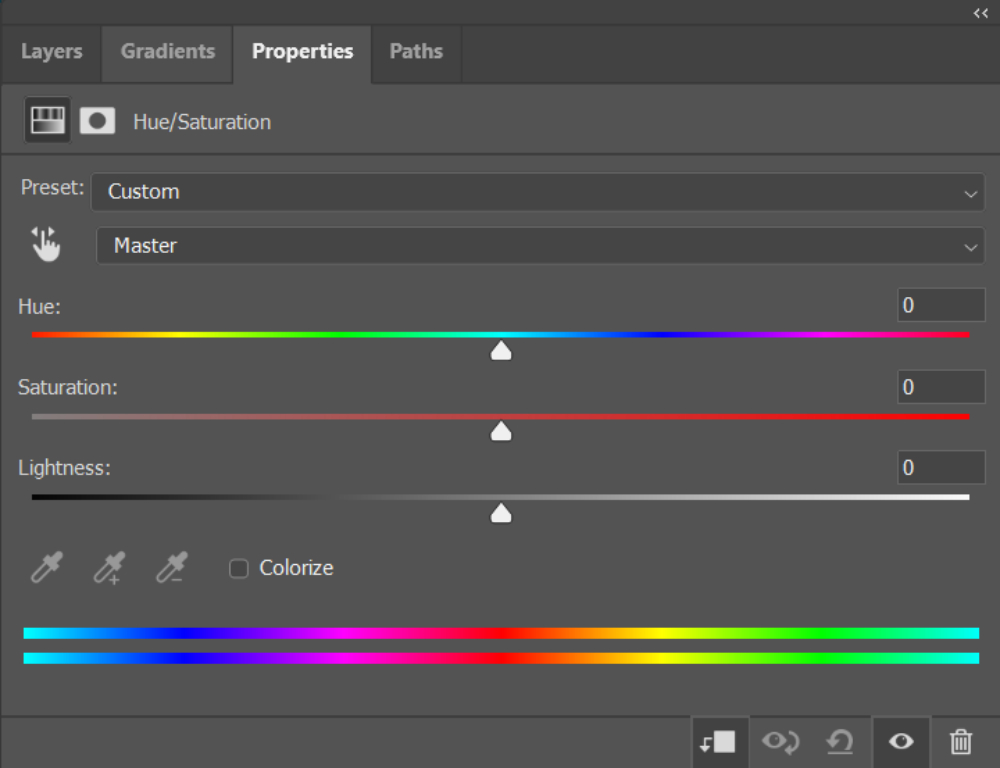
Once you have selected the Hue/Saturation adjustment layer, you will see an adjustment panel. Within this panel, you will find three sliders: Hue, Saturation, and Lightness:
- Hue: To change the overall hue of the image, you can adjust it by dragging the Hue slider. You can fine-tune the value of the hue according to your needs.
- Saturation: Dragging it to the left will decrease the saturation, making the image appear more muted. Dragging it to the right will increase the saturation, making the colors more vibrant.
- Lightness: The Lightness slider is used to adjust the brightness of the image. Dragging it to the left will darken the image, while dragging it to the right will brighten the image.
You can also manually enter precise values for each attribute by typing them into the input boxes next to the sliders.
As you make adjustments, you can see the real-time changes in the preview box above the adjustment panel. This allows you to fine-tune the adjustments until you achieve the desired effect.
You may have noticed that when adjusting the Hue slider, the color of the object doesn't match the color displayed on the slider. What's going on?
Actually, we can check the "Colorize" option below the Hue/Saturation slider, which allows us to simply overlay a color onto the image. When "Colorize" is checked, the image will take on the color selected on the Hue slider, while preserving the original brightness and darkness of the image.
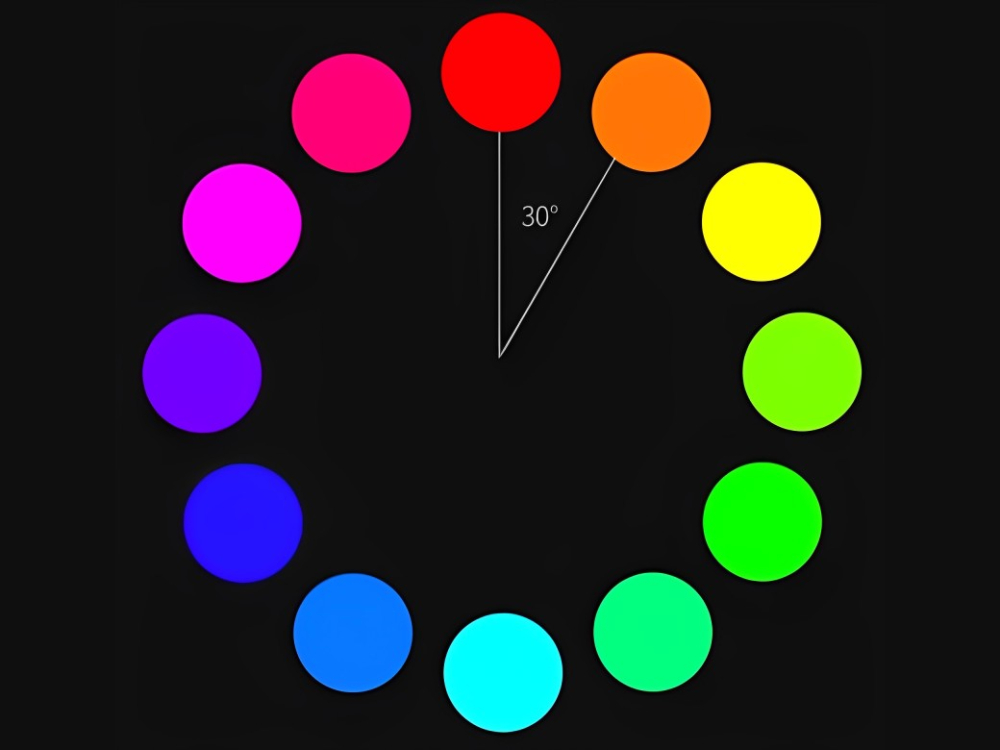
When "Colorize" is unchecked, the color changes are determined based on the position of the color on the hue spectrum. For example, if you move the Hue slider to green, the object in the image will appear magenta. Moving it to blue will make the object appear yellow.
You can refer to the hue spectrum image below. The 12 colors on the spectrum are separated by 30-degree intervals. Red is at 0 degrees on the hue spectrum, while orange is at 30 degrees.
If you want the object to become orange, you need to enter "+30" on the Hue slider. However, if you want the object to become blue, which goes beyond the 180-degree limit on the hue bar, you need to enter a counterclockwise degree, such as "-120".
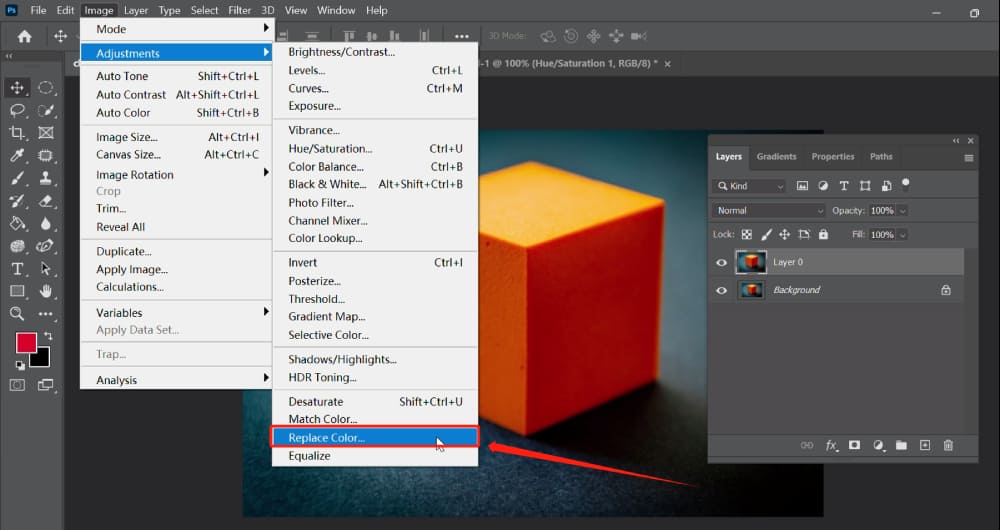
Method 3: Using the Replace Color Panel
The third method is the "Replace Color" dialog. This method also involves adjusting the color of an object by modifying its hue/saturation. Although this method lacks a colorize option, you can directly choose the replacement color from the "Color Picker (Result Color)".
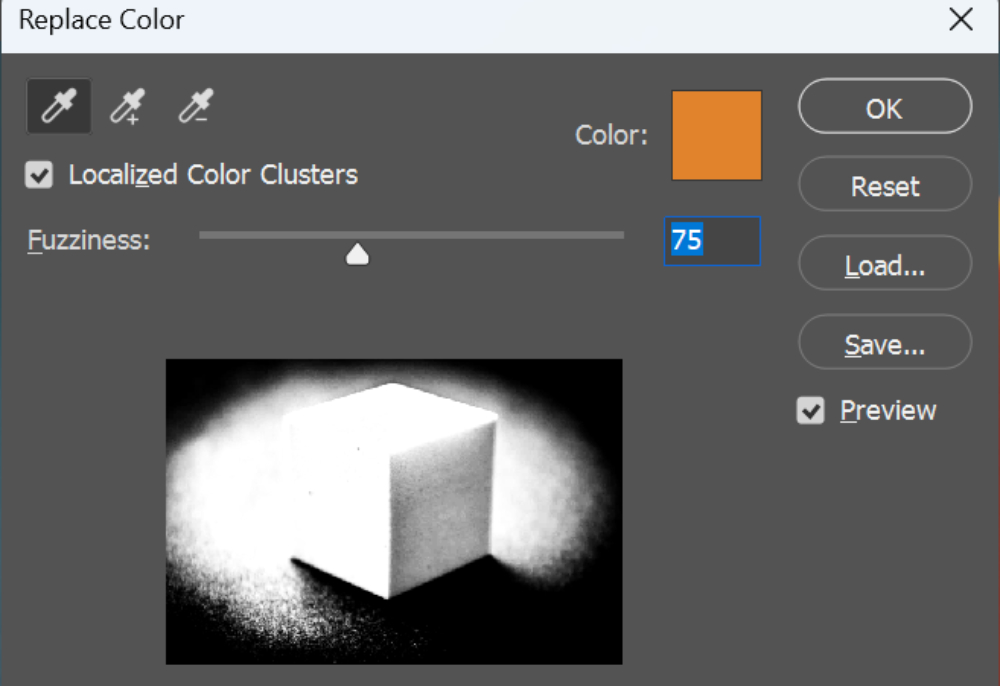
To access this feature, navigate to the top toolbar and click on the "Image" option, then select "Adjustments" followed by "Replace Color." A new dialog box will appear.
If you want to select similar, contiguous colors in the image, check the "Localized Color Clusters" box to create a more accurate mask.
You can perform any of the following actions to make a selection of the areas where you want to modify the object's color:
- Hold down the Shift key and click or use the "Add to Sample Eyedropper" tool to add regions.
- Hold down the Alt key and click (Windows) or the Option key and click (macOS), or use the "Subtract from Sample Eyedropper" tool to remove regions.
- Click on the "Color" in the upper right corner to open the "Color Picker (Selection Color)." Use the color picker to choose the color you want to replace.
Once you have selected the regions where you want to modify the color, adjust the Color Fuzziness slider or enter a value to control the influence of related colors within the selection.
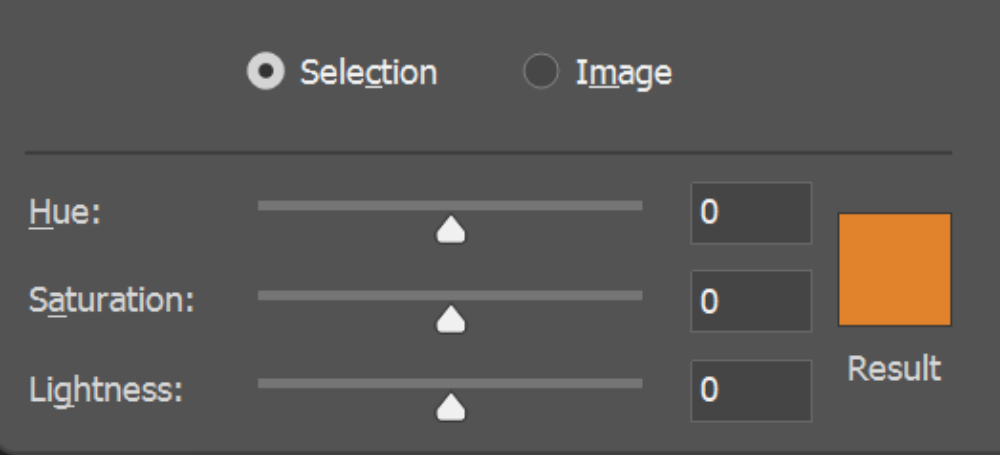
When it comes to selecting the replacement color, you have two methods available:
- Drag the sliders for hue, saturation, and brightness (or enter values in the text boxes) to adjust the replacement color.
- Double-click the Result color swatch and use the color picker to choose the replacement color.
As you may have noticed, the Replace Color dialog is more suitable for making global color changes, rather than precise modifications to specific details or objects.
Product Recommendation: Enhance Your Color Editing Workflow
In this tutorial on how to change the color of an object in Photoshop, we have shared three techniques. As we wrap up our guide, we would like to introduce you to a valuable companion that can significantly enhance your color editing workflow: TourBox.

TourBox is a powerful hardware controller designed specifically for creative professionals, offering intuitive and efficient control over various software applications, including Photoshop.
When it comes to color adjustment, TourBox provides a seamless experience that can greatly improve your productivity.
With TourBox, you can effortlessly fine-tune the hue, saturation, and brightness settings of your selected objects. Its customizable dials and buttons allow for precise adjustments, giving you a tactile and intuitive way to modify color values in real time.
Say goodbye to tedious keyboard controls and hello to a more natural and fluid editing process.
Whether you are a professional photographer, graphic designer, or digital artist, TourBox is a game-changer that enhances your color editing capabilities and unleashes your creativity. Give it a try and experience the difference it can make in your work.