How to Extend Background in Photoshop?
Whether you're a photographer, graphic designer, or simply an enthusiast, this step-by-step tutorial will guide you through the process of how to extend background in Photoshop.
Get ready to unlock endless creative possibilities and bring your visions to life with just a few clicks. Let's get started!
Requirements
- Adobe Photoshop (CS6 or later)
- An image to work with

In this article, you will learn:
- How to Extend Simple Background in Photoshop?
- How to Extend Complex Background in Photoshop?
- Other Ways to Extend Backgrounds in Photoshop
- Final Thoughts About Extending Background in Photoshop
How to Extend Simple Background in Photoshop?
During the process of graphic design or post-processing of photographs, there are instances where we may encounter a situation where the background of a photo is too small. In such cases, we may need to use Photoshop to extend the background.
If the background has few elements and they are repetitive, we can make use of Photoshop's Content-Aware Scale Tool.
By simply dragging and using this tool, we can expand the image background seamlessly and achieve a natural blend. Let's illustrate the steps involved using a simple example:
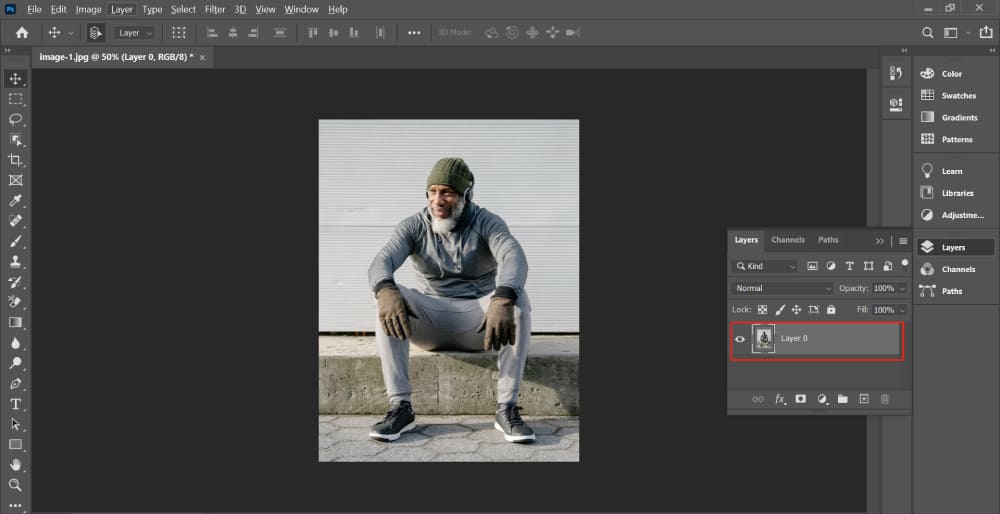
1. Open Your Image in Photoshop
Do this by navigating to "File" > "Open" in the menu bar and then choosing your image. Don't forget to click on the thumbnail of the image you imported in the layer panel to make it a layer.
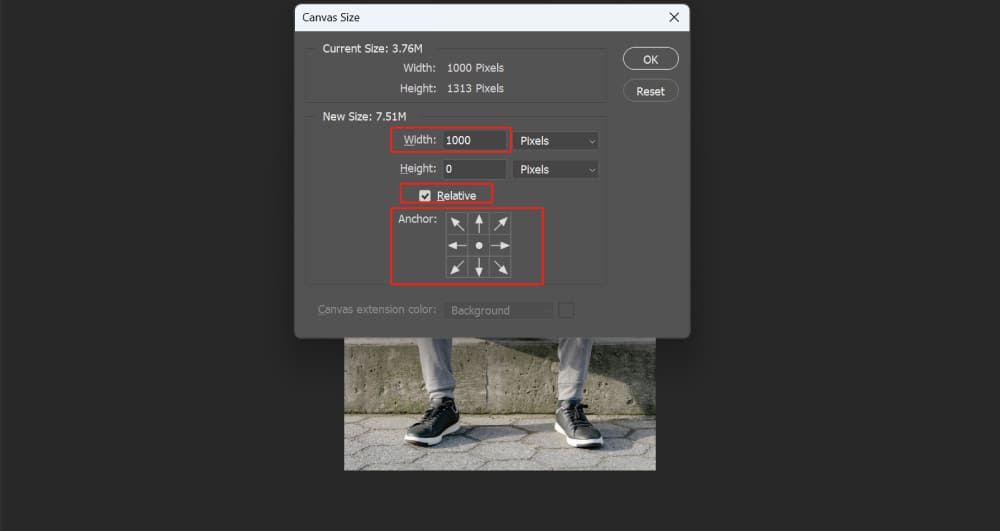
2. Increase the Canvas Width
Expanding the background of a photo typically involves increasing the width on both sides of the image.
First, we need to increase the canvas width. Click on the "Image" tab in the menu bar, then select "Canvas Size" from the dropdown menu.
In the dialog box that appears, check the "Relative" option and enter the desired width value.
For example, in the image below, we're increasing the overall width by 1000px. You can also adjust the canvas's expansion direction by clicking on the "Anchor" option below.
3. Extend the Background
After increasing the width of the image on both sides, the transparent area becomes visible. At this point, you need to click on "Edit" and then select "Content-Aware Scale" from the dropdown menu.
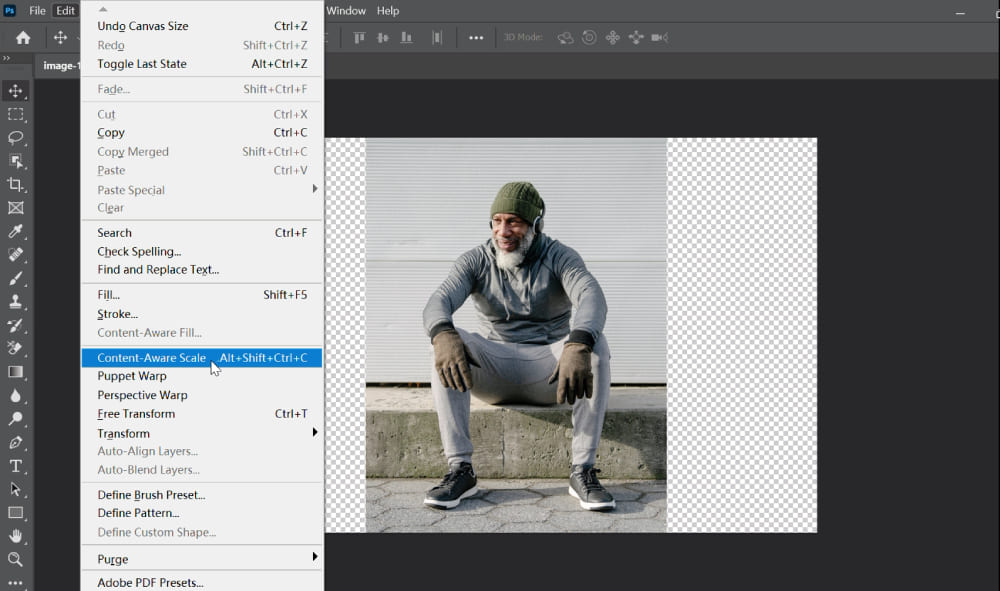
Content-Aware Scale is a feature that automatically fills in the expanded background when resizing an image.
Click and drag the handles on the bounding box to resize the image. Hold down the "Shift" key to horizontally stretch the image. Content-Aware Scale will intelligently adjust the image size while preserving important details.
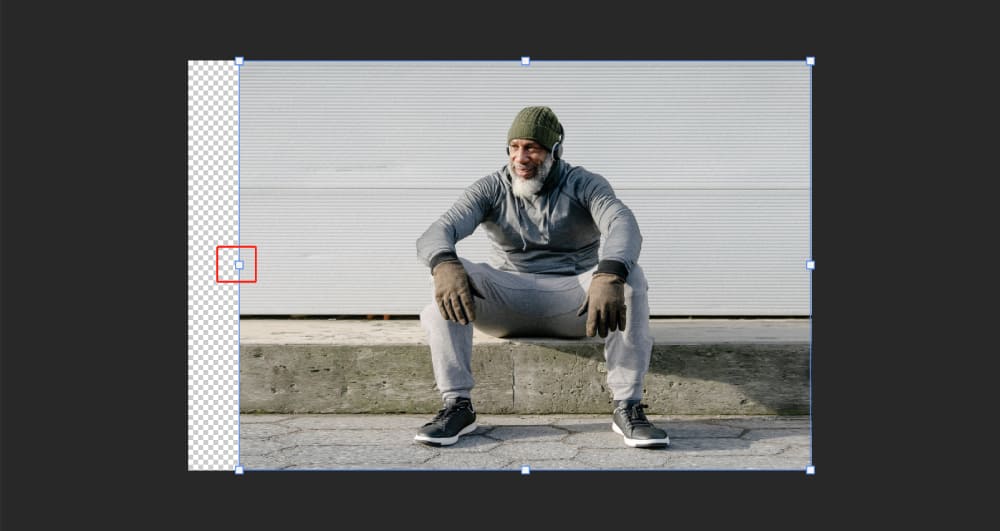
The final result is shown in the following image, where the expanded width on both sides has been automatically filled in. The subject and shadows remain undistorted.

Of course, the above method of operation is only suitable for images with relatively simple backgrounds and clear subject outlines. But what if the background is more complex? How can we expand the background in Photoshop? Please continue reading below.
How to Extend Complex Background in Photoshop?
To illustrate, let's take an example using the image shown below. If we use the "Content-Aware Scale" method mentioned above, the subject becomes distorted along with the complex background when stretched.
The result is unsatisfactory. In such cases, we need to protect the selection of the subject while expanding the background.
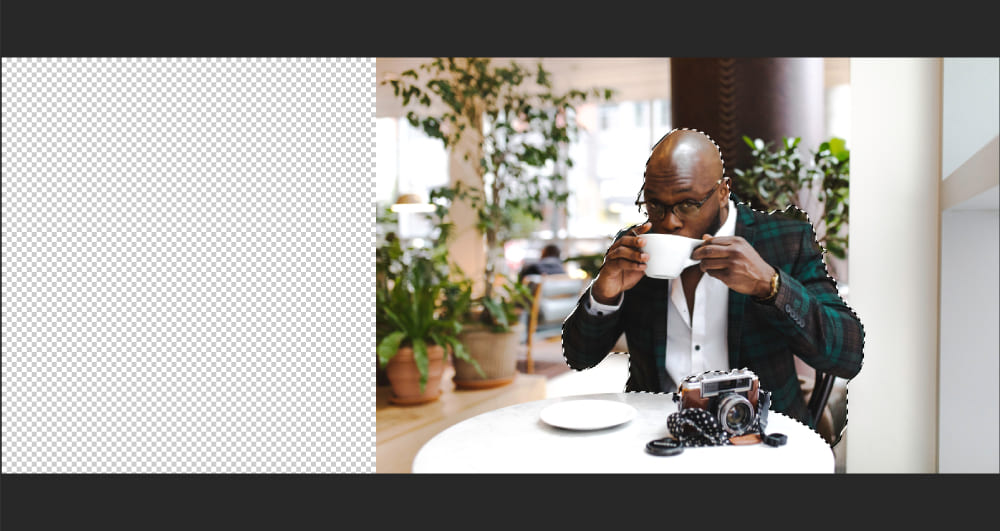
1. Create a Selection of the Subject
Start by using a selection tool to create a selection around the subject. You can use the "Quick Selection Tool" or the "Lasso Tool" among others. The selection doesn't need to be extremely precise, just a rough outline will suffice.
2. Save the Selection
After creating the selection, right-click and choose "Save Selection" from the dropdown menu.
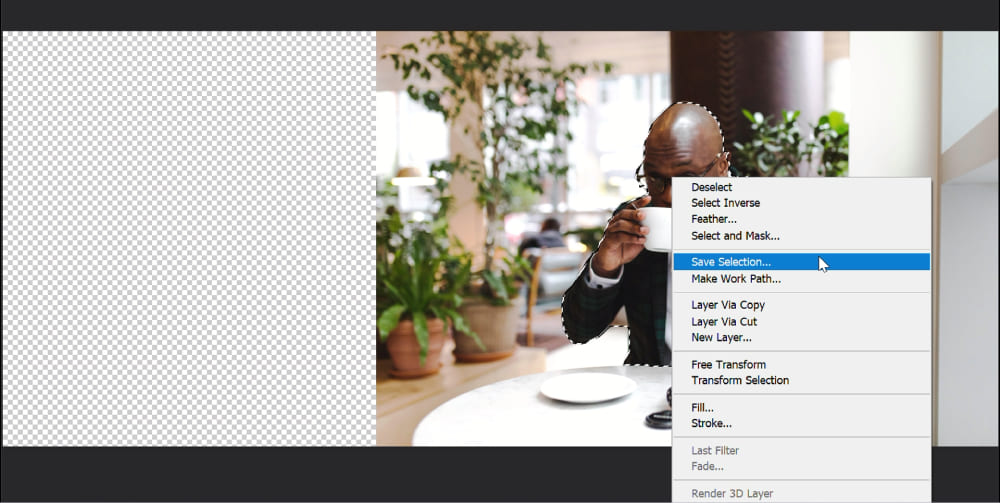
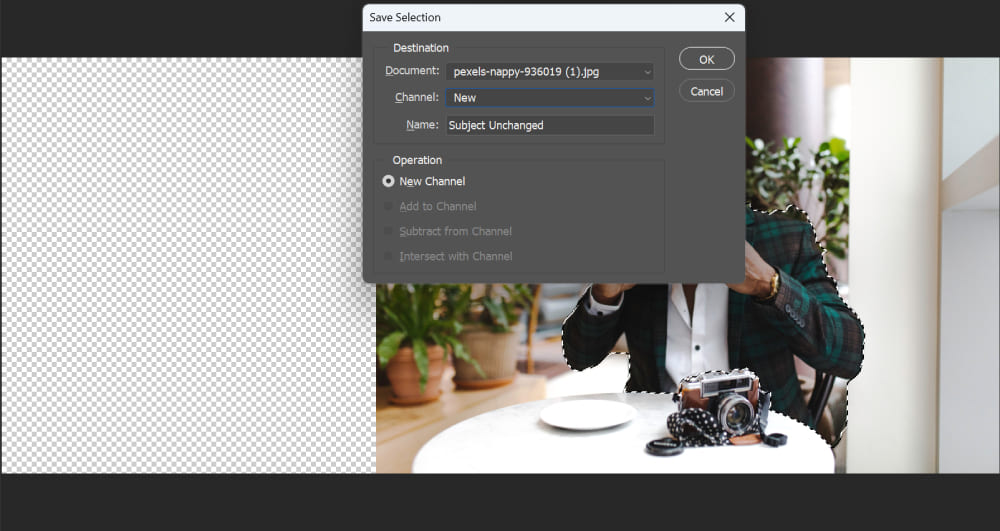
In the pop-up window, you can choose any name you like for the selection. Just make sure it's something memorable. Here, let's name it "Subject Unchanged." Save this selection to a "New Channel" instead of a layer.
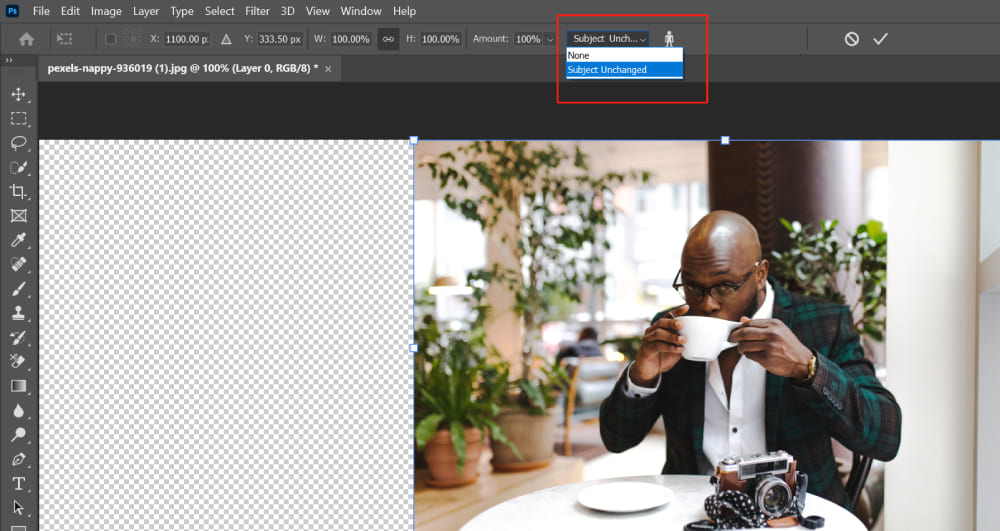
3. Extend the Background
Click on "Edit" in the menu bar, then select "Content-Aware Scale" from the dropdown menu. Utilize this feature to automatically fill in the stretched areas.
At this point, pay attention to the "Protect" section in the toolbar above. Choose the name we previously saved, in this case, "Subject Unchanged."
The final extending background result is as follows: we can see that the subject remains unchanged, and the stretched portion of the background has been filled using the content-aware feature.

Since this is just an explanatory example, the content-aware fill may not provide optimal results. We can use other tools to further enhance the image for better results.
However, the main purpose here is to demonstrate how to expand the background in a complex image using Photoshop without distorting the subject or the main element we want to protect.
Other Ways to Extend Backgrounds in Photoshop
In the above tutorial, we learned how to expand the background of an image using the Content-Aware Scale in Adobe Photoshop.
In addition to that, there are several other methods to achieve this, and we will discuss three of them: using the Crop Tool, Content-Aware Fill Tool, and Clone Stamp Tool.
Method 1: Use the Crop Tool
- Open Your Image in Photoshop: Do this by navigating to File > Open in the menu bar and then choosing your image.
- Select the Crop Tool: You can find the Crop tool in the toolbar on the left. It looks like two overlapping right angles.
- Extend the Canvas: Click and drag the handles on the corners or edges of the image to extend the canvas. As you extend the canvas, you will see that the new area is transparent.
- Choose the Content-Aware Option: In the top menu bar, check the option that says "Content-Aware". This will tell Photoshop to fill the new canvas area with content that matches your existing image.
- Confirm the Crop: Press Enter or Return to confirm the crop. Photoshop will take a moment to process and then fill the new canvas area.

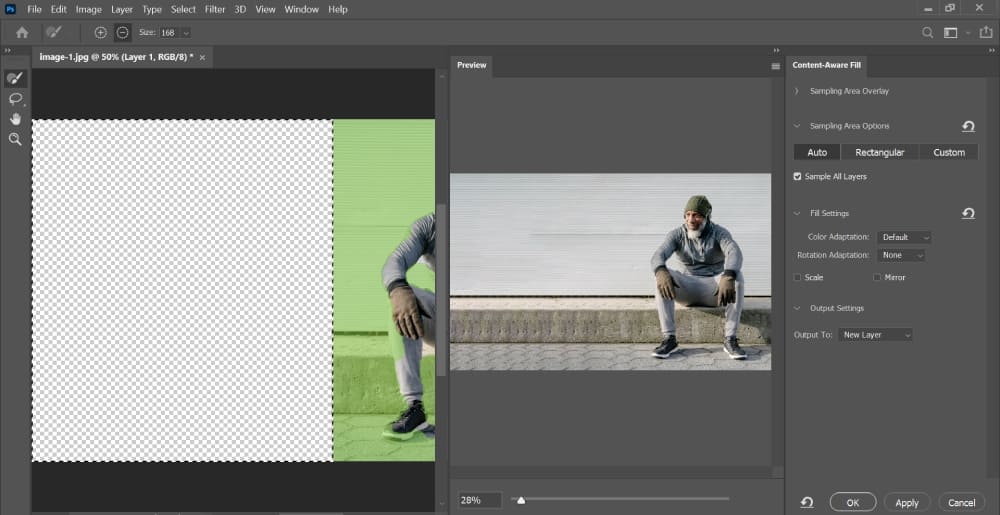
Method 2: Use the Content-Aware Fill Tool
- Create a New Layer: Open your image in Photoshop and click on the "Create a new layer" button in the Layers panel. Use the Canvas Size or Crop Tool we mentioned above to expand your canvas.
- Select the Rectangular Marquee Tool: You can find this tool in the toolbar on the left. It looks like a dotted square.
- Draw a Rectangle around the Area: Click and drag to draw a rectangle that covers the area you want to extend.
- Content-Aware Fill: Go to the Edit menu and select Content-Aware Fill. This will open a new dialog box.
- Configure the Content-Aware Fill Settings: In the dialog box, you can adjust settings to control how Photoshop fills the selected area. Click OK when you're satisfied with the settings.
- Deselect the Rectangle and Merge the Layers: Go to Select > Deselect to remove the rectangle. Then, in the Layers panel, right-click on the new layer and select "Merge Down" to merge it with the original image.
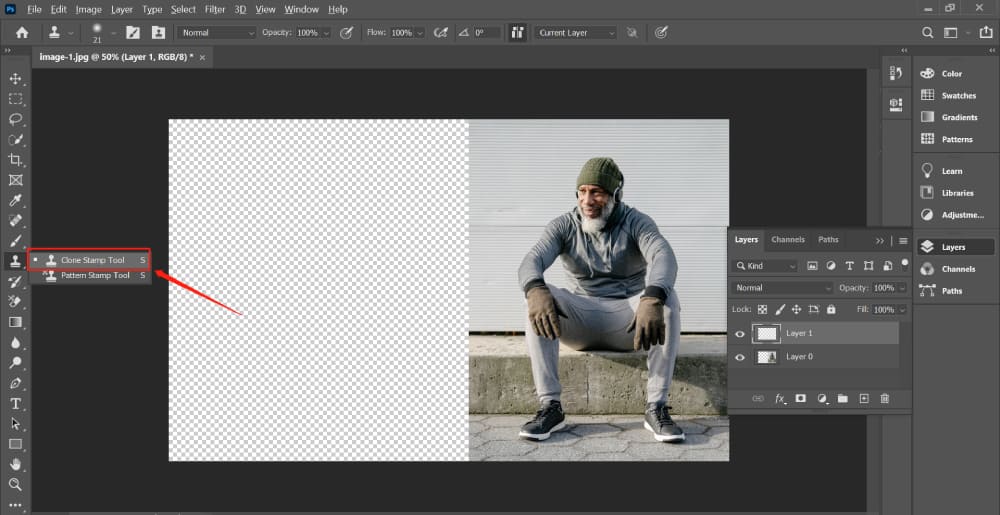
Method 3: Use the Clone Stamp Tool
- Select the Clone Stamp Tool: You can find this tool in the toolbar on the left. It looks like a rubber stamp.
- Set the Source Point: Alt-click (or Option-click on a Mac) on the part of the image you want to clone. This sets the "source point" for the cloning.
- Paint and Clone: Paint over the area you want to extend. As you paint, Photoshop will copy the pixels from the source point to the new location, effectively "cloning" them.
- Repeat as necessary: You may need to set a new source point and paint several times to cover the entire area you want to extend.
Final Thoughts About Extending Background in Photoshop
We've journeyed through the intricate pathways of how to extend background in Photoshop, exploring four powerful techniques to extend image backgrounds.
Just to recap, we delved into the magic of the Content-Aware Scale, the Crop Tool, the Content-Aware Fill, and the Clone Stamp Tool. Each tool has its unique advantages and use cases, empowering you to manipulate your images in ways that best suit your creative vision.
But, wouldn't it be great if there was a way to streamline your Photoshop workflow even further? To bring your artistic projects to fruition with even greater efficiency and convenience?
Let me introduce you to TourBox, a game-changer for all Photoshop enthusiasts.

TourBox is an advanced controller specifically designed for creative tools like Photoshop. It's like the Swiss Army knife for your editing workflow, allowing you to access your most-used tools and settings without having to traverse through endless menus.
The dial, knob, and buttons on the TourBox can be customized to your liking, meaning you can assign any function you want to these controls.
In essence, TourBox is not merely an accessory, but an extension of your creative self. It will help you to navigate through the Photoshop interface swiftly, enhancing your efficiency, and giving you more time to focus on what really matters - your creativity.