How to Mask in Premiere Pro: An Ultimate Tutorial
When it comes to video editing, having a diverse set of skills can make all the difference in bringing your creative vision to life. One such skill that stands out in Adobe Premiere Pro is the art of masking.
Not only does it enable you to craft stunning cinematic effects, but it also proves invaluable in tackling a range of challenges encountered during the filming process.
While masks are often used to create captivating illustrations or trim footage into specific shapes, their potential extends far beyond these conventional applications.
Once you grasp the intricacies of this tool, a world of creative possibilities awaits, allowing you to elevate your videos to new heights.
In this tutorial, we'll delve into the depths of how to mask in Premiere Pro, unveiling its secrets and unlocking the true potential it holds.

In this article, you will learn:
- What Is a Mask in Premiere Pro?
- How to Mask in Premiere Pro?
- Final Thoughts About Mask in Premiere Pro
What Is a Mask in Premiere Pro?
In Adobe Premiere Pro, a mask is a tool that allows you to isolate and manipulate specific parts of your footage. Masks are used in combination with the program's effect controls and are incredibly useful for a variety of purposes, such as color grading, creating special effects, or even hiding certain elements in your scene.
There are three different types of masks in Premiere Pro:
- Ellipse Mask: This allows you to create a mask in the shape of an ellipse or a circle. It's useful for isolating round objects or creating vignettes.
- 4-Point Polygon Mask: As the name suggests, this mask lets you create a four-sided polygon. It's a good choice when you're dealing with rectangular or square objects.
- Free Draw Bezier: This is the most flexible masking tool in Premiere Pro. You can draw any shape you want, making it the best choice when dealing with complex shapes.
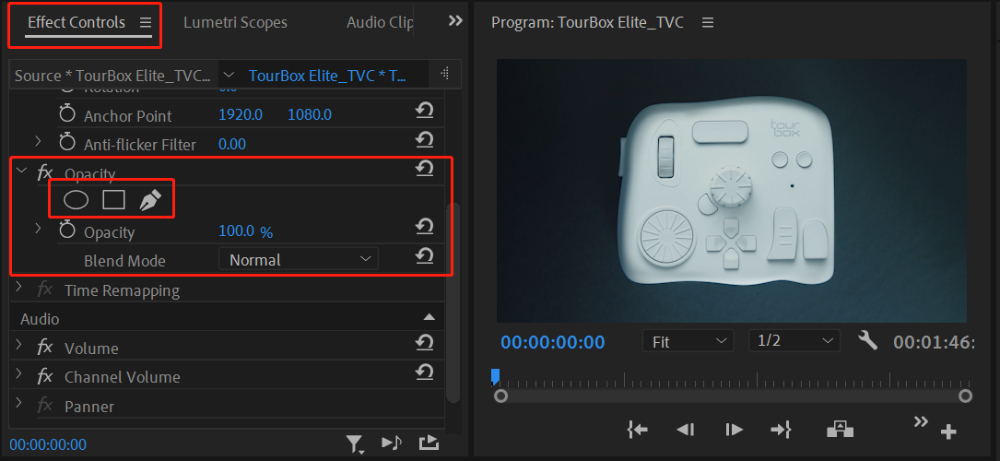
After importing video footage into Premiere Pro, when we select a video clip, we can find an "Opacity" option in the Effects Control panel. This is where we create and manage Premiere Pro masks.
How to Mask in Premiere Pro?
In Premiere Pro, a mask only contains one path, which is different from a vector mask in Photoshop. As mentioned above, under the Opacity option in the Effects Control panel, there are three buttons that respectively create masks in the shape of an ellipse, a rectangle (path), and a Bezier curve.
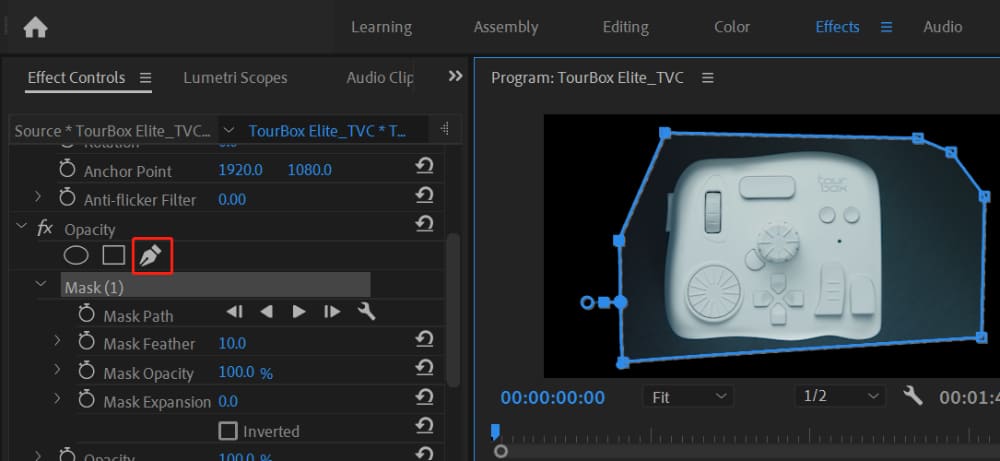
The Free Draw Bezier tool allows for the freeform drawing of mask shapes, and we will use this masking tool as the main example:
- Left-clicking adds anchor points while clicking and dragging creates anchor points and adjusts the curvature. Remember to end the path, or the path will not take effect.
- To delete a mask, simply right-click on it and select "Clear."
- To edit an existing mask, select it and make adjustments in the Program panel.
- By default, you can move and select anchor points or move the entire mask.
- Left-clicking on a segment of the path adds an anchor point, while holding down the Ctrl key and left-clicking on an anchor point deletes it.
- Holding down the Alt key while left-clicking an anchor point resets it and adds control handles to adjust the curvature.
- If you drag one end of the handle while holding down the Alt key, you can adjust both sides separately.
Next, we will introduce the parameters of masks in Premiere Pro.
First is the Mask Path. The Mask Path can be used to create keyframes for the shape of the mask path.
After clicking the stopwatch button (Toggle animation) to activate it, you can edit the keyframes and mask path in the Program panel on the right. Premiere Pro will automatically generate animation between two keyframes.

Once the mask is properly positioned, clicking "Track selected mask forward" on the right of the Mask Path option will prompt Premiere Pro to automatically track the target.
By clicking the "Tracking method" option on the right of the Mask Path and selecting the wrench icon, you can change the tracking method. Although accuracy cannot be guaranteed, using this feature flexibly can save time.
In addition to the Mask Path, all other mask parameters can have keyframes added to them, which you can try out for yourself.
Here are the other parameters within the mask area:
- Mask Feather: It creates a soft, blurred transition around the mask area, with the strength increasing as the value increases.
- Mask Opacity: It adjusts the transparency of the mask.
- Mask Expansion: It can push the mask area inward or outward by a certain amount.
Bonus Tips:
- Mask Feather and Mask Expansion can also be directly adjusted by dragging along the path.
- "Inverted" can modify the mask mode from "positive mask" to "negative mask" when checked.
- The parts of the footage that are inside the mask are the ones affected by the effect. Anything outside the mask will remain unchanged. This allows you to apply effects to specific parts of your footage, creating a wide range of creative possibilities.

Final Thoughts About Mask in Premiere Pro
In closing, Premiere Pro's masking feature is a powerful tool that lets us take our video editing to the next level. We've walked through the steps of how to mask in Premiere Pro, and using them to isolate and modify certain areas of our footage.
Although we've covered a lot, it's important to note that mastering this technique requires practice. There are a few subtleties that are easy to overlook:
- Feather: Don't forget to adjust the feather of the mask to create smooth transitions. This can make a huge difference in the final result.
- Keyframes: Remember that keyframes can be used to animate your masks over time, allowing for dynamic adjustments throughout your clip.
- Track Matte: The Track Matte function can be used in conjunction with masks for more advanced effects.
Lastly, we want to share a tool that can greatly improve your workflow - the TourBox. This console is designed specifically for editing and offers a new, more efficient way to interact with Premiere Pro.

The TourBox allows you to map your most frequently used actions, including those related to masking, to a set of intuitive controls. It is an invaluable asset for quicker, more precise edits.

We hope this guide has been informative and has encouraged you to delve deeper into the realm of video editing. Remember, practice is the key, and don't shy away from experimenting with new tools like the TourBox. Happy editing!