How to Remove a Watermark in Photoshop?
Watermarks can sometimes be a nuisance, obstructing the beauty and impact of an otherwise perfect image.
Whether you're a professional photographer or an avid enthusiast, knowing how to remove a watermark in Photoshop is a valuable skill to have in your repertoire.
In this comprehensive tutorial, we will explore seven powerful techniques that will empower you to effortlessly eliminate watermarks and restore the pristine quality of your visuals.
So, let's dive into the world of Photoshop wizardry and learn how to bid farewell to those unwanted watermarks once and for all.

In this article, you will learn:
- Seven Effective Methods to Remove a Watermark in Photoshop
- Final Thoughts About Removing a Watermark in Photoshop
Seven Effective Methods to Remove a Watermark in Photoshop
In this section, we will explore seven methods in Photoshop for removing watermarks. These methods include:
- Spot Healing Brush Tool
- Clone Stamp Tool
- Remove Tool
- Content-Aware Fill
- Generative Fill
- Patch Tool
- Select Nearby Areas to Mask Watermark
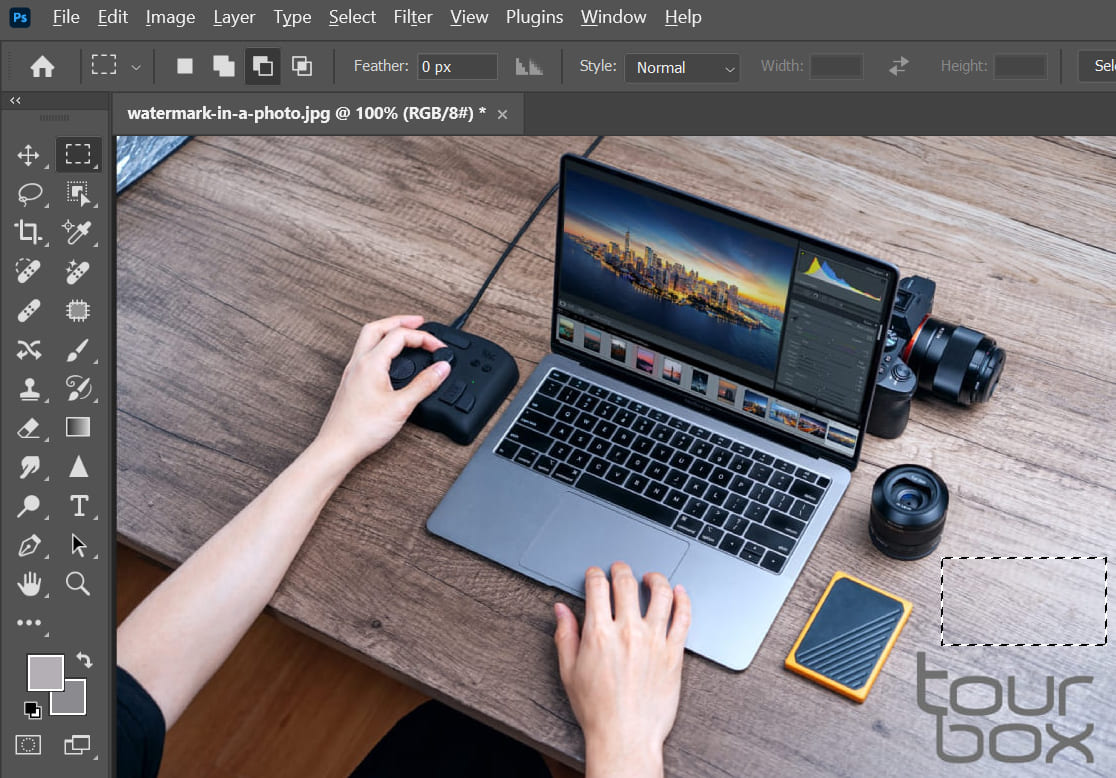
Let's start by opening an image that contains a watermark. As we can see, there is a watermark located in the bottom right corner of the image.
We will use this image as an example to illustrate how to remove a watermark in Photoshop.

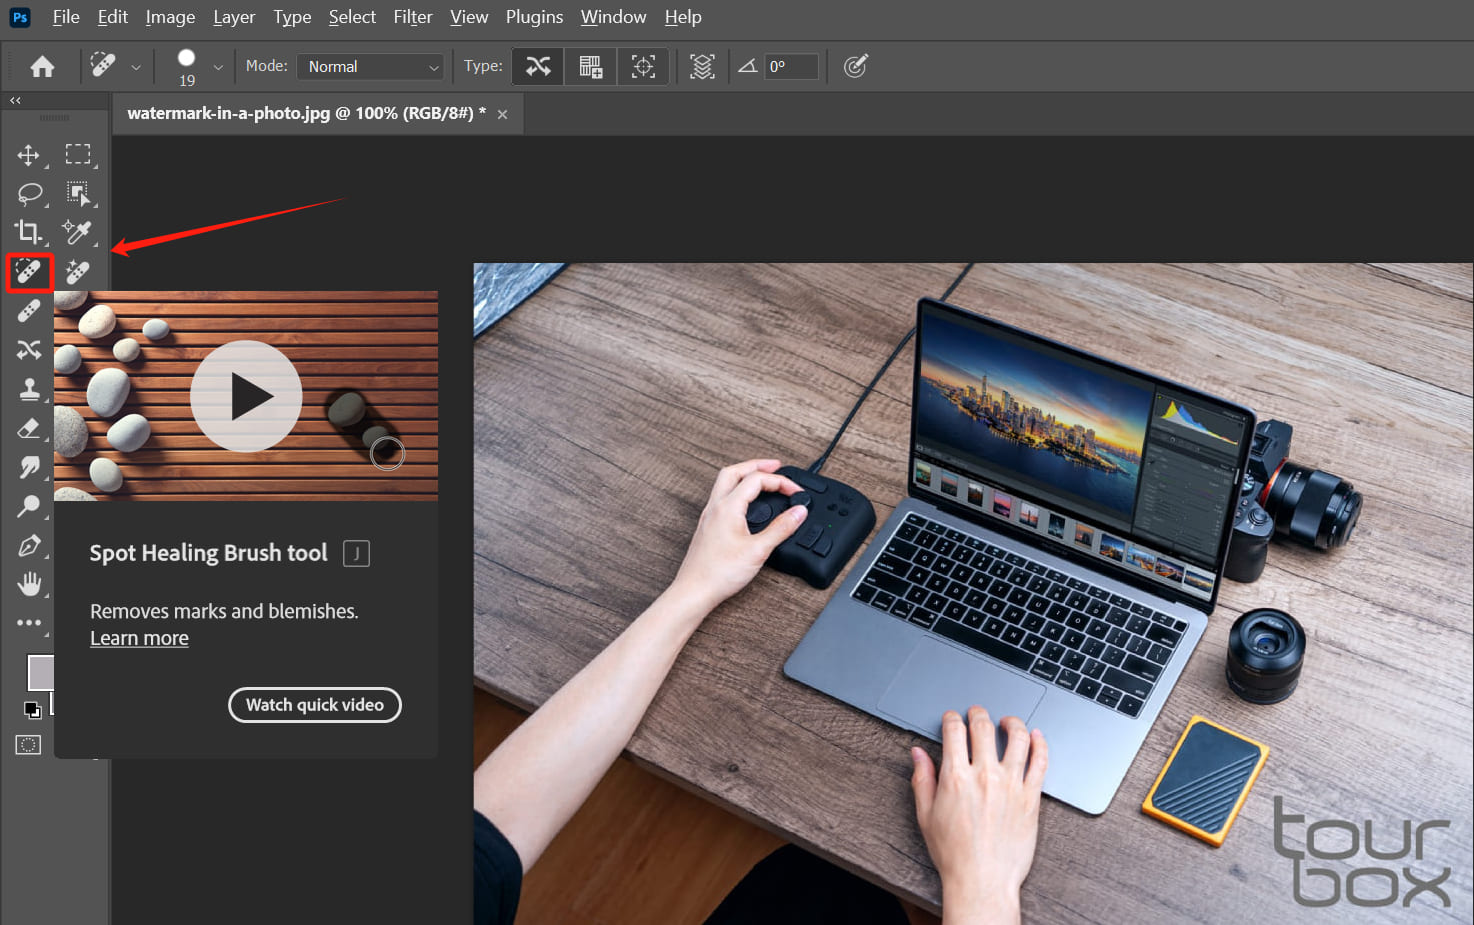
1. Spot Healing Brush Tool
The Spot Healing Brush Tool is a convenient and user-friendly tool commonly used for watermark removal and portrait retouching.
When using this tool, you simply need to identify the area you want to repair, adjust the brush size accordingly, and then move the mouse over the target area.
The tool automatically matches and blends the surrounding pixels, making it practical and efficient for various applications.
Here is how to use Spot Healing Brush Tool to remove watermarks:
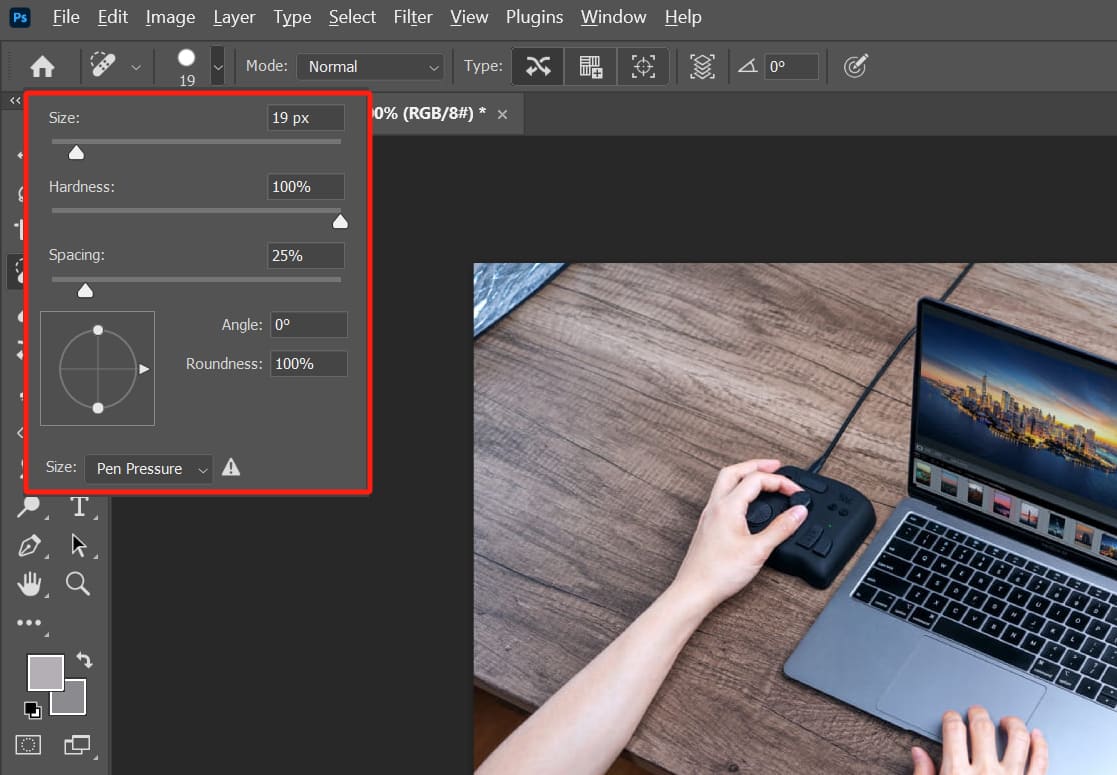
Select the Spot Healing Brush Tool from the toolbar on the left side and adjust the brush size to suit your needs.
Apply strokes over the watermark. With a gentle stroke, the watermark disappears. It's incredibly convenient and quick.
If you find that the strokes appear unnatural compared to the surrounding image, you can decrease the brush hardness to achieve a softer effect.
2. Clone Stamp Tool
The Clone Stamp Tool is used to sample a part of an image and apply it to another area or different parts of the same image. To sample, simply hold the Alt key and click on the desired area.
The Clone Stamp Tool allows for flexibility in sampling, as you can re-sample at any time.
Additionally, you can adjust the opacity and flow settings in the options bar to achieve the desired effect. However, one drawback is that it can be a slower process.
Here is how to use the Clone Stamp Tool to remove watermarks:
Continuing with the previous example image, select the Clone Stamp Tool from the toolbar.
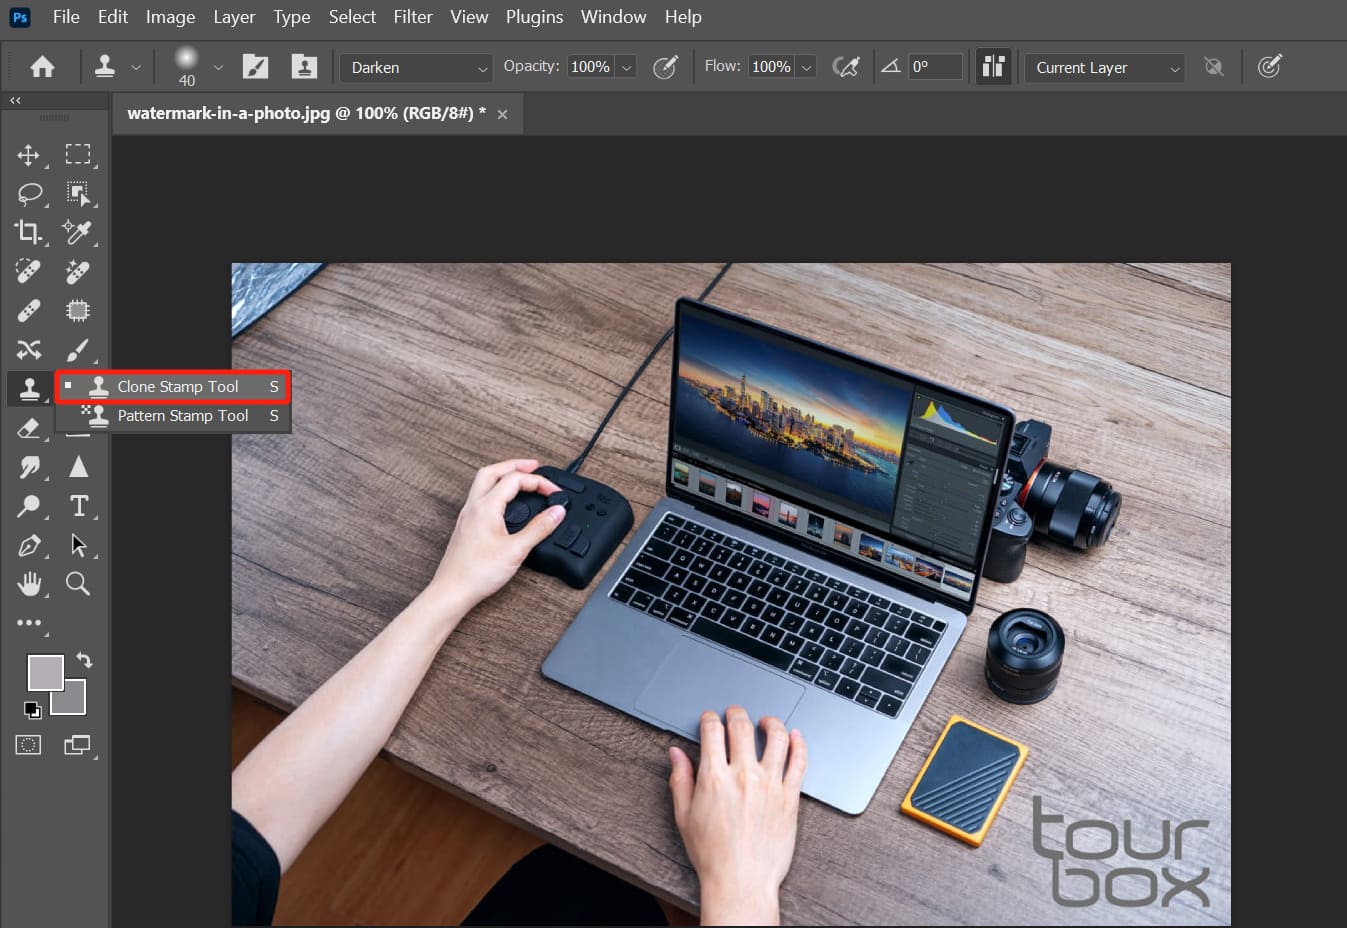
Hold the Alt key and click on a portion of the image to sample from, indicated by a target-like cursor.
After sampling, apply strokes over the watermark area. As shown in the image below, the watermark is easily removed. It's a simple and effective way to eliminate watermarks.
Further Reading:
Both the Healing Brush Tool and the Clone Stamp Tool are effective in removing watermarks from images. However, when you actually use these tools, you may find yourself constantly adjusting brush size, opacity, flow, and other properties.
Frequent adjustments of these properties can become quite tedious. That's why we'd like to introduce you to TourBox, a creative tool beloved by digital artists.

TourBox's built-in functions include adjusting brush properties such as size, opacity, and flow.
With simple settings, you can effortlessly control TourBox with one hand and make precise adjustments to these properties. You'll love the excellent tactile experience and the significant boost in work efficiency that TourBox brings.
For instance, in the following video, we'll demonstrate a simple process using TourBox to remove watermarks from images in Photoshop using two different methods.
You'll see that you no longer need to remember any keyboard shortcuts or navigate through complex software menus to find specific commands. Your interaction with Photoshop will be as intuitive as using a game controller.
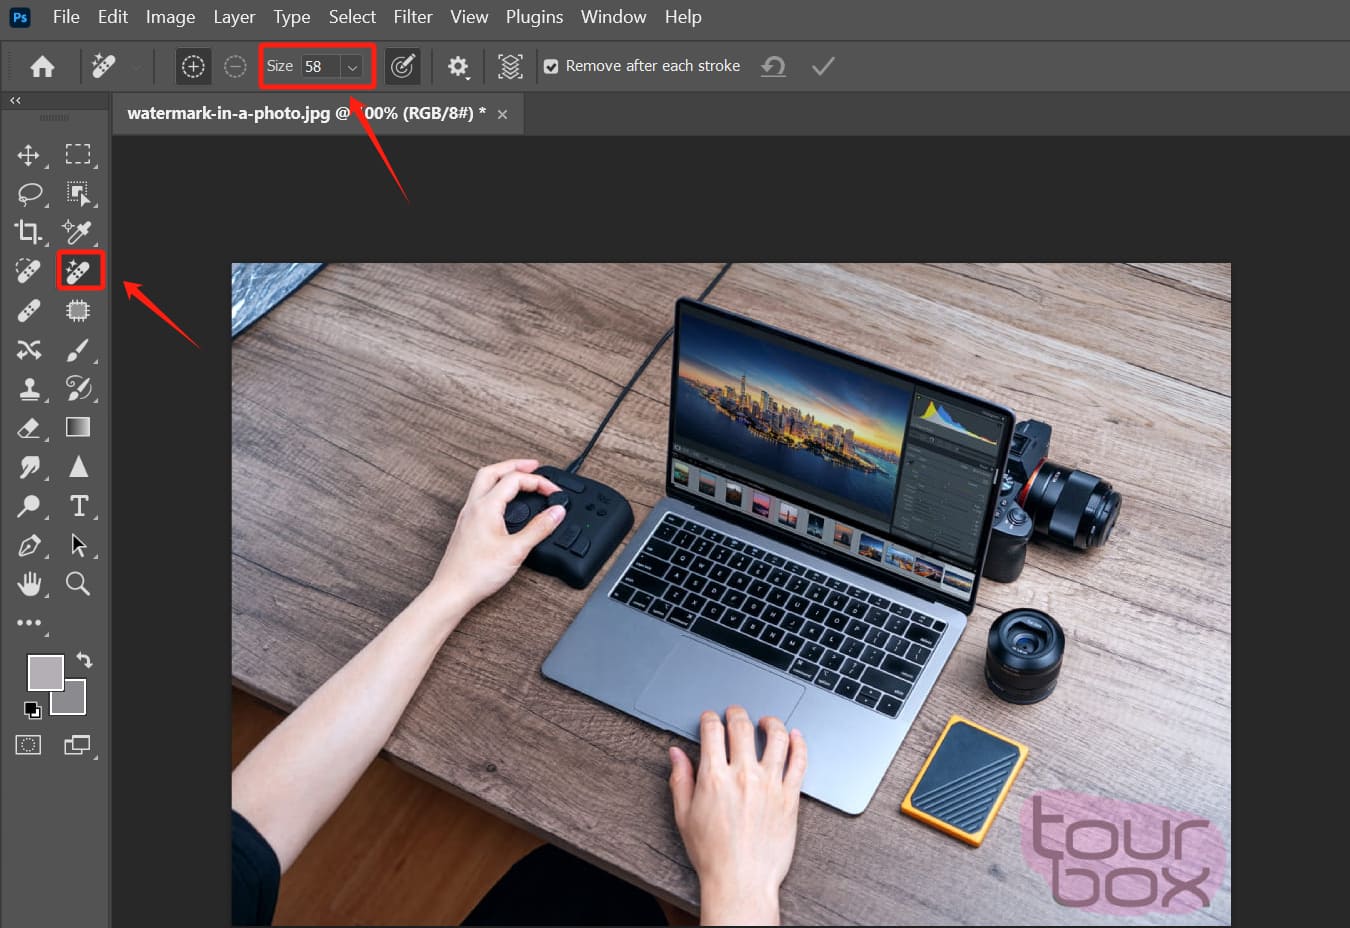
3. Remove Tool
The Remove Tool is another excellent tool in Photoshop for removing watermarks. Just from its name, you can tell that the Remove Tool is designed to eliminate unwanted elements and imperfections from images.
Using the Remove Tool is also very simple. In the Photoshop toolbar on the left, click on the Remove Tool, then adjust the brush size to an appropriate setting and simply paint over the watermark.
Convenient and swift, the Remove Tool is not only useful for removing watermarks but also for easily getting rid of people or objects. Give this tool a try and see how it works for you!
4. Content-Aware Fill
The principle behind Content-Aware Fill is the software's ability to analyze the surrounding image and seamlessly blend and fill the selected area based on this analysis. This technique allows for quick and seamless blending effects.
To begin, use the Rectangular Marquee Tool (or any selection tool) to make a selection around the watermark area.
Go to the "Edit" menu and select "Content-Aware Fill." This will open the Content-Aware Fill panel.
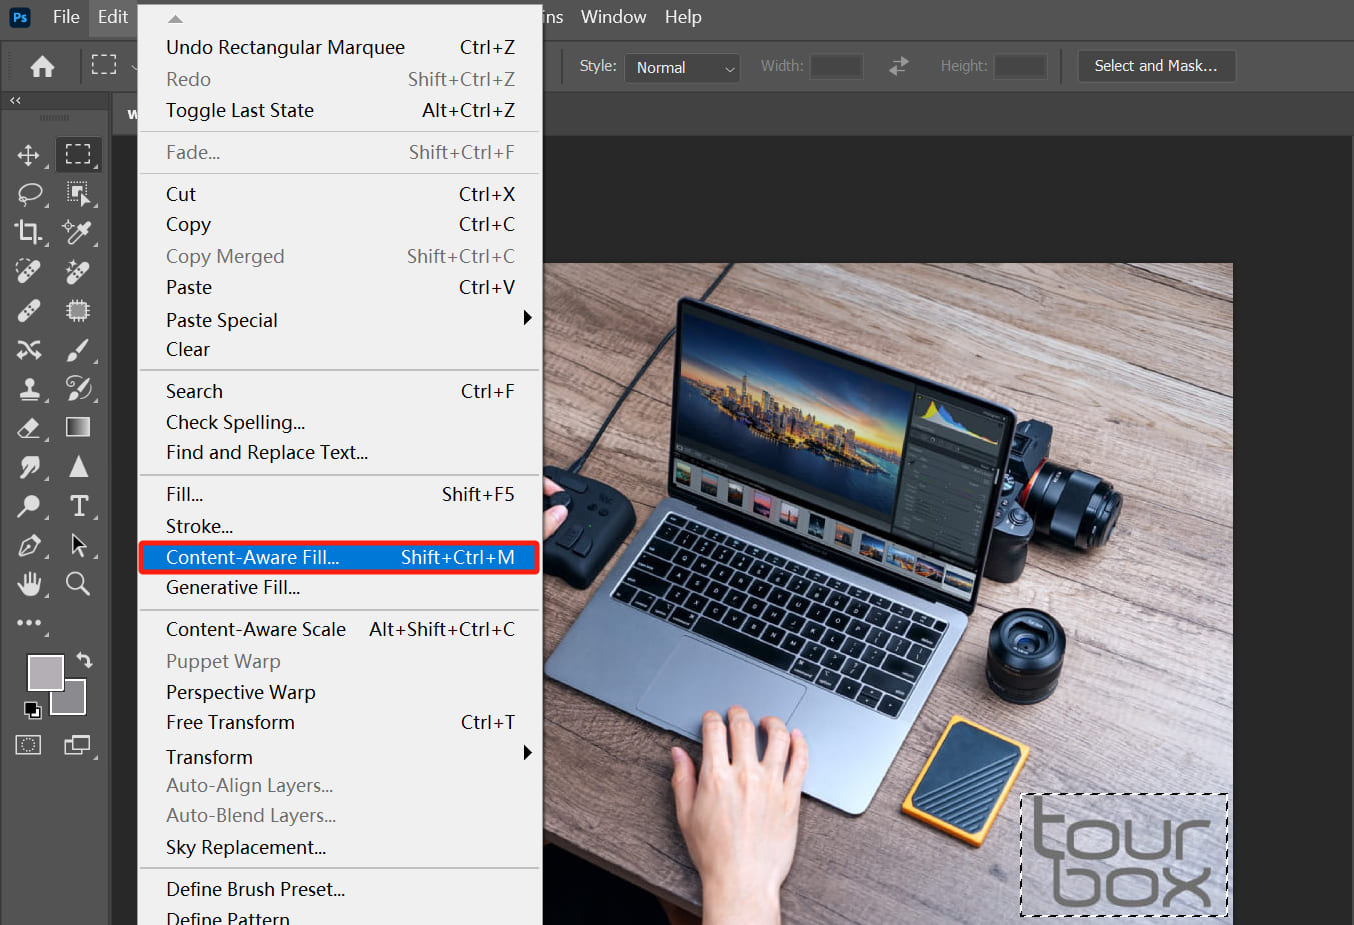
Within this panel, you will find various parameters for Content-Aware Fill.
You can experiment with adjusting these parameters and perform tests, but in most cases, the default settings work well. Once you are satisfied with the settings, click "OK."
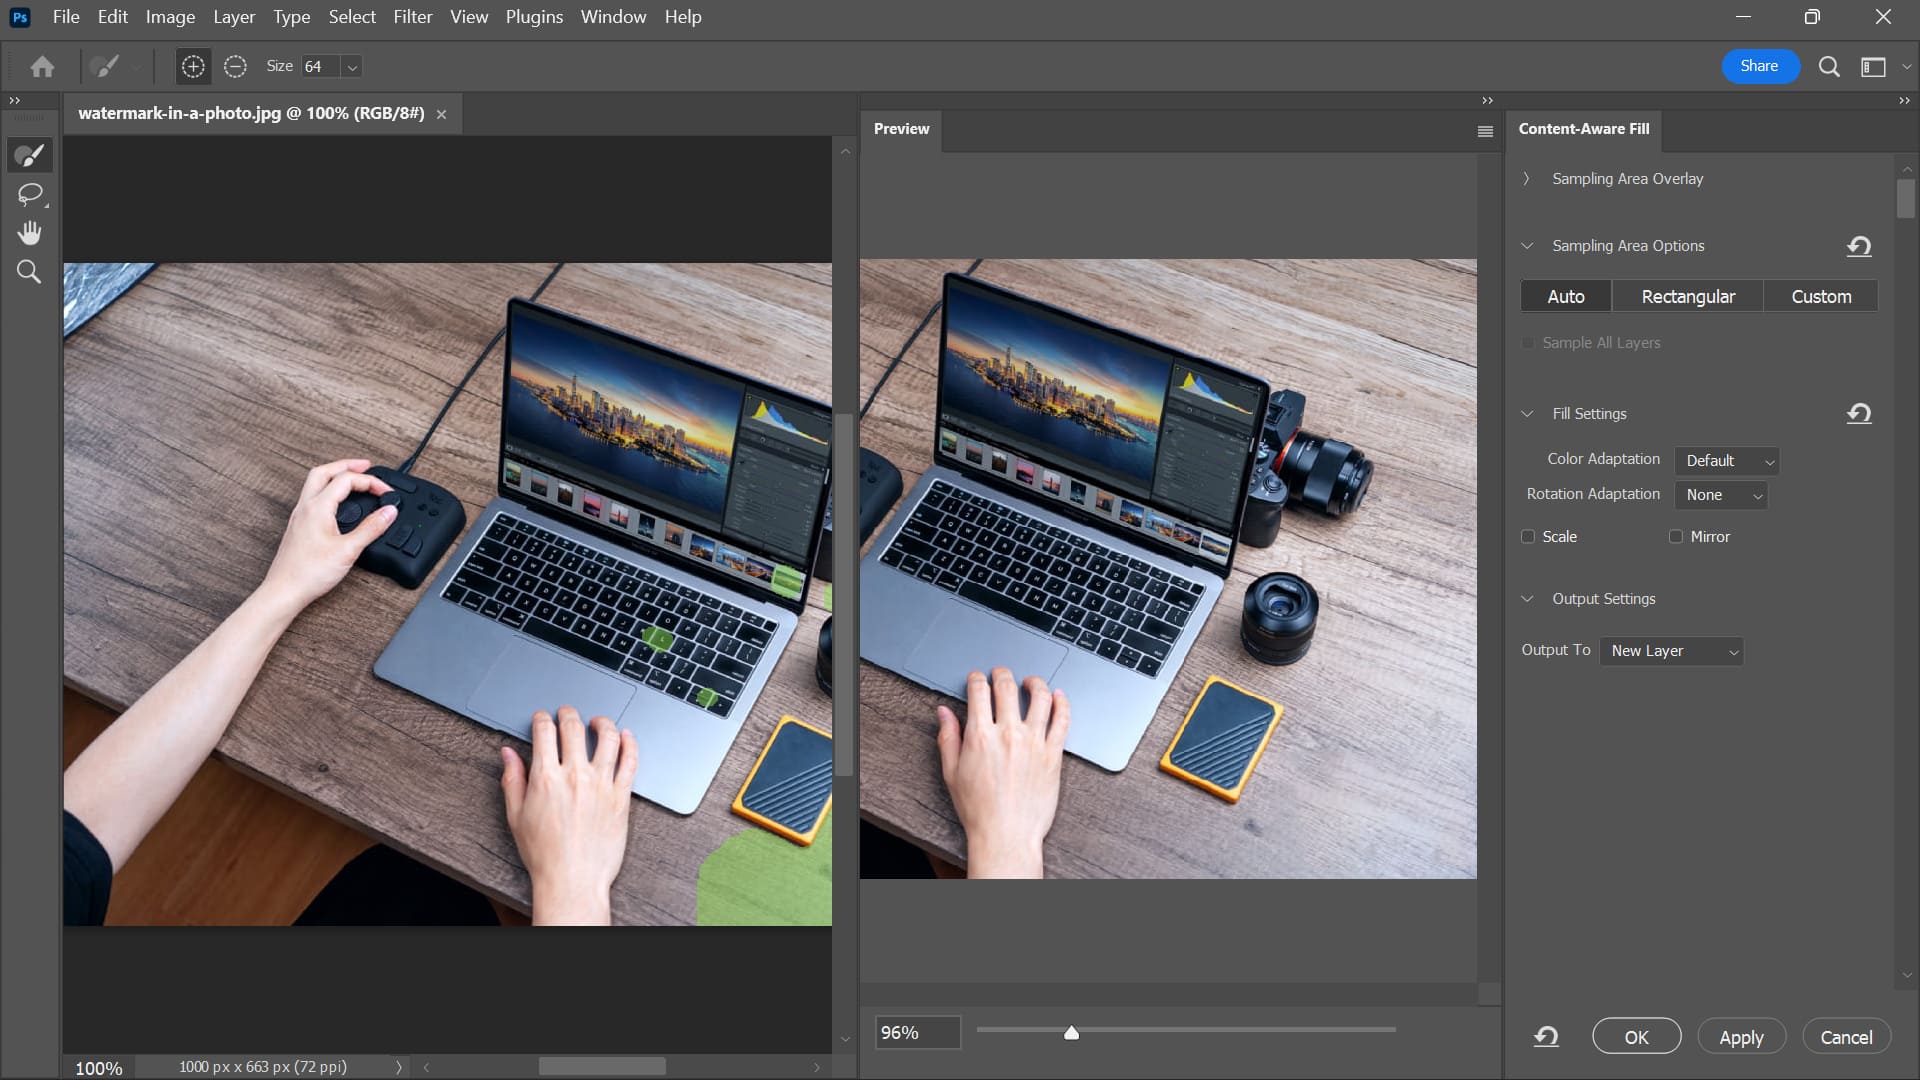
5. Generative Fill
Photoshop's Content-Aware Fill feature is great for simple scene modifications in images. However, when dealing with more complex scenes, it may not perform as well.
So, if you have a picture with a complex scene that includes a watermark, and you find that none of the four methods we mentioned earlier are giving you satisfactory results, you might want to try Adobe's AI-powered feature called Generative Fill.
Generative Fill may take a bit more processing time compared to Content-Aware Fill, but it produces the most natural results.
Give Generative Fill a try, and you'll discover how simple it is to remove watermarks in Photoshop. It's the ultimate solution for removing watermarks in Photoshop.
Further Reading:
We have provided a detailed guide on how to use Content-Aware Fill and Generative Fill in the article below. If you're interested, click the link to learn more:
6. Patch Tool
The Patch Tool is a powerful tool that allows you to seamlessly replace selected portions of an image, making it ideal for removing watermarks.
Select the Patch Tool from the toolbar on the left side of the screen. It looks like a patch or a bandage.
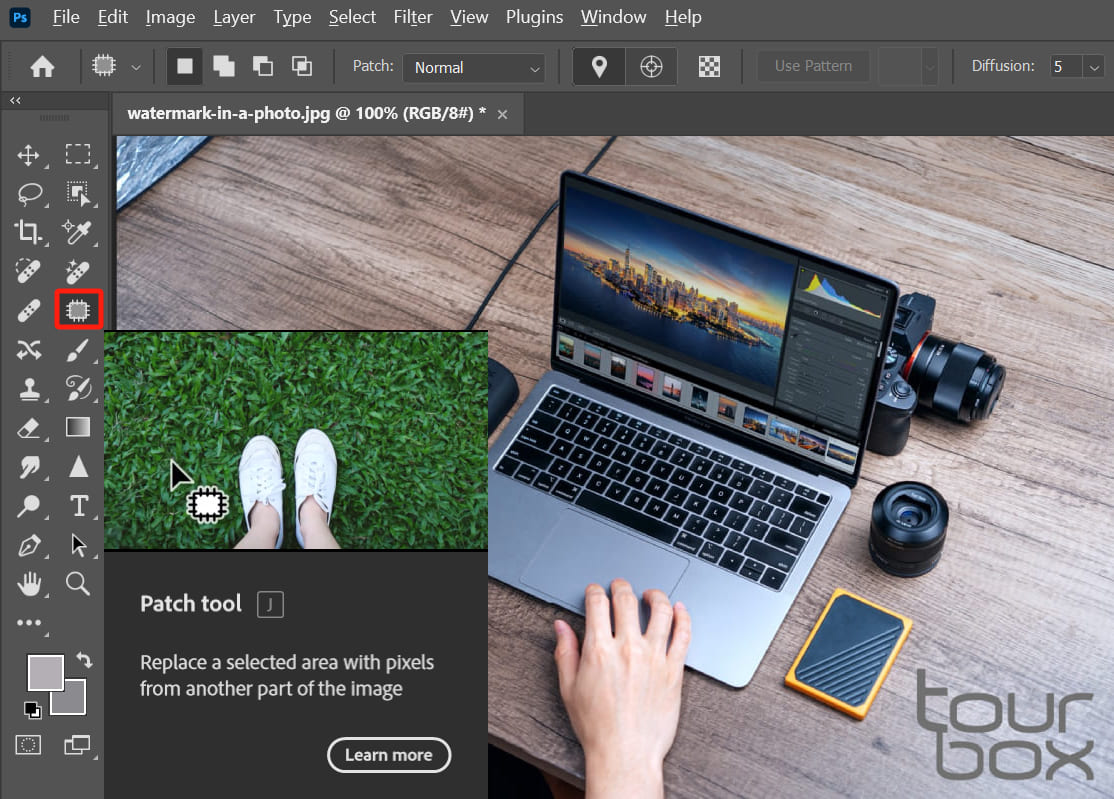
Draw a rough selection around the watermark using the Patch Tool. Ensure that your selection encompasses the entire watermark area.

Once the selection is made, click and hold the left mouse button within the selected area. Drag the selection to a clean and similar area of the image that you want to use as a replacement for the watermark.
As you drag the selection, you'll notice that the image beneath the cursor is being previewed in real-time.
Position the selection over an area of the image that matches the surrounding pixels, ensuring a seamless blend.
Release the mouse button once you're satisfied with the placement of the selection. Photoshop will then replace the selected watermark area with the pixels from the chosen replacement area.
Zoom out and examine the image to ensure that the watermark has been effectively removed. If needed, you can use the Patch Tool again to make further adjustments and refine the results.

7. Select Nearby Areas to Mask Watermark
We don't really recommend the method of selecting nearby areas to cover up watermarks. Compared to the various Photoshop methods mentioned earlier for removing watermarks, this approach can be both laborious and inefficient.
However, you can still learn about this method of watermark removal if you're interested.
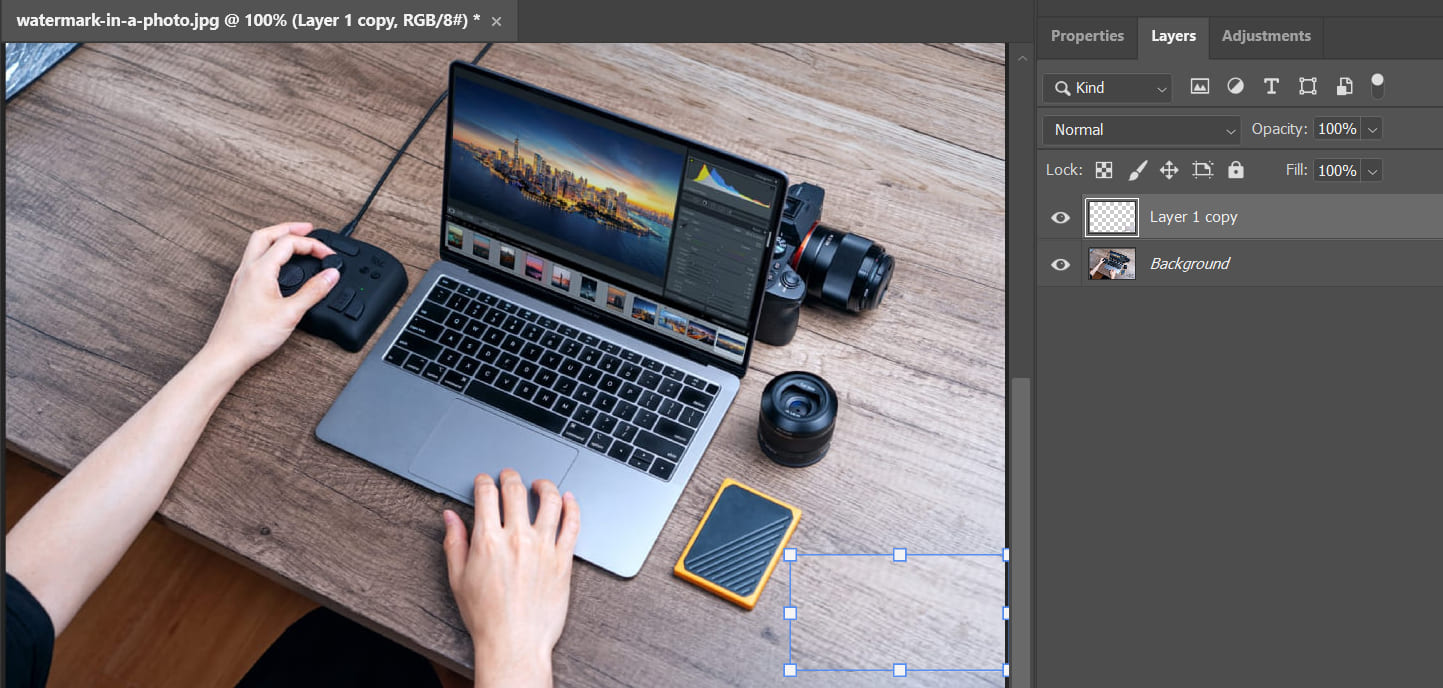
Start by using the Rectangular Marquee Tool to select a nearby area that you want to use as a cover-up. If the edges are irregular, you can use tools like Quick Selection, Lasso, or Pen to make a precise selection.
Press Ctrl+J (or Command+J on Mac) to duplicate the selected area onto a new layer. Drag this duplicated layer above the watermark layer to cover it, as shown in the image below.
If the duplicated layer is too large or too small in relation to the watermark area, you can adjust the layer size to fit the watermark region.
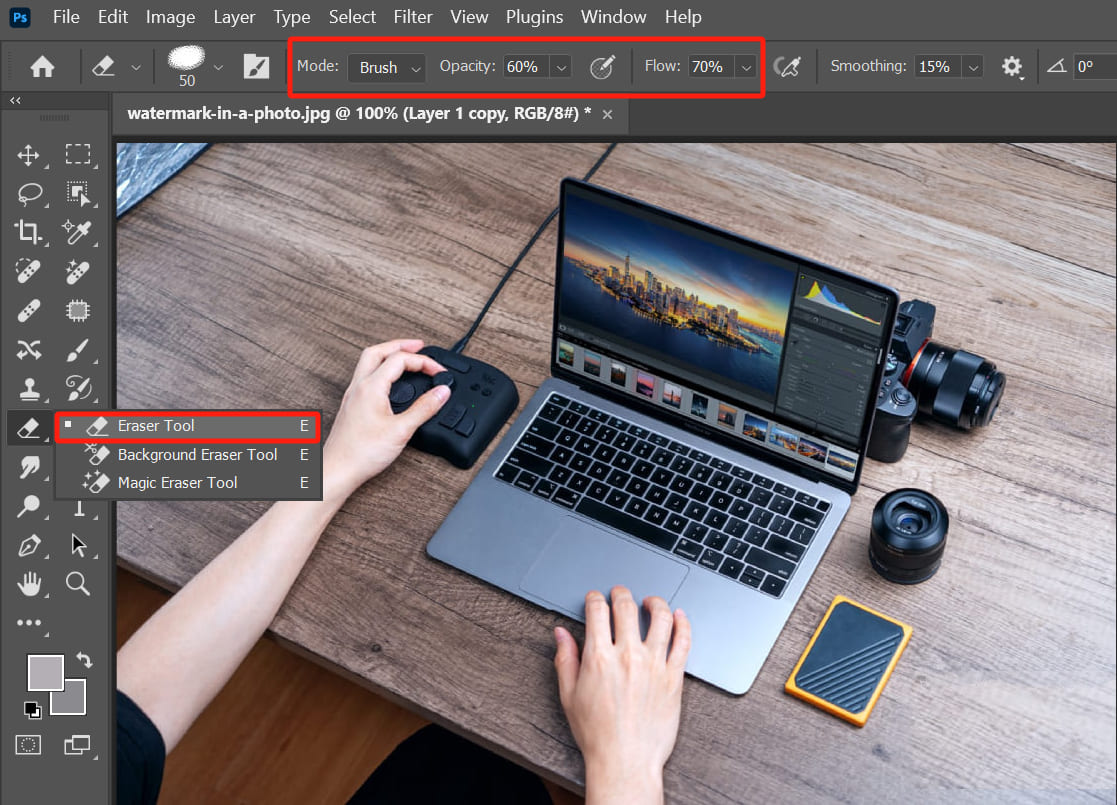
You may notice visible edges where the cover-up layer overlaps the watermark. To blend them seamlessly, select the Eraser Tool and adjust the opacity and flow settings to a lower value.
Carefully erase the edges, making them gradually fade into the surrounding areas.
Remember to adjust the size and hardness of the Eraser Tool according to the requirements of different areas.
Take your time and refine the blending until the watermark is adequately concealed, as shown in the image below.
Final Thoughts About Removing a Watermark in Photoshop
In this tutorial, we've shared seven methods for removing watermarks in Photoshop. Considering the effectiveness and ease of use, we highly recommend the Remove Tool, Content-Aware Fill, and Generative Fill methods.
By now, you should have a good understanding of the detailed steps to remove watermarks in Photoshop and be eager to enhance your images.
If you're interested in TourBox, you might want to explore our budget-friendly option, TourBox Lite. Check out our photo editing page to learn more about how TourBox simplifies every step of image processing.

With TourBox, you can not only edit but also create with efficiency and precision. Most importantly, you can fully enjoy the pleasure of creative work. So why not give it a try and see how it transforms your creative workflow?