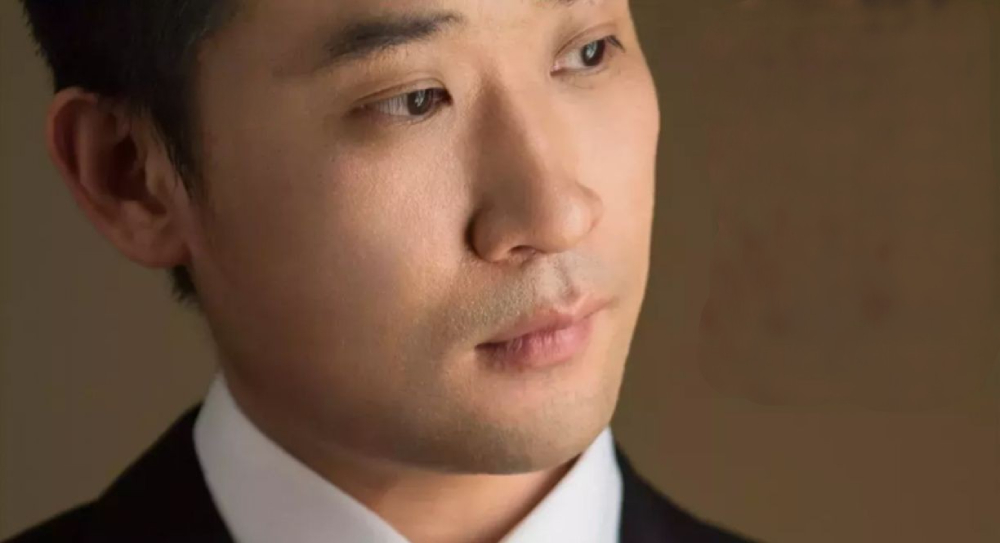
How to Smooth Skin in Photoshop: A Comprehensive Tutorial
In the world of digital image editing, one of the most sought-after skills is the ability to create flawless skin in portraits.
Whether you're a professional photographer, a graphic designer, or simply an enthusiast looking to enhance your photos, the art of how to smooth skin in Photoshop is a game-changer.
In this comprehensive tutorial, we will explore three highly effective methods for achieving smooth and radiant skin in your portraits:
- Portraiture Filter Retouching
- Frequency Separation Retouching
- Dodging and Burning Curve Retouching
We will guide you through each approach, equipping you with the tools to transform ordinary photos into stunning works of art.
Are you ready to elevate your portrait editing game and discover the secrets to achieving flawless skin in Photoshop? Let's get started!

In this article, you will learn:
- Method 1: Portraiture Filter Retouching
- Method 2: Frequency Separation Retouching
- Method 3: Dodging and Burning Curve Retouching
- Final Thoughts About Smooth Skin in Photoshop
Method 1: Portraiture Filter Retouching
Adobe Photoshop is a powerful editing tool with a myriad of features and plugins, one of which is the Portraiture Filter.
This plugin is a godsend for portrait photographers, as it simplifies the skin smoothing process, making your portraits look professionally edited with minimal effort.
Here's a detailed guide on how to use the Portraiture Filter in Photoshop.
Step 1: Install the Portraiture Plugin
Before you can use the Portraiture Filter, you need to install it. Visit the Imagenomic website to download the plugin and follow the installation instructions.
Once installed, you'll find the Portraiture Filter under the "Filter" menu in Photoshop.
Extra Tip:
The price of this Photoshop plugin is quite steep. Therefore, it's crucial to carefully weigh your budget and determine if you can afford this investment before deciding whether to use it.
Step 2: Open Your Image
Launch Photoshop and open the image you want to retouch by selecting "File" > "Open," then navigate to your file and click "Open."
Step 3: Create a Duplicate Layer
Before applying the Portraiture Filter, it's good practice to duplicate your background layer. This way, you can compare the before and after versions of your image.
To do this, go to "Layer" > "Duplicate Layer." Name the new layer as you wish and click "OK."
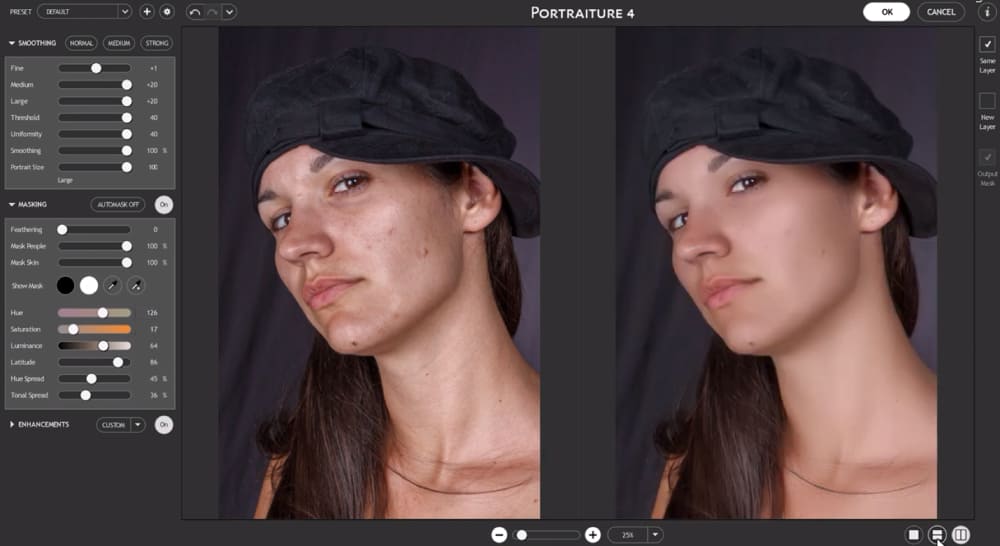
Step 4: Apply the Portraiture Filter
With the duplicate layer selected, go to "Filter" > "Imagenomic" > "Portraiture." This will open the Portraiture dialog box.
In the dialog box, you'll see several sliders and options to fine-tune the skin-smoothing process:
- The "Smoothing" section lets you adjust the smoothing level for different sizes of details.
- The "Masking" section automatically identifies the skin tones in your image.
- The "Enhancements" section lets you adjust skin tones, warmth, and brightness.
If you're new to Portraiture, start with one of the preset options. As you become more familiar with the tool, you can customize the settings to achieve your desired effect.
Step 5: Adjust the Effect
After applying the Portraiture filter, click "OK" to close the dialog box. If you find the effect too strong, you can lower the opacity of the duplicate layer to tone it down.
Simply find the "Opacity" slider in the Layers Panel and adjust it to your liking.
You can also sharpen the image as needed based on the specific circumstances.
Method 2: Frequency Separation Retouching
While the Portraiture Filter provides powerful functionality, it is important to note that it is just a third-party plugin for Photoshop and may not fully address all complexities in skin retouching.
To tackle more intricate projects, you can employ the second method: Frequency Separation Retouching (or High/Low-Frequency Retouching).
The fundamental principle behind this method involves utilizing the concept of image subtraction to divide an image into High-Frequency layers (texture, details) and Low-Frequency layers (lighting, color blocks).
By blending the High-Frequency layer onto the Low-Frequency layer using the Linear Light blending mode, you can create a seamless composite image.
This approach, although slightly slower than the Portraiture Filter, allows you to separate the texture and color of the subject into two layers.
You can then utilize tools like the Clone Stamp and Healing Brush to address issues like acne or blemishes on the texture layer.
Additionally, on the color layer, you can sample skin tones for blending, achieving a more even complexion and adding realistic skin highlights and shadows.
While the explanation in a text may seem confusing, the images below provide a clear visual representation for better understanding.
Low-Frequency layer (lighting, color blocks):

High-Frequency layer (texture, details):
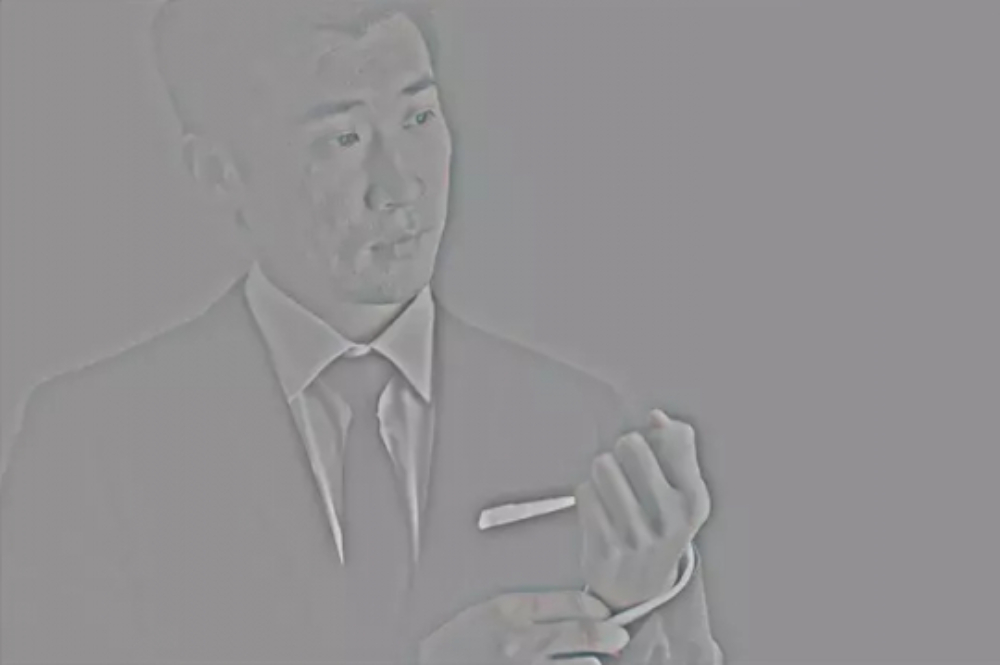
The Low-Frequency layer and High-Frequency layer combine using the Linear Light blending mode in layer blending options, resulting in the original image.

By dividing the image into separate layers, we can modify the texture and details on the High-Frequency layer without affecting the original colors.
Similarly, adjustments to the light and dark color blocks can be made on the Low-Frequency layer without compromising the fine details.
This means that we can directly use brushes to retouch the skin on the Low-Frequency layer without losing any details.
This technique is particularly useful for portrait retouching, as it allows us to achieve smooth skin tones while preserving the texture details.
Now, let's delve into the step-by-step process of utilizing Frequency Separation Retouching in Photoshop.
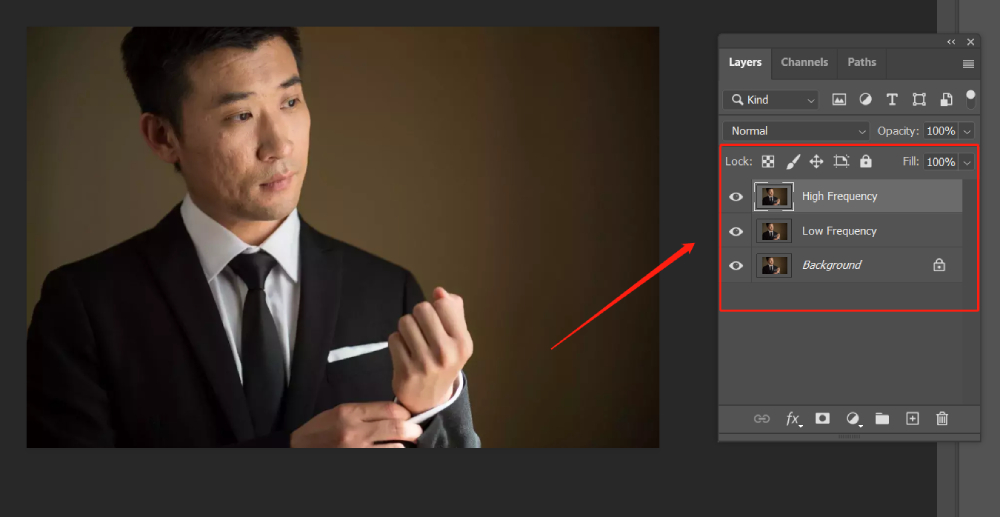
Step 1: Duplicate the Background Layer Twice
Open your image in Photoshop. In the Layers panel, you'll see your image as the Background layer.
Right-click on the Background layer and select Duplicate Layer. Name this layer Low Frequency.
Repeat the process to create another duplicate layer, but this time, name it High Frequency.
You should now have three layers: Background, Low Frequency, and High Frequency.
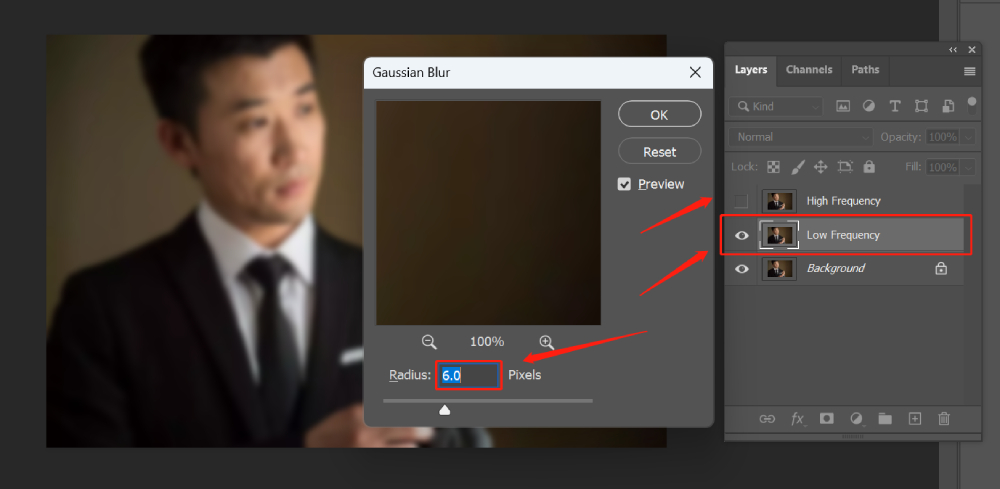
Step 2: Apply Gaussian Blur to the Low-Frequency Layer
To begin, we disable the visibility of the High-Frequency layer and apply "Filter > Blur > Gaussian Blur" to the Low-Frequency layer.
The specific value for Gaussian Blur does not have a fixed parameter; it depends on the level of segmentation you desire.
When selecting the radius for Gaussian Blur, the key is to blur the skin details while preserving the overall shape and color. The exact value will vary based on the image's resolution.
In this case, we choose a blur value of 6.
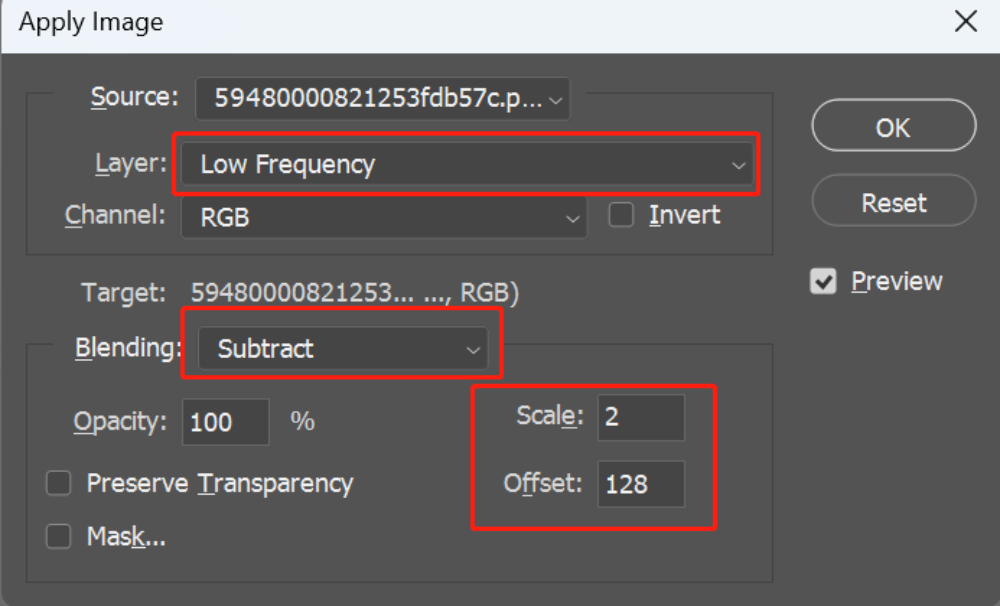
Step 3: Apply High-Pass Filter to the High-Frequency Layer
We select the High-Frequency layer and enable its visibility. Go to Image > Apply Image. This will open the "Apply Image" window.
In the "Apply Image" window, set the layer to the Low-Frequency layer, blending mode to Subtract, scale to 2, and offset to 128.
Please pay attention to the options or values highlighted in the red box in the image below.
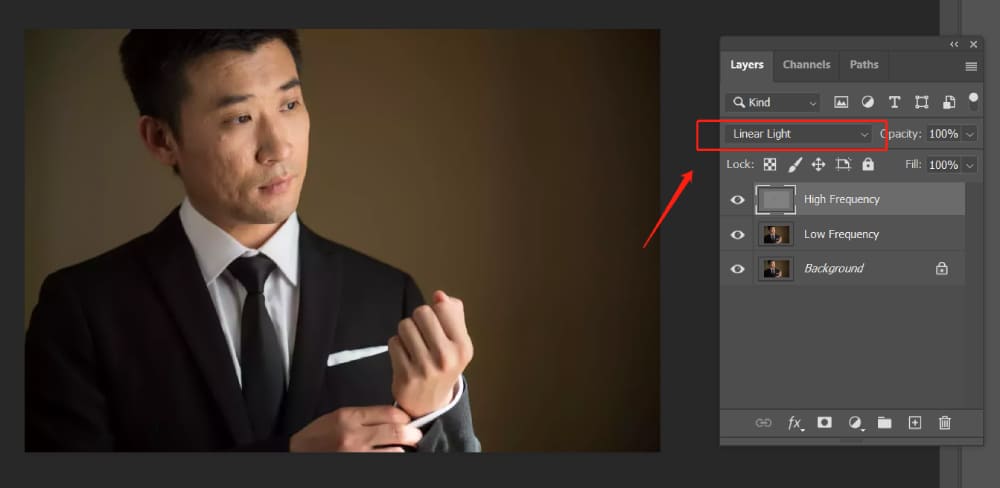
Now, with the High Frequency layer selected, change the blending mode to Linear Light.
At this point, your image should look the same as when you started. However, the color and texture details are now separated into the Low-Frequency and High-Frequency layers.
Now you can retouch the color (Low-Frequency) and texture (High-Frequency) separately.
Step 4: Retouch the Low-Frequency Layer
We select the Low-Frequency layer. To begin, we divide the areas that require adjustment into blocks and apply varying degrees of Gaussian Blur.
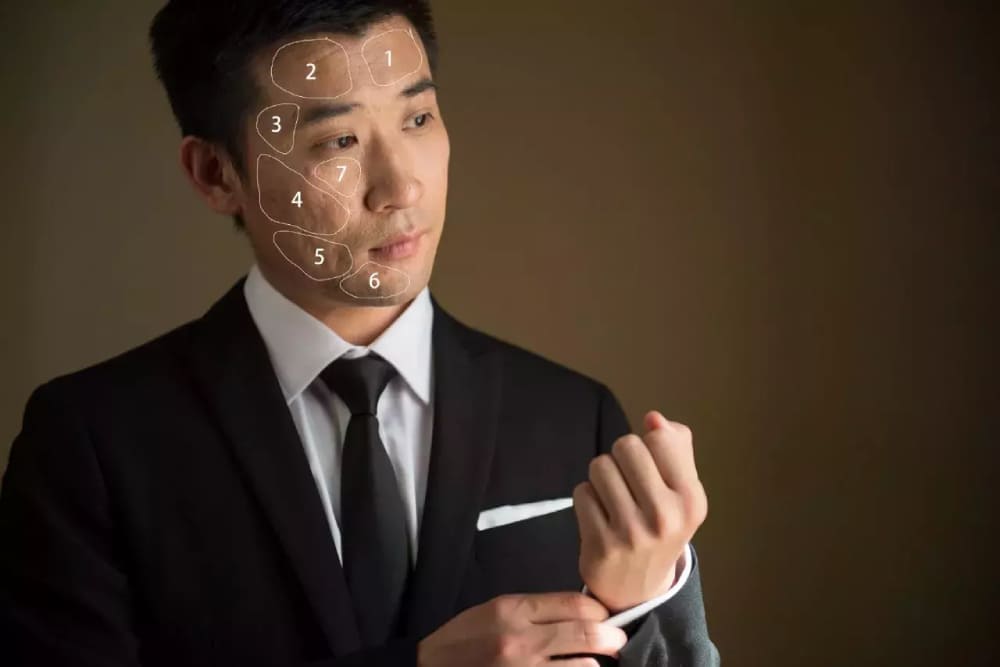
From the toolbar, choose the Lasso Tool and set the feathering to around 20 pixels (or adjust it based on the image resolution). Create a selection around the area you want to smooth.
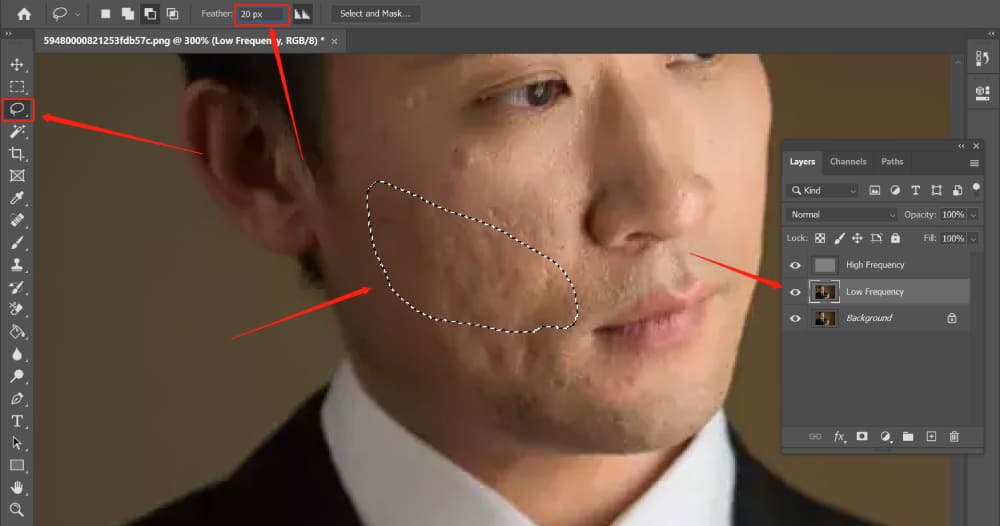
Go to Filter > Blur > Gaussian Blur. The value for Gaussian Blur should be adjusted to the point where the facial unevenness is no longer visible.
If the value is too high, it will result in a loss of facial contrast. In this case, we use a value of 30.
Repeat this process for all the areas that require smoothing. The values for feathering and Gaussian Blur will vary depending on the situation.
Additionally, the finer the divisions in the areas, the better the preservation of overall facial contrast.
Tips:
If you are not satisfied with the color and brightness of the image, you can make adjustments to the color and brightness on the Low-Frequency layer.
Step 5: Retouch the High-Frequency Layer
We select the High-Frequency layer and use tools like the Healing Brush and Clone Stamp to address various imperfections on the face that affect the texture.
When selecting replacement areas, it is crucial to choose regions with similar textures to ensure a seamless blend.
Let's take a look at the results we can achieve with Frequency Separation Retouching in Photoshop.

Method 3: Dodging and Burning Curve Retouching
This method requires a longer operation time and is suitable for professional skin retouching.
If you have sufficient time and want to achieve the best skin-smoothing effect, you can choose this method. Here are the steps to use the Dodging and Burning Curve for skin smoothing:
Step 1: Create Two Curve Adjustment Layers
Create two curve adjustment layers and name them Dodging and Burning, respectively.
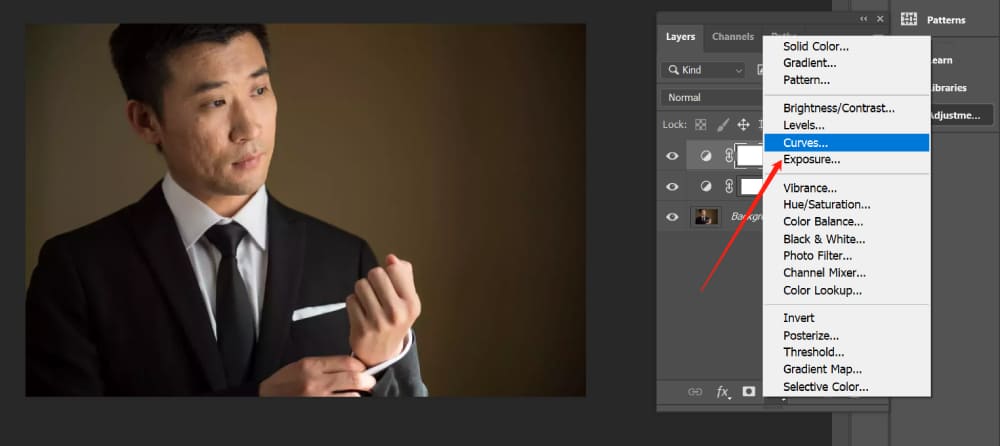
Step 2: Adjust the Curves for Brightness and Darkness
Select the Dodging layer and raise the middle point of the curve. Adjust the Dodging layer curve to brighten the image.
There is no fixed parameter for the brightness adjustment. Just make sure it is not too subtle.
Then use the shortcut (Cmd + I on Mac or Ctrl + I on Windows) or Image > Adjustments > Invert to invert the mask.
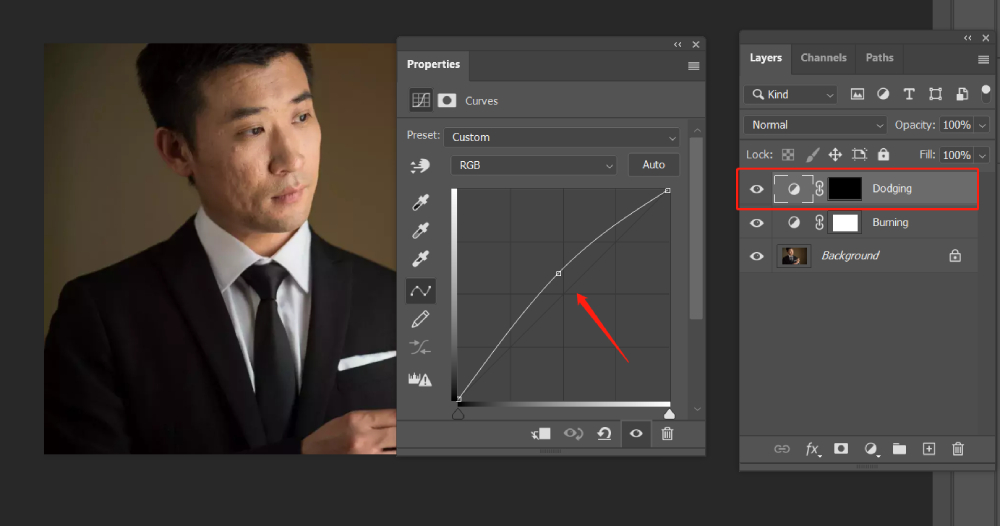
Similarly, adjust the curve on the Burning layer to darken the image. Again, there is no fixed parameter for the darkness adjustment. Afterward, invert the mask using Ctrl + I.

Step 3: Retouch the Skin
Next, we zoom in on the areas of the subject's face with imperfections. We use the Brush Tool with the opacity and flow set to around 15%.
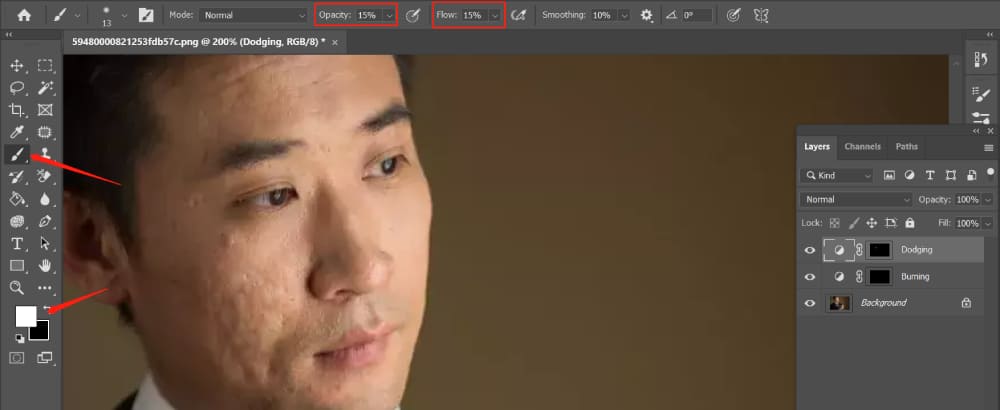
Zoom in on the areas of the subject's face with imperfections. Use a white brush on the Dodging layer mask to paint over the shadowed areas, enhancing the highlights.
Similarly, use a white brush on the Burning layer mask to paint over the highlighted areas, reducing their intensity.
We continue this process until the skin tone appears more even and the highlights and shadows look natural. This process may take several hours, but the final result will be more natural-looking.
Let's see the final result.
Final Thoughts About Smooth Skin in Photoshop
In the previous sections, we intentionally focused on presenting three distinct skin smoothing methods, without mixing in other techniques, to allow you to better understand the differences between each approach.
However, in a typical skin retouching process, it is common to combine different methods to achieve optimal results.
We can start by using conventional tools such as the Healing Brush, Clone Stamp, or Spot Healing Brush to address minor skin imperfections without compromising the skin texture and quality.
Then, we can employ a combination of Frequency Separation Retouching and Dodging and Burning Curve techniques for more detailed skin smoothing.
By integrating these methods, we can achieve a comprehensive and refined skin retouching workflow that preserves the natural texture while effectively addressing various skin flaws.
Product Recommendation:
While these methods can yield impressive results, we understand that the process can become quite intricate and time-consuming, especially when dealing with complex portrait retouching tasks that require frequent adjustments to the brush size and other repetitive operations.
That's where TourBox comes in. This innovative tool is designed to streamline your editing workflow, providing a seamless and efficient experience.

Imagine the convenience of having dedicated dials, buttons, and scroll wheels that enable you to make real-time adjustments while keeping your focus on the creative process.
With TourBox, you can save valuable time and energy, allowing you to dedicate more of your efforts to achieving flawless skin retouching results.

In conclusion, the key to smooth skin in Photoshop is to approach skin smoothing with a balanced and adaptable strategy, utilizing the appropriate tools and techniques based on the specific needs of each image.
Experimentation and practice will help you develop your own personalized approach to achieve the desired skin-smoothing results. So, feel free to explore and combine these methods to master the art of seamless and natural-looking skin retouching.