How to Compress an Image in Photoshop: A Comprehensive Guide
If you're a photographer or a photography enthusiast, you're likely aware that photos taken with a camera can have high resolution and large file sizes, which can take up substantial storage space.
When we need to upload such images to certain platforms, the large size can cause slow upload speeds, and some platforms may also impose restrictions on image size.
Similarly, if you're a designer or an artist creating with high-quality image materials, you may encounter a problem: these image files can be so large that they slow down your computer's performance and cause your project files to become extremely bulky.
This is where the need to compress images in Photoshop comes in, as it can enhance work efficiency. While there are online image compressors available on the internet, they don't offer the same level of control over the compression scale as Photoshop does.
Therefore, in this tutorial, we'll teach you how to compress an image in Photoshop perfectly to fit your creative needs.

In this article, you will learn:
- What Is Image Compression
- How to Compress an Image in Photoshop?
- Final Thoughts About Image Compression in Photoshop
What Is Image Compression
Image compression is a crucial aspect of digital image processing. It plays a key role in managing storage space, transferring files quickly, and optimizing images for the web. The two main types of image compression are:
- Lossless Compression
- Lossy Compression
1. Lossless Compression
Lossless compression is a method that reduces the size of the file while keeping the original image data intact.
This means you can restore the image back to its original form without any loss of quality. Formats like PNG, GIF, and TIFF use lossless compression.
These are typically used for images where quality and details are of high importance such as in professional photography or in medical imaging.
2. Lossy Compression
Lossy compression, on the other hand, significantly reduces the file size by eliminating 'less important' information. This can result in some degradation of image quality, but often these changes are not noticeable to the human eye, particularly at lower levels of compression.
The most common format that uses lossy compression is JPEG. This format is used widely for photographs and images with lots of colors and gradients.
It's important to note that every time you open, edit, and save a JPEG file, it undergoes compression, and thus, some information is lost. This is called generational loss.
There's also a balance between the degree of compression and the quality of the image. Higher compression leads to lower file size but can also result in lower-quality images.
The key is to find the right balance that maintains an acceptable level of image quality while achieving a reduced file size.
Ultimately, the type of compression you choose will depend on your specific needs:
- If you need to preserve the exact details and quality of an image, go with lossless compression.
- If you need to significantly reduce the file size and can afford some loss in quality, go with lossy compression.
How to Compress an Image in Photoshop?
Whether you're a professional designer or a hobbyist, mastering the art of image compression in Photoshop can significantly enhance your workflow.
In this section, we'll delve into several methods to do just that, allowing you to reduce file size while maintaining the highest quality possible.
Method 1: Adjust Image Size
Open your image in Photoshop. Navigate to 'File' > 'Open' and select the image you wish to compress.
Open the 'Image Size' dialog box. Navigate to 'Image' > 'Image Size' or use the shortcut Ctrl+Alt+I (Windows) or Command+Option+I (Mac).
Adjust the size of your image. You have the option to alter the width and height of your picture here.
Make sure to check the chain icon, labeled as "Constrain aspect ratio", located to the left of the Width and Height options. This ensures the proportional relationship between the image's width and height is maintained.
Decrease the resolution. For optimal web use, the resolution can be lowered to 72 pixels per inch.
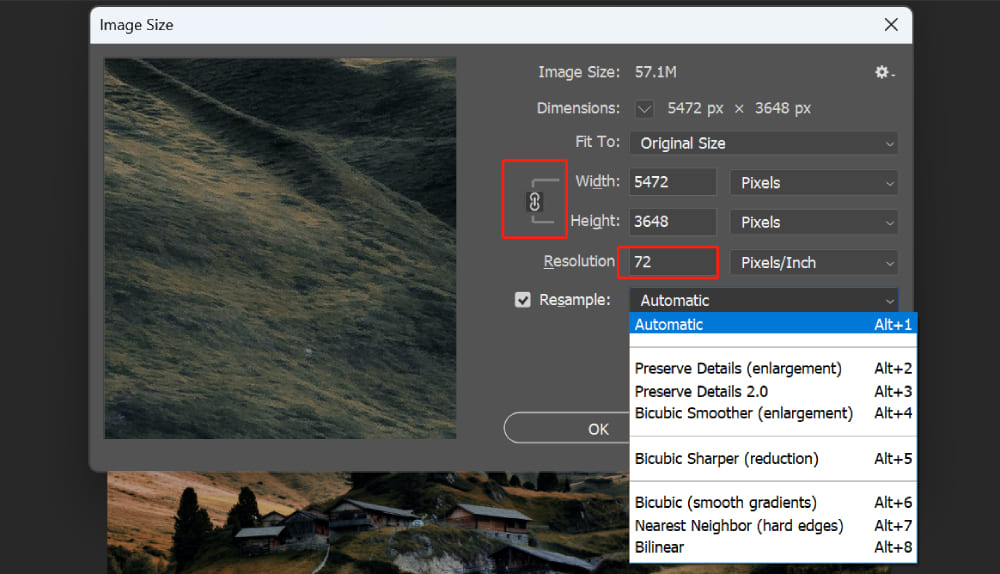
In addition to these basic settings, we also see that the Image Size panel includes a dropdown menu for resampling. Resampling is a fundamental image editing procedure that alters the pixel count in an image.
This is a feature you'll often make use of when changing the size of an image in Photoshop. The 'Image Size' dialog box presents numerous resampling options, each designed with a specific use-case in mind.
Let's take a closer look at these parameters:
- Automatic: Automatic Resampling lets Photoshop choose the best resampling method based on the image content and whether you're reducing or enlarging the image.
- Preserve Details (enlargement): This is the older version of Preserve Details and is primarily used for enlarging images.
- Preserve Details 2.0: This version uses artificial intelligence to preserve detail when resizing images. It's especially useful for making large prints from small photos.
- Bicubic Smoother: Best for enlarging images. It applies additional smoothing to reduce pixelation.
- Bicubic Sharper: Best for reducing image size. It applies sharpening to counteract the softening that can happen during downsampling.
- Bicubic (Smooth Gradients): It uses a mathematical formula to calculate the color values of new pixels based on the color values of existing pixels. It provides a smoother transition between pixel colors, and as a result, it's slower than other methods, but it generally provides better results.
- Nearest Neighbor (hard edge): It is a simple resampling method that assigns the color value of the closest pixel to a new pixel. It's fast but can result in a pixelated or blocky appearance. This is most useful for hard-edge graphics, such as pixel art, where maintaining sharp edges is key.
- Bilinear: It is a faster resampling method than Bicubic, but it provides less precision. It calculates the color value of a new pixel based on a weighted average of the 4 pixels in the nearest 2 x 2 neighborhood. This method can be useful when speed is more important than absolute quality, such as in preliminary drafts.
Our first method involves compressing the image size by adjusting its dimensions. Large dimensions can result in a considerably large file size, which may not always be necessary for our practical use.
Therefore, we can adjust the image size according to the requirements of the actual project. However, if you don't want to change the image size, or want to further compress the image after resizing it, you might be wondering what to do next.
Don't worry, let's explore other methods of image compression in Photoshop.
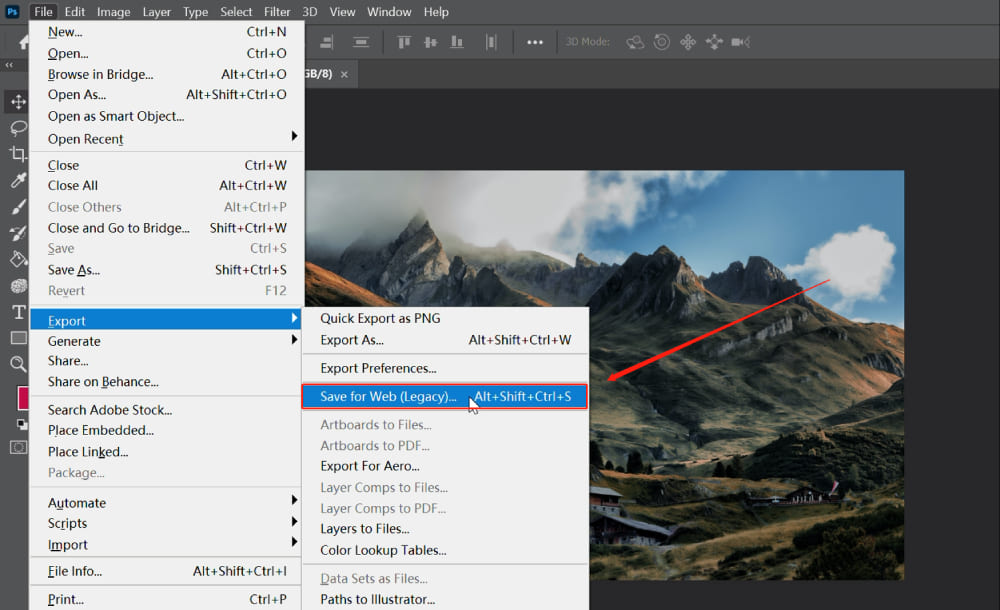
Method 2: Use 'Save for Web'
Open your image in Photoshop. Navigate to "File" > "Export" > "Save for Web (Legacy)", or use the shortcut keys Alt + Ctrl + Shift + S.
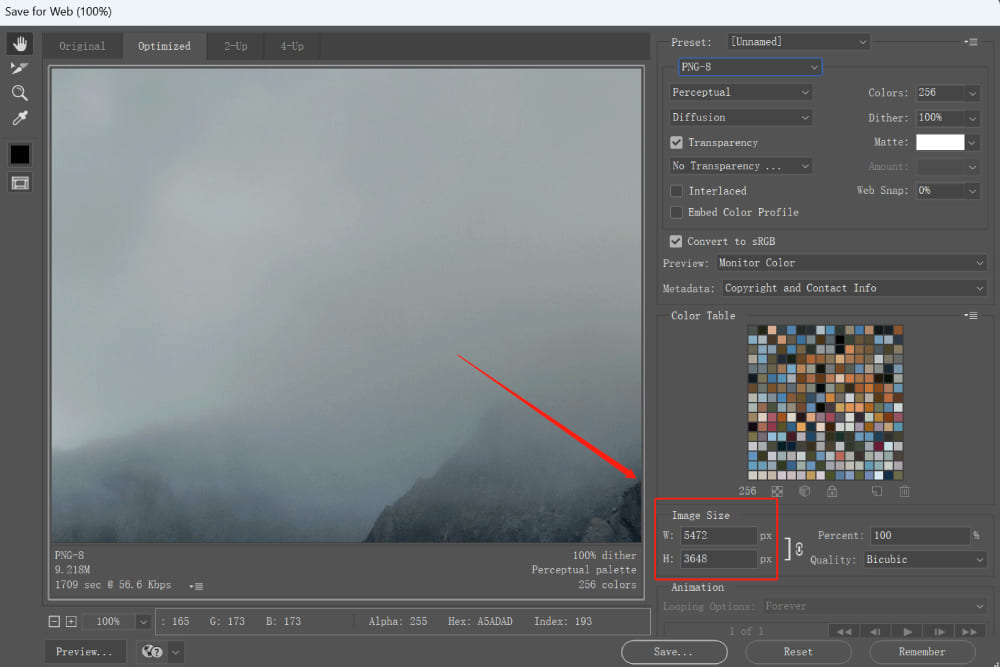
A save dialog box will appear. In the lower-left corner of this panel, you can see the file size of the photo after export.
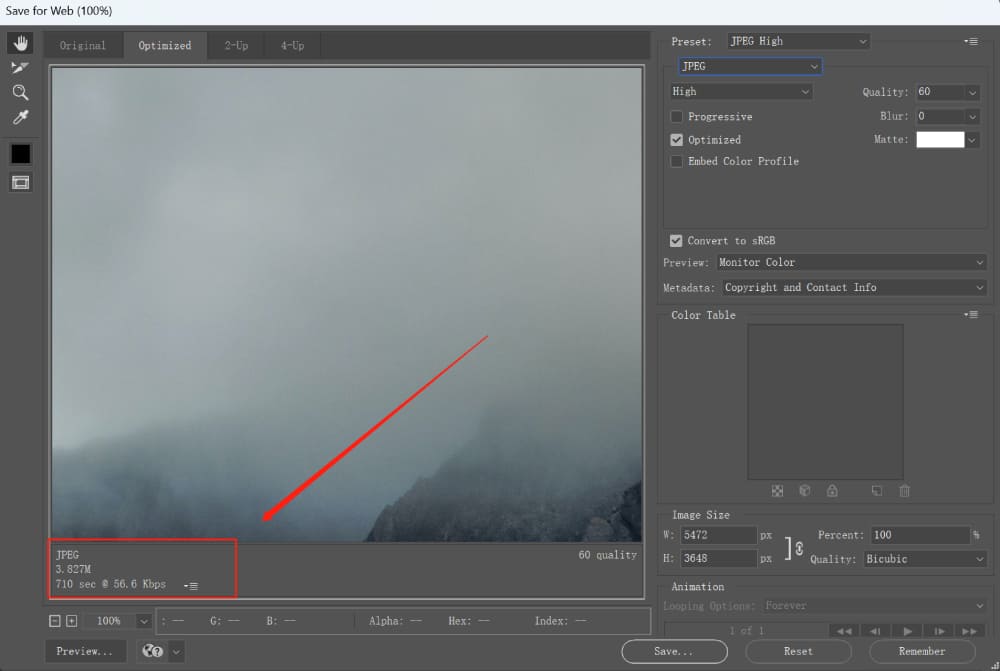
Choose the format that best suits your specific needs. JPEG is typically used for photos, while PNG is suitable for images with a transparent background.

As previously mentioned, if you need to preserve the exact details and quality of an image, use lossless compression formats like PNG or GIF. Here, we can achieve image compression by adjusting the image size in the panel.
Important Tip:
You might wonder about the difference between PNG-8 and PNG-24. PNG-8 can store 256 colors, making it very suitable for images with fewer color varieties.
On the other hand, PNG-24 can store more color information than PNG-8, representing images with richer colors, but it consequently takes up more space.
However, with lossless compression, image quality takes priority over image size. So, lossless compression doesn't compress the image that much. If you need to significantly reduce file size and can tolerate some quality loss, use JPEG - a lossy compression format.
Lossy compression significantly reduces file size by eliminating "less important" information, which could lead to a drop in image quality. Evaluate your needs to decide whether a smaller file size takes precedence over high-quality images.
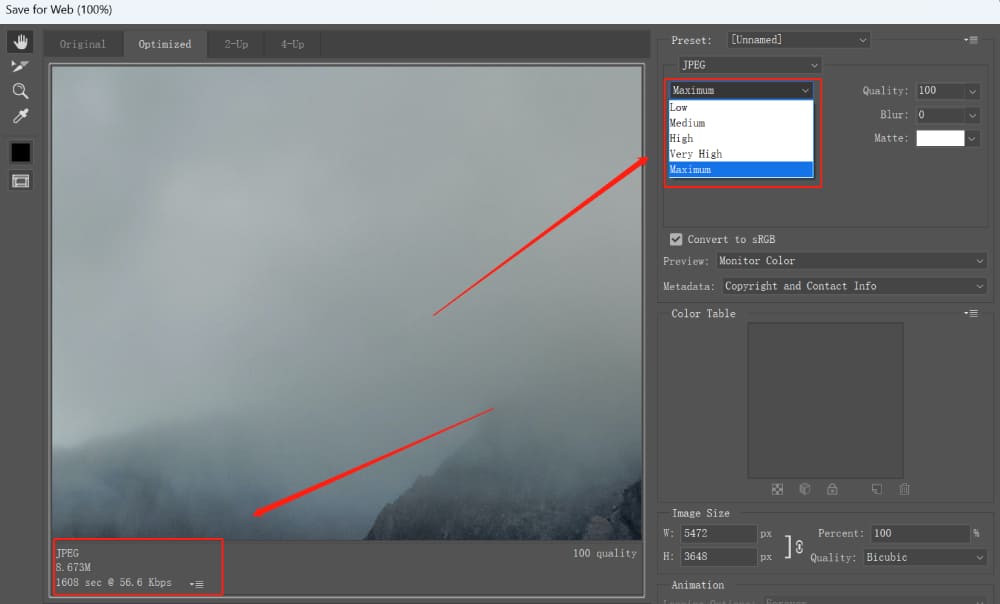
Let's use JPEG as an example, given our main goal is image compression.
We can start by setting compressing levels. From Maximum to Low, there are different compression levels, with Maximum offering the highest image quality and consequently the largest file size.
We can choose High or Very High, and see the image size in real time in the lower left corner. The image size can be reduced by half or even more, while the visual difference in the image is not significant.
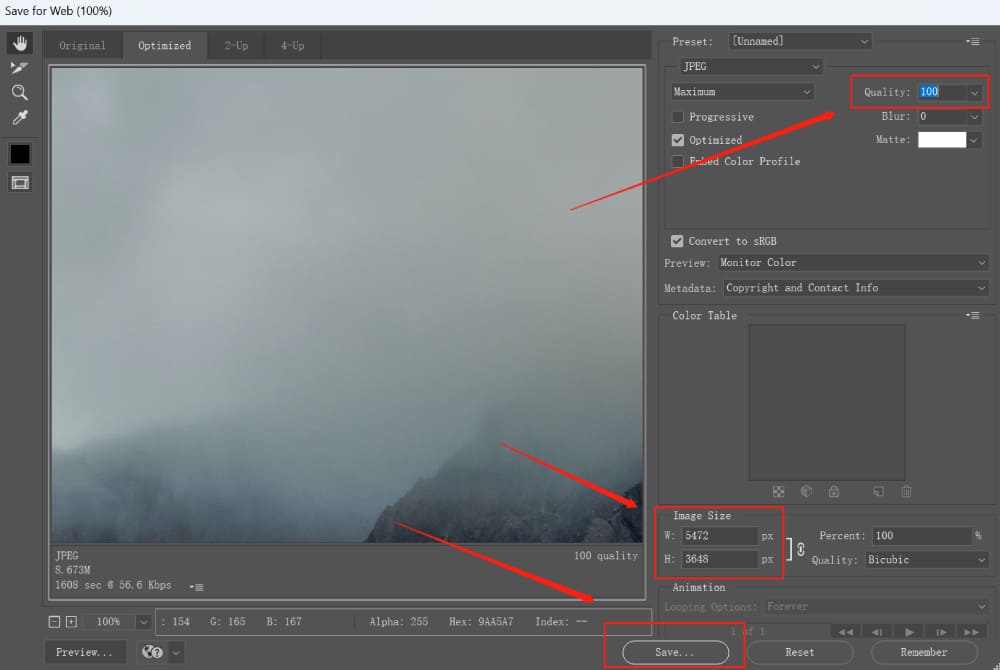
We can also use the "Quality" slider to adjust the compression level. The smaller the number, the smaller the file size, but the lower the image quality. A setting around 60-70 usually provides a good balance for web use.
Compress to your desired image size based on your needs. We can also achieve further image compression here by adjusting the image size. The advantage is that the image size is calculated in real time, and you can observe changes in image quality and size in real-time.
Click "Save" and choose a save location. Your image compression in Photoshop is now complete.
Final Thoughts About Image Compression in Photoshop
Before we wrap up this tutorial, let's go over a few tricks that can make your image compression process in Photoshop even more efficient:
- Understanding Compression: Losky formats like JPEG will reduce your file size, but they can also reduce quality. On the other hand, lossless formats like PNG preserve quality at the expense of larger file sizes.
- Experiment with Quality Settings: The quality slider in the "Save for Web" dialog is your friend. Don't be afraid to reduce the quality setting. Often, small reductions in quality won't be noticeable but will result in a much smaller file size.
- Resize your Image: If your image is larger than it needs to be, resize it. This can drastically reduce the file size without a noticeable loss in quality.
Product Recommendation:
Whether you're compressing images or handling any other task in Photoshop, efficiency and precision are key. TourBox is an innovative controller specifically designed for image processing, graphic design, and other creative tasks.

It's compatible with a range of software, including Photoshop. The ergonomic design and customizable shortcuts of TourBox can dramatically increase your productivity, allowing you to focus more on your creativity and less on navigating complex menus and commands.
In the context of our tutorial, imagine adjusting image sizes, swapping between compression formats, or sliding the quality scale with just a simple knob twist or button press. Sounds like a breeze, right?
That's it for today's tutorial on how to compress an image in Photoshop. We hope these tips, tricks, and the introduction to TourBox have been helpful. Happy editing!