Photoshop Color Range: A Quick Guide to Pick and Refine Colors
Photoshop has a handy selection tool called Color Range. You can use it to pick specific colors or tonal areas in an image precisely. If you want to know how it works, this short guide will give you a quick, easy overview.

In this article, you will learn:
- How to Open the Color Range Panel?
- Photoshop Color Range: Parameter Guide
- Use Cases for the Color Range Tool
- FAQ About the Color Range Tool
- Conclusion
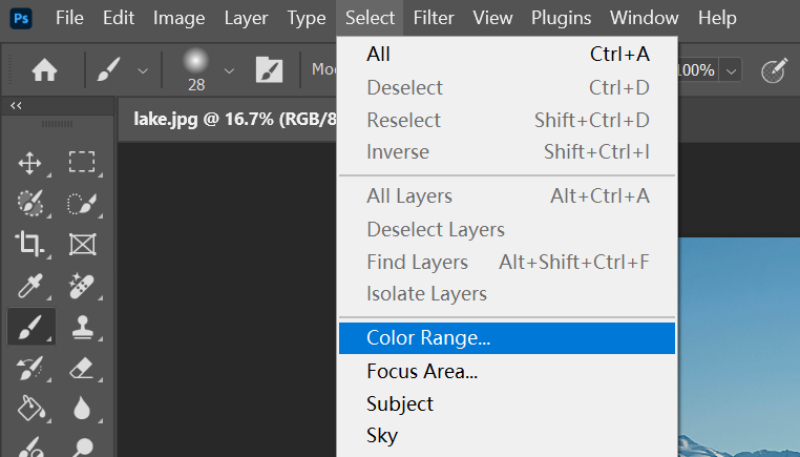
How to Open the Color Range Panel?
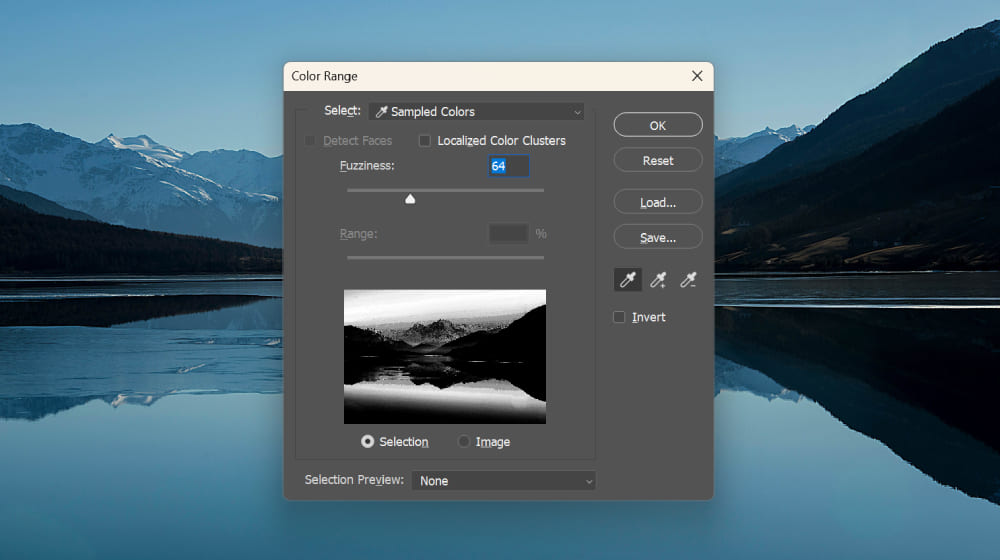
In the top menu, go to Select > Color Range (shortcut: Alt+S+C) to open the Color Range panel.
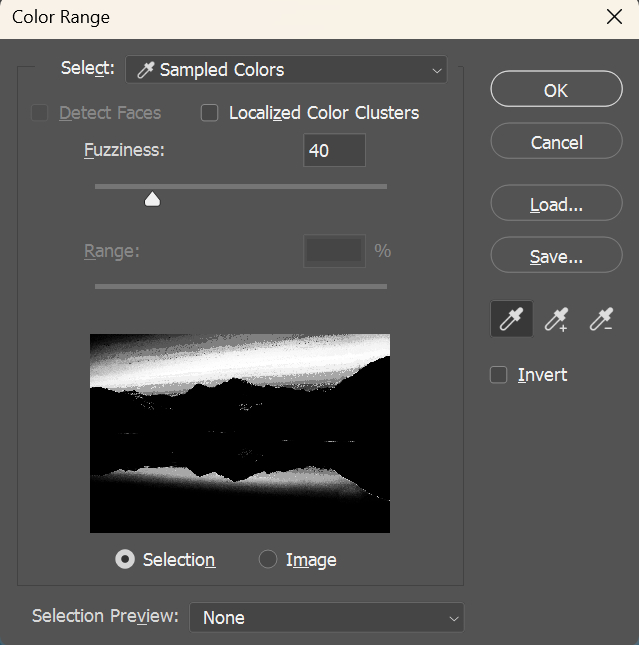
Take a quick look — the panel is roughly split into three parts: the eyedropper tool group, the preview area, and the settings bar.
At the bottom of the panel, you can change the preview mode. When you click a spot in the image with the eyedropper, the preview area updates.
In the default Selection view, white = selected, black = not selected, and gray = partly selected. If you switch to the Image view, you'll see the original photo so you can compare the selection.
Photoshop Color Range: Parameter Guide
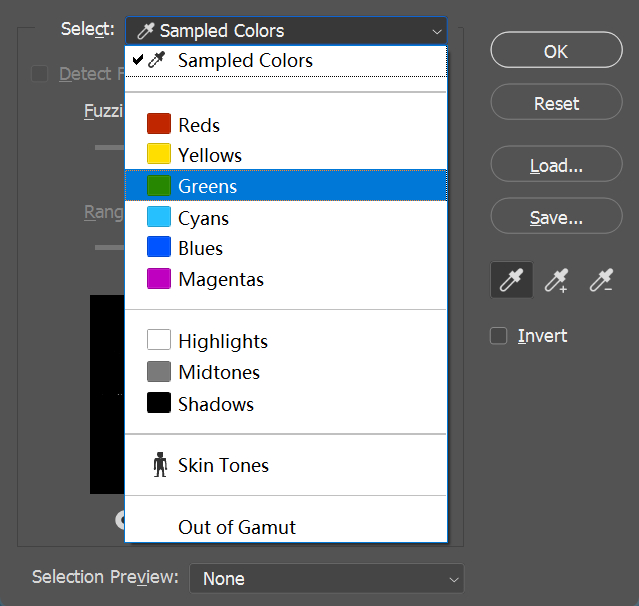
1. Select Dropdown
- Presets: Includes system presets like Highlights, Midtones, Shadows, and Skin Tones. Good for quickly picking specific tonal areas or skin.
- Sampled Colors: Use the eyedropper to pick colors manually. You can add to a sample with Shift + click or subtract with Alt + click.
- Out of Gamut: For RGB images only. Quickly picks colors that fall outside the CMYK gamut (think very neon colors).
2. Fuzziness
This works like the Magic Wand's Tolerance. Move the slider to change how wide the selection is. Higher values (0–200) make the selection broader. Lower values make it tighter and more precise.
- Low value = only colors very close to the sampled color are selected.
- High value = more colors similar to the sampled color are included.
Watch the black-and-white preview while adjusting. Try to make the parts you want white and the parts you don't want black.

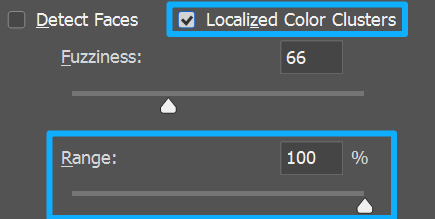
3. Localized Color Clusters
Check this to enable the Range slider.
It limits selection based on how far colors are from the sampled point in the image. This helps avoid selecting similar colors that are far away in the background.
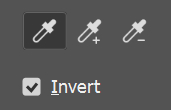
4. Invert
Tick Invert to flip the selection.
Example: pick the sky first, then check Invert to select everything except the sky (like buildings on the ground).
5. Eyedropper Tool Group: Advanced Tips
- Main Eyedropper (Eyedropper Tool): Click the image or preview to sample a color. You can drag to sample like a lasso.
- + Eyedropper (Add to Sample): Hold Shift and click to add more colors. Great for selecting multiple, separate color areas.
- - Eyedropper (Subtract from Sample): Hold Alt and click to remove colors from the sample (useful to exclude distracting highlights, like hair shine).
Continuous Sampling Trick:
Hold Shift and drag the eyedropper to add colors continuously. Release to merge the samples automatically.
Use Cases for the Color Range Tool
Knowing what Photoshop's Color Range tool does and how to open it is easy. The real question is how to use it in real projects. Below are three simple scenarios. Refer to the steps as a guide rather than following them exactly, and apply the tool to a project that fits.
1. Scenario 1: Precise Skin Selection for Portraits
- Open the portrait and choose Select > Color Range.
- Pick the Skin Tones preset and check Detect Faces to improve accuracy.
- Set Fuzziness to 30–50. Aim to make the skin areas white in the preview and the background black.
- If some skin isn't selected, use the + Eyedropper to add samples. If the background is picked by mistake, use the – Eyedropper to remove it.
- Check Invert to get the non-skin selection. This is useful when you want to adjust the background or protect the skin.
2. Scenario 2: Cleaning up Edges of Transparent Objects
- Open a photo of glassware and go to Select > Color Range.
- Click the glass highlights with the eyedropper. Set Fuzziness to 40–60.
- Turn on Localized Color Clusters and drag the Range slider to about 20–30, so only the highlights on that piece of glass are selected.
- Click OK to make the selection, then press Ctrl+J to copy it to a new layer.
- Go to Select and Mask and use the Refine Edge Brush Tool on the edges to refine the glass's transparent look.
3. Scenario 3: Extracting a Subject from a Busy Background
- Open a flower photo and choose Select > Color Range.
- Click the foreground red flower with the eyedropper. Set Fuzziness to 50–70.
- Check Localized Color Clusters and set the Range to about 15–20 to avoid selecting similar colors in the background.
- Use the Add to Sample eyedropper to include the darker edges of the petals.
- Press Ctrl+Shift+I to invert the selection, delete the background layer, and you'll be left with a clean flower selection.
FAQ About the Color Range Tool
Q1: White or Black Fringe Around the Selection
Fix:
- Open Select and Mask and set Decontaminate Colors to about 50%–80% to remove leftover edge color.
- Expand the selection by 1–2 pixels, then feather it a little.
Q2: Can't Pick a Specific Color
Possible causes:
- The layer is locked (the Background layer is locked by default).
- The color is outside the document’s color gamut (for example, CMYK mode can't pick some RGB/neon colors).
Fix:
Double-click the Background layer to unlock it, or convert the document to RGB mode and try again.
Q3: Preview Looks Different from the Actual Result
Check these:
- Set Selection Preview to Quick Mask to see the selection over the image.
- Make sure Invert is off so that white in the preview matches the actual selected area.
Conclusion
In this tutorial, we explained what the Photoshop Color Range tool does and shared some handy tips for using it. As a selection tool, Color Range is especially useful in certain situations.
So when you need to pick a specific color or tonal area in a project, give this tool a try.
If you use Photoshop often for image editing or art, consider trying TourBox, a creative controller that speeds up your workflow.

You can map your most-used Photoshop shortcuts and tools to TourBox's knobs, dials, and buttons. That means you won't have to keep switching tools or digging through menus. You can control Photoshop by feel and spend more time on creative work instead of repetitive tasks.

Photoshop is easy to learn and can really boost your productivity — especially for photographers and digital artists who do a lot of detailed color work. If you like working on an iPad, check out our TourBox Elite Plus. It delivers a smooth, responsive experience on both PC and iPad.