Master the Power of Smart Object in Photoshop: An Essential Tutorial
Are you familiar with the "Smart Object" feature in Photoshop? In the process of design and image editing, we rely on this feature for every image we work with.
Smart Object plays a pivotal role in determining the speed of our image-creation process. More importantly, they enable quicker and cleaner modifications to images while ensuring consistency throughout.
So, what is a Smart Object in Photoshop? And how do we use them? Read on as we address all your queries and provide you with a comprehensive understanding.

In this article, you will learn:
- What Are Pixels, Bitmaps, and Vectors?
- What Is a Smart Object in Photoshop?
- How to Create and Use a Smart Object?
- Tips and Tricks for Mastering Smart Object
What Are Pixel, Bitmap, and Vector?
Before diving into the concept of Smart Objects, it's essential to understand the relationship between pixels, bitmaps, and vectors.
First and foremost, it's important to note that Photoshop is primarily a bitmap editing software. Most of the editing involves modifying pixels, while vector graphics are mainly used for shape manipulation.
1. What Is Pixel?
Pixels are tiny squares that make up an image. Each square has a specific position and assigned color value, determining the appearance of the image.
We can consider pixels as indivisible units or elements within an image. They cannot be further divided into smaller units or elements and exist as individual colored squares.
A bitmap image consists of a specific number of pixels that determine the size of the image displayed on the screen.
2. What Is Bitmap?
Bitmaps, also known as raster images, describe images using pixels. Each individual point, called a pixel, forms the image.
These pixels can be arranged and colored differently to create patterns. When you zoom in on a bitmap image, you can see countless individual squares (pixels).
With a sufficient number of pixels of different colors, you can create richly colored images to realistically depict various scenes. Common bitmap formats include JPG, GIF, PNG, and BMP.
You can try zooming in on any photo or image in Photoshop. When you zoom in enough, you will see numerous small squares. Each square represents a pixel, storing information about its position, color, and transparency.
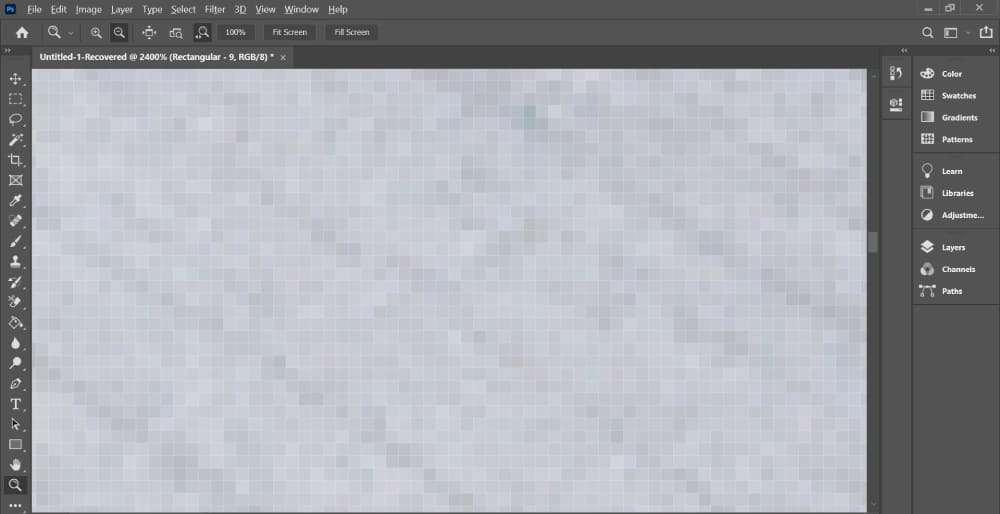
By arranging these small pixels densely (the denser the pixels in a given area, the finer the resulting image), we achieve realistic photographs or images.
However, bitmaps have a drawback. While they offer rich colors, they are prone to distortion when scaled or rotated.
Additionally, bitmap files tend to have larger file sizes. Now, let's move on to vector.
3. What Is Vector?
Vectors are composed of mathematical lines and curves, forming shapes. They also contain information about color and position.
Vector graphics have smaller file sizes and do not distort when scaled, resized, or rotated.
However, vectors have their limitations. They are not suitable for creating images with complex color variations.
Therefore, they are often used for simple and direct images such as logos, icons, and symbols. The common vector format is SVG.
Now that we have covered the basics of pixel, bitmap, and vector, you might wonder how all of this relates to Smart Object. Don't worry, in the next section, we will dive into Smart Objects and address your questions.
![]()
What Is a Smart Object in Photoshop?
If you're a frequent user of Photoshop, you're probably familiar with the terms "Smart Object" and "Rasterize."
However, you may not fully understand what these terms mean. You might have encountered dialog boxes containing these terms while working with images and often clicked "Yes" without much thought.
Keep reading to explore the concepts of Smart Objects and Rasterization in Photoshop, and understand the relationship between them.
1. Smart Object Concept
A Smart Object is like a special layer in Photoshop that holds the image data of a picture, whether it's made of pixels (raster image) or shapes (vector image).
Smart Objects preserve the source content of an image along with all its original characteristics, enabling non-destructive editing of the layer.
When you create a Smart Object, you're essentially telling Photoshop to retain the inherent properties of the source image. Most importantly, modifications to a Smart Object won't damage the original file, which is crucial for maintaining image sharpness and editability.
What does this mean?
When you edit a Smart Object—for example, adjusting levels or hue/saturation—Photoshop converts these adjustments into Smart Filters, allowing you to revert them later if needed.
Furthermore, scaling and transforming a Smart Object, because it is based on vectors, won't degrade the layer's sharpness.
Perhaps the previous explanation was a bit abstract. Let's put it in simpler terms: you can think of a Smart Object as turning an object into a small PSD file.
In Photoshop, many convenient operations directly modify file properties. For example, when you scale a bitmap down to a small size and confirm the changes, then enlarge it back to the original size, you'll notice the image becomes jagged.
This happens because, upon confirmation of the downscaling, the pixel property of the image is directly modified.
If you want to revert to the original pixel information, you can only do so by undoing the changes, which can be inconvenient in a workflow.
By converting to a Smart Object, not only are the source file properties preserved, but you can also double-click on the source file to enter the object and make further modifications.
Multiple Smart Objects can share a single source file, greatly improving layer recognition and enabling modular operations.
2. Rasterizing Layer Concept
However, "Smart Object" only works with vector-based images, and many operations and filters cannot be directly applied to Smart Objects. You need to convert them into regular layers to do so.
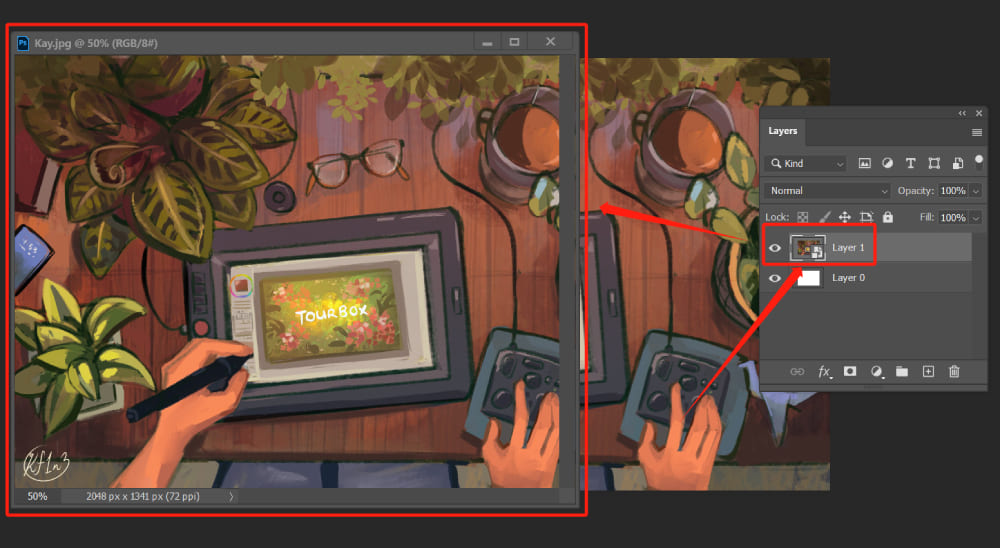
For example, when you try to paint directly on a layer that has been converted into a Smart Object, the system will prevent you from doing so (as shown in the image below).
Also, the system reminds you that you need to rasterize the layer before performing such operations (other operations that alter pixel data will also be restricted).
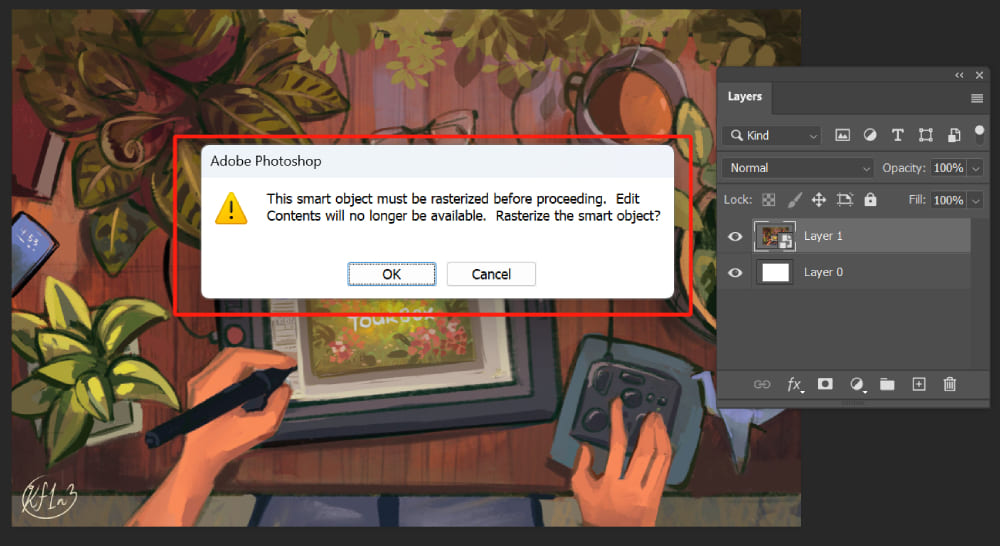
This is because, after converting a layer into a Smart Object, it becomes a vector-based image, and the pixel data of that layer is strictly protected, preventing direct editing that modifies pixel data.
The popup window in Photoshop has already informed us about how to convert a Smart Object into a regular layer: by rasterizing the image (or object).
This process retains only the pixel information of the original image, but scaling or transforming it can result in loss of information.
For example, if you scale down a 600px x 600px JPG image that has been rasterized to 60px x 60px and then enlarge it back to 600px x 600px, the image will become pixelated.
How to Create and Use a Smart Object?
In fact, if you're a beginner in Photoshop, you may not even be aware of what a Smart Object is, but you have already created and used Smart Objects before.
When you drag an image into Photoshop, you will notice that it has a diagonal line indicator during free transform, and in the Layers panel, there is a small icon in the bottom right corner of the layer, as shown in the image below:
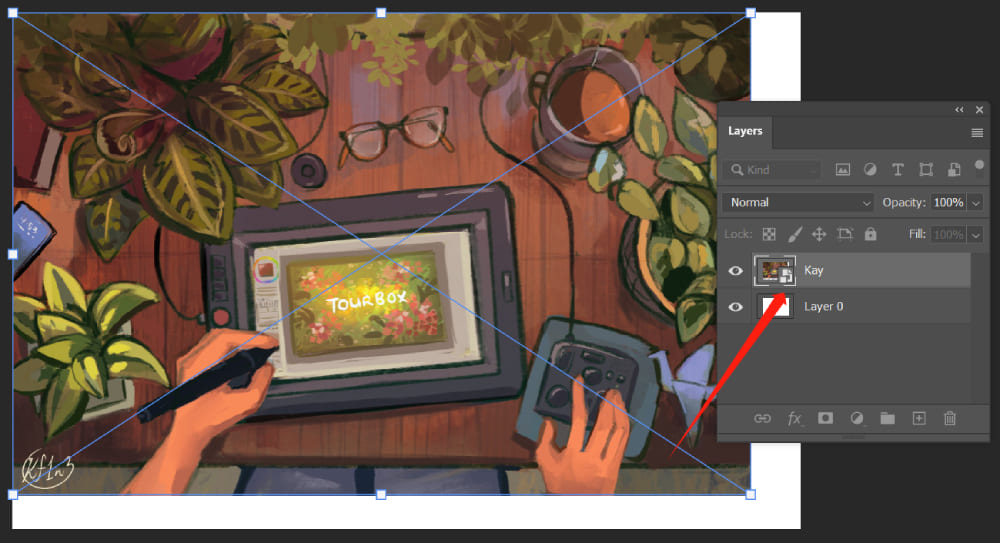
These signals indicate that the layer is already a Smart Object, even though you didn't actively create it!
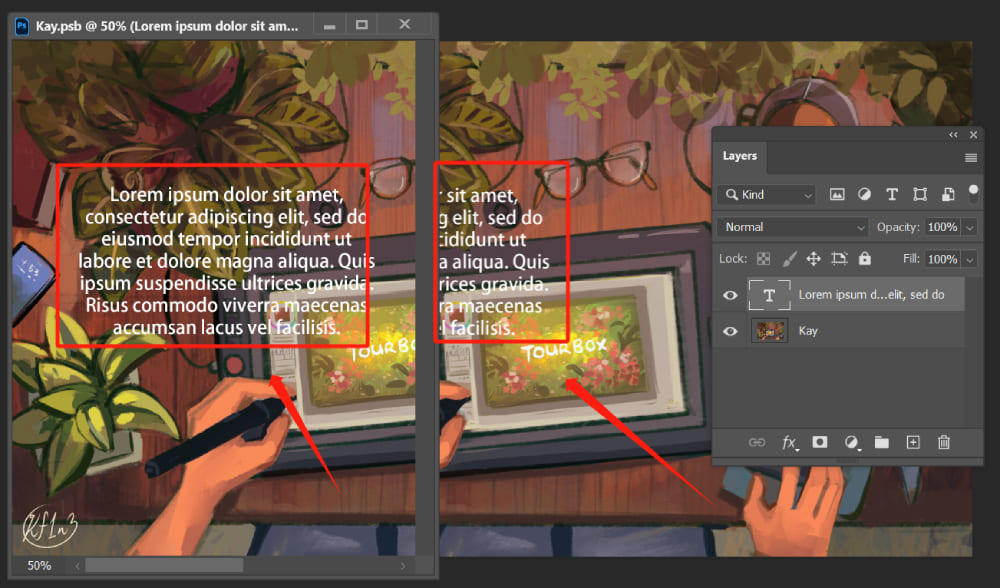
As we have emphasized before, scaling down and then enlarging a Smart Object does not result in a loss of image quality.
In other words, a bitmap with Smart Object properties can be resized repeatedly without sacrificing image clarity (provided the image size doesn't exceed its original size).
So, how can we actively create a Smart Object? How should we proceed?
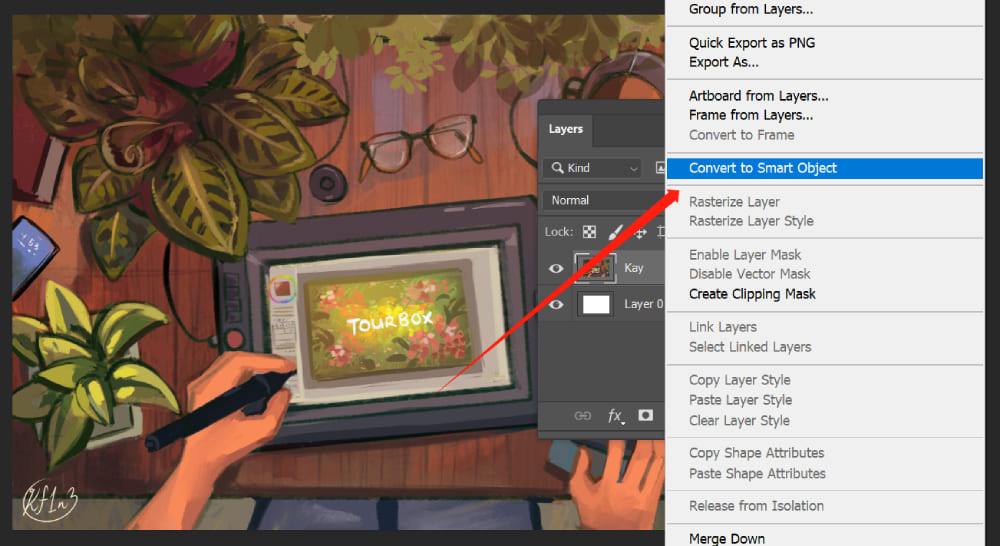
- To create a Smart Object manually, simply select one or multiple layers and right-click with the mouse, then choose "Convert to Smart Object" from the menu. This action will convert the selected layers into a Smart Object.
- If you have already selected a Smart Object, you can also right-click on the Smart Object in the Layers panel and choose "Rasterize Layer" to convert the selected Smart Object into a regular layer.
Double-click on the thumbnail of the Smart Object, and Photoshop will open the source file of the Smart Object.
Here, you can make pixel-level modifications or directly replace the content. Finally, remember to "Merge Visible Layers" and save the changes.
Now, close the source file and return to the original PSD where the Smart Object was located. You will notice that the Smart Object has been updated.
In addition to preserving image integrity, Smart Objects also allow for modularization of PSD documents. This design concept is similar to modular thinking in programming.
It enables us to make adjustments to individual elements without affecting the entire composition. It also facilitates teamwork and collaborative work by allowing multiple individuals to work on different aspects simultaneously.
Additional Tips:
When we duplicate a Smart Object by pressing "Ctrl+J", and then double-click on the thumbnail of one of them to access the source file for modifications, saving the changes will result in all the duplicated Smart Objects being updated.
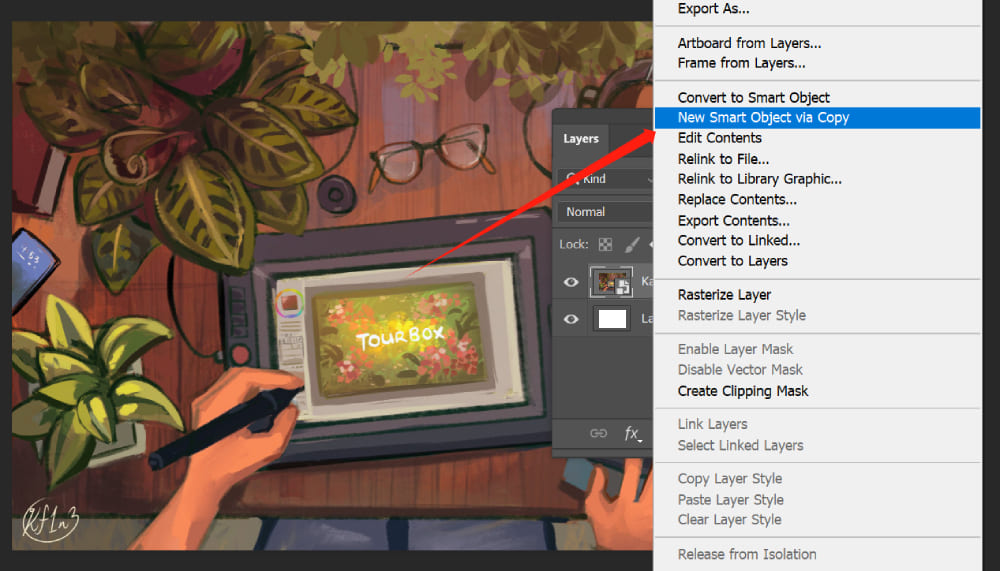
However, there are times when we don't want the duplicated Smart Objects to share the same source. In such cases, we want changes made to one Smart Object's source file to not affect the others.
To achieve this, simply right-click on the Smart Object and choose "New Smart Object via Copy" from the context menu. Photoshop will create a new source file for the copied Smart Object, ensuring that the two Smart Objects are not linked and changes made to one will not affect the other.
Tips and Precautions for Mastering Smart Object
As we conclude this tutorial, let's recap and explore some tips and Precautions when working with Smart Objects in Photoshop:
- Take Advantage of Non-Destructive Editing: The main advantage of Smart Objects is their ability to preserve an image's original characteristics, allowing for non-destructive editing. This means you can scale, rotate, skew, distort, warp, or apply filters to a Smart Object without permanently altering the original image.
- Be Aware of File Size: While Smart Objects offer many benefits, they can significantly increase your Photoshop file size. This is because they store image data for all transformations and modifications.
- Use Smart Filters: When you apply a filter to a Smart Object, it becomes a Smart Filter. This allows you to adjust, hide, or remove filter effects as you wish—another aspect of the non-destructive editing capabilities of Smart Objects.
- Rasterization: If you need to use features not compatible with Smart Objects, you'll need to rasterize the layer. However, be aware that this is a destructive process—you'll lose the benefits of the Smart Object, and it cannot be undone.
And that's a wrap! Smart Objects are a powerful tool in your Photoshop toolkit, allowing for flexible and non-destructive editing.
However, as with any tool, they must be used thoughtfully and correctly. With practice, you'll be able to leverage Smart Objects to enhance your creative workflow.
As a final note, consider integrating a tool like TourBox into your workflow. It's a controller designed for digital creators, providing quick and intuitive control over Photoshop.

It can be particularly helpful when working with complex processes like Smart Objects, enhancing your efficiency and creative potential.