White Balance in Photography: Mastering the Art of Color
Have you ever taken a photo and wondered why it looked strange? Your photos may have had a blue tone or an orange glow. Well, the likely culprit is something called white balance.
Don't be confused by the name. The white balance has nothing to do with balancing white objects or anything like that. It's all about color temperature, ensuring that the whites in your photos actually appear white.
You might wonder why this is important. Understanding white balance is crucial if you want your photos to look more professional and avoid strange color issues, or have a unique color style.
Without further ado, keep reading to learn more about white balance in photography!

In this article, you will learn:
- What Is White Balance?
- Why Is White Balance Important?
- Tips for Achieving Proper White Balance in Photography
What Is White Balance?
White balance is an important aspect of photography that can make or break your photos. It is the process of adjusting the colors in a digital photograph to make them appear more natural by balancing the color temperature.
This is achieved by adding the opposite color to the image to bring the color temperature back to neutral.
The goal of white balance is to eliminate color bias and make the colors in an image resemble reality, so that whites appear white and not tinted with blue or orange.
In simple terms, white balance refers to the color temperature of the light in your photos.
When shooting in different lighting conditions, your camera needs to adjust its white balance to ensure that the colors in your photos look natural.
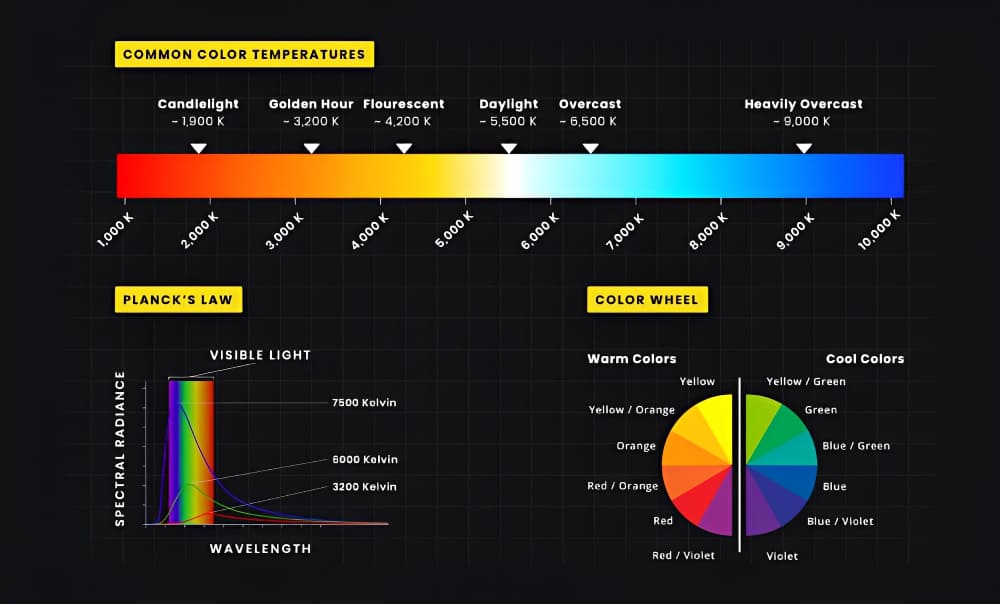
So, what exactly is color temperature, and why does it affect white balance? Color temperature is a measure of the warmth or coolness of light, and it's measured in Kelvins.
For example, a candle emits warm light at around 1500K, while a blue sky on a sunny day emits cool light at around 6000K.
Now, here's where things get interesting. The color temperature of the light affects the colors in your photos.
For instance, your photos may look too yellow or orange if you're shooting indoors under warm, yellow light (around 3000K). Conversely, if you're shooting outdoors on a cloudy day, the light may have a blue cast (around 7000K), making your photos look too cold and blue.
Different light sources affect white balance in different ways. For example, fluorescent lights tend to have a greenish cast, while incandescent lights have a yellow or orange cast. Daylight, on the other hand, is considered a neutral light source, with a color temperature of around 5500K.
Here is a YouTube video (made by Adoram) introducing white balance and color temperature:
Why Is White Balance Important?
White balance may seem like a small detail, but it can have a significant impact on the overall look and feel of your photos. The right white balance can make your images look natural and appealing, while the wrong white balance can make them look unnatural and unappealing.
Have you ever taken a photo that looked perfect at the time, only to be disappointed when you viewed it later?
Perhaps the colors looked off, or the whites appeared yellow or blue instead of pure white. This is a common problem in photography, and the culprit is often incorrect white balance.
1. What Is White Balance in Photography
White balance is an important aspect of photography that refers to the color temperature of the light in your photos.
When you take a photo, the camera needs to adjust its white balance to ensure that the colors in your image look natural. This is because different light sources have different color temperatures, which can affect the colors in your photos.
The goal of white balance is to make sure that whites in your photos appear white, not tinted with blue or orange. White balance adjustments can also affect the overall mood and feel of a photo, as different color temperatures can create different color casts and affect the overall look of the image.
Most cameras come with several white balance presets that you can choose from, such as daylight, cloudy, shade, fluorescent, and incandescent.
These presets adjust the color temperature of your photos to match the light source you're shooting under. Alternatively, you can manually adjust the white balance on your camera, or adjust it during post-processing to achieve the desired effect.
White balance is the process of adjusting the colors in a digital photograph to make them appear more natural by balancing the color temperature. It is an essential aspect of photography that ensures that the colors in your photos look accurate and true to life.
2. How White Balance Affects the Overall Mood and Feel of a Photo
White balance can have a significant impact on the mood and feel of a photo. Different white balance settings can create different color casts, which can affect the overall look and feel of the image. Let's take a look at some examples:
1). Warm White Balance
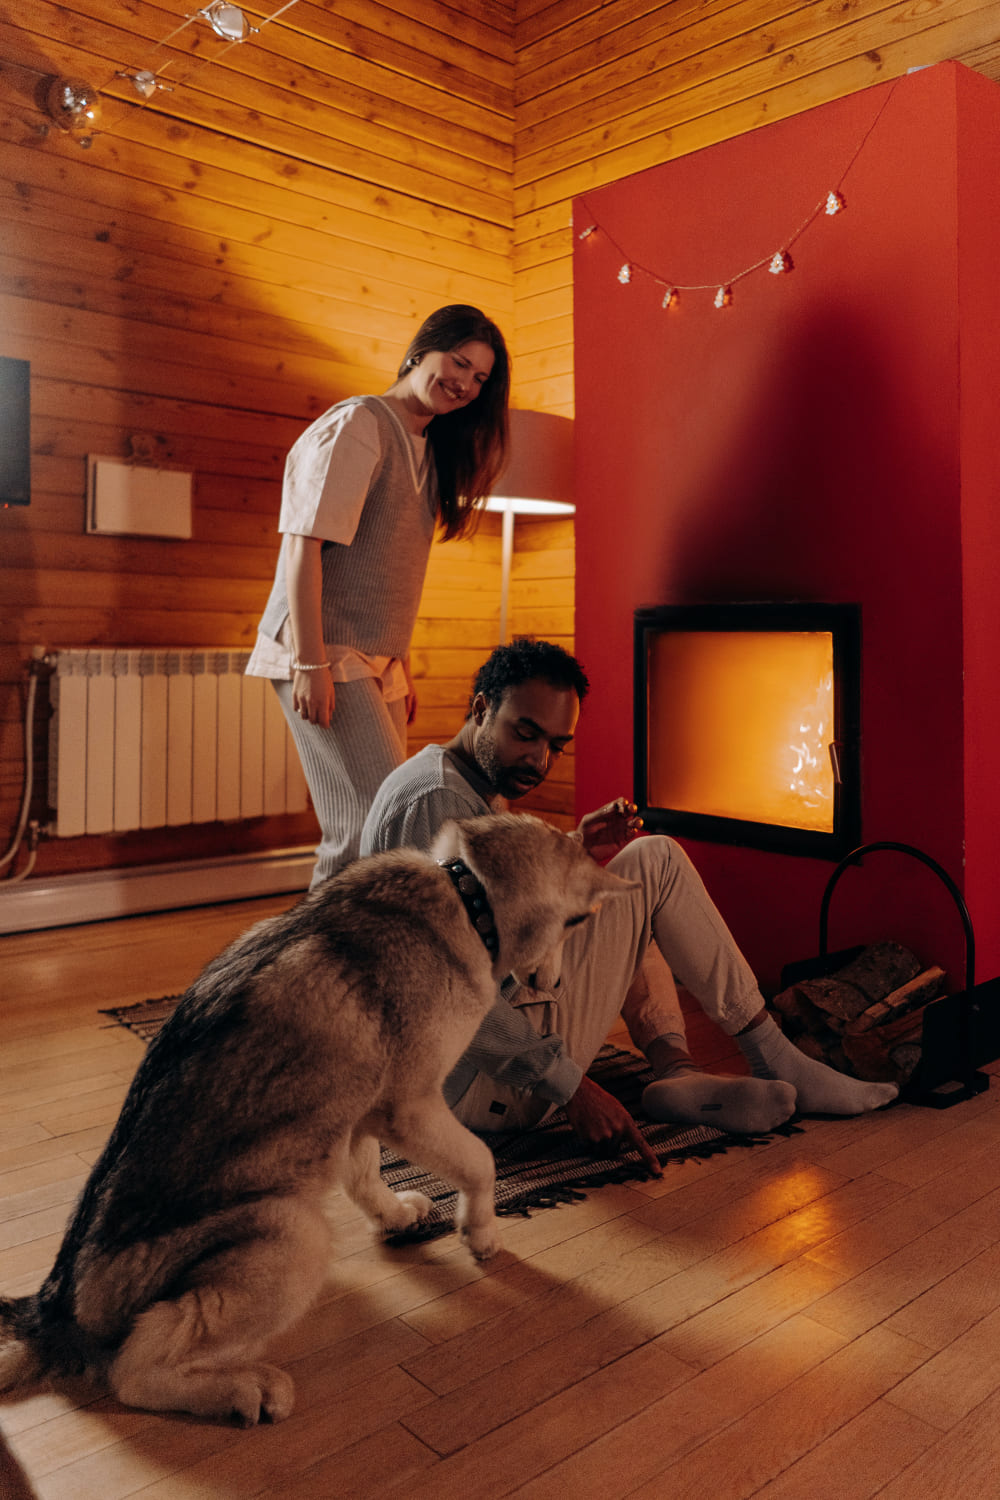
warm white balance setting (e.g., 3000K) can create a cozy and inviting mood in photos.
This is because warm tones are often associated with warmth, comfort, and relaxation. Warm white balance is often used in indoor photos, such as those taken in a home or restaurant, to create a cozy atmosphere.
For example, a photo of a family gathered around a fireplace would benefit from a warm white balance setting to enhance the cozy feel of the scene.
2). Cool White Balance
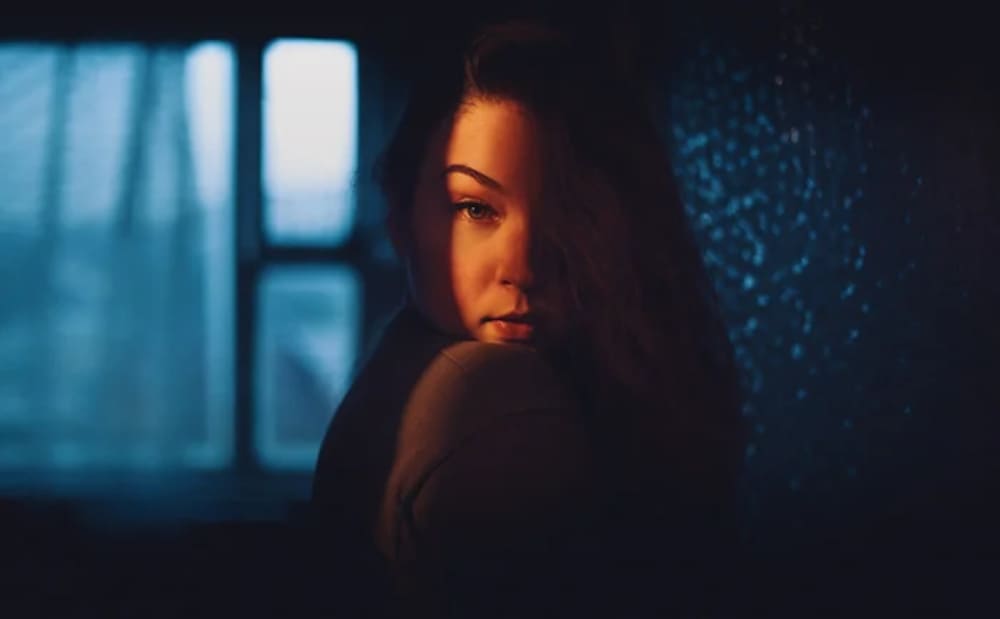
A cool white balance setting (e.g., 6000K) can create a more clinical, sterile, or futuristic mood in photos. This is because cool tones are often associated with cleanliness, efficiency, and technology.
Cool white balance is often used in outdoor photos, such as those taken on a cloudy day, to create a cool, calming atmosphere.
For example, a photo of a city skyline taken on a cloudy day would benefit from a cool white balance setting to enhance the futuristic feel of the scene.

3). Neutral White Balance
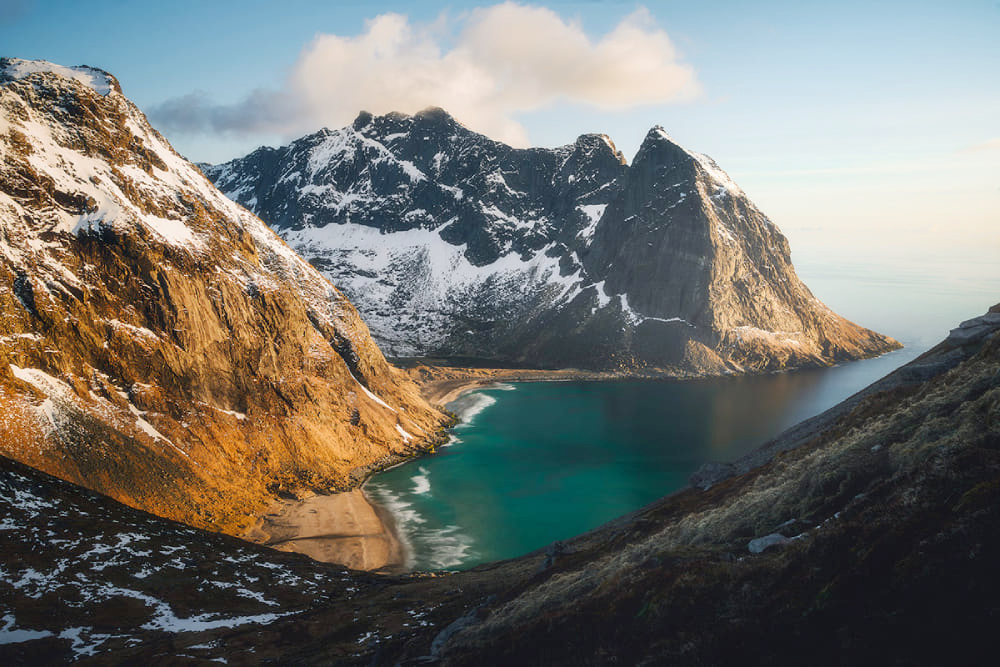
A neutral white balance setting (e.g., 5000K) can create a more natural and realistic mood in photos. This is because neutral tones are often associated with realism and accuracy.
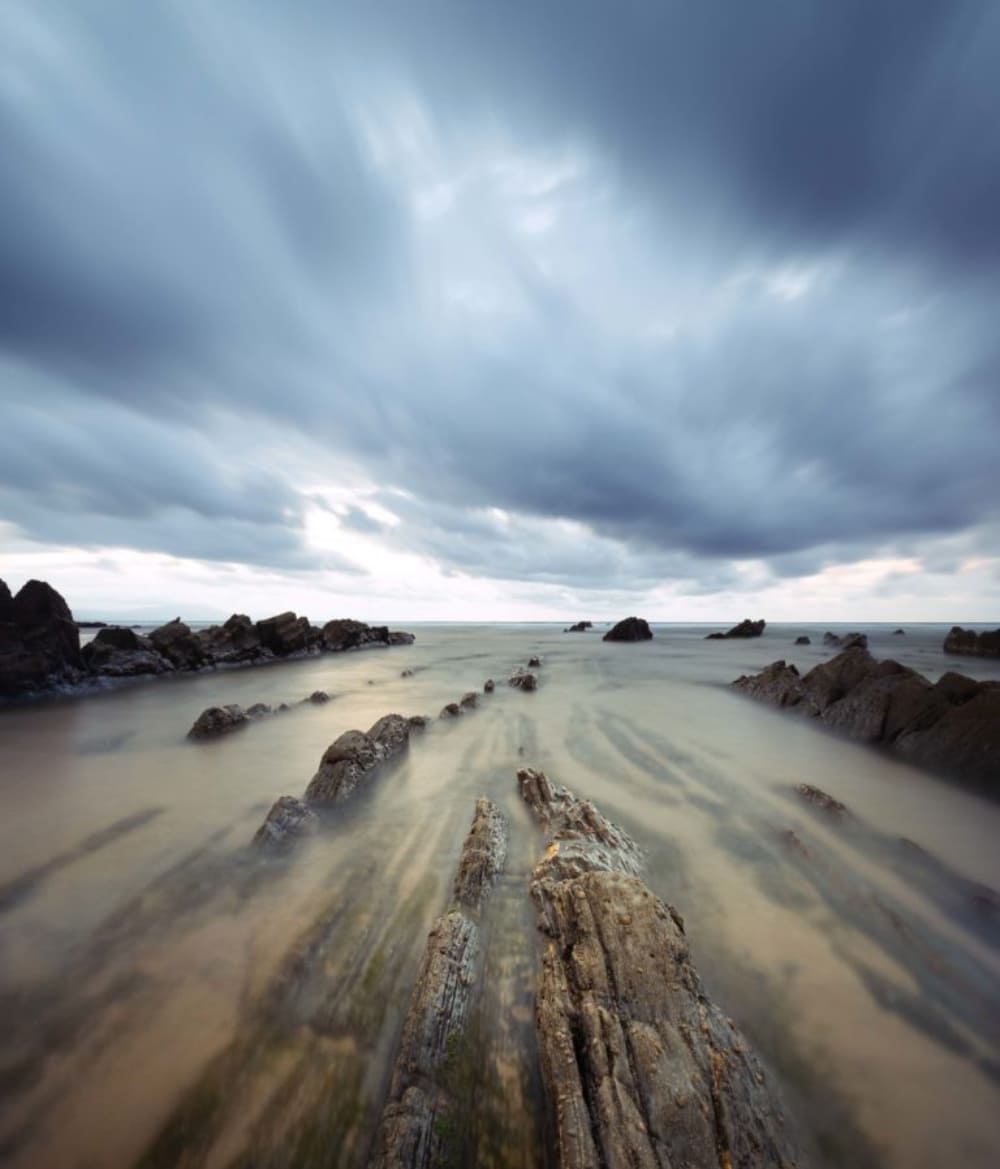
Neutral white balance is often used in landscape photography, where accurate color representation is important.
For example, a photo of a mountain range would benefit from a neutral white balance setting to accurately capture the natural colors of the scene.
White balance can greatly affect the mood and feel of a photo by creating different color casts. By choosing the right white balance setting, you can enhance the overall mood and atmosphere of your photos to create the desired effect.
3. Examples of Photos With Incorrect White Balance
1). A Photo of a Person Taken Indoors Under Tungsten Light
The auto white balance setting on the camera will likely make the person look too orange. This can be fixed by setting the white balance to tungsten or by using a preset white balance setting that matches the type of light in the room.
2). A Photo of a Landscape Taken on a Cloudy Day
The auto white balance setting on the camera will likely make the landscape look too blue. This can be fixed by setting the white balance to cloudy or by using a preset white balance setting that matches the type of light in the sky.
3). A Photo of a Sunset
The auto white balance setting on the camera will likely make the sunset look too orange. This can be fixed by setting the white balance to sunset or by using a preset white balance setting that matches the type of light in the sky at sunset.

Tips for Achieving Proper White Balance in Photography
Getting the right white balance can be tricky, but it's essential for achieving natural and accurate colors in your photos.
Whether you're shooting indoors or outdoors, some several tips and techniques can help you achieve proper white balance. In this section, we'll share some of these tips and tricks so that you can get the most out of your camera's white balance settings and take better photos.
1. Camera Settings That Affect White Balance
Setting the white balance in your camera can be confusing, especially when dealing with the Kelvin light scale. But don't worry, it's not as complicated as it sounds!
The Kelvin light scale is a range of numbers that represent the warmth of the color temperature.
Any number above 5000K is considered cool or blue, and any number below 5000K is considered warm or yellow. However, using the camera's white balance settings can be confusing because sometimes, using a Kelvin light scale like 8000K can result in a severe orange skew.
The reason for this is that adjusting the white balance on your camera is all about telling it to adjust its color interpretation so that the colors in your photos look more natural and accurate.
The camera will then balance the color temperature by adding the opposite color to the image to try to bring the color temperature back to neutral.
For example, if it's a cloudy day with a high color temperature of 6200K and you set the white balance to 3000K, the camera will interpret the light as being warmer than it really is.
To balance the whites, it will add a little cooler tint (blue) to the image, which will make the photo look cooler or bluer than what your eyes see.
Conversely, if you set the white balance to 9000K, the camera will interpret the light as being cooler than it really is. To balance the whites, it will add a bit of warmth (reds and oranges) to the image, which will make the photo look warmer than what your eyes see.

To adjust the white balance on your camera, you can use the white balance settings.
Most cameras come with several white balance presets that you can choose from, such as daylight, cloudy, shade, fluorescent, and incandescent. These preset adjust the color temperature of your photos to match the light source you're shooting under.
Alternatively, you can manually adjust the white balance on your camera. Many cameras have a custom white balance feature that allows you to set the white balance based on a neutral gray object in your scene.
This ensures that your color balance is accurate, even if you're shooting under tricky lighting conditions.
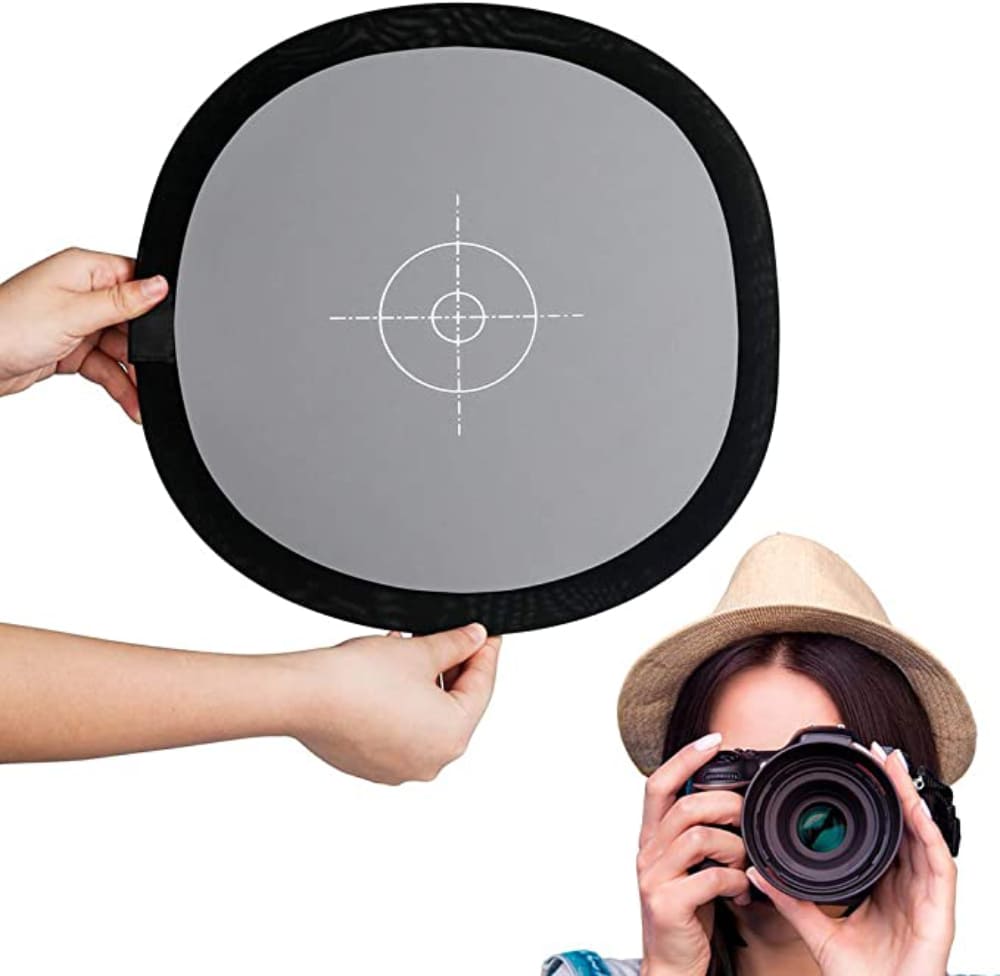
2. Use a Gray Card
A gray card is a photography tool that is used to help set the correct white balance and exposure in your photos. It is a small card that is usually gray in color, with a neutral tone that reflects light evenly across the visible spectrum.
To use a gray card, you simply place it in front of your subject and take a photo of it. This photo is then used as a reference point for setting the white balance and exposure in your camera.
By using a gray card, you can ensure that your colors are accurate and that your exposure is set correctly, even in tricky lighting conditions.
Gray cards come in different sizes, shapes, and materials, and some even have multiple shades of gray on them to help with more complex lighting situations.
They are often used by professional photographers but can be useful for anyone looking to improve the accuracy of their colors and exposure in their photos.
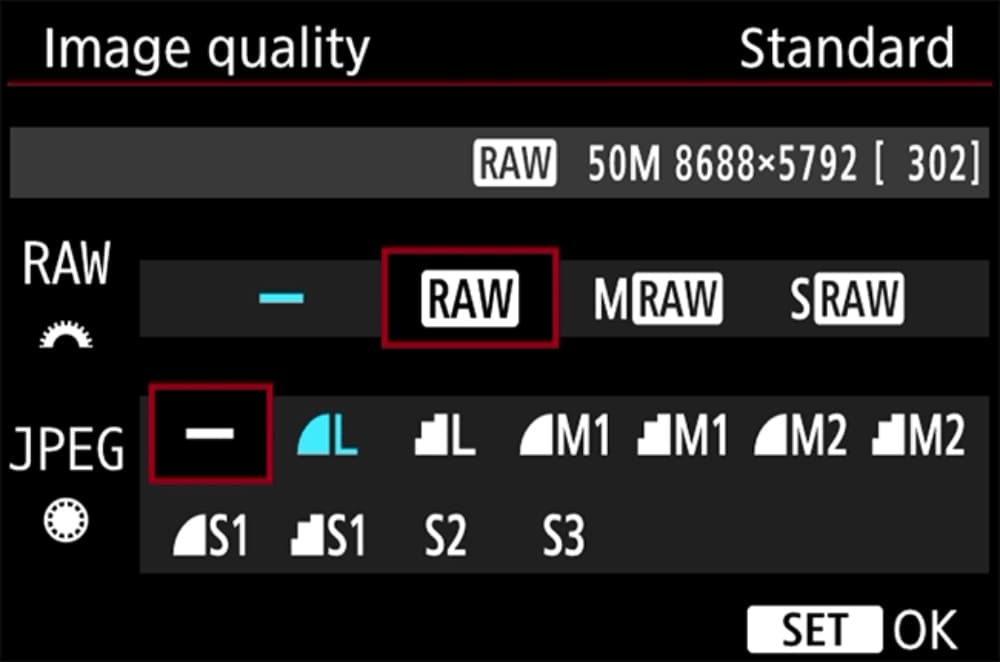
3. Shoot in RAW Format
Shooting in RAW format allows you to have greater control over the white balance of your photos during post-processing. RAW is a file format that captures all the information from your camera's sensor, giving you more flexibility to adjust your photos later on.
To shoot in RAW format, you'll need to set your camera to capture RAW files instead of JPEG files. This can usually be done in your camera's settings menu. Once you've set your camera to shoot in RAW format, you can start taking photos.
When you shoot in RAW format, your camera doesn't apply any processing to the image, including white balance adjustments. This means that you have the flexibility to adjust the white balance of your photos during post-processing, without losing any image quality.
You may use programs such as Adobe Lightroom or Photoshop to change the colors of your RAW images after they have been taken. This allows you to fine-tune the color temperature and tint of your photos to achieve the exact look you want.
Shooting in RAW format can take up more space on your memory card and require more processing power to edit, but the flexibility it provides in post-processing can be well worth it.
With RAW format, you can adjust the white balance of your photos to your heart's content, without worrying about losing quality or accuracy.
Further Reading:
4. Identify the Light Source
Take a moment to look at the light source in your environment. Is it natural light, such as sunlight or shade, or is it artificial light, such as tungsten or fluorescent? Identifying the light source can help you select the correct white balance preset on your camera or adjust it manually.
5. Use Photoshop, Lightroom Classic, and Other Image Editing Tools
Both Photoshop and Lightroom Classic offer tools to adjust the white balance of your photos in post-photo editing.
In Photoshop, you can use the Curves adjustment tool to adjust the white balance of your photos. This involves setting a gray point by clicking on a neutral area of your photo and adjusting the curve to fine-tune the white balance.
You can also adjust the individual Red, Green, and Blue channels if needed.
Further Reading:
In Lightroom Classic, you can use the Temp and Tint Sliders in the Basic Panel to adjust the color temperature and tint of your photo. You can also use the White Balance Selector to click on a neutral area of your photo and automatically adjust the white balance.
Further Reading:
Mastering White Balance in Lightroom: Tips for Correcting Color Cast
However, using image editing software like Photoshop and Lightroom Classic can be repetitive and tedious work. This is where the ergonomically designed TourBox can come in handy.

TourBox is a controller that allows you to assign commonly used functions to its buttons and dials, freeing up your productivity and allowing you to work more efficiently and comfortably.

This means you can adjust your white balance and other image editing settings more efficiently, without having to constantly switch between your mouse and keyboard.
White balance is important in photography because it impacts the colors in your photos. Different light sources and color temperatures can affect your white balance, so it's important to adjust it correctly.
By understanding white balance and how to adjust it, you can achieve more accurate and natural colors in your photos, resulting in better-looking images.
So, say goodbye to dull colors and hello to stunning, natural-looking photos!