Mastering Face Swap in Photoshop: 5-Minute Tutorial
Welcome to our express tutorial on mastering face swap in Photoshop. In just five minutes, you'll acquire the essential skills to effortlessly swap faces and unleash your creativity.
Whether you're a beginner or a seasoned Photoshop user, this guide will equip you with the knowledge and techniques needed to achieve seamless and jaw-dropping face swaps.
So, let's dive right in and discover how to create captivating transformations using the power of Photoshop's face swap capabilities.
Get ready to amaze yourself and others with your newfound skills in this exciting journey of face-swapping in Photoshop!

In this article, you will learn:
- Considerations Before Face Swap in Photoshop
- How to Face Swap in Photoshop?
- Final Thoughts About Face Swap in Photoshop
Considerations Before Face Swap in Photoshop
In just five minutes, you'll acquire the essential skills to effortlessly swap faces and unleash your creativity. However, before we delve into the exciting world of face-swapping, it's important to address two key points:
- Follow the Relevant Laws and Regulations
- Choose Appropriate Photo Materials
1. Follow the Relevant Laws and Regulations
Firstly, while face-swapping in Photoshop is a relatively simple technique, it's crucial to understand the legal risks associated with sharing and distributing face-swapped photos.
The unauthorized use of someone's likeness without their consent can potentially infringe upon their rights, such as their right to privacy or publicity.
Therefore, it's essential to always respect and obtain proper permissions when using face-swapped images for any public or commercial purposes.
2. Choose Appropriate Photo Materials
Secondly, the selection of face swap source materials plays a pivotal role in achieving realistic and natural-looking results.
Opting for images with similar facial angles, skin tones, and intricate facial details will significantly enhance the authenticity of your face swap in Photoshop.
Additionally, this careful selection process will minimize the amount of color correction and post-processing work required, saving you valuable time and effort.
Now that we've addressed these important considerations, let's dive into the step-by-step process of creating captivating face swaps using the power of Photoshop.
Get ready to unlock your creative potential and master the art of face-swapping in just five minutes!
How to Face Swap in Photoshop?
First, let's open our materials, Material A and Material B, in Photoshop.
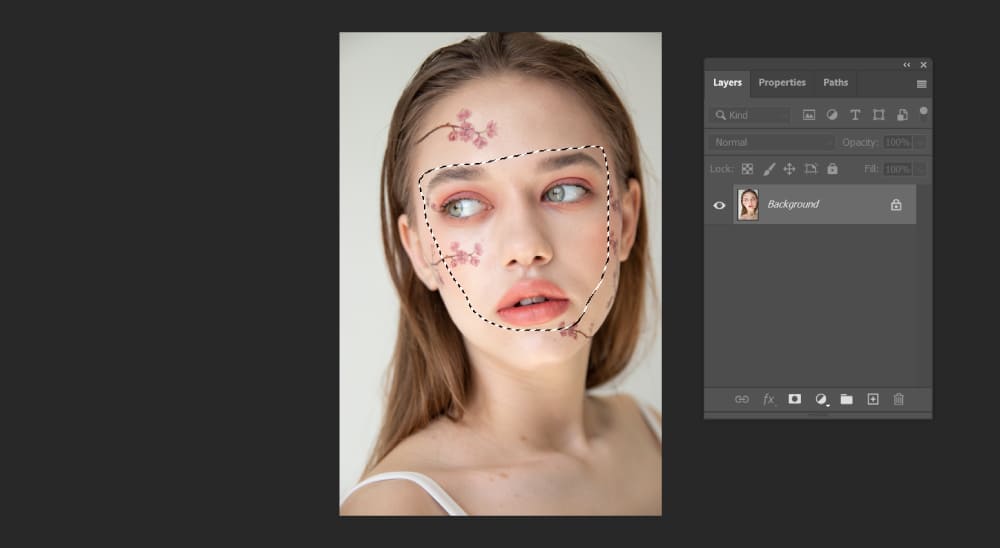
Next, locate and select the Lasso Tool from the toolbar on the left-hand side. With the Lasso Tool, draw a rough outline around the face area of Material A.
It doesn't need to be an accurate selection. Just make sure it approximately covers both eye corners, a bit below the mouth, and a bit above the forehead, as shown in the example image below:
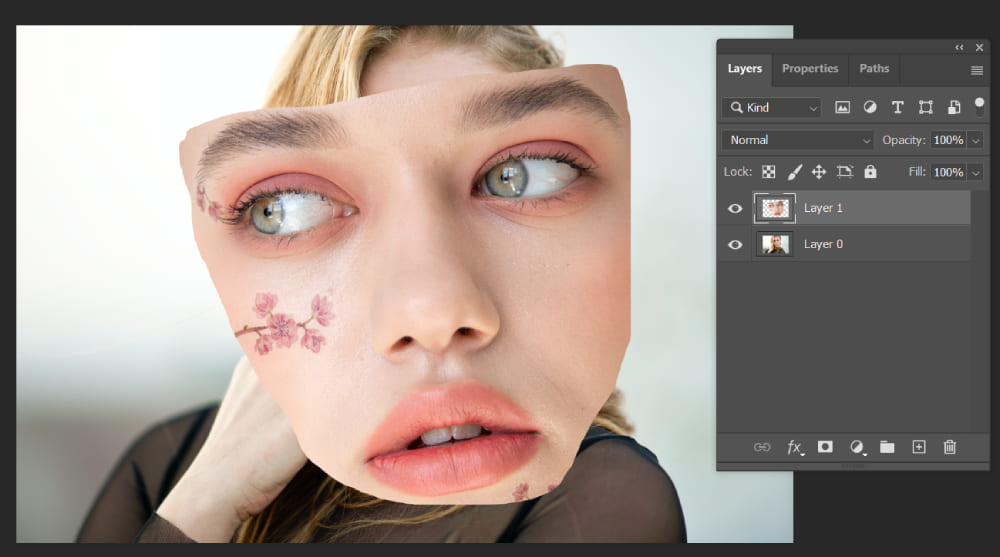
To copy the layer, use the keyboard shortcut "Ctrl+C". Then, navigate back to the other image, Material B, and paste the layer using "Ctrl+V", as shown in the example image below:
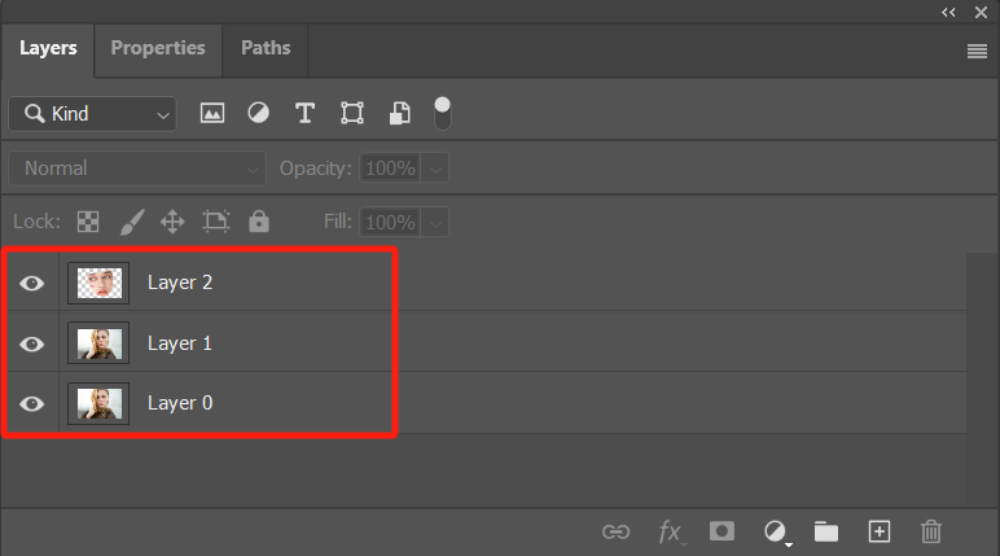
This is definitely not the desired outcome, but don't worry. Let's open the Layers panel first and ensure the following settings:
- Duplicate the layer of Material B, making sure that both Layer 0 and Layer 1 contain two copies of Material B's layer. (We duplicate it for easier adjustments later on.)
- Additionally, ensure that Layer 2 represents the pasted selection of Material A.
- Confirm that the layer order, from top to bottom, is Layer 2 > Layer 1 > Layer 0.
Feel free to rename the layers according to your naming preferences, as long as the layer order is correct.
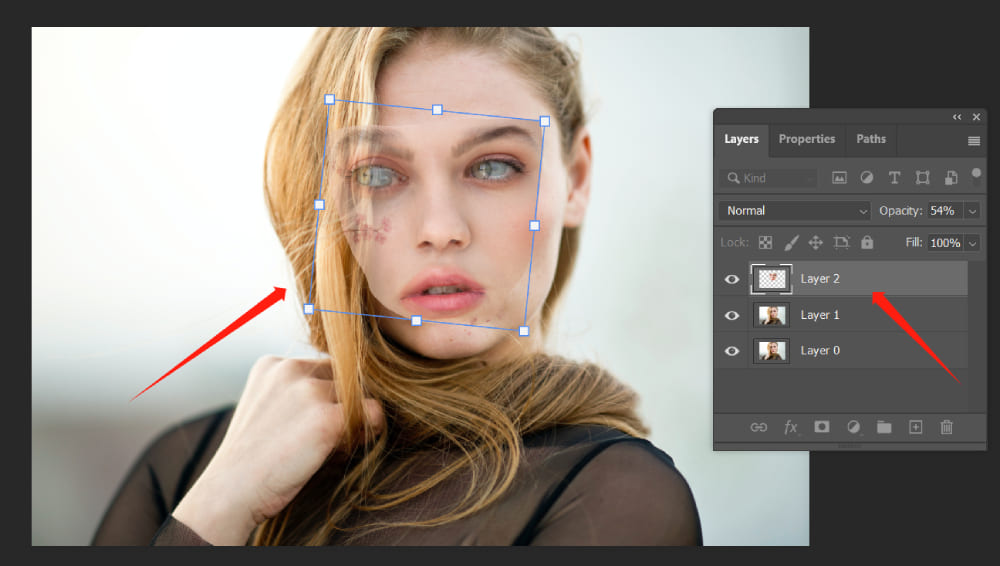
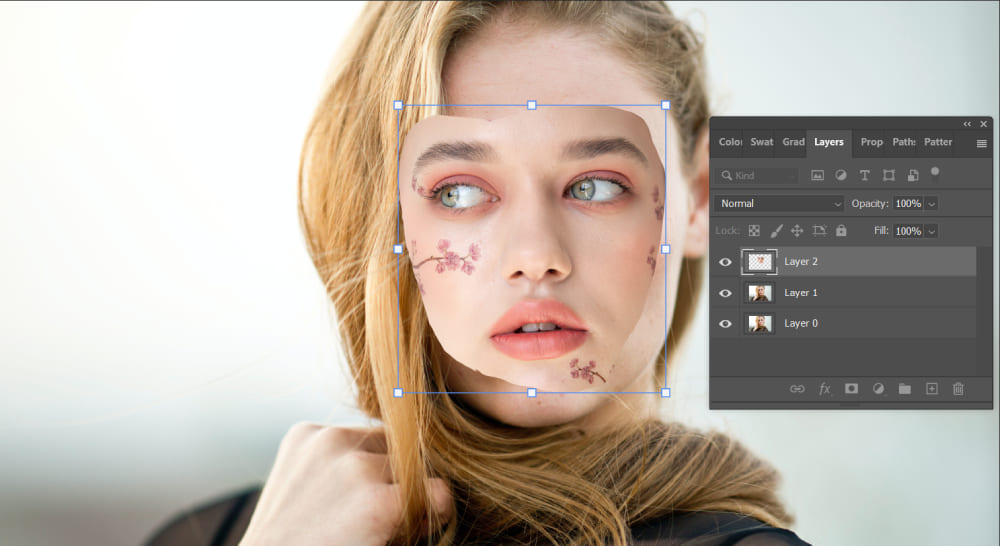
After pasting the layer, let's set the opacity of Layer 2 to around 50 to 65. Select Layer 2 and use the "Ctrl+T" shortcut to access the Free Transform tool for modifications.
Since we adjusted the opacity, you should now be able to faintly see the facial structure of Layer 1. Align the face properly, paying close attention to the position and size of the eyes.
Then, make the necessary adjustments to the angle and size of Layer 2 accordingly.
Once the adjustments are complete, let's set the opacity back to 100. At this point, you may notice that the left eye of the person in Layer 2 extends beyond the boundaries of the face.
We can temporarily set this issue aside and address it during the subsequent adjustments. Now, it's time to proceed with the face swap in Photoshop.
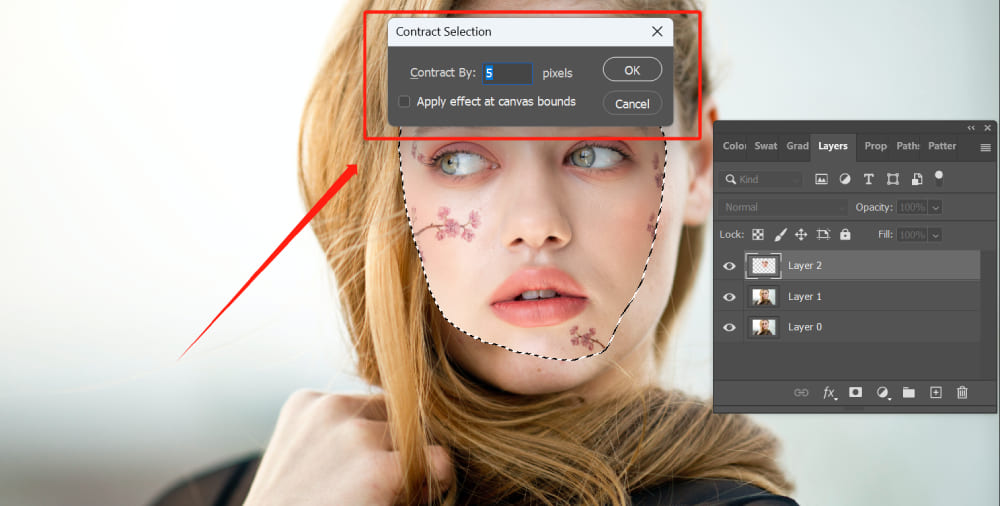
Press and hold the Ctrl key and click on the thumbnail of Layer 2 to load the selection.
With the selection active, navigate to the menu bar and choose "Selection" > "Modify" > "Contract." Enter a value of approximately 5 to 8 pixels and click OK.
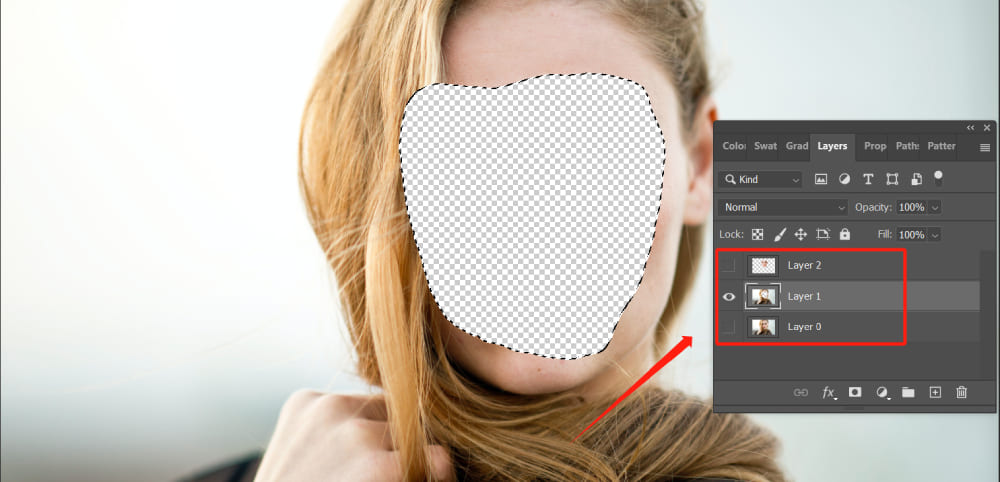
Let's return to the Layers panel and disable the small eye icons in front of Layer 2 and Layer 0, ensuring that only the small eye icon in front of Layer 1 is enabled. This means that only Layer 1 is currently visible.
At this stage, you may still see the selection outline. Press the "Delete" key to remove the contents within the selection. If you have followed the steps correctly, you should now see a similar result as shown in the example image below.
Re-enable the small eye icon in front of Layer 2. Hold down the Shift key and select both Layer 0 and Layer 2. Navigate to the menu bar and choose "Edit" > "Auto-Blend Layers," as shown in the example image below.
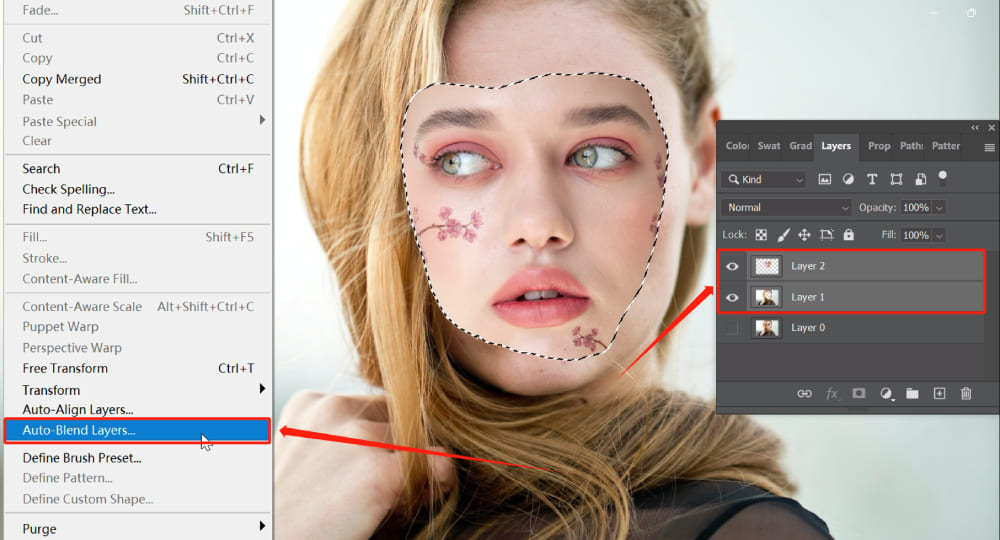
At this point, the Auto-Blend Layers panel will appear. Keep the default settings and click OK to proceed.
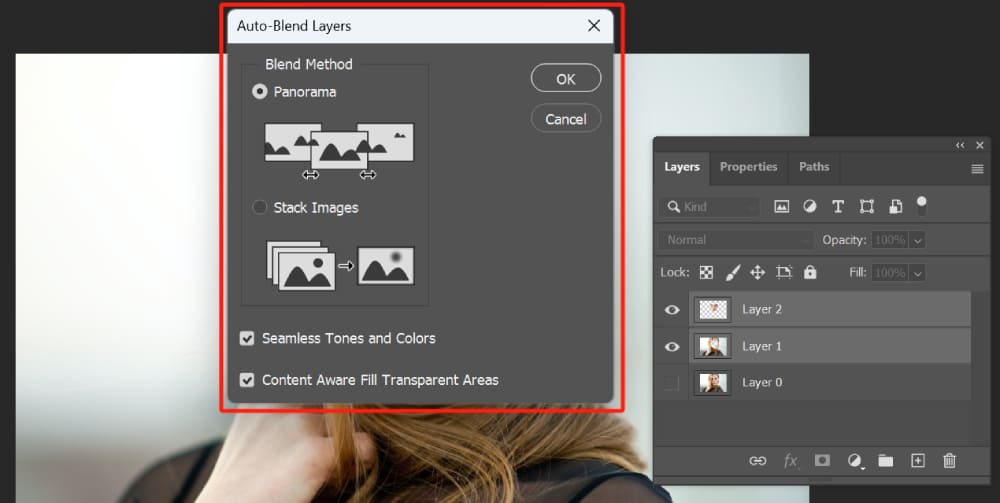
Let's take a look at the result. Photoshop automatically adjusted the skin tone of the face, resulting in a very natural effect.
Of course, this is not the final result of our Photoshop face swap. We still need to make further adjustments to the image.
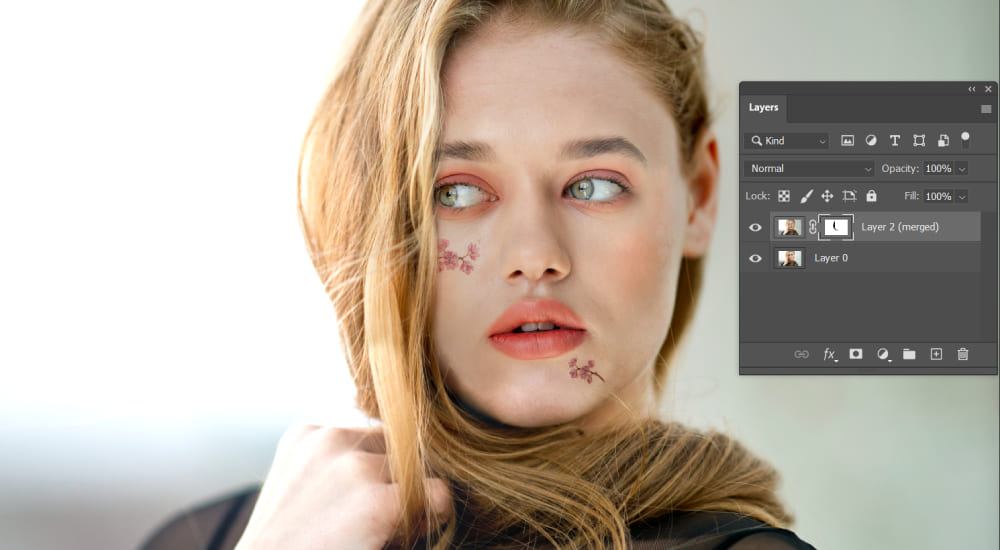
At this point, you may notice in the Layers panel area that a Layer 2 (merged) layer has been automatically generated above the Layer 2 layer. Now, Layer 1 and Layer 2 are no longer needed, so you can delete or hide these two layers.

Now, the Layer 0 which we previously duplicated and kept throughout the process takes the stage.
Following the principles of Layer Mask in Photoshop, we will use a black brush to make adjustments to the Layer 2 (merged) layer.
To address any imperfections in the facial details, we can use the "Healing Brush Tool" for touch-ups.
Now, let's take a look at the facial details after the adjustments.
We can further adjust the brightness and color of the image by creating adjustment layers.
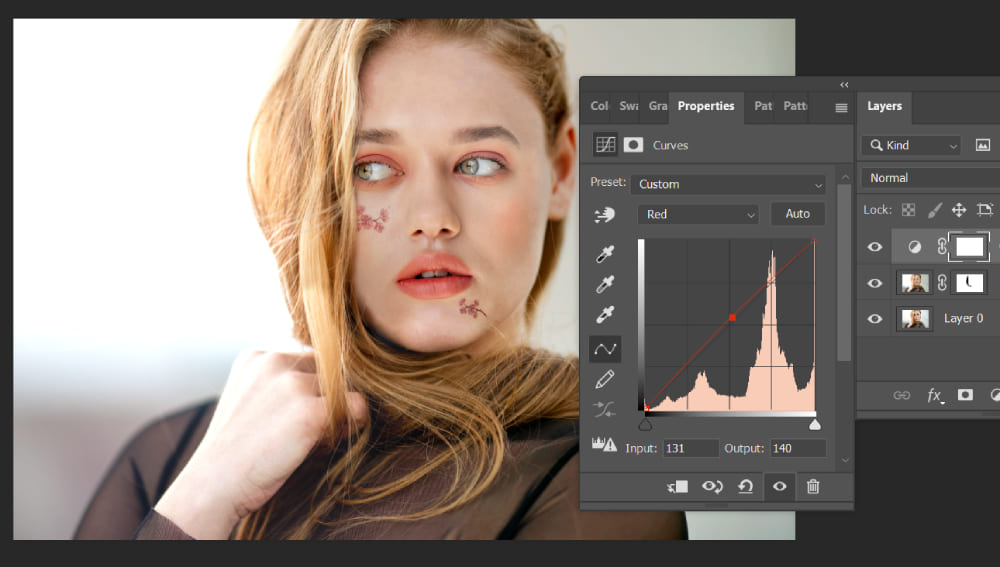
Let's take a look at the before and after comparison of the face swap in Photoshop.

Final Thoughts About Face Swap in Photoshop
In the final section of the Face Swap in Photoshop tutorial, we want to convey that using Auto-Blend Layers for face swapping in Photoshop is incredibly quick and convenient.
However, this feature may not solve all problems. When dealing with more complex image blending, it's important to have a deeper understanding of Photoshop techniques and color adjustment knowledge.
To truly master Photoshop, we highly recommend considering TourBox as a companion for your Photoshop journey.

TourBox provides seamless integration with Photoshop and enhances the editing workflow by providing intuitive controls for various Photoshop functions.
Its ergonomic design and customizable buttons allow for efficient and precise adjustments, giving users a greater level of control over their creative process.
By incorporating TourBox into your Photoshop workflow, you can streamline your editing process, save time, and unlock new creative possibilities.
It's a valuable tool that complements your Photoshop skills and empowers you to take your editing to the next level.