Mastering Batch Editing in Lightroom Classic: A Comprehensive Guide
Lightroom Classic is a powerful photo editing software that allows you to make various adjustments and optimizations to your images, enhancing both your creative efficiency and quality.
However, if you have a large number of photos to edit, individually editing each one can be tedious and time-consuming. Is there a way to apply the same editing settings to multiple photos or videos all at once?
The answer is yes. Lightroom Classic provides several methods for batch editing, and this article will guide you through the specific steps and considerations on how to batch edit in Lightroom. With these techniques, you'll be able to accomplish your batch editing tasks quickly.

- Method 1: Synchronize Settings
- Method 2: Copy and Paste Settings
- Method 3: Apply Presets
- Method 4: Auto Sync
- Method 5: Use TourBox
- Frequently Asked Questions About Batch Edit in Lightroom
Method 1: Synchronize Settings
Synchronize settings refers to editing one photo and selecting other photos you want to edit. In the Develop module, click the Sync button at the bottom and choose the settings you want to sync, such as exposure, contrast, color, etc. Then click Sync.
This way, you can apply the editing settings from the first photo to the other selected photos. This is a very common method for batch editing in Lightroom Classic.
Select the photo you want to edit in the Library module, then click the Develop module.
In the Develop module, make the desired edits to this photo, such as adjusting the white balance, curves, tones, etc.
After making adjustments to the first photo, start by selecting it. Then, choose the other images that you want to apply the same edits to.
In the thumbnail area, you can hold down the Command key (Mac) or Control key (Windows) and click the other photos you want to sync the settings to. Alternatively, hold down the Shift key and click the first and last photo to select a range of photos.
Make sure that the photo you adjusted is positioned as the first photo in your selection. Lightroom will recognize and sync the settings based on the adjustments made to the first photo.
At the bottom of the Develop module, click the Sync button to open the Sync Settings dialog.
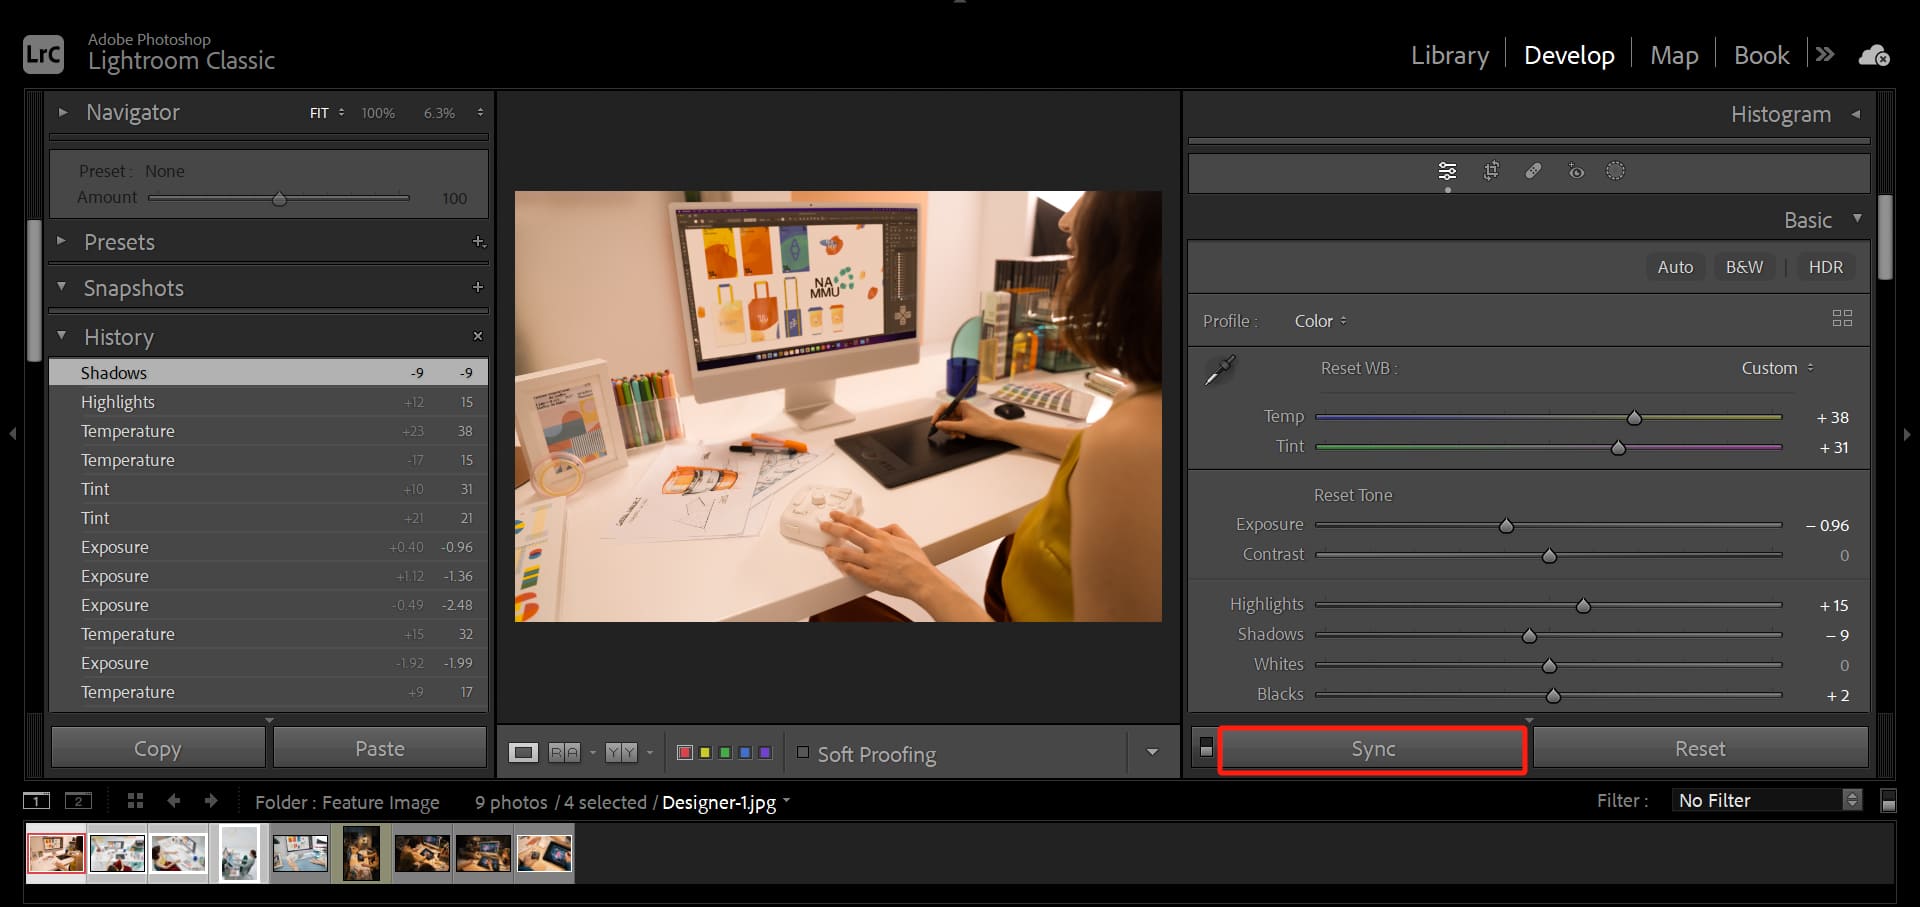
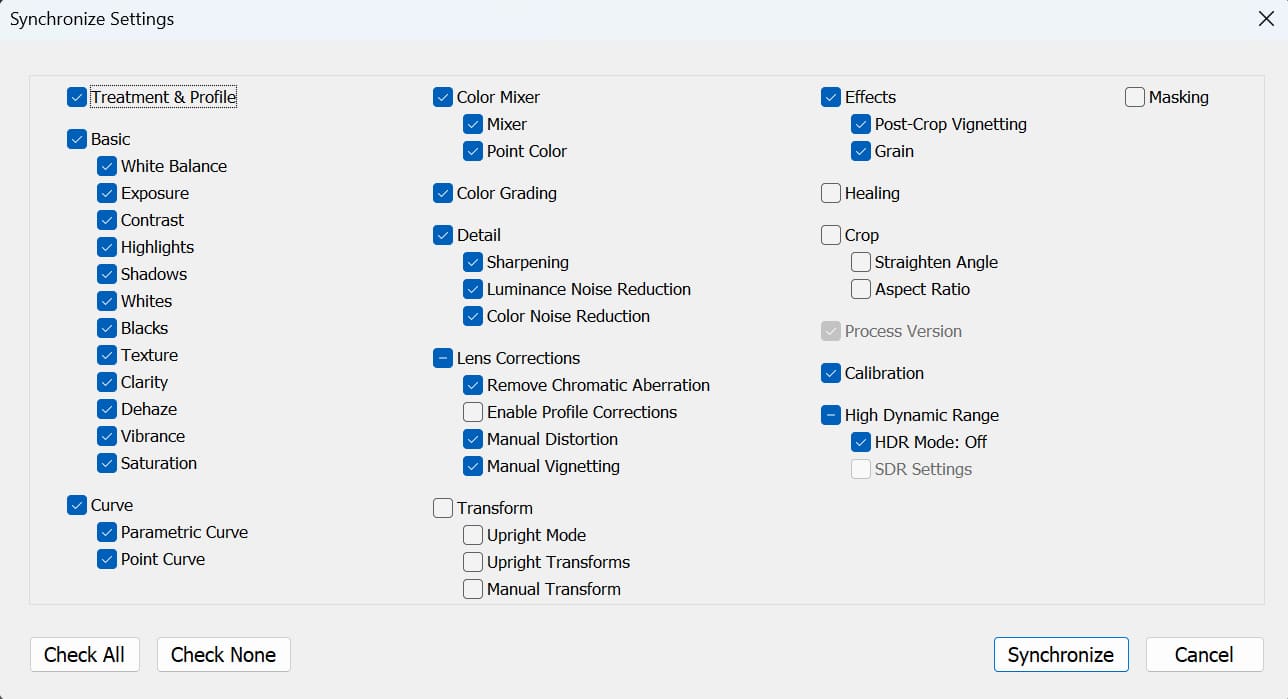
In the Synchronize Settings dialog, check the types of settings you want to sync, such as White Balance, Exposure, etc. Then click Sync.
Wait for the sync to complete, and you will see that the selected photos have all applied the same editing settings.
If you want to sync editing settings more flexibly within a collection in Lightroom Classic—rather than rigidly applying the first photo's edits to all—here's how:
In Lightroom Classic's "Develop" module, edit (color correct) any photo within the collection.
Next, press "Ctrl/Command + Shift + C" to copy the settings from the photo you want to sync across the collection. Then select all photos in the collection ("Ctrl/Command + A") and sync the copied settings onto all of them.
In essence, you need to copy the attributes of that specific photo before syncing. By default, Lightroom Classic syncs using the attributes of the first photo in the collection.
Here are some considerations for synchronize settings:
- Synchronize settings can only be done in the Develop module and not in other modules.
- Synchronize settings can only be applied to photos and not to videos.
- Synchronize settings will overwrite the original editing settings of the selected photos. If you want to preserve the original settings, you can create a snapshot or virtual copy before syncing.
Method 2: Copy and Paste Settings
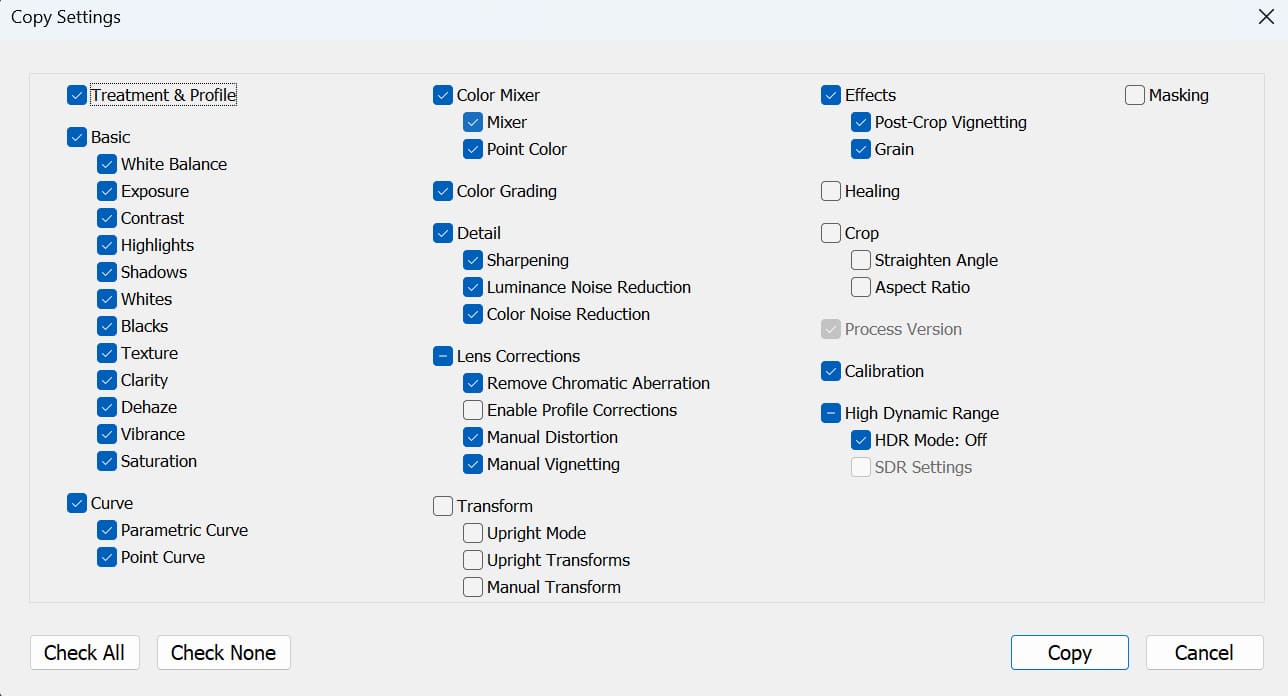
Copy and Paste settings refer to editing one photo and then using the shortcut key Command+C (Mac) or Ctrl+C (Windows) to select the types of settings you want to copy.
Then, while holding down the Command (Mac) or Control (Windows) key, click the photos you want to paste the settings onto and use the shortcut key Command+V (Mac) or Ctrl+V (Windows) to paste the settings.
This method can also achieve batch editing in Lightroom Classic, but the steps may be a bit more cumbersome.
In the Library module, select the photo you want to edit, then click the Develop module.
In the Develop module, make the desired edits to this photo, such as adjusting the white balance, curves, tones, etc.
Use the shortcut key Command+C (Mac) or Ctrl+C (Windows) to open the Copy Settings dialog, select the types of settings you want to copy, and then click Copy.
In the thumbnail area, hold down the Command (Mac) or Control (Windows) key and click the other photos you want to paste the settings onto. Alternatively, hold down the Shift key and click the first and last photo to select a range of photos.
Use the shortcut key Command+V (Mac) or Ctrl+V (Windows) to paste the settings. Wait for the paste to complete, and you will see that the selected photos have all applied the same editing settings.
Considerations for Copy and Paste settings are as follows:
- Copy and Paste settings can be done in any module, not just limited to the Develop module.
- Copy and Paste settings can be applied to both photos and videos, not just limited to photos.
Method 3: Apply Presets
Apply presets refers to selecting a preset as the initial default setting when importing photos or videos, so that you can apply a filter effect to all imported photos or videos at once.
To do this, you need to go to the Preferences menu and change the default option from Adobe Default to the preset you want, including any presets you've created.
This method may not be as common, but it can still achieve batch editing in Lightroom Classic.
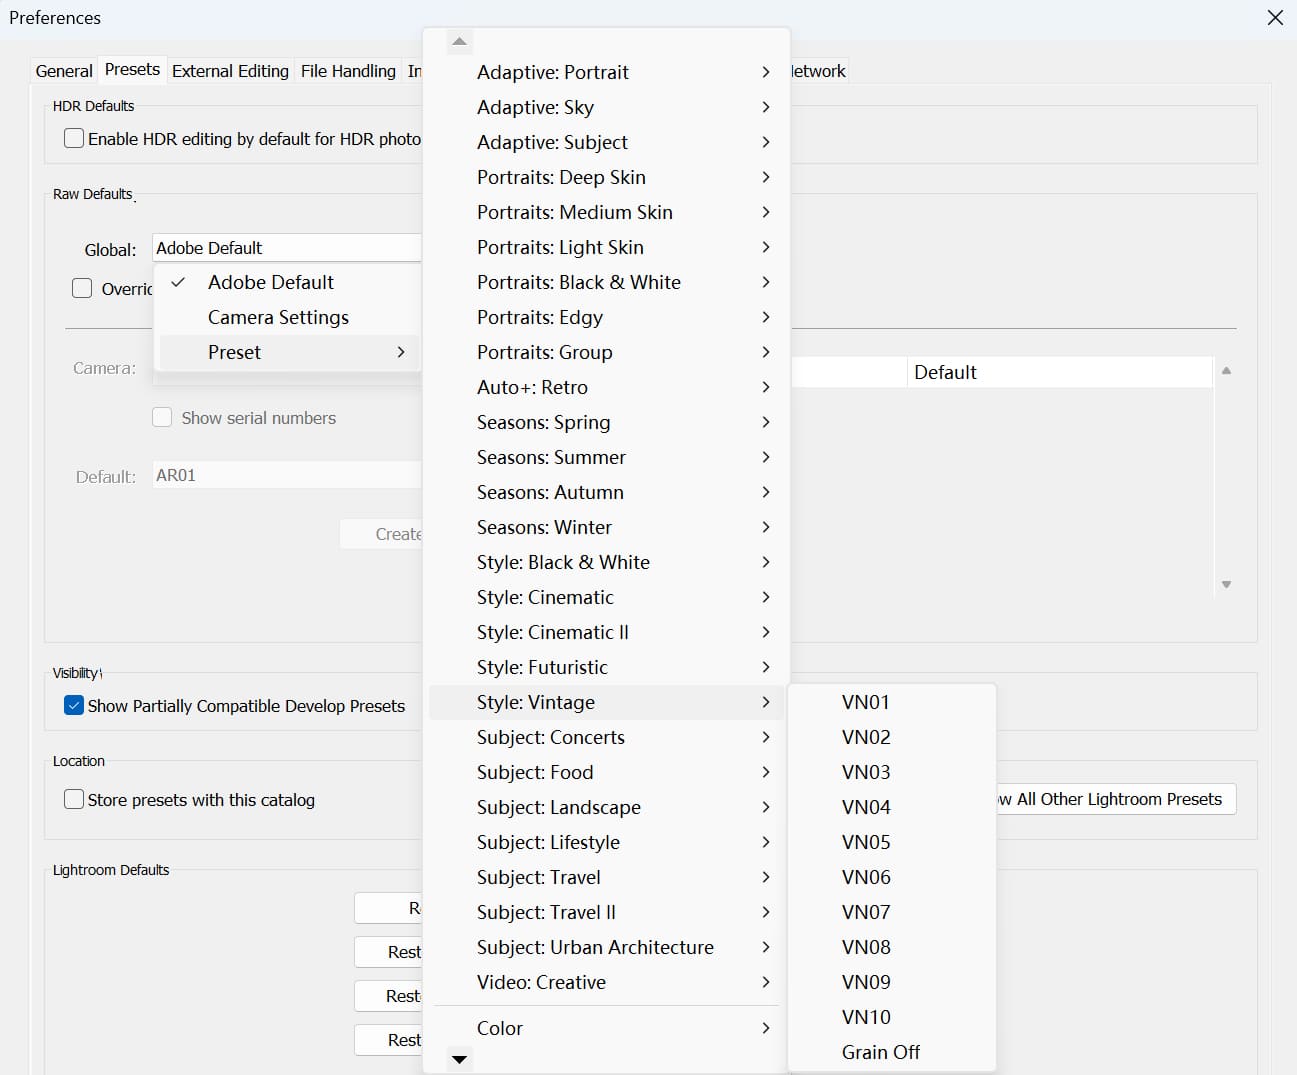
In Lightroom Classic, click on the Edit menu, select Preferences, and open the Preferences dialog box.
In the Preferences dialog box, click on the Presets tab and locate the section for Raw Defaults settings.
In the Raw Defaults settings section, change the dropdown menu from Adobe Default to the preset you want or your own created preset.
Click Close to save your preferences. When importing photos or videos, you will see that the preset you selected has been applied to all the photos or videos.
Considerations for applying presets are as follows:
- Apply presets can only be done when importing photos or videos, not after importing.
- Apply presets can be done to both photos and videos, not just limited to photos.
- Apply presets does not overwrite the original editing settings of the imported photos or videos. Instead, it adds the preset as the initial default setting to your photos or videos. You can change or remove the preset at any time in the Develop module.
Method 4: Auto Sync
Auto sync means that after selecting multiple photos or videos, you click the auto sync button at the bottom of the Develop module.
This allows you to instantly apply any adjustments to all the selected photos or videos. To turn off auto sync, simply click the auto sync button again.
This method requires simple settings and allows for easy batch editing in Lightroom Classic.
In the Library or Develop module, hold down the Command (Mac) or Control (Windows) key and click the multiple photos or videos you want to sync settings for.
Alternatively, hold down the Shift key and click the first and last photo or video to select a range of photos or videos.
Click the Develop module, and then click the auto sync button at the bottom of the Develop module to activate the auto sync feature.
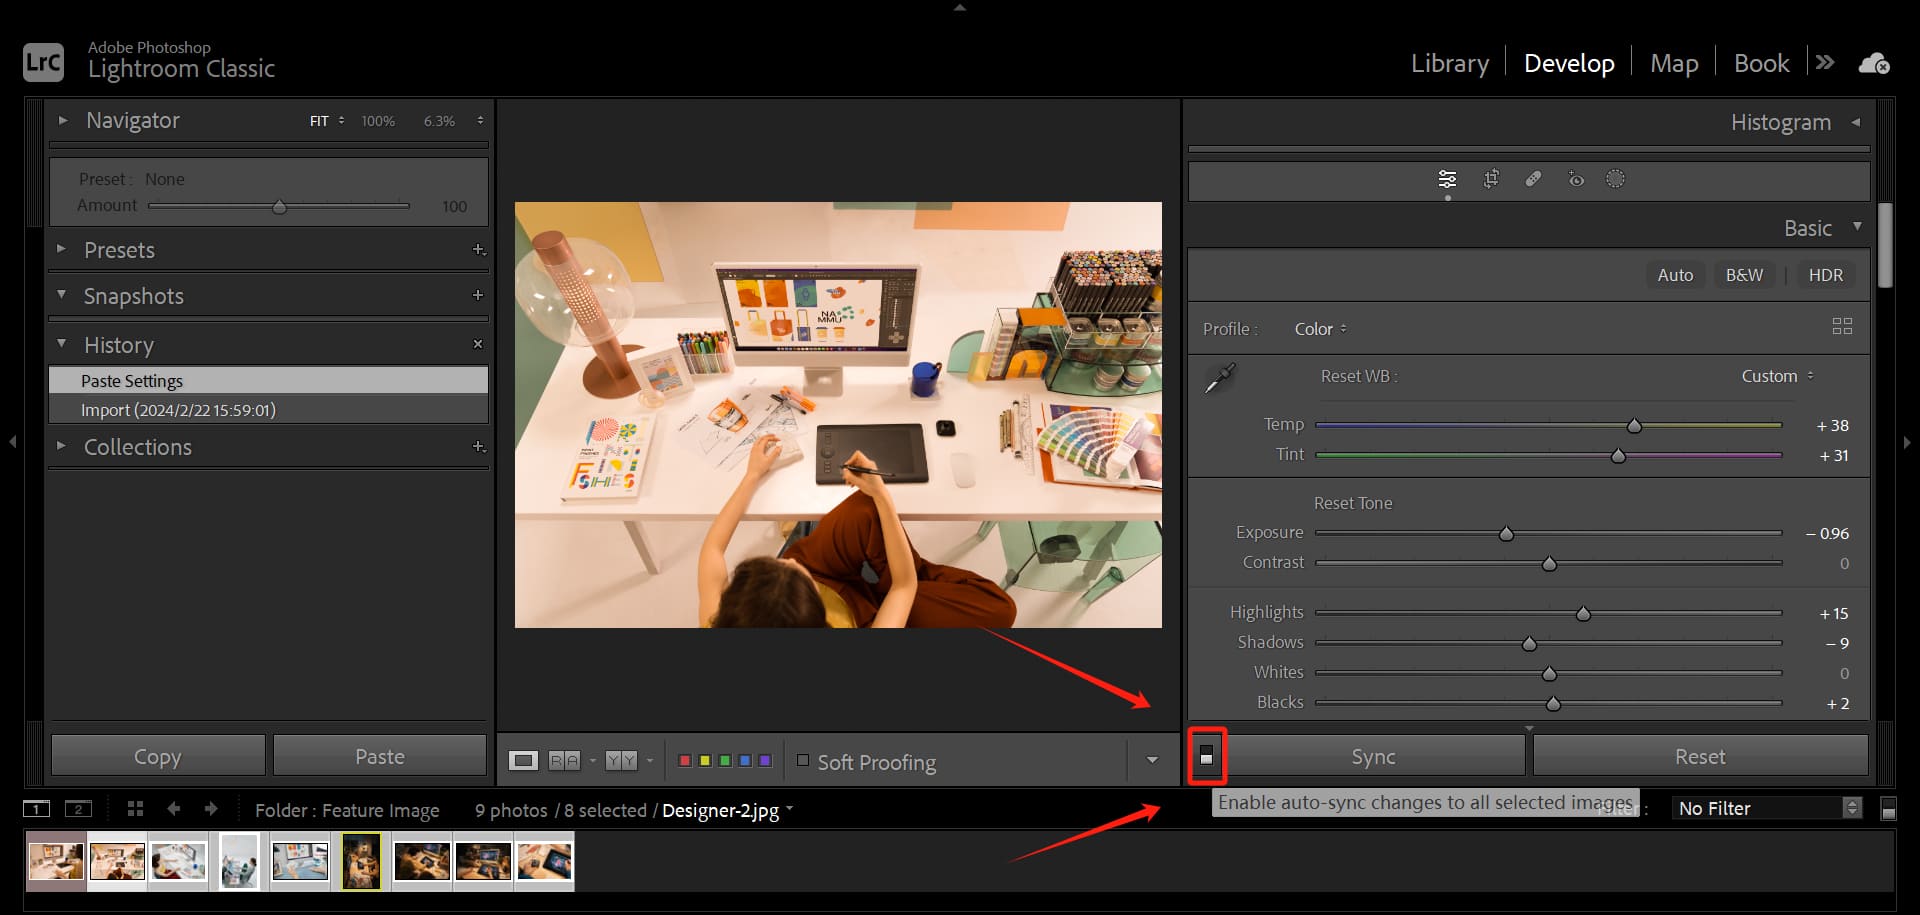
In the Develop module, make the desired edits to any one photo or video, and you will see that all the selected photos or videos are instantly synced with your editing settings.
Considerations for using auto sync are as follows:
- Auto sync can only be done in the Develop module and not in other modules.
- Auto sync can be applied to both photos and videos, not just limited to photos.
Method 5: Use TourBox
Have you heard of TourBox? TourBox is a controller designed specifically for creative professionals, and it can be used in conjunction with creative software like Lightroom Classic.
With TourBox, you can easily adjust various parameters with just one hand, breaking free from traditional keyboard and mouse operations and enabling more personalized actions.
The best part is that you can use TourBox to achieve fast, precise, and convenient batch editing in Lightroom Classic, avoiding tedious tasks.
There are two ways to achieve batch editing in Lightroom Classic with TourBox:
- Assign the hotkeys for selecting all images ("Ctrl/Command + A"), synchronizing settings ("Ctrl/Command + Shift + S"), and hitting the Enter key (CR) to the buttons or combinations on TourBox. This way, you can simply press the corresponding button on TourBox to execute the batch editing commands.
- You can set up multi-step operations, such as batch editing, as macro commands. When processing multiple photos in Lightroom Classic, you can press a button on TourBox and go grab a cup of coffee while the macro command completes a series of actions for you.
Further Reading:
Don't worry about the setup process on TourBox being complicated. The TourBox Console editor provides presets for various creative software, and it has built-in functions for the commands used in that software.

This means that you can quickly customize the settings based on your preferences without having to manually look up the corresponding shortcut keys for each operation. It's incredibly user-friendly and easy to get started with.
Frequently Asked Questions About Batch Edit in Lightroom
Question: What Is Batch Editing?
Batch editing refers to applying the same editing settings to multiple photos or videos at once, saving time and effort.
Question: Why Use Batch Editing?
Using batch editing allows you to quickly complete a large number of editing tasks, improving your editing efficiency and quality. You can choose the batch editing method that suits your needs and preferences, or combine different methods to achieve the desired batch processing effect.
Question: What Batch Editing Methods Does Lightroom Classic Have?
Lightroom Classic offers several batch editing methods, including syncing settings, copying and pasting settings, applying presets, and using auto sync.
For specific steps and considerations for these methods, please refer to the previous sections of this tutorial. Additionally, you can also use TourBox to perform batch editing operations in Lightroom Classic.
Product Recommendation:
TourBox has launched the latest TourBox Lite series. TourBox Lite offers the same one-handed operation experience for creative software at a lower price.

Additionally, you can also use TourBox Lite with office software, browsers, Spotify, and even while watching YouTube. Why not give it a try and experience the convenience for yourself?