How to Blur a Background in Photoshop?
Welcome to our comprehensive tutorial on how to blur a background in Photoshop! Blurring the background of an image can add depth, focus, and professional touch to your photos.
In this tutorial, we will guide you step by step through the process, equipping you with the knowledge and techniques to achieve stunning blurred backgrounds in your images.
Without further ado, let's dive in and unlock the power of Photoshop's blurring capabilities!

In this article, you will learn:
- Shallow Depth of Field and Background Blur
- How to Blur a Background in Photoshop?
- Final Thoughts About Blurring Background in Photoshop
Shallow Depth of Field and Background Blur
Take a moment to reflect on the type of photographs where you often come across beautifully blurred backgrounds. That's right, it's portrait photography.
Blurring the background of an image is a technique often employed in portrait photography. In this genre, photographers frequently utilize the shallow depth of field effect to isolate the subject and create a visually captivating image with depth and focus.
What Exactly Is Shallow Depth of Field?
Shallow depth of field refers to the narrow range of focus in an image where the specific subject is sharp and stands in sharp contrast to the softly blurred background.
This effect draws attention to the subject, making it the focal point of the composition and creating a pleasing visual separation between the subject and its surrounding environment.
Shallow depth of field is widely employed in portrait photography to emphasize the subject's features, convey emotions, and eliminate distractions from the background.
Further Reading: An Ultimate Guide to Depth of Field in Photography
How to Achieve Shallow Depth of Field in Photography?
Several factors come into play when aiming for shallow depth of field in photography. The primary factors include the aperture setting, focal length, and the distance between the subject and the background.
By selecting a wide aperture (small f-number), such as f/1.8 or f/2.8, and using a longer focal length lens, we can effectively decrease the depth of field and blur the background.
Additionally, positioning the subject further away from the background creates greater separation and enhances the blurring effect.
While achieving shallow depth of field in-camera is the preferred method, it's not always feasible due to various limitations.
However, with the help of Photoshop's background blurring techniques, we can freely add and adjust this effect, transforming our photos into stunning works of art. This is precisely the goal of our "How to Blur a Background in Photoshop" tutorial.
In the next section, we will use the following image as our material and demonstrate how to achieve a shallow depth of field and blur the background effect in Photoshop.

How to Blur a Background in Photoshop?
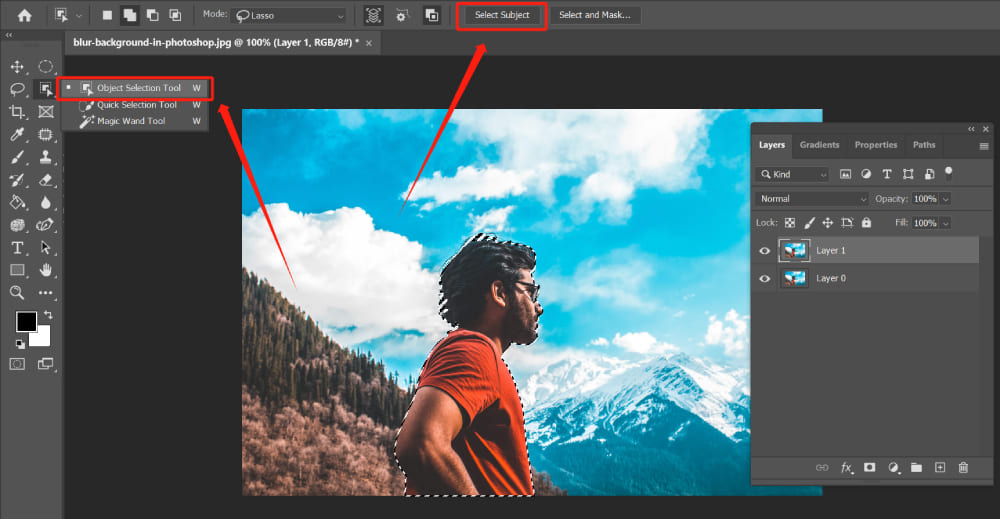
First, we import the photo and duplicate the layer. Then, we use the Object Selection Tool to select the main subject of the image.
You can roughly outline the shape of the subject using the Object Selection Tool or directly click on the "Select Subject" option in the toolbar above. Both methods will allow Photoshop to intelligently create a selection based on the main subject.
Alternatively, you can use the Pen Tool or other tools to create a selection. However, since our goal is to blur the background in Photoshop, we don't necessarily need an accurate and detailed selection.
The functionality of the Object Selection Tool is sufficient for our purposes.
If you have some familiarity with Photoshop, your initial reaction would likely be to invert the selection and then apply "Gaussian Blur".
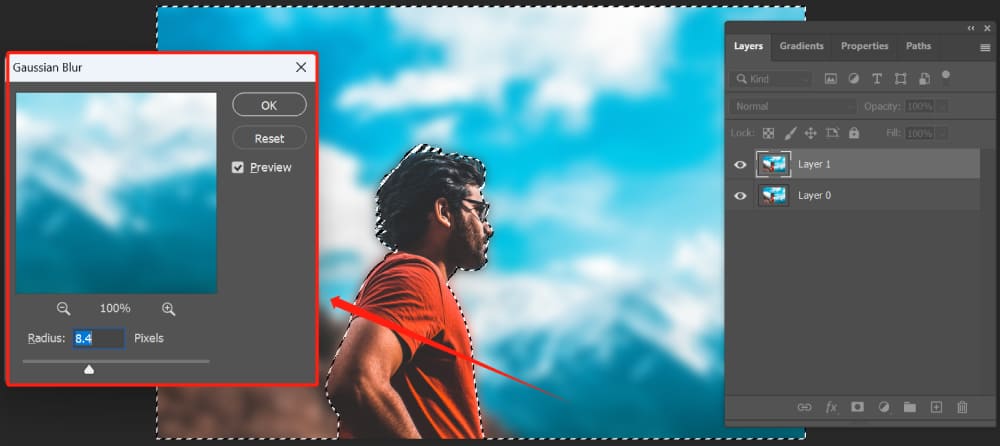
However, there are two issues with this approach:
- When we zoom in on the image, there will be a noticeable halo around the edges of the subject.
- By applying Gaussian Blur, we blur the entire background of the image. However, this can make the photo appear highly unnatural.

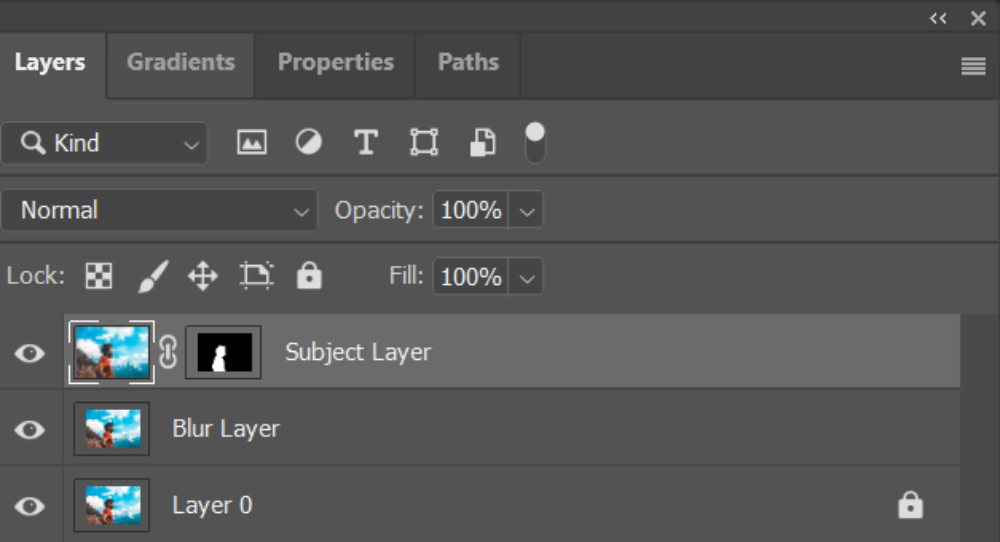
Let's start over. We'll re-import the image, duplicate the layer, and use the Object Selection Tool to select the main subject once again. Then, we'll add a layer mask to this layer.
Then, we'll duplicate Layer 0 once more and place the newly duplicated layer below the "Subject Layer". Let's name this layer "Blur Layer," but feel free to choose a name that suits your preferences or workflow.
The following image is provided as a reference for you to follow along.
While holding down "Ctrl", click on the "Layer mask thumbnail" to reload the selection.
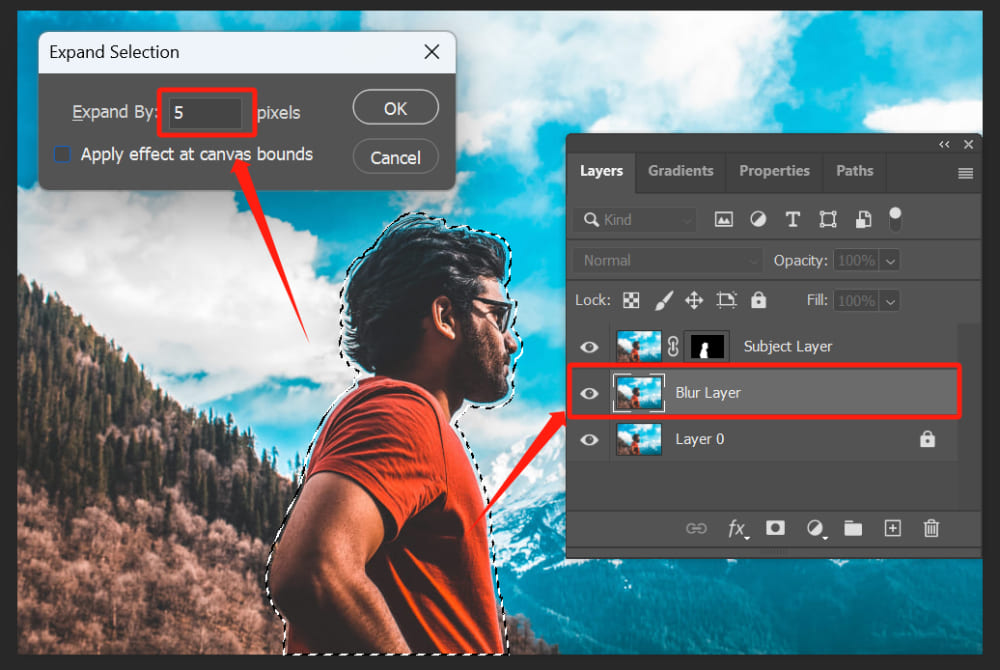
We select the "Blur Layer" (be sure to select the correct layer) and then click on "Select" > "Modify" > "Expand" in the toolbar at the top of Photoshop.
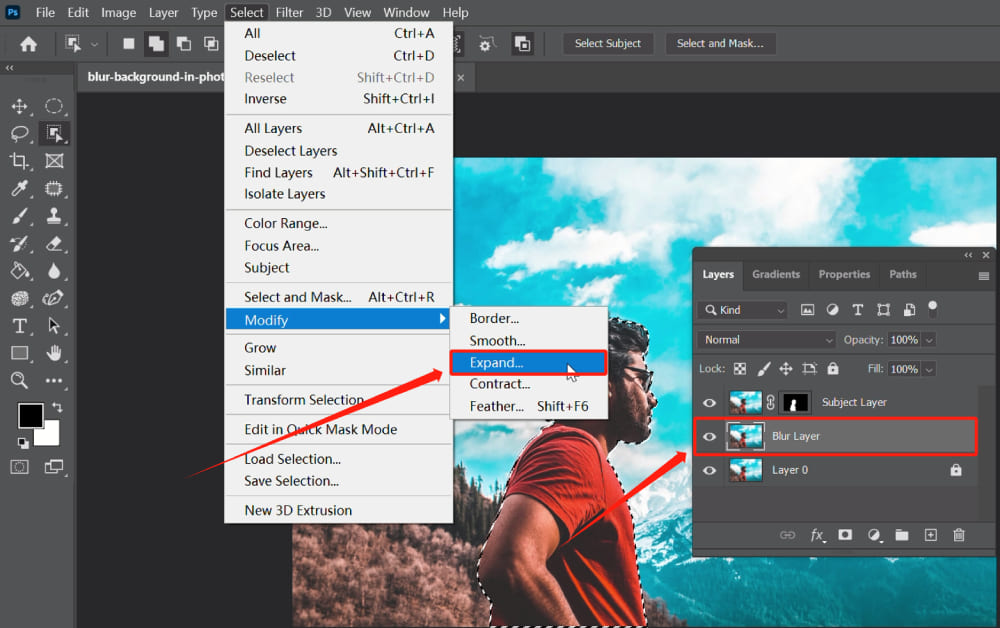
In the "Expand Selection" window that appears, we set the "Expand by" value to 5 pixels. This will expand the selection area by 5 pixels and help us avoid any halo effect along the edges of the subject.
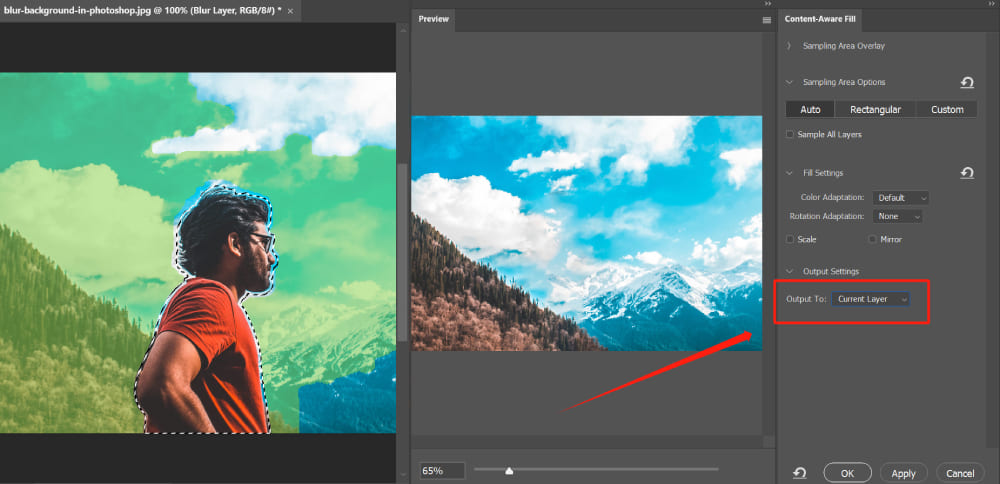
After expanding the selection area, we click on "Edit" > "Content-Aware Fill." In the Content-Aware Fill window, we simply click on OK to proceed.
To keep things organized, we adjust the Output Settings in Content-Aware Fill to output to the current layer.
For more information and tips on the features and usage of Content-Aware Fill in Photoshop, please refer to this article: How to Use Content-Aware Fill in Photoshop?
By hiding the Subject Layer, you can see the result of content-aware filling, and you'll notice that the person originally present in the image is now gone.
Content-aware fill works by analyzing different parts of the image within the selected area and then filling it accordingly.
We convert the "Blur Layer" into a smart object and make the "Subject Layer" visible. Press the shortcut key "Ctrl + D", and then we apply a "Field Blur" to the "Blur Layer."
(The "Field Blur" filter can be found in the "Blur Gallery" under the "Filter" dropdown menu.)
The reason we choose not to use Gaussian Blur is that it is commonly used to reduce detail and mitigate the impact of noise in photos.
On the other hand, Field Blur can be used to create the effect of a wide aperture focusing on a specific object or achieve selective blurring of the scene. Considering the respective purposes of these two blur filters, it is natural for us to choose Field Blur.
We set the "Field Blur" value in the upper right corner of the Field Blur panel to 15 pixels. This will blur the entire scene. (You can adjust this value according to your preference and specific needs. In this project, a value of 15 pixels is sufficient.)
Next, we add a pin below the scene and set its blur value to 0 pixels, indicating that this area should remain unblurred.
Moreover, we can adjust the blur range by manipulating the position of the pin. Additionally, we can drag the slider on the pin to control the blur value, allowing us to have precise control over the size of the blur and effectively manage the blur area.
We understand that the text may seem complex, so we recommend watching the video below for a demonstration of the specific steps.
If we zoom in on the image, you will notice that there are no halos around the subject. This is thanks to the earlier step of expanding the selection area.

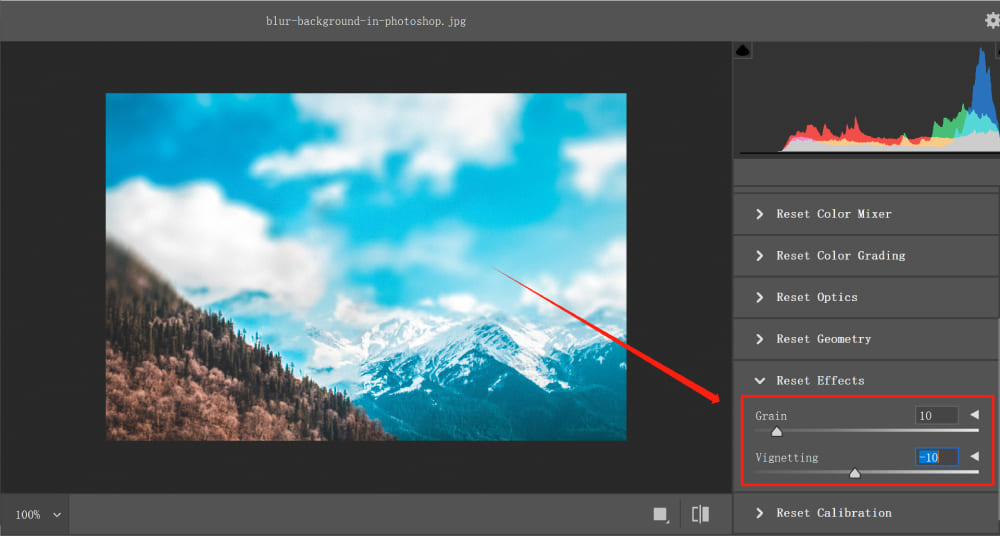
We carefully examine the image after blurring the background. The basic adjustments have been completed, but the blurred background still lacks a sense of realism. At this point, we can manually add some grain and vignetting.
We select the blurred layer and go to "Filter" > "Camera Raw Filter." In the "Effects" tab, we adjust the values for grain and vignetting. The specific values can be determined based on your preferences and needs.
Let's take a look at the final result of blurring the image in Photoshop.

Final Thoughts About Blurring Background in Photoshop
As we reach the final chapter of our tutorial on how to blur a background in Photoshop, it's time to explore a powerful tool that can enhance your editing experience.
Meet TourBox, a game-changing device designed to streamline your workflow and unleash your creativity.

When it comes to blurring backgrounds in Photoshop, precision and efficiency are key. TourBox offers an intuitive interface and customizable controls that make this process a breeze.
By assigning specific functions to its dials, buttons, and sliders, you can effortlessly fine-tune your blurring techniques, saving you valuable time and effort.
TourBox seamlessly integrates with Photoshop, providing a seamless editing experience. With its ergonomic design and tactile controls, you'll find yourself immersed in a truly intuitive editing workflow.
Whether you're adjusting brush sizes, modifying blur intensity, or navigating through Photoshop's tools, TourBox allows for precise and natural adjustments with a simple twist or press.
So, as you embark on your journey to creation, consider TourBox as your trusted companion.