[DaVinci Resolve Tutorial] How to Color Grade in DaVinci Resolve?
Video editing is a rewarding and challenging endeavor where you navigate through countless footage clips, piece them together, and tell your story.
This process can be lengthy and arduous, but eventually, you'll reach a destination. When you stand at the finish line, you'll witness a whole new dimension: color.
In this tutorial, we will delve into the world of color grading in Davinci Resolve, guiding you through how to color grade in Davinci Resolve.

In this article, you will learn:
- The Power of Color in Visual Storytelling
- What You Need to Know Before Color Grading in DaVinci Resolve
- How to Color Grade in DaVinci Resolve?
- Primary and Secondary Color Grading
- How to Properly Color Grade in DaVinci Resolve?
- Final Thoughts About Color Grading in DaVinci Resolve
The Power of Color in Visual Storytelling
Over the past century, filmmakers have continuously explored the impact of color on emotions and integrated it into their films. Even in the same scene, different color choices can evoke entirely different atmospheres. That's the power of color grading.
The significance of color in visuals is akin to the role of music in an opera. Once you master the art of color grading in Davinci Resolve, it becomes an immensely enjoyable process—one that you're sure to love.
What You Need to Know Before Color Grading in DaVinci Resolve
Before we dive into the intricacies of the DaVinci Resolve Color page, it's important to understand that when we engage in color grading, we typically adjust three key parameters of pixels: hue, brightness, and saturation.
The reason why color grading can become complex is that each frame consists of thousands of pixels, and we have varied requirements for different colors in different areas. Moreover, we are working with a video, not just a single photograph.
In a video, the scenes and subjects are constantly changing. We need to track moving objects, isolate specific colors for adjustments, or globally modify the shadows or highlights of the entire frame.
To achieve precise and nuanced manipulations, we rely on the diverse set of tools available in DaVinci Resolve.
The challenge lies in combining and utilizing these tools to achieve the desired effects. It's not just about understanding individual tools but also mastering the art of crafting their combination to bring our creative vision to life.
How to Color Grade in DaVinci Resolve?
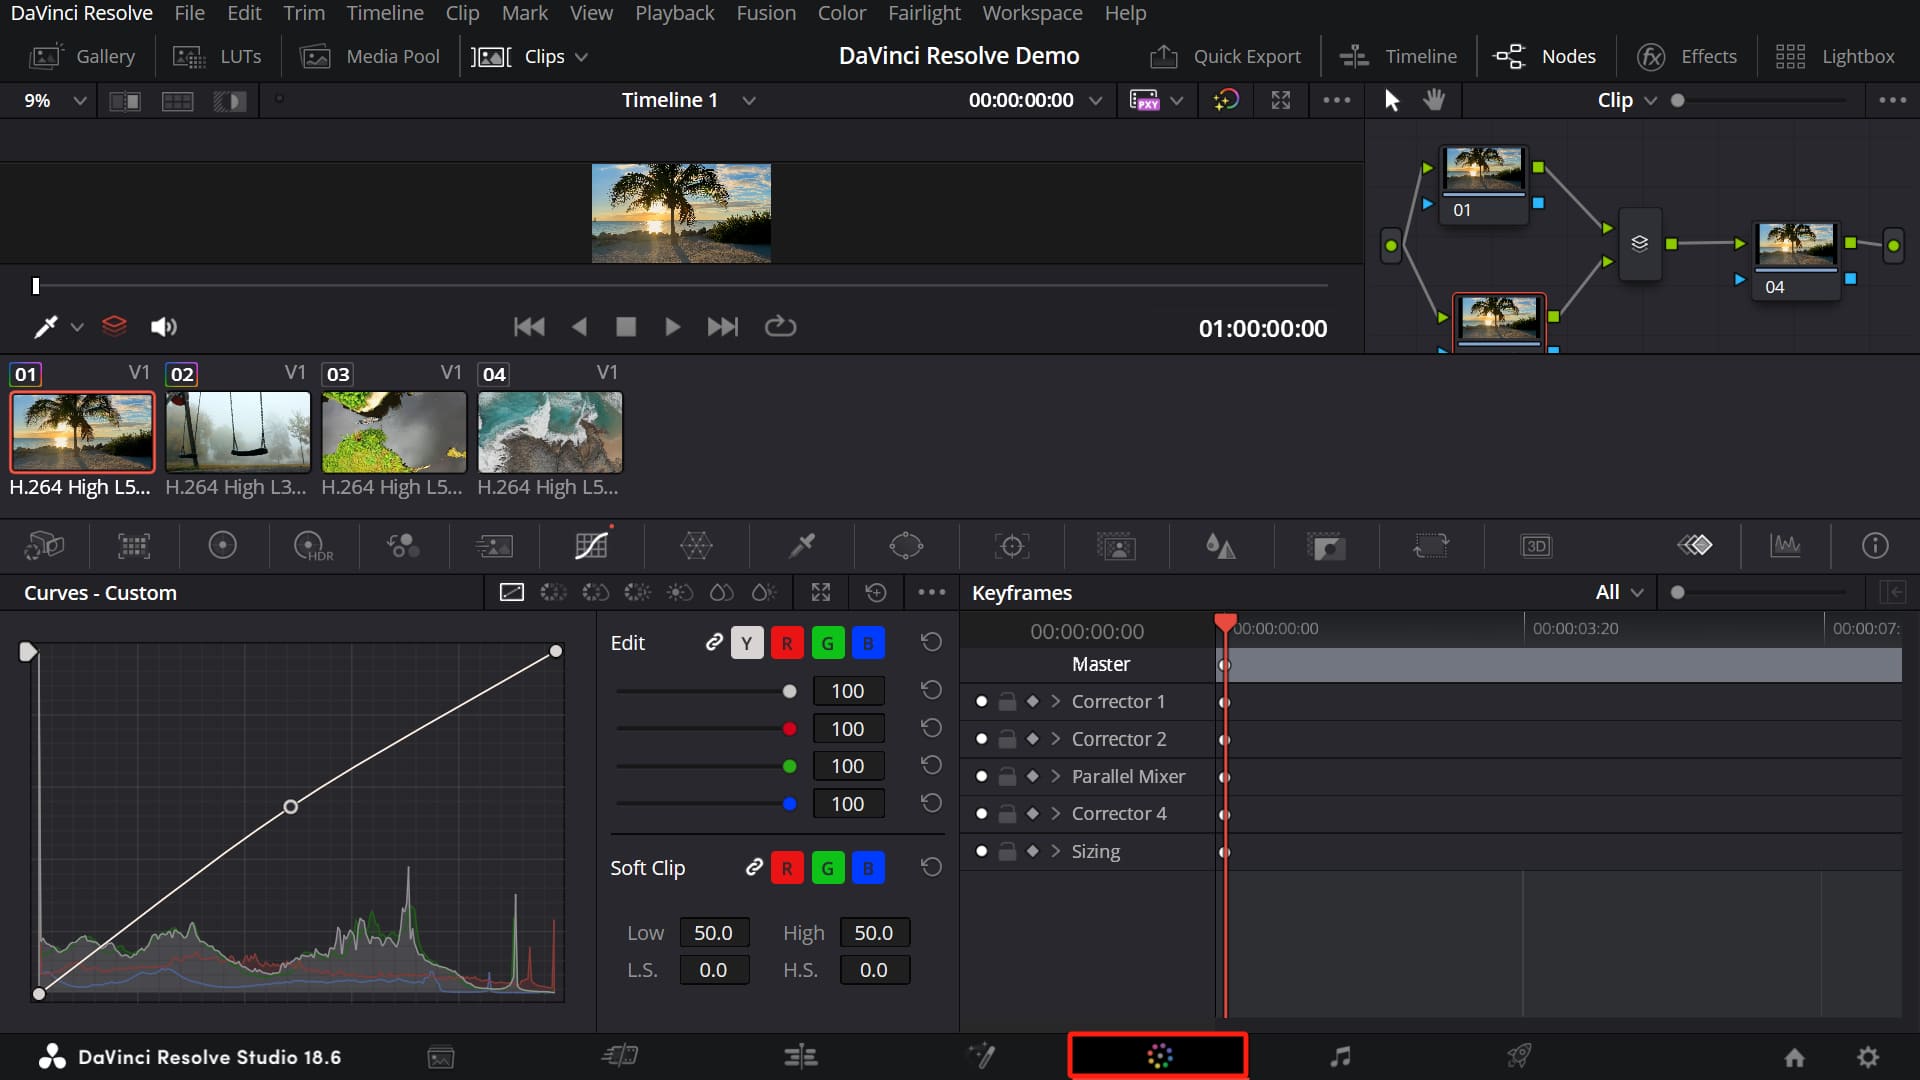
When you navigate to the Color page in DaVinci Resolve (located as the fifth option at the bottom of the DaVinci Resolve interface), you'll notice significant differences compared to the Edit panel.
Firstly, the timeline workspace has been replaced by color grading tools, and secondly, the Inspector workspace has been replaced by nodes.
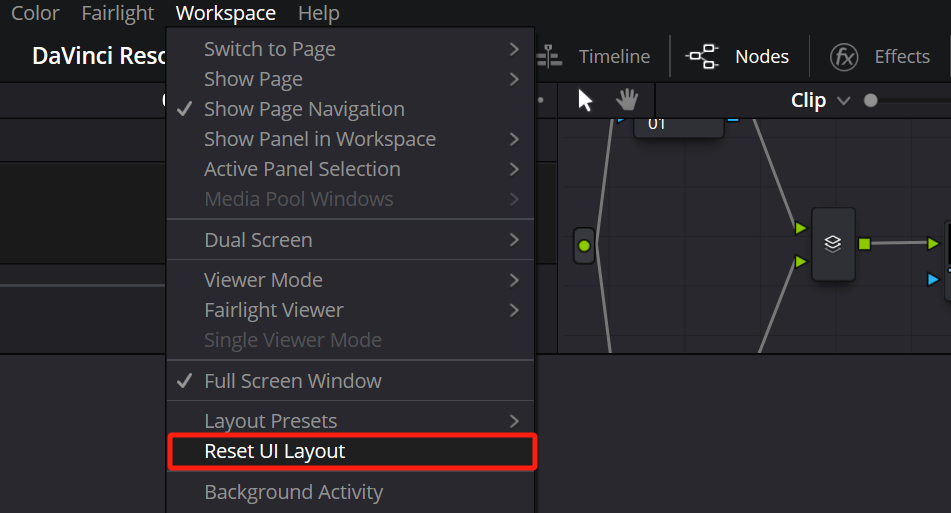
Additional Tip:
If your interface looks different from the image shown above or if you accidentally closed certain workspaces, you can easily reset the layout. Simply click on "Workspace" in the toolbar at the top of DaVinci Resolve and select "Reset UI Layout" from the drop-down menu.
On the Color page, your media on the timeline is organized in a single row, as indicated by the red box in the image below.
If you don't see the media pool indicated by the red box in the image below, you can open that workspace by clicking on "Clips" in the top right corner of the Color Page.

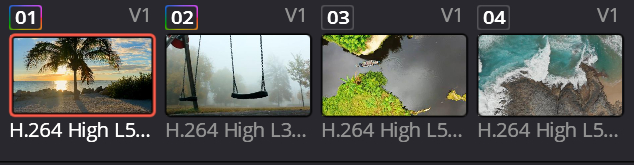
In the top-left corner of each media clip, you'll find a numeric identifier. However, it's important to note that this number doesn't solely represent the order of the clips.
It also has a surrounding frame that indicates whether the clip has undergone color adjustments. If the clip remains unchanged, the frame will be gray.
However, if any color changes have been applied, the frame will become colored. This provides a visual cue to easily identify which clips have been color-graded.
As shown in the image below, we have applied color grading to Media 1 and Media 2, while Media 3 and Media 4 remain ungraded. It's easy to distinguish this just by looking at the media identifiers.
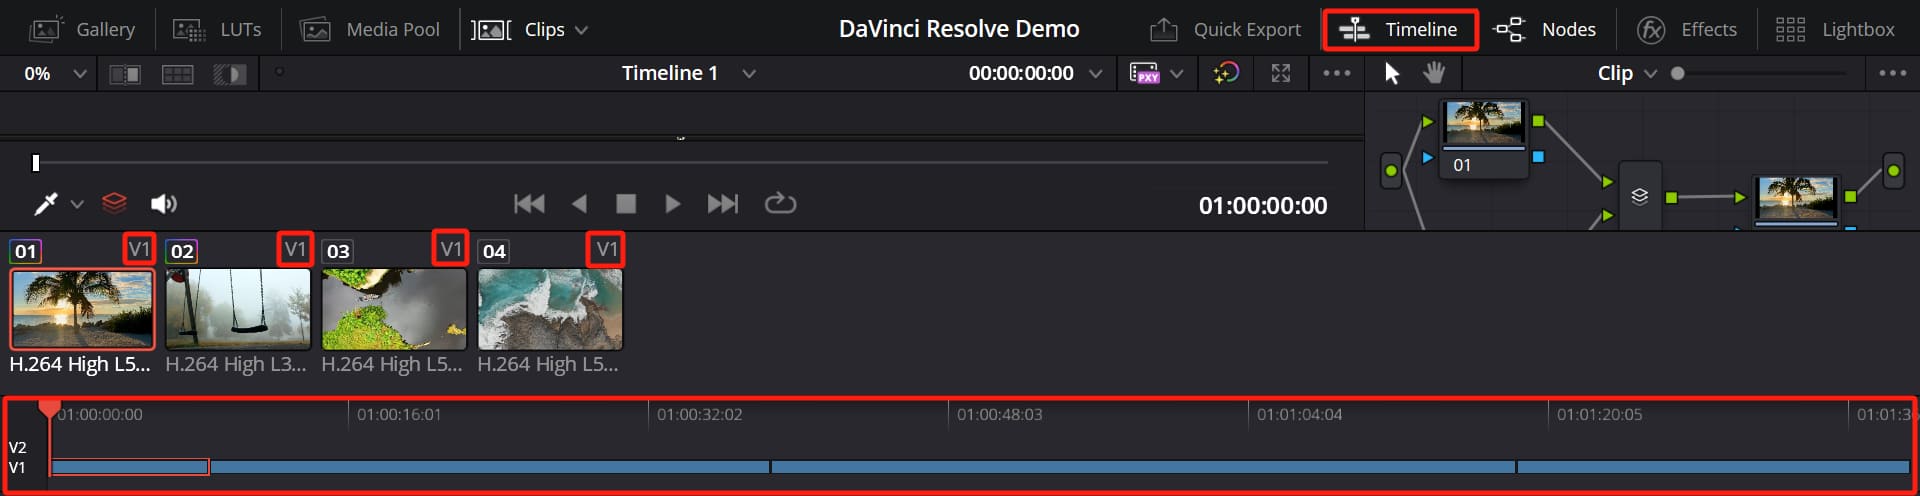
In the top right corner of each media clip, you'll see the track number indicating the location of that clip. If it's not immediately clear, you can click on the "Timeline" button in the top right corner of the Color page.
This will bring up a thumbnail view that helps you visualize the position of the selected clip on the timeline.
Next, let's further explore the workspace of the Color page. We'll start by hiding the "Clips" workspace and opening the "Gallery" workspace.
When you do this, you'll notice that on the left side of the Color Page, the Gallery workspace displays a message saying "No stills created," while on the right side, you'll find DaVinci Resolve's media viewer.
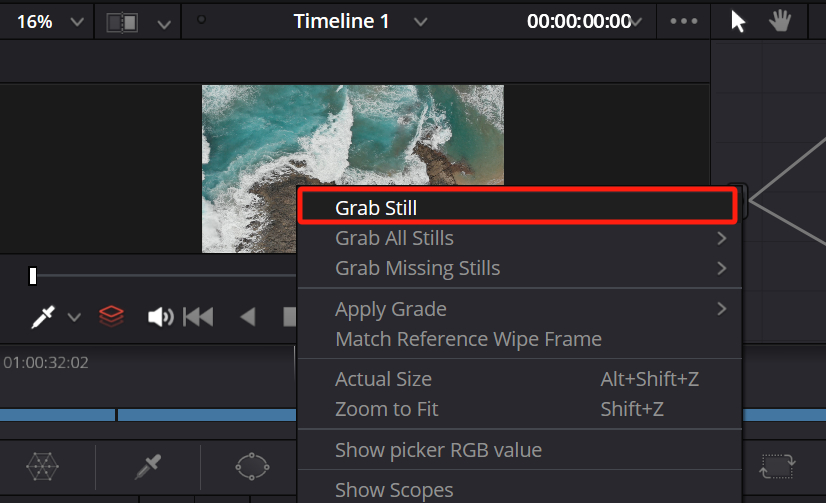
The Gallery workspace on the left is where you can save screenshots of your color grading work within DaVinci Resolve. To capture a screenshot, locate the desired frame in the media viewer, right-click, and select "Grab Still." The screenshot will then appear in the Gallery on the left.
To export the screenshot, right-click on it and choose "Export" from the pop-up menu. Select the desired file export format, and you can export a full-resolution screenshot within DaVinci Resolve.
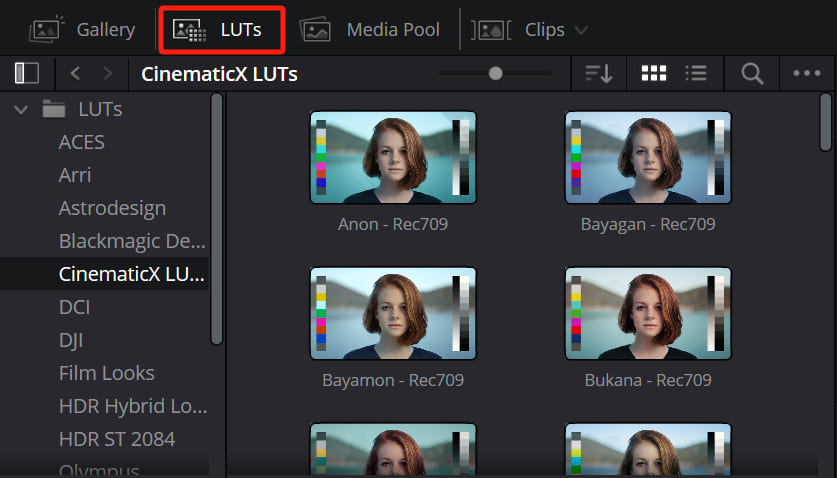
Next to the Gallery workspace, you'll find the LUTs workspace. But what exactly are LUTs? You can think of LUTs as universal color-grading presets.
Further Reading:
To learn more about how to use LUTs in DaVinci Resolve, please check out this tutorial: "How to Apply LUTs."
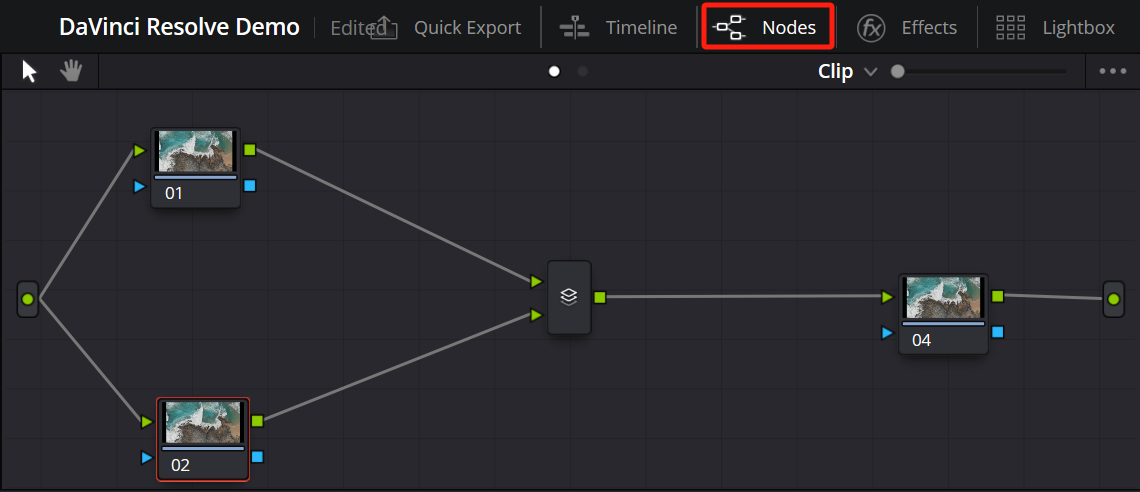
Next, let's focus on the right side. Click on "Nodes" in the top right corner of the Color page, and you'll enter the core area of color grading in DaVinci Resolve.
Nodes may appear intimidating, especially if you're used to other video editing software, as this concept might be unfamiliar to you. However, nodes are simply a visual representation of the steps involved in your color grading process.
When you create a new node in DaVinci Resolve, you can perform further color adjustments based on the result of the previous node, progressing until the final output. It's like a pipeline of operations, although in DaVinci Resolve, there is more complex logic involved.
Further Reading:
For more insights on nodes in DaVinci Resolve, check out this tutorial: "A Complete Guide to Nodes."
Next, you'll notice the color grading tool panel located below the Color Page. DaVinci Resolve offers a wide range of color grading tools, but you don't need to use every single one. Often, achieving great results can be accomplished with just a few key tools.
Here, we'll introduce two of the most commonly used tools: the Color Wheels and the Curves.
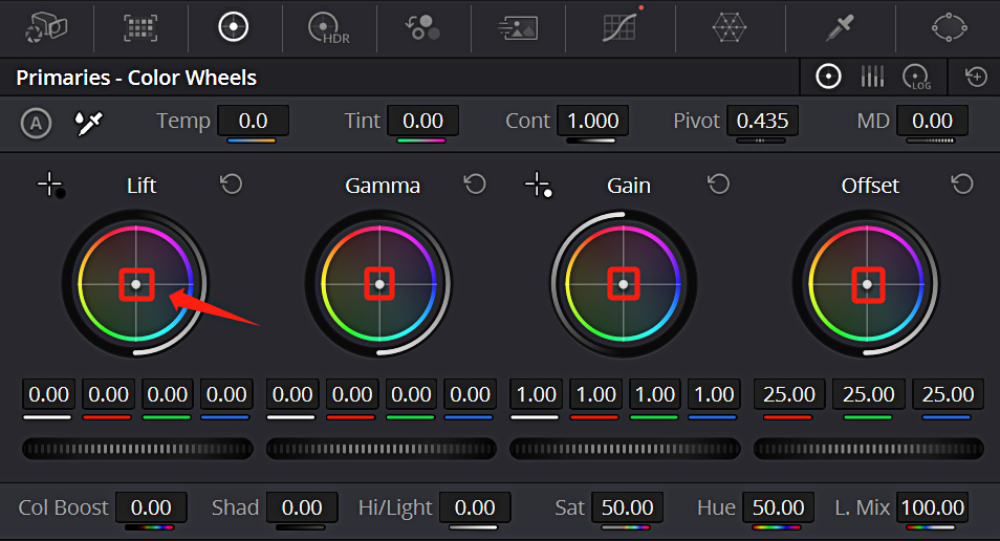
1. Color Wheels
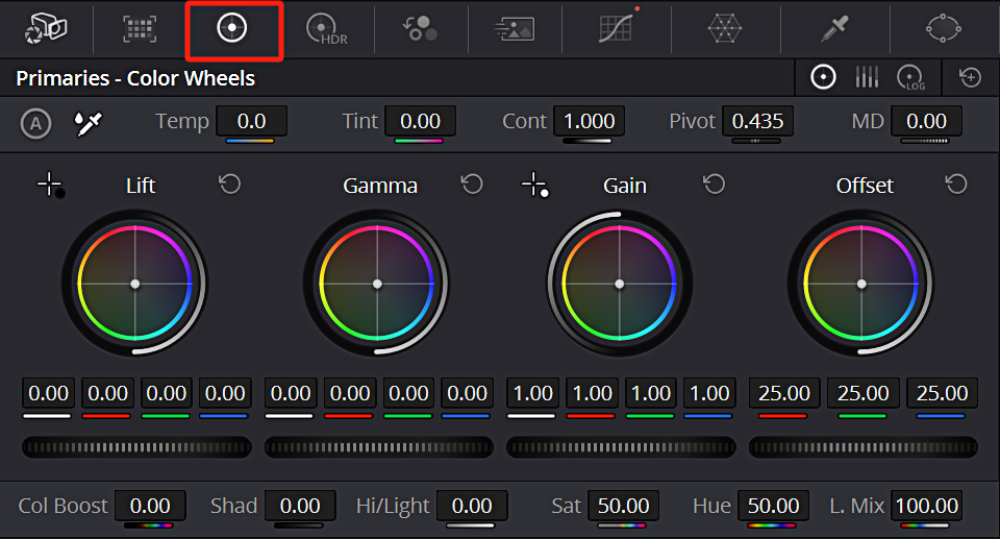
The Color Wheels tool has a straightforward interface, consisting of four Primary Wheels:
- Lift: Adjust the shadows in the clips.
- Gamma: Control the mid-tones in the clips.
- Gain: Handle the highlights in the clips.
- Offset: Provide overall adjustments to the clips.
By clicking and dragging the small dot in the middle of each Primary Wheels, you'll notice the corresponding color shifts in the associated region. It's important to be careful with your adjustments, as large movements can result in unnatural-looking colors.
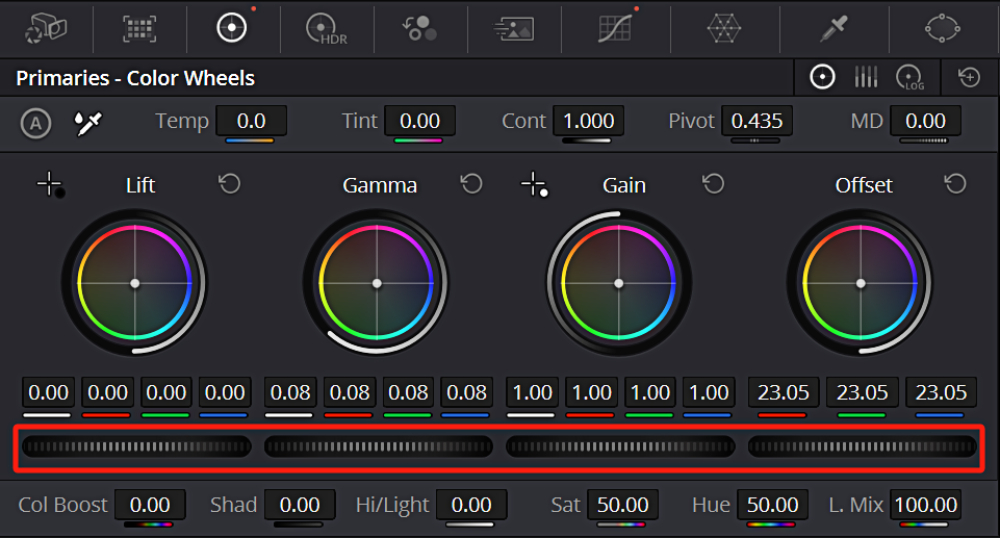
Below each Primary Wheels, there is a gear icon that controls the brightness of the respective region. This gear icon is incredibly useful, allowing you to precisely control the distribution of light and dark in your clips.
Examples:
- Dragging the gear icon below the "Gain" color wheel to the left reduces the brightness of the clip's highlight areas.
- Moving the gear icon below the "Lift" color wheel to the right increases the brightness of the shadow areas.
- Adjusting the gear icon under "Offset" impacts the overall brightness of the entire clip.
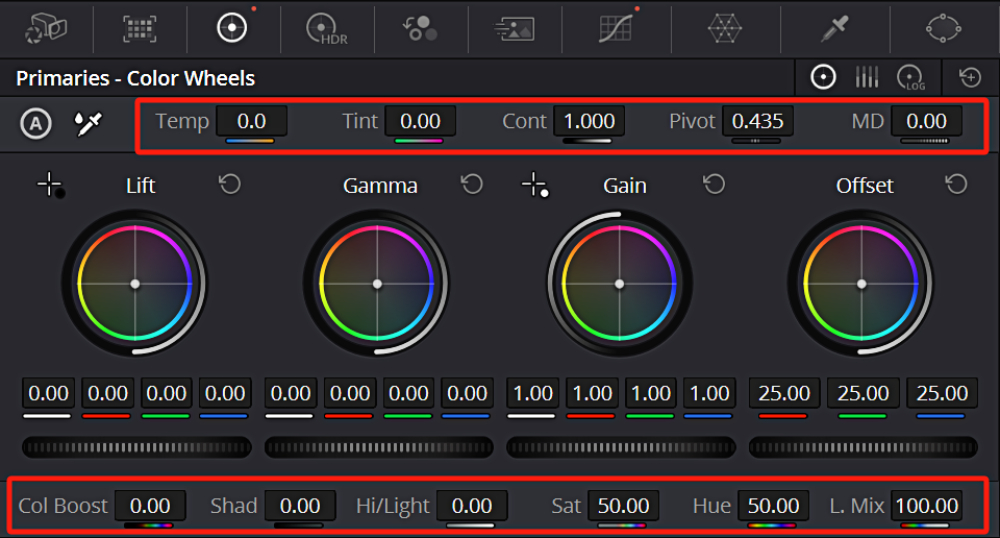
DaVinci Resolve also includes powerful Adjustment Controls within the Color Wheels workspace, allowing you to quickly adjust contrast, saturation, tint, temperature, mid-tone details, shadow tint, highlights, and more.
These controls surround the Color Wheels workspace, and you can simply click on the values and drag the mouse while holding the left button to make adjustments. (Dragging to the left decreases the value, while dragging to the right increases it.)
The functions of these controls may overlap with the Primary Wheels, but they have slightly different effects on the footage. We suggest trying them out separately, as you should be able to clearly perceive the distinct differences between them.
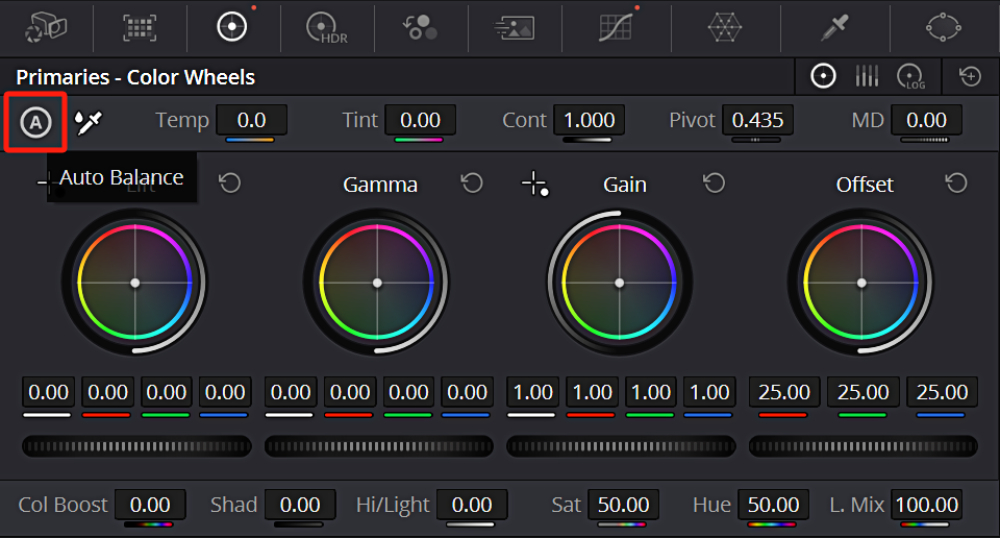
In addition to manual color adjustments, the Color Wheels workspace in DaVinci Resolve also provides some intelligent color grading tools.
For example, there is a white balance tool (represented by a dropper icon) located in the top left corner of the Color Wheels workspace.
If your clips has noticeable color casts, where areas that should be white appear as different colors, you can use the white balance tool to click on a white object in the clips. DaVinci Resolve will automatically adjust the white balance based on that selection.

Alternatively, if you prefer a one-click solution and want DaVinci Resolve to automatically color grade your footage, you can find the "Auto Balance" button next to the white balance tool. Just click this button, and it will analyze the footage and attempt to balance the colors and contrast.
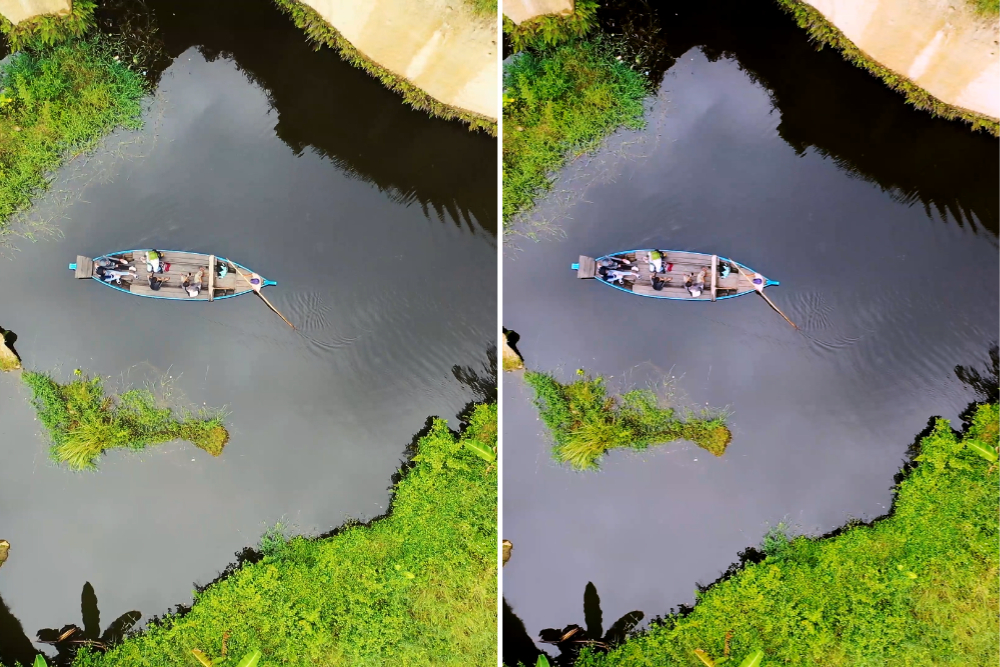
Let's take a look at a before-and-after comparison of the screenshot after using the "Auto Balance" feature. It seems to do a pretty decent job!
(The image on the left is a screenshot of the original footage, while the image on the right is a screenshot of the footage after applying the Auto Balance feature in DaVinci Resolve.)
Make a Mistake?
In DaVinci Resolve, you have a solution for that. Above each of the four Primary Wheels, there is a "Reset" button that allows you to reset individual adjustments made using the Color Wheels.
Additionally, at the top right corner of the Color Wheels workspace, you will find a "Reset All" button. This button allows you to reset all the adjustments you've made in that workspace, effectively starting fresh.
2. Curves
The Curves tool is another commonly used color grading tool in DaVinci Resolve. Moving from the left side to the right side of the curve represents the transition from shadows to highlights. By adjusting the curve, you can change the overall brightness and contrast of the footage.
For example, you can place a point on the left side of the curve (representing shadows) and pull it down to enhance the shadow effect. Similarly, placing a point on the right side of the curve (representing highlights) and pulling it up can enhance the highlight effect.
This creates a noticeable contrast in the footage.
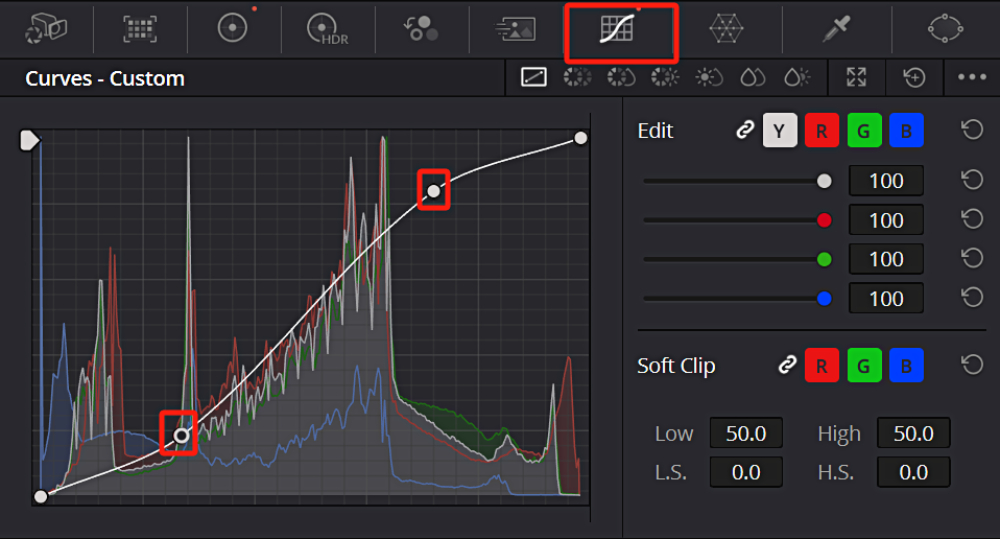
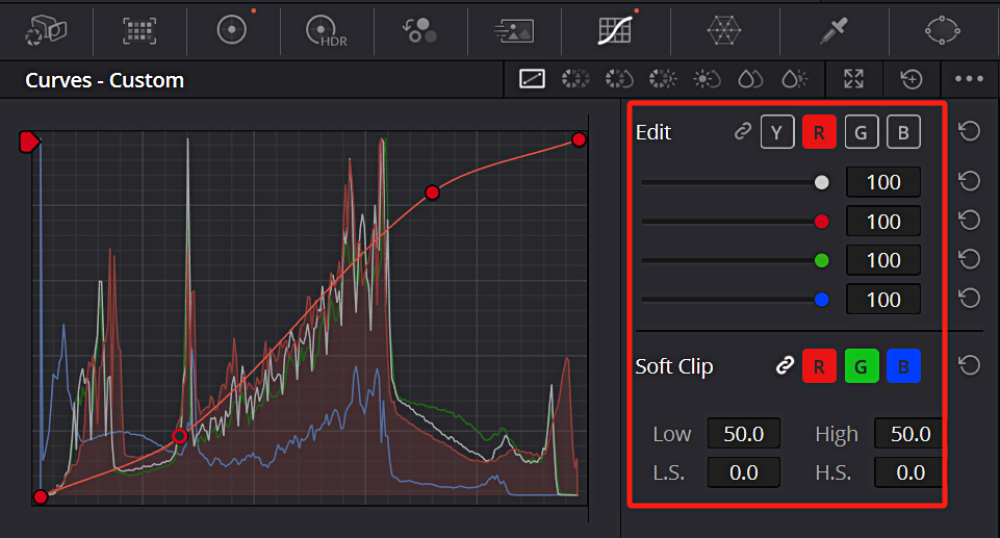
The "S" shape curve is a common curve form frequently used in the Curves tool. However, the use of the Curves tool extends beyond this. You can further click the buttons on the right side of the Curves tool to separate individual channel curves, such as the red, green, and blue curves, to make specific color adjustments in the footage.
In color grading with DaVinci Resolve, nothing beats hands-on practice. We recommend you opening DaVinci Resolve and experiencing the Color Wheels and Curves tools firsthand.
Once you master these two tools, you'll feel right at home when it comes to color grading in DaVinci Resolve.
Additional Tip:
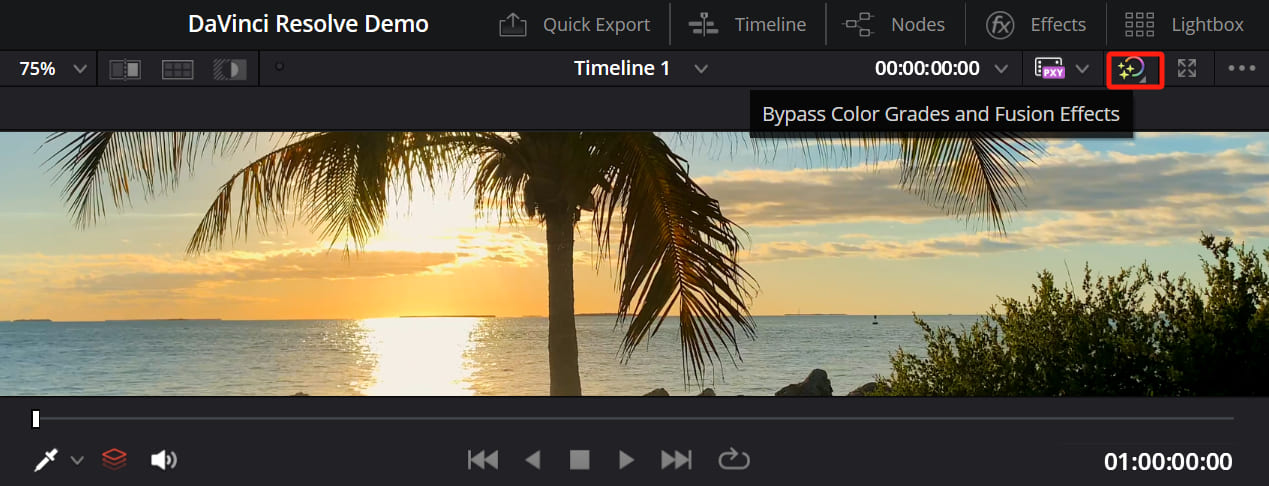
After color grading in DaVinci Resolve, if you want to quickly compare the footage before and after the color adjustments, you can click on the "Bypass Color Grades and Fusion Effects" option in the top-right corner of the media viewer. Alternatively, you can use the "Shift + D" shortcut key to toggle this bypass state on and off for a quick comparison.
Primary and Secondary Color Grading
In the previous section on how to color grade in DaVinci Resolve, we mainly covered the Color Wheels and Curves as basic color-grading tools. However, there are many more techniques to explore.
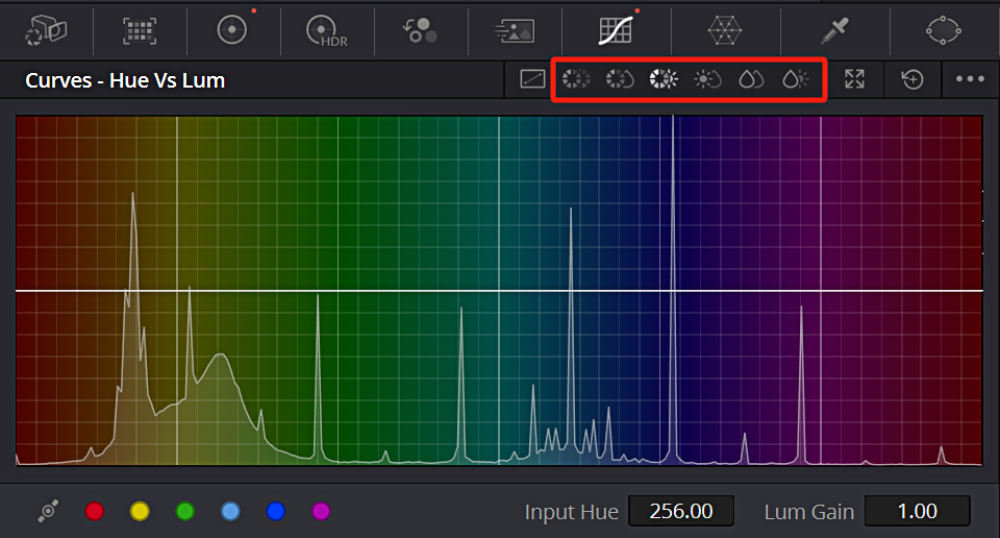
For instance, within the Curves tool, you'll notice options for different sub-interfaces above it. By clicking on these options, you'll discover various curve modes. These modes primarily serve the purpose of assisting you with Secondary Color Grading.
This brings us to the distinction between Primary Color Grading and Secondary Color Grading. Simply put, the methods we discussed earlier are focused on adjusting the overall look of the footage, which is Primary Color Grading.
On the other hand, Secondary Color Grading involves controlling specific areas and colors within the footage. In Secondary Color Grading, you'll utilize tools like Qualifier, Window, Magic Mask, and Tracker to individually adjust particular regions or specific colors in the footage.
Further Reading:
Feel free to explore these tools. Due to space limitations, this tutorial won't go into extensive detail about them. If you're interested, you can check out our tutorial on secondary color grading: "Secondary Color Grading & Color Correction."
How to Properly Color Grade in DaVinci Resolve?
When using DaVinci Resolve for color grading, whether it's using the Color Wheels, Curves, or other tools, relying solely on your eyes for color judgment is not enough. Your display, the ambient lighting in your workspace, and various other factors can influence your final judgment.
Therefore, we need a reliable tool to assist us in color grading, and that tool is the "Scopes" in DaVinci Resolve. Scopes analyze the visual information of your video footage and present it in a clear and organized manner, helping you understand the state of your clips.
To open the Scopes, you can click on Workspace > Video Scopes > On in the top toolbar of DaVinci Resolve.
Alternatively, you can directly access the Scopes interface by clicking on the "Scopes" button in the top-right corner of the color grading workspace on the Color Page.
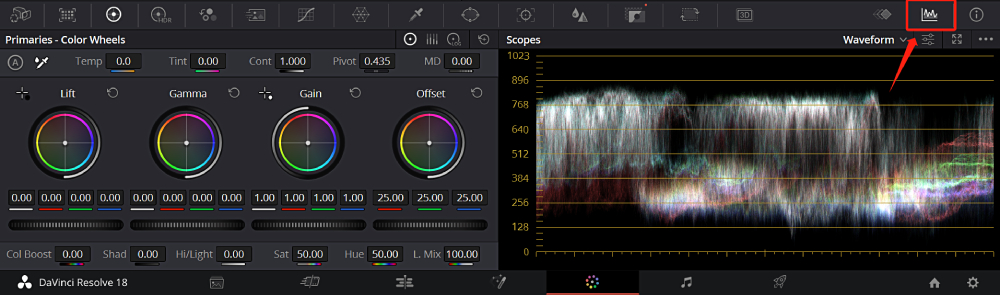
There are several types of scopes available, but for beginners in DaVinci Resolve, the most useful one is the Waveform. Select the Waveform from the dropdown options in the Scopes workspace, and you will see a waveform graph composed of various pixels.
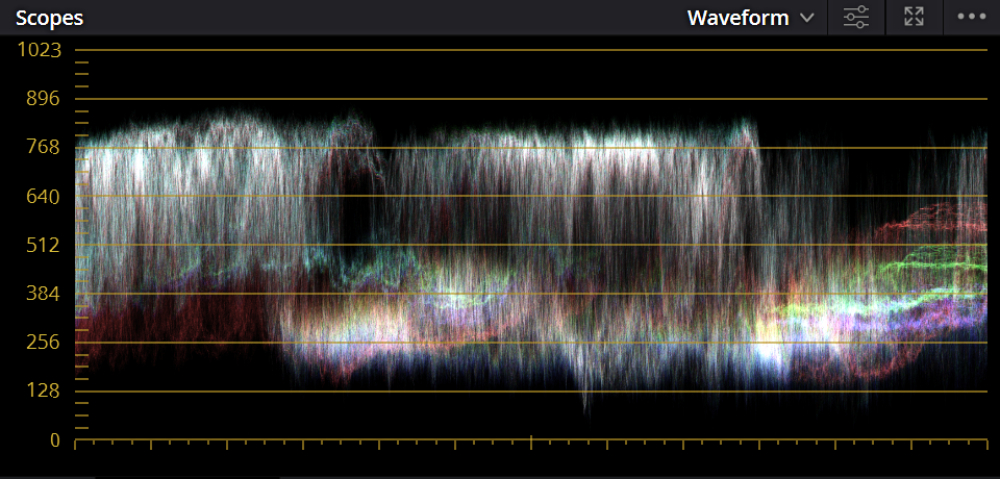
So, how do you use the Waveform? The bottom area of the waveform represents pure black, while the top area represents pure white. The waveform visualizes the brightness of individual pixels in the selected video footage.
Here, we have a video clip to demonstrate. By examining the waveform, you can see that the pixels of the clip are concentrated in the middle of the waveform. There are no pixels in the shadow and highlight areas.
To make the black areas truly black, you can select the gear icon under the "Lift" section in the Color Wheels workspace and drag it to the left.
This adjustment will darken the shadow areas of the clip until they touch the bottom of the waveform, ensuring that you don't lose any details in the shadows due to excessive adjustment.
Next, you can drag the gear icon under the "Gain" section in the Color Wheels workspace to the right. This adjustment will brighten the highlight areas until they reach the top of the waveform (pure white).
You can also make slight adjustments to the overall contrast of the clip by adjusting the gear icon under the "Gamma" section in the Color Wheels, based on the information displayed in the waveform.
You can watch the video below to get a better understanding of how to use Waveform.
To learn more about how to use the Scopes in DaVinci Resolve, you can watch the YouTube video below created by Waqas Qazi, which provides insights into Scopes and their usage in DaVinci Resolve.
In conclusion, regardless of which Scopes you use, it's important to understand that they merely present data and serve as a basic guide.
The ultimate video style is still determined by your creative decisions. However, utilizing these Scopes effectively can indeed enhance your workflow efficiency and color grading accuracy.
Final Thoughts About Color Grading in DaVinci Resolve
In this tutorial, we have explored how to color grade in DaVinci Resolve. As we conclude our journey, we would like to introduce you to a powerful tool that can further enhance your editing experience: TourBox.

This innovative device is built to simplify your workflow and give you more intuitive control over your creative process. Add TourBox to your color-grading setup, and you can unlock new possibilities and get the look you want faster.
You can map common DaVinci Resolve functions and shortcuts to TourBox's buttons and knobs — like using a game controller to help with your edits. But TourBox is more than a shortcut mapper.
It also includes many exclusive built-in features. For example, in Resolve, you can use the HoverAdjust feature to get a feel similar to a professional grading console, at a much more affordable price.

Our basic color grading tutorial for DaVinci Resolve comes to an end. It's time to select some of your favorite film and video clips and dive into color grading with DaVinci Resolve. It is through continuous experimentation that you will develop your own unique aesthetic.
So, what are you waiting for? Let's get started and unleash your creativity!