How to Denoise Footage in DaVinci Resolve?
DaVinci Resolve is a powerful yet user-friendly video editor, but cleaning up noisy footage can still be tricky for beginners. Noise most often appears when you shoot in low light, raise the ISO, or use a small sensor — it makes footage look grainy and unpolished.
Fortunately, Resolve offers robust noise-reduction tools that can significantly improve your clips and give them a more professional finish. In this tutorial, we'll walk you step-by-step through how to denoise footage in DaVinci Resolve.

In this article, you will learn:
Method 1: Using Temporal & Spatial NR
If you're looking to reduce noise in your footage using DaVinci Resolve, Temporal & Spatial NR is a powerful tool that can help. Here's a step-by-step guide on how to useTemporal & Spatial NR to reduce noise in your footage:
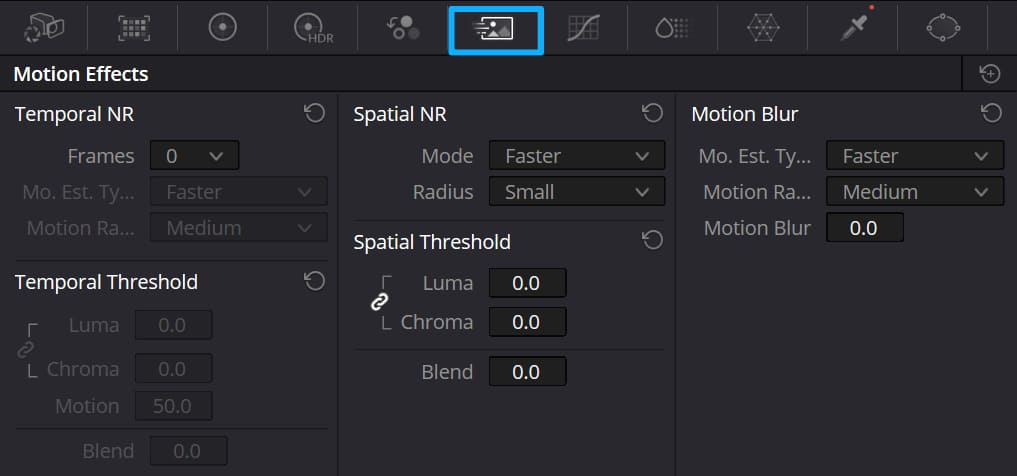
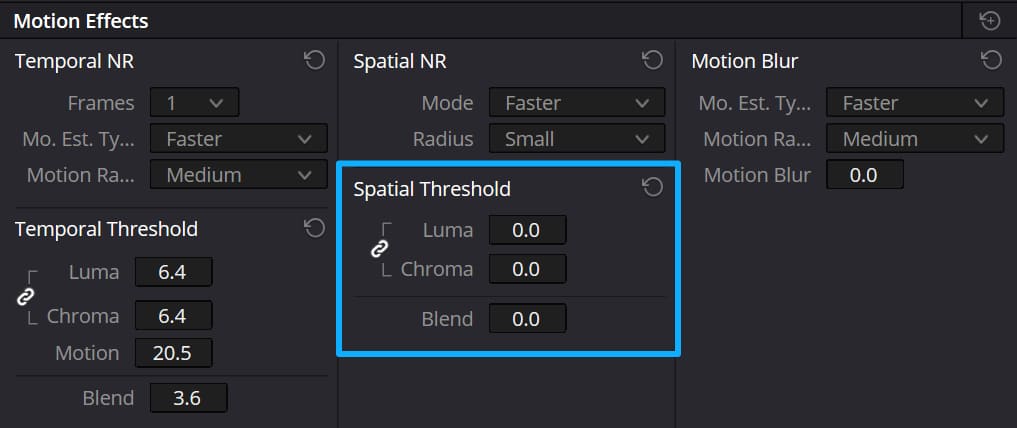
Step 1: Open the Motion Effects Panel
In the Color page, select the node you want to affect (noise reduction is applied to the active node). Click the Motion Effects button in the toolbar to open the panel.
The panel contains these sections:
- Temporal NR (temporal noise reduction)
- Temporal Threshold
- Spatial NR (spatial noise reduction)
- Spatial Threshold
- Motion Blur (not relevant for denoising; it adds artificial blur)
You'll normally be working with Temporal NR (temporal noise reduction) and Spatial NR (spatial noise reduction). These two approaches reduce noise in different ways, and you can use both together as needed.
- Temporal noise reduction compares multiple frames (before and after the current frame) to separate persistent image detail from random noise. It typically gives the best results for film-like grain and flicker, but if applied too aggressively, it can cause ghosting or motion blur — especially where there's fast motion. Temporal NR usually relies on motion estimation to avoid blurring moving subjects.
- Spatial noise reduction works on a single frame, analyzing nearby pixels to smooth high-frequency noise. It's useful for residual noise after temporal NR, but overdoing spatial NR can soften fine detail and produce artifacts such as banding or color blocking.
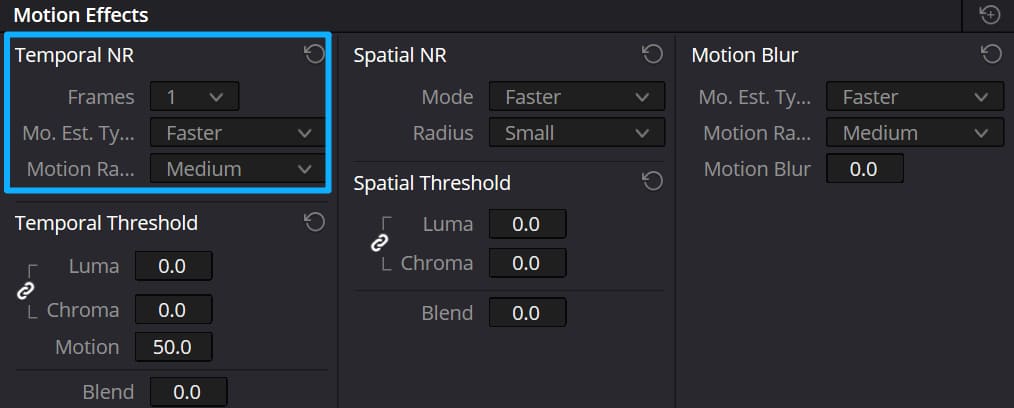
Step 2: Apply Temporal Noise Reduction
Temporal NR uses neighboring frames to separate real detail from noise. It's usually the most effective first step, but it can cause ghosting on fast motion.
Key controls:
- Frames: How many neighboring frames are sampled when averaging. More frames → stronger smoothing and more processing load. Higher frame counts can produce artifacts on fast motion; try a low value (e.g., 1) for quick action.
- Motion Estimation Type (Mo. Est. Type): Controls how Resolve detects motion. "Faster" is less CPU/GPU-intensive but less precise; "Better" is more accurate but heavier. "Off" disables motion estimation and applies temporal NR across the whole frame.
- Motion Range: Tells the motion estimator what scale of motion to expect (Small / Medium / Large). Use Small for slow or minimal motion, Large for fast-moving subjects with blur.
If you have a lot of movement, increase motion estimation quality and fine-tune Motion Range to avoid motion-shadowing or ghosting.
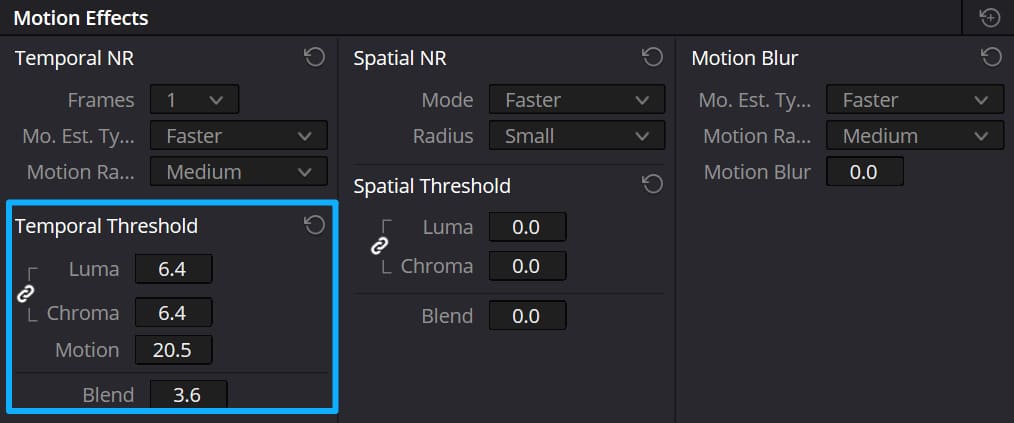
Step 3: Adjust Temporal Thresholds
These thresholds control how much temporal NR is applied to different image components:
- Luma: Amount of temporal NR applied to luminance. Higher values remove more luminance noise but can erase fine detail.
- Chroma: Amount of temporal NR applied to color. Raising chroma can reduce color noise and chroma blotchiness, but too much can wash out color detail.
- Motion (threshold): Defines how the tool treats moving pixels: pixels above this threshold are treated as moving and are generally excluded from temporal smoothing to prevent ghosting. Adjust to protect moving subjects.
- Blend: Mixes the denoised result with the original image. Lower values = more NR; higher values = more of the original. Use Blend to soften the NR effect if details look overly smooth.
Extra Tip
Typically, the luminance and chroma threshold parameters are linked together, so adjusting one will change both thresholds. However, you can click on the chain icon to the left of Luma and Chroma to unlink these two parameters.
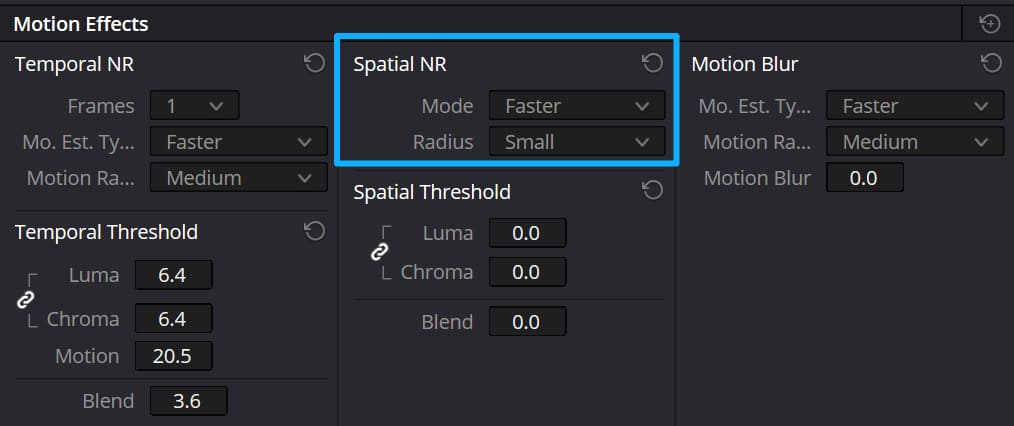
Step 4: Apply Spatial Noise Reduction
If residual noise remains after temporal NR, use spatial NR. It analyzes neighboring pixels within the same frame to smooth high-frequency noise.
Main controls:
- Mode: Choose the spatial algorithm. "Faster" is lighter on resources and fine at low settings; "Better" uses a higher-quality algorithm but requires more processing. You can also choose None to skip spatial NR.
- Radius: Small / Medium / Large. Smaller radii are cheaper and preserve detail better at low thresholds; larger radii smooth a wider area but may blur edges or introduce artifacts if overused.
Step 5: Adjust Spatial Thresholds
These work similarly to the temporal thresholds:
- Luma: Strength of spatial noise reduction for luminance. Avoid very high settings that remove fine detail.
- Chroma: Strength of spatial noise reduction for color. Helps smooth color speckles while preserving edges when tuned properly.
- Blend: Mixes the spatially denoised image with the original. Use this to find a balance between noise reduction and retained detail.
Step 6: Preview and Render
Play your clip in the Viewer to evaluate the results. Scrub and check fast action as well as still areas for ghosting or unwanted smoothing.
Tweak Temporal and Spatial settings until you reach a good compromise between noise reduction and preserved detail.
When satisfied, go to the Deliver page, choose your export settings, add to the render queue, and start the render.
Best Workflow for Denoise Footage in DaVinci Resolve
Start by using Temporal NR (frame-based) and then, only if needed, use Spatial NR (per-frame smoothing). Here's the quick steps:
- Enable Temporal NR and start with Frames = 1–2 (increase only if needed).
- Set Motion Estimation to "Better" for complex motion (or "Faster" for light/no motion).
- Choose a Motion Range (Small/Medium/Large) that matches how fast things move in your shot.
- With Luma/Chroma linked, slowly raise Luma until non-moving areas look cleaner; then fine-tune Chroma (unlink if color speckles remain).
- Adjust Motion Threshold to protect moving subjects (it controls which pixels are considered "moving" and thus excluded from temporal averaging).
- If residual noise remains, enable Spatial NR, pick "Better" for quality, set an appropriate Radius, and raise Luma/Chroma slightly.
- Use Blend (temporal & spatial) to dial back a heavy effect and preserve texture.
- Preview on both still and moving areas, render a short test clip, then export.
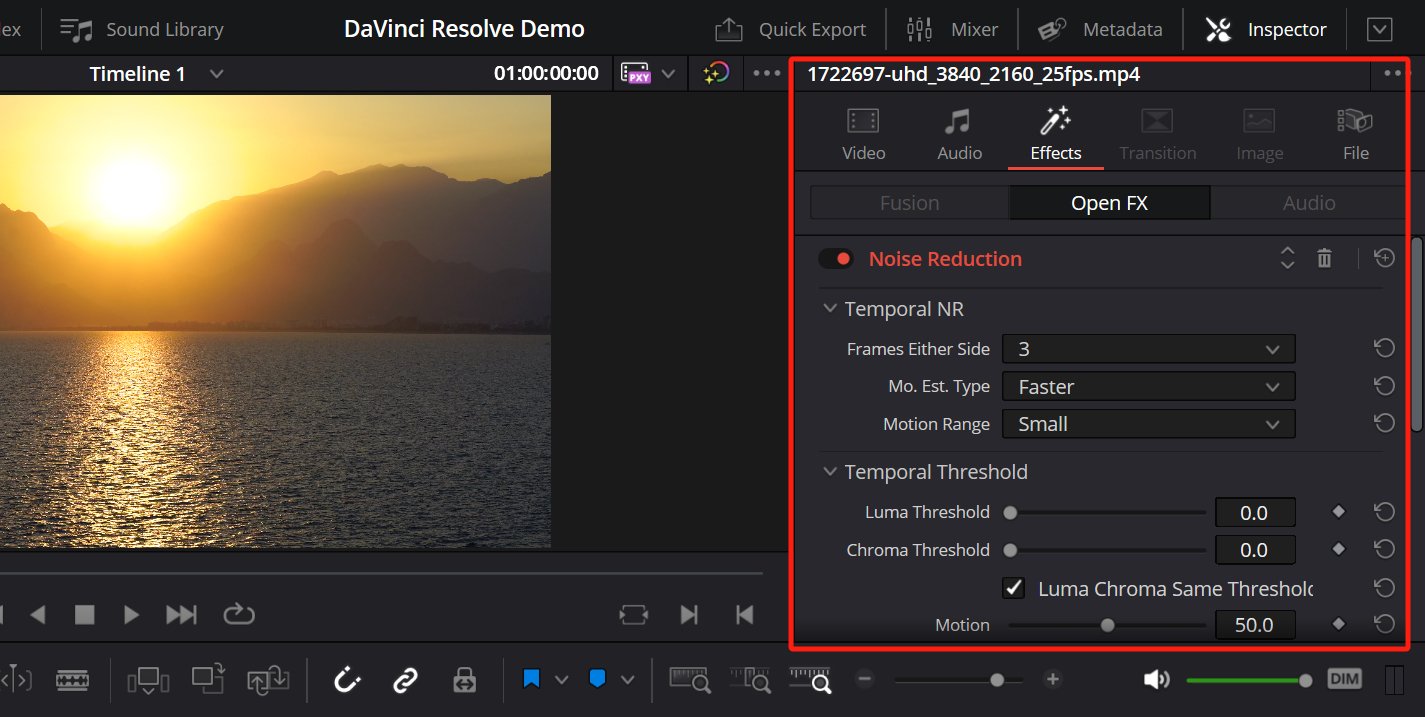
Method 2: Using OpenFX Noise Reduction
In addition to the built-in Motion Effects tools, DaVinci Resolve also offers an OpenFX Noise Reduction effect for more flexible control.
OpenFX is the plugin standard Resolve supports, and the built-in ResolveFX (OpenFX) library includes a Noise Reduction effect that offers both temporal and spatial controls similar to the Motion Effects noise tools.
Step 1: Access the Open FX Library
Navigate to the "Edit" workspace located at the bottom of the interface. At the top left corner of the "Edit" page, click on the "Effects" tab to find the Open FX library.
Step 2: Locate the Noise Reduction Tool
Scroll down the list of available effects within the Open FX library until you find "Noise Reduction". It's located under the "ResolveFX Revival" category.

Step 3: Apply Noise Reduction
Drag the Noise Reduction effect onto the clip in your timeline.
On the Edit page, the effect's parameters will appear in the Inspector under the clip's OpenFX stack.
Alternatively, you can apply and tweak OpenFX effects directly on a node in the Color page using the Color page's OpenFX panel if you prefer working there.
Step 4: Adjust Noise Reduction Parameters
Open the Inspector (top right) to adjust the Noise Reduction controls. You'll find options for both Temporal (frame-based) and Spatial (per-frame) reduction that work on the same principles as Motion Effects:
- Use Temporal first to exploit frame-to-frame information, then use Spatial to clean up remaining high-frequency noise.
- Tweak Luma/Chroma thresholds, motion estimation settings, radius, and blend to balance noise removal against detail preservation.
Conclusion
And that concludes our tutorial on how to denoise in DaVinci Resolve. In this tutorial, we introduced two methods for denoising in DaVinci Resolve, and you can choose the one that suits your specific project or personal preference.
We'd also like to recommend TourBox, a creative tool beloved by many colorists, editors, and content creators. TourBox can simplify every step of your video editing process, and you're sure to love the changes it brings.

TourBox includes built-in features made specifically for DaVinci Resolve. Whether you're adjusting the timeline, editing clips, managing media, or color grading, you can operate TourBox with one hand and complete complex tasks with fewer steps.
If you have a lot of repetitive editing and color work in Resolve, you'll find TourBox can significantly speed up your workflow and improve your overall experience. Visit our video editing and color grading page to learn more.

By using TourBox to quickly and easily make adjustments, you can save time and be more productive. If you want to improve your video editing workflow, consider using TourBox.