How to Scale an Image in Photoshop?
In Photoshop, scaling an image is a common task. Whether you're adjusting the output resolution, creating a poster, optimizing for screen size, or simply shrinking an image for storage, you'll often need to scale an image.
Photoshop offers several ways to do this. This tutorial will guide you through the different methods of scaling images in Photoshop and how to preserve the highest quality possible when enlarging or reducing an image.

In this article, you will learn:
How to Scale an Image in Photoshop?
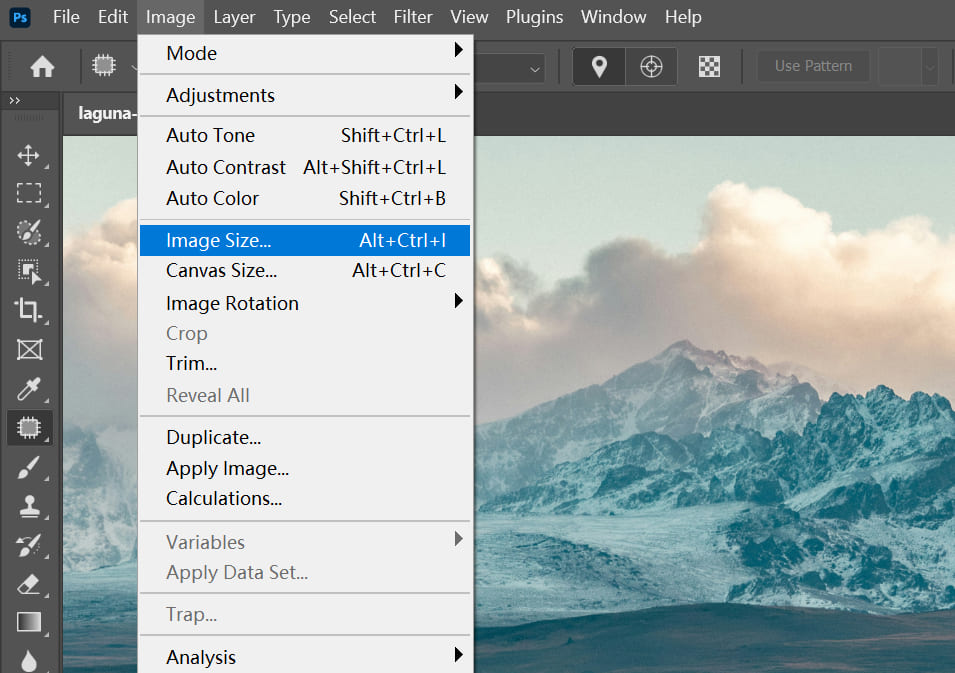
1. Image Size Dialog
In Photoshop, the easiest way to scale an image is by using the "Image Size" dialog box. You can access this by going to the top menu and selecting "Image > Image Size."
In the pop-up dialog, you can directly enter the new width and height values. To maintain the aspect ratio, make sure the "Constrain Aspect Ratio" option (the chain icon) is checked.
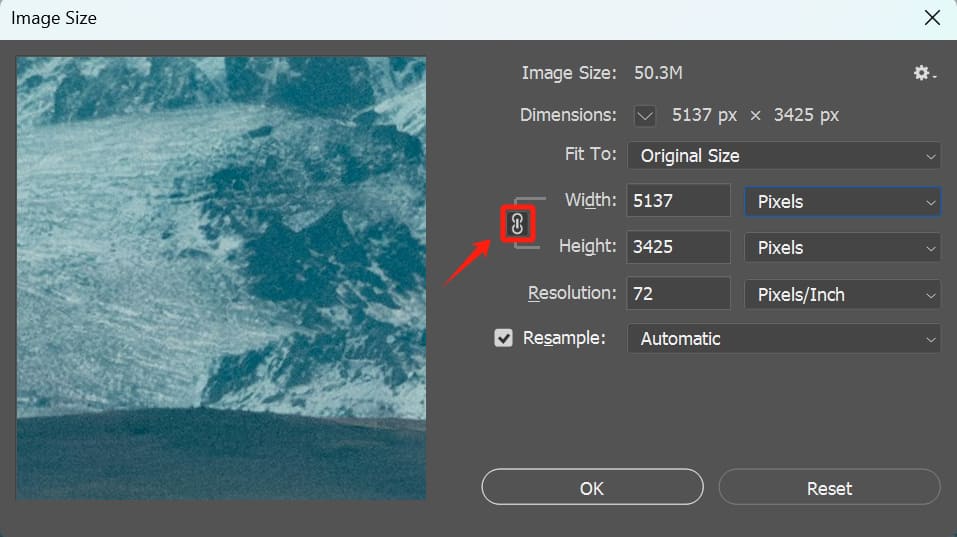
By default, the "Resample" option is turned on in the dialog box.
When "Resample" is checked, adjusting the width or height will add or remove pixels, changing the total pixel count of the image. If you uncheck this option, only the print size or resolution will change, while the total pixel count stays the same.
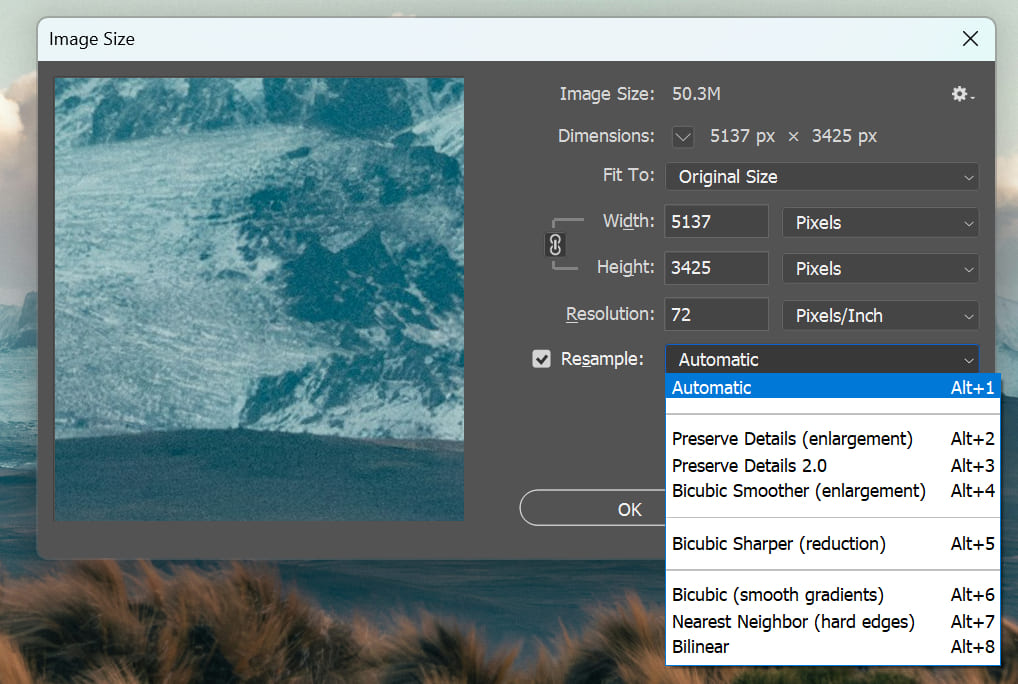
In most cases, Photoshop offers several resampling algorithms in the Image Size dialog box. Each one works best for different situations, and you can choose like this:
- Automatic: Photoshop will automatically switch between algorithms like "Preserve Details (enlargement)" or "Bicubic (Sharper)" depending on whether you're enlarging or shrinking. For most everyday needs, simply choosing "Automatic" will give you a good result without overthinking it.
- Preserve Details (Enlargement): This is the best choice for enlarging an image. "Preserve Details 2.0" offers a better balance of detail and noise control, helping you retain textures as much as possible. However, if you enlarge the image too much, it might have a slight "painting" effect.
- Bicubic Smoother: This can also be used for enlarging and is a softer alternative to "Preserve Details." If you don't need to preserve texture after enlarging and want a smoother, more polished look, give this one a try.
- Bicubic Sharper: This is the go-to option for shrinking images. It automatically sharpens the image as it reduces size, preventing the details from getting too blurry. Compared to regular bicubic, it makes the resized image look sharper.
- Nearest Neighbor: The fastest and most "brutal" option, it works by directly copying or discarding pixels when resizing, which can lead to noticeable jagged edges. Only use this for pixel art, cartoon-style graphics, or special effects.
- Bilinear: Somewhere between Nearest Neighbor and Bicubic, it's faster but gives average results. It's not used often for everyday tasks, but it can be a good compromise.
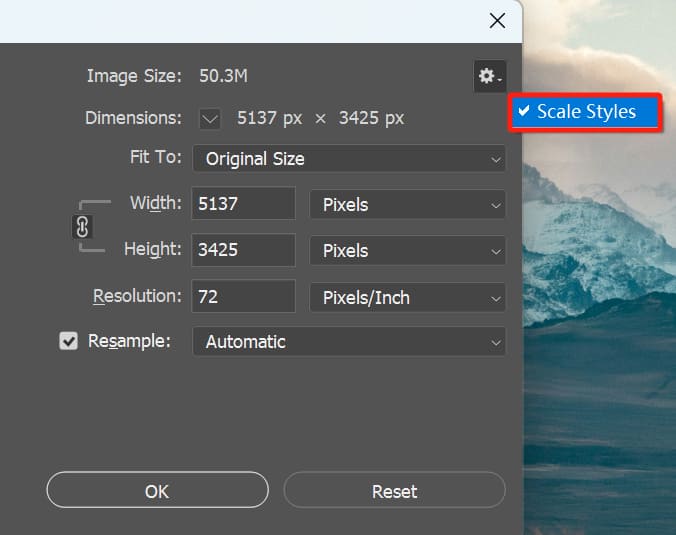
In the top-right corner of the dialog, you can also check "Scale Styles" by clicking the gear icon. This will ensure that any layer styles, like shadows or strokes, are scaled along with the image.
Once you've set everything, click "OK" to complete the scaling.
2. Free Transform Tool
In addition to the menu options, Photoshop's Free Transform tool also allows you to quickly scale layers or selections.
First, make sure the layer you want to scale is editable. By default, Photoshop locks the first layer as the "Background," which cannot be transformed directly. If you need to scale the background layer, double-click on it or click the lock icon in the Layers panel to unlock it.
Once unlocked, you can activate Free Transform by going to Edit > Free Transform in the menu or by using the shortcut Ctrl+T (Win) / Command+T (Mac).
Once activated, you'll see a border with eight control points. You can drag any of the corner points to scale the image. To maintain the aspect ratio while scaling, hold the Shift key as you drag a corner. (In Photoshop CC 2019 and later, you can also use the "Maintain Aspect Ratio" lock icon in the top options bar.)
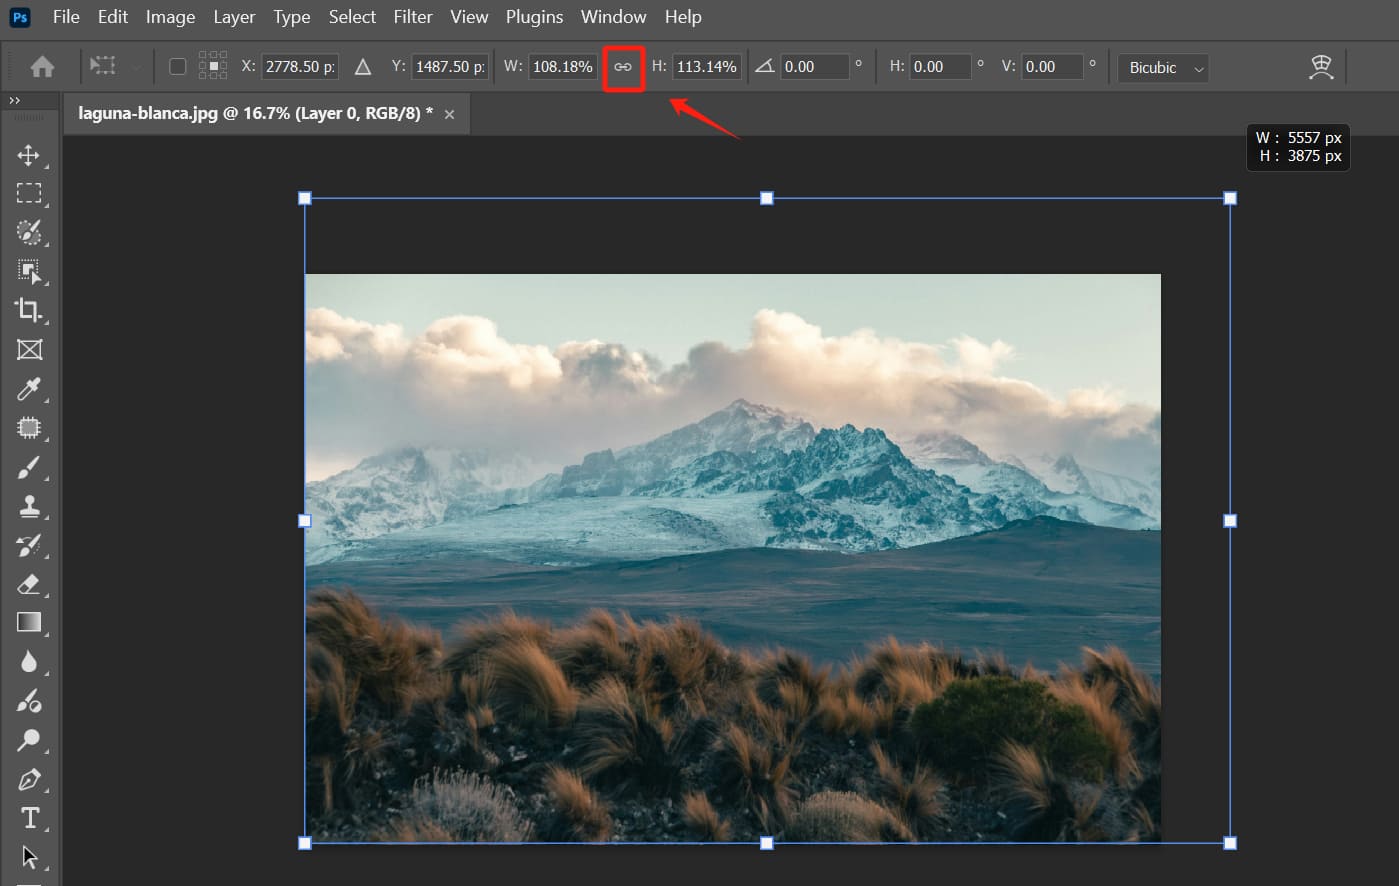
If you want to scale symmetrically from the center, hold the Alt (Win) / Option (Mac) key while dragging the border. Once you've adjusted the size, press Enter to apply the transformation.
Keep in mind, Free Transform works with almost any type of layer, including regular pixel layers, text, shapes, smart objects, and more (except when the background layer is locked).
In general, the Free Transform tool combines the most common transformation commands like scaling, rotating, skewing, and perspective changes. It's a one-stop tool for transformations.
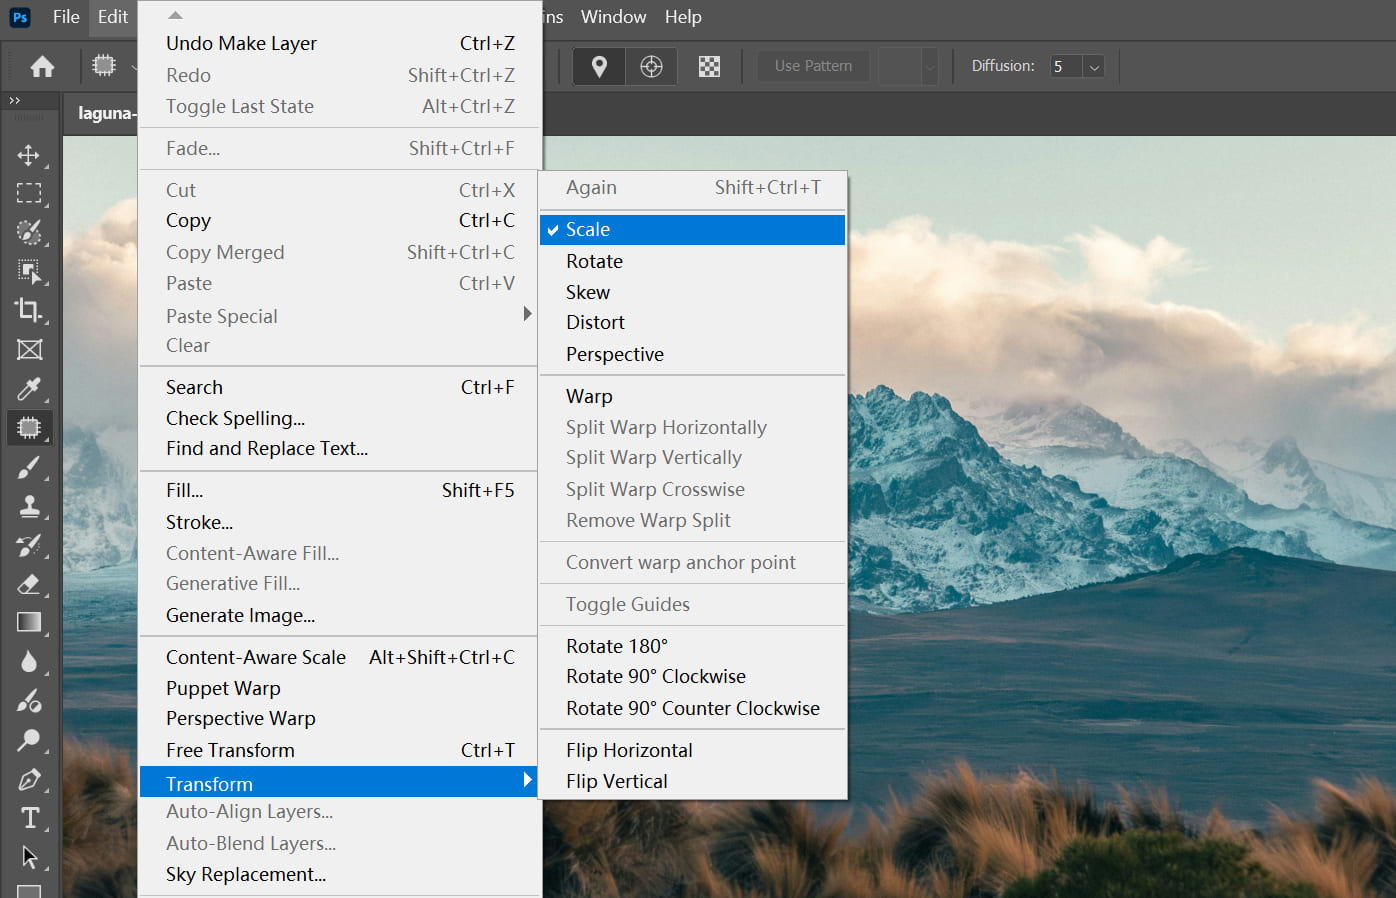
For batch scaling, Photoshop also provides a Transform submenu (Edit > Transform), where you'll find scaling, rotating, and other commands. This submenu functions similarly to Free Transform but offers a fixed transformation type.
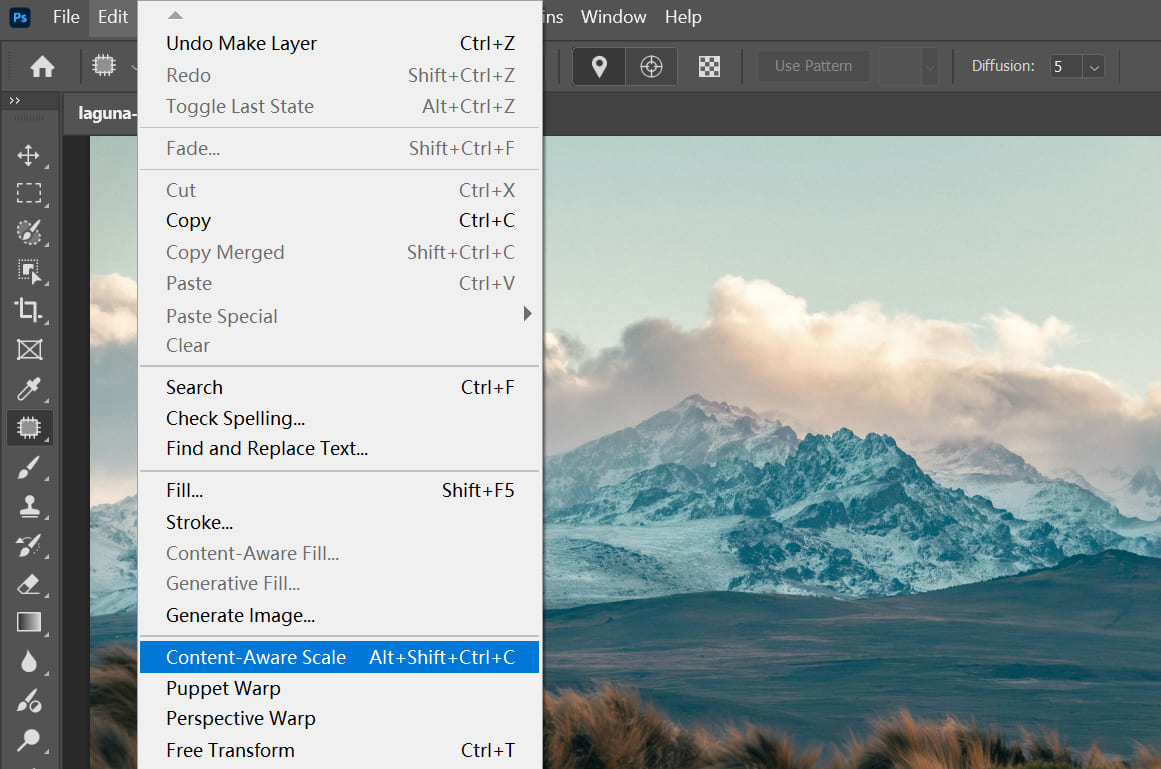
3. Content-Aware Scale
Photoshop also offers an intelligent scaling option called Content-Aware Scale.
You can find it under the Edit menu. Content-Aware Scale allows you to adjust the overall size of an image without significantly stretching important objects like people, buildings, or animals.
For example, if you want to make a background image wider but don't want to distort the main subject in the center, you can use Content-Aware Scale. It works by automatically adding or removing pixels in areas with less important visual content, while preserving the shape of the protected areas.
For more advanced control, you can select the areas you want to protect, save them as an Alpha channel, and then specify that channel during scaling to protect those areas.
This feature is more advanced, so if you're new to Photoshop, it's a good idea to understand the basics first, and then experiment with it as needed. If you're interested, you can check out our article on Content-Aware Scale through the link below.
Further Reading:
How to Use Photoshop Content-Aware Scale: A Step-by-Step Guide
How to Maintain Image Quality When Scaling?
One of the most common problems when scaling images is a drop in quality. This happens because scaling essentially resamples the image pixels, and resample algorithms can cause blurriness or jagged edges. To minimize quality loss, here are a few things you can try:
1. Choose the Right Resample Method
In the Image Size dialog box, make sure Resample is checked. In the Resample dropdown, you'll find several resampling algorithms. We've already provided a brief overview of each one above.
If you're still unsure, here's the simplest answer:
- If you don't want to deal with the details, just choose Automatic.
- For enlarging by more than 120% and wanting to keep details, select Preserve Details.
- For shrinking and adding sharpness, go with Bicubic Sharper.
- If you're looking for the smoothest enlargement, choose Bicubic Smoother.
If you're unsure which one to use, start with Automatic and let the software choose the best algorithm based on whether you're enlarging or shrinking. However, in practice, you can try a few different options to see which one works best for your image.
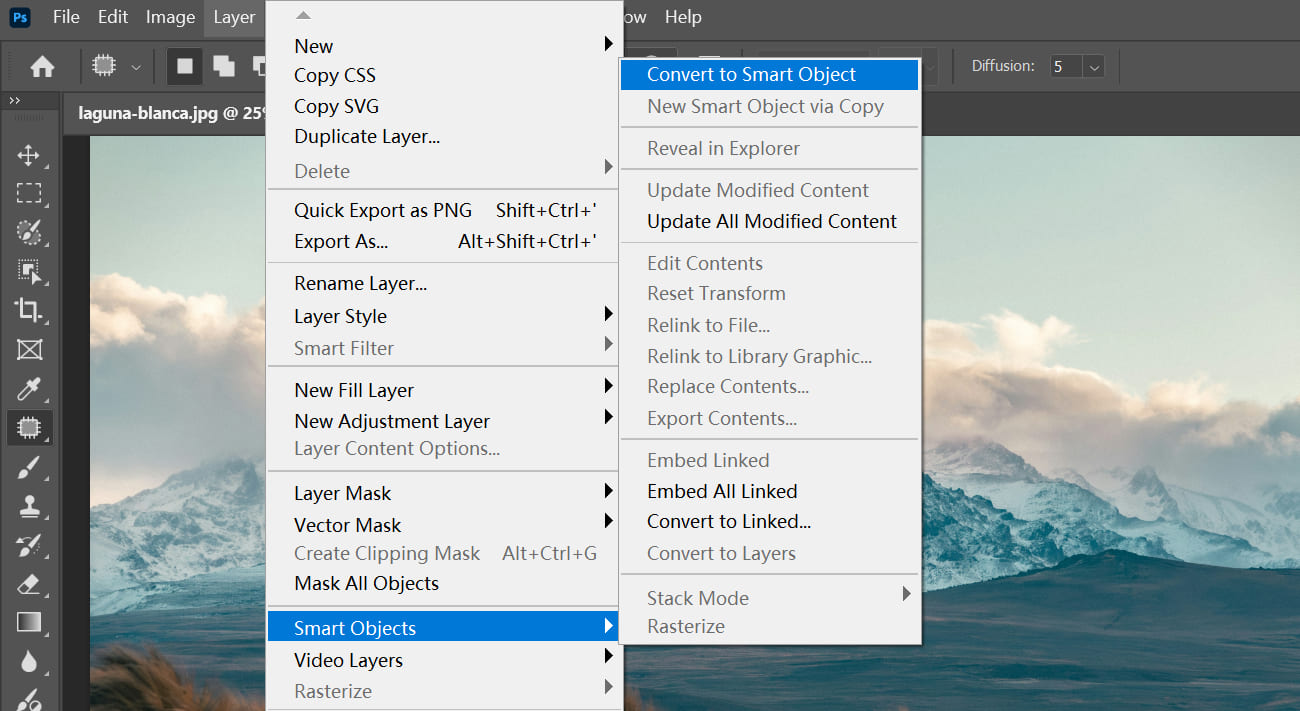
2. Use Smart Objects
Using Smart Objects allows for nondestructive scaling. When you scale a regular layer, some image data is lost after each transformation. To avoid this, we recommend converting the target layer into a Smart Object (right-click the layer > Convert to Smart Object) or choosing Place as Smart Object when placing a file.
Smart Objects preserve the original image data, so each time you scale, rotate, or transform it, the operation is applied to the Smart Object, but the original pixels remain unaffected.
This way, whether you enlarge or shrink the image multiple times, Photoshop will always render it based on the original, complete data, preventing cumulative errors and quality loss.
To use this feature, select the layer and go to Layer > Smart Objects > Convert to Smart Object in the top menu, then proceed with your usual scaling.
Once you're done and no longer need to make adjustments, you can right-click the Smart Object layer and choose Rasterize Layer to convert it back to a regular layer.
Further Reading:
Master the Power of Smart Object in Photoshop: An Essential Tutorial
3. Be Careful with Multiple Resizes and Sharpen Moderately
As mentioned earlier, scaling an image can make it slightly blurry. So, when creating smaller images, you can reduce the pixel sampling slightly and then use the USM Sharpen filter to sharpen it.
In other words, when you shrink an image, applying a sharpening filter can help restore details and make it appear clearer. When enlarging, if the image feels a bit soft, you can lightly sharpen it after scaling.
Just be careful not to over-sharpen, as this can create noise or jagged edges.
4. Control the Final Resolution
If you need to output a high-resolution image, the best approach is to work with higher-resolution material from the start (or use images with a higher scanning resolution). It's not ideal to enlarge a low-resolution image too much, as the quality loss will be noticeable.
5. Other Tips
When using the Free Transform tool, you can press Esc before dragging the control points to undo the current transformation, or press Enter/Return to apply the transformation. Additionally, using common shortcuts like Ctrl+Z (undo) or Ctrl+D (deselect) can speed up your workflow.
Photoshop's help documentation lists many useful shortcuts, and the shortcut for Free Transform is Ctrl/Command+T. Understanding and using these shortcuts can make your resizing work much faster.
Further Reading:
Common Photoshop Keyboard Shortcuts: Tips to Boost Your Workflow
Alternatively, you can try TourBox, a controller that can significantly improve a creator's workflow.

You can map commonly used software shortcuts or tools onto the TourBox, so instead of searching through long menus or remembering hard-to-keep shortcuts, you can quickly access these tools with the press of a button.
Of course, TourBox is not just a simple shortcut mapper. Its unique algorithms offer several features to help creators improve efficiency and their creative experience.

For example, Built-in Functions (for binding actions without shortcuts), TourMenu (for integrating feature menus), and Macro (for batch processing tasks). You can use these features to expand the possibilities of your work.
Conclusion
In this article, we shared how to scale images in Photoshop. Specifically, you can change the image size using menu commands, shortcuts, and transformation tools like Free Transform.
To keep the original image sharp, it's also important to learn the right resampling techniques and how to use Smart Objects.
We hope this guide helps you easily master various Photoshop scaling techniques and create great work!