How to Use LUTs in DaVinci Resolve?
In DaVinci Resolve color grading, LUTs are a core tool for speeding up your workflow. They can quickly restore the original colors of your footage or give your image a cinematic look with one click. But many beginners find LUTs abstract and hard to understand. They don't know how to use different types of LUTs or import or export them.
Today, we bring a detailed guide on using LUTs in DaVinci Resolve — from basic concepts and categories to step-by-step operations. You'll learn to use LUTs with ease and double your color-grading efficiency!

In this article, you will learn:
- What Is a LUT?
- Types of LUTs
- How to Import and Export LUTs in DaVinci Resolve?
- DaVinci Resolve Color-Grading Tips
- Conclusion
What Is a LUT?
LUT stands for LOOKUP table. It is a table used to look up values. Sony's definition is simple: a LUT is a table of fixed numbers whose main job is to change an image's contrast and color.
How it works is easy to understand. When you apply a LUT in DaVinci Resolve, the software reads each pixel's original color. It then finds the matching output color in the LUT table and replaces the original color with that output color. This all happens instantly, which is why LUTs speed up grading.
In short, a LUT is a "color conversion formula" for your image. Different LUTs use different conversion rules, and you choose one based on what you need.
Further Reading:
Types of LUTs
In real grading work, LUTs fall into three main types: calibration LUTs, restore (transform) LUTs, and creative (style) LUTs. Restore and creative LUTs are the ones we use most. Below, we explain each type and how to use them.
1. Calibration LUT
A calibration LUT is the most "basic" of the three. Its main job is not to color-grade the picture, but to calibrate the image on DaVinci Resolve's viewer or an external monitor. This helps you see more accurate color and brightness while you grade. That way, you won't be misled by a monitor that shows the image wrong.
How to use it (simple steps):
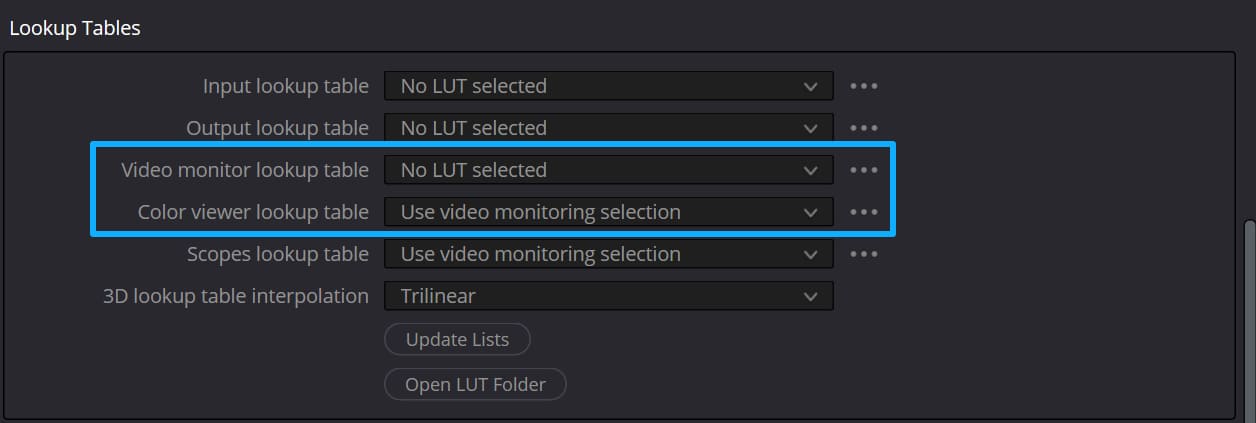
- Open Project Settings (bottom right of DaVinci Resolve).
- In Color Management, find the Lookup Tables option.
- Load the calibration LUT you need.
After you load it, the viewer or monitor will be calibrated. You usually only need to do this once. Calibration LUTs are not used often during daily grading — the focus stays on the other two LUT types.
2. Restore LUT (Transform LUT)
Restore LUTs, also called transform LUTs, are essential for working with raw footage. Almost all professional footage needs a restore LUT to get a correct base image.
Why use a restore LUT? On professional shoots, cinematographers often record in Log mode to keep highlight and shadow detail. Log footage looks flat and low in saturation when you view it directly. A restore LUT converts that flat Log image into a normal-looking image with correct color and contrast for a standard monitor.
How to apply a restore LUT:
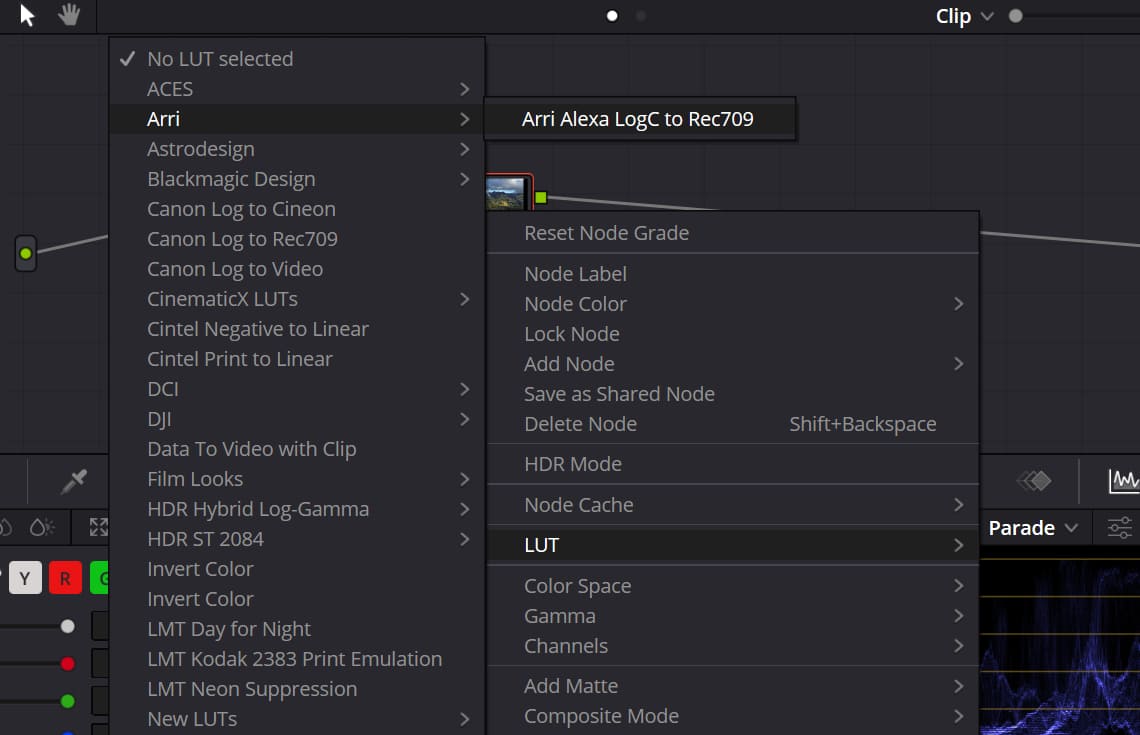
- Identify the camera used to shoot the footage (for example: Arri, Sony, Canon).
- DaVinci Resolve includes built-in restore LUTs for major camera brands — no download needed. In the Color page, create a new serial node for the clip. Right-click the node, choose LUT, then find the matching restore LUT under the camera's category (for example, Arri -> Log C to REC709).
- Click the LUT. The flat Log image will instantly change to a normal-looking image.
Important reminder: Applying a restore LUT does not make the image "perfect." It gives you a correct base. You still need to fine-tune saturation, contrast, and tones to match the shooting conditions and your creative intent.
3. Style LUTs
Style LUTs are the most creative kind. They are a quick shortcut for beginners to get a polished look. Their main job is to give your footage a specific visual style or tone fast.
Whether it's a classic film look — like the teal-and-orange tone in Joker — or trendy film-like, vintage black-and-orange, or Hong Kong-style tones, a style LUT can do it in one click. You don't need to tweak colors by hand. This saves a lot of grading time.
How to apply:
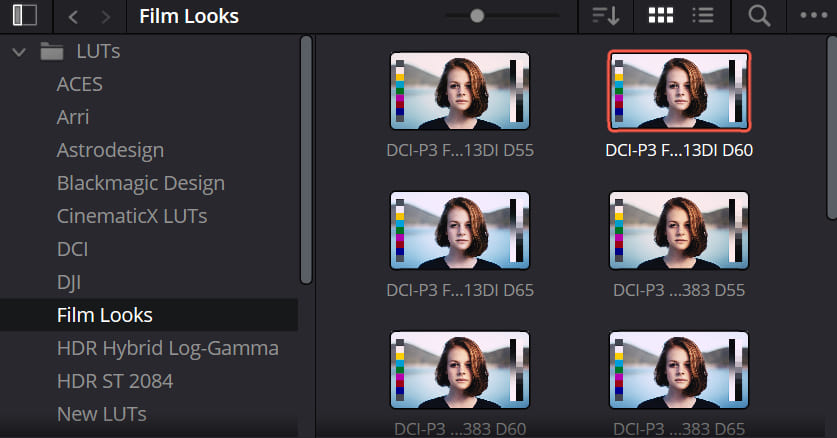
- In DaVinci Resolve's Color page, open the LUT library and pick a style LUT you like from the built-in options.
- Add the chosen LUT to a serial node on the clip. The image will switch to that style right away.
Key tips for using style LUTs:
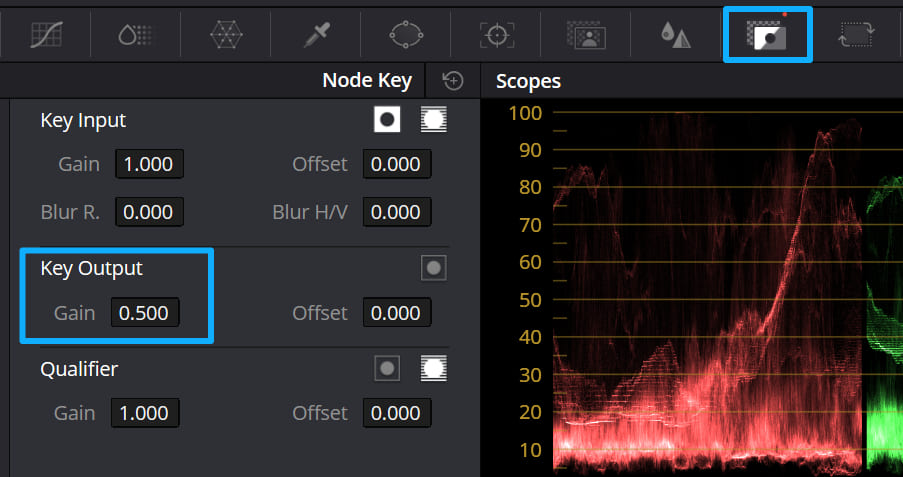
- LUTs have limited precision. After applying a style LUT, the result may not match your idea exactly (for example, the tone may be too strong or slightly off). You will need to fine-tune.
- Go to the Key panel on the Color page and adjust the Gain control to change the LUT's strength. This helps the tone look more natural.
- A more professional approach is to add serial nodes before and after the LUT node. Use those extra nodes for subtle tweaks (for example, adjust local colors or lower the saturation of one hue). That keeps the LUT's style but makes the image fit your creative goal better.
How to Import and Export LUTs in DaVinci Resolve?
DaVinci Resolve's built-in LUTs are often enough. But if you want more niche or unique looks, you'll need to import external LUTs. If you create a look you like, you can also export it as a custom LUT and reuse it later.
These two practical tricks are key. The steps are clear and easy to follow.
1. Import an External LUT
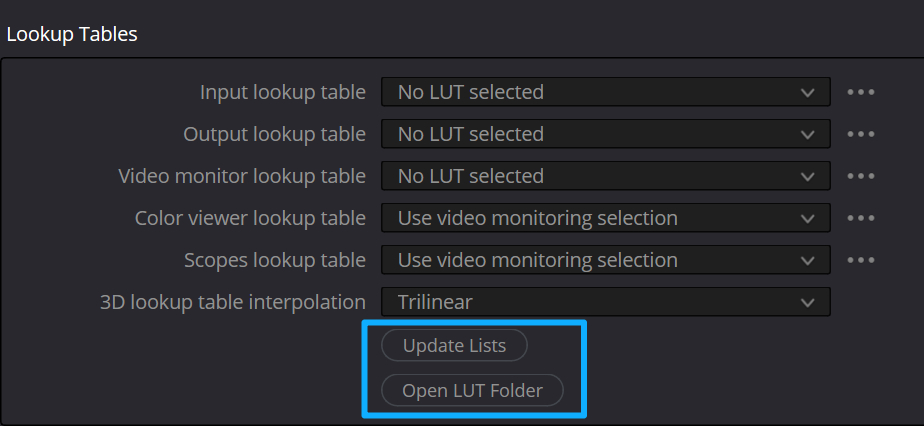
- Open Project Settings in DaVinci Resolve. Go to Color Management and find the Lookup Tables section.
- Click the button to open the LUT folder. A file browser window will open to Resolve's LUT folder. Copy the external LUT files or folder into that window.
- Return to Resolve and update the LUT library (or restart Resolve). The imported LUTs will appear in the LUT library, and you can use them.
2. Export a Custom LUT
- Finish all grading for the clip in DaVinci Resolve and make sure the image looks the way you want.
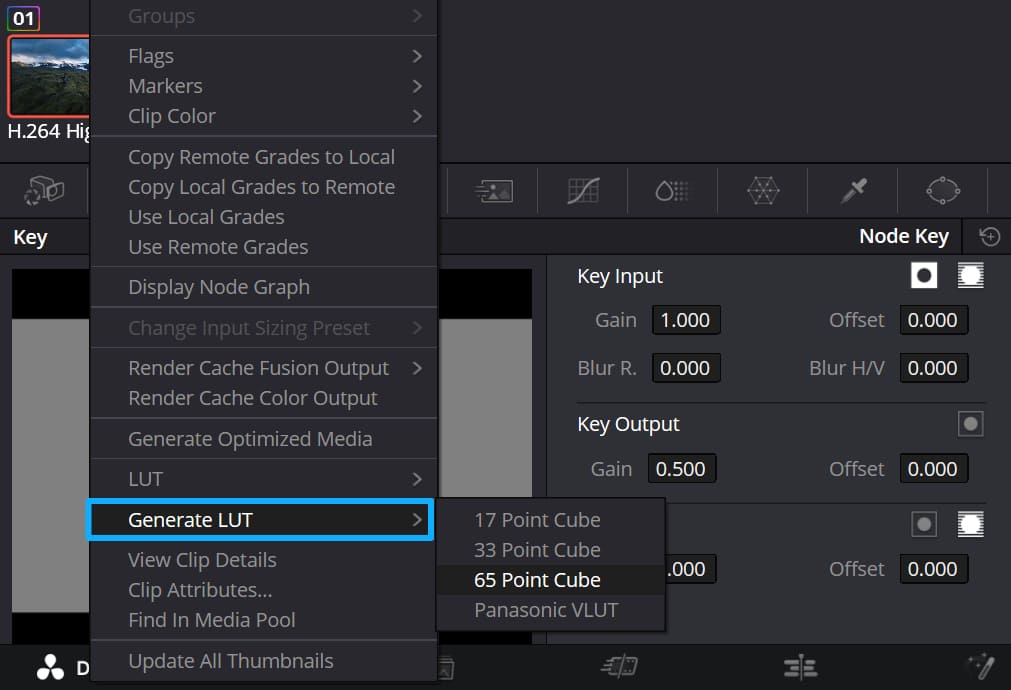
- On the Color page, in the Clip panel, right-click the graded clip's thumbnail. Choose "Generate LUT" from the menu. Pick the LUT precision you want (higher precision keeps color more accurate but makes a bigger file).
- In the dialog, give the LUT a name, pick a save location, and click Save. Your graded look is now exported as a custom LUT you can apply to other clips.
DaVinci Resolve Color-Grading Tips
1. Log Footage Workflow
Apply a restore LUT first to get normal colors. Then add a style LUT on top. Finally, make small adjustments. This workflow is the safest. It helps avoid messy color changes.
2. Node Tips
Put the LUT on its own serial node. That makes it easy to turn the LUT on or off and compare before/after. You can also tweak that node alone without affecting other steps.
3. LUTs Are Only a Tool
Don't rely on LUTs too much. They speed up your work but don't finish the job. The small fixes after applying a LUT are what make the image look unique and high-end.
4. Use TourBox
When you drag curves, color wheels, or other controls with a mouse in DaVinci Resolve, the values can jump when you release the mouse. That makes precise tweaks hard.

If you use TourBox — a popular controller among editors, creators, and colorists — you can hover the mouse over a wheel, slider, curve, or value box and use TourBox's physical knobs to adjust settings. It feels like using a game controller.

You can also map common shortcuts to TourBox buttons and knobs. This speeds up organizing, playback, editing, and grading in Resolve. If you want to learn more, check our DaVinci Resolve page.
Conclusion
LUTs are a core tool in DaVinci Resolve. They may look hard to learn, but they are easy to use once you know the basics.
The key is to learn the three LUT types: calibration LUTs make your monitor more accurate, restore LUTs bring footage back to normal color, and style LUTs create a mood. If you also learn how to import external LUTs and export your own custom LUTs, beginners can quickly make great-looking images.
But the real core of grading with LUTs is understanding color and tone. LUTs help you reach your creative idea faster, but you still need to fine-tune things by hand. Combining LUTs with manual tweaks is what makes the final look match your vision.