Beginner Photography Tips: Simple Ways to Take Better Photos Today
For beginner photographers, once you buy a camera, you can't wait to start shooting. But complicated, boring camera settings and the intimidating path of learning post-processing can really crush your confidence to go out and shoot.
So today we won't talk about gear choices, complicated camera settings, or specific pre- and post-shoot workflows. Instead, we'll share some easy, useful, and beginner-friendly photography tips that will help you quickly take great photos and enjoy photography.

In this article, you will learn:
- Photography Tip 1: Learn to Use Light
- Photography Tip 2: Learn to Use Color
- Photography Tip 3: Master Shutter Speed
- Photography Tip 4: Simple Post-Processing
- Conclusion
Photography Tip 1: Learn to Use Light
We all say photography is an art of light and shadow. Light is the most important element in photography — nothing else compares.
Without light, neither the photographer nor the camera can see the world. But light is not just a tool for recording images. Different light conditions can make very different photos.
1. Backlighting
First, look at the photo below. In this loving scene, the light adds a warm, family feeling. The soft, golden light leads the viewer's eye from the child to the mother and then to the animal outside the door.
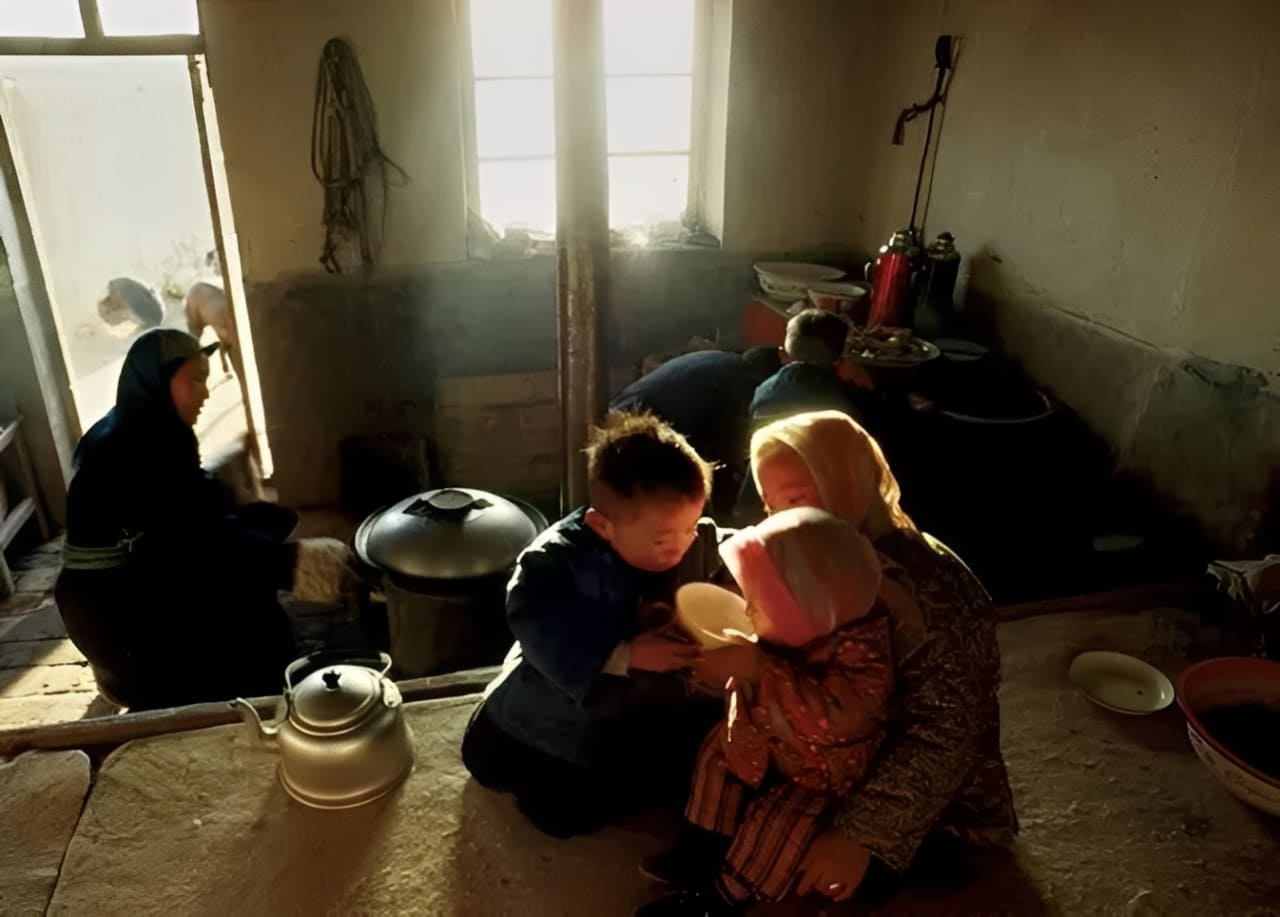
This photo was taken with backlighting. Backlighting is a very simple and useful technique. You don't need special training to use it.
Just remember one thing: light can emphasize where you want the viewer to look. Used well, light will guide the eye to the most important part of the picture. With light, you can add a halo to hair, clothing, or other details.
Of course, when shooting backlit scenes, it's best to underexpose a bit to keep highlight detail.
2. Soft Light
Portraits often use soft light. Soft light helps the model relax, smooths skin texture, and creates a connection through the eyes. In the memorable portrait below, light plays the lead role. It draws the viewer's eye to the cowboy's eyes. The light comes from the side and just lights the cowboy's hat, exposing the highlights rather than the shadows.
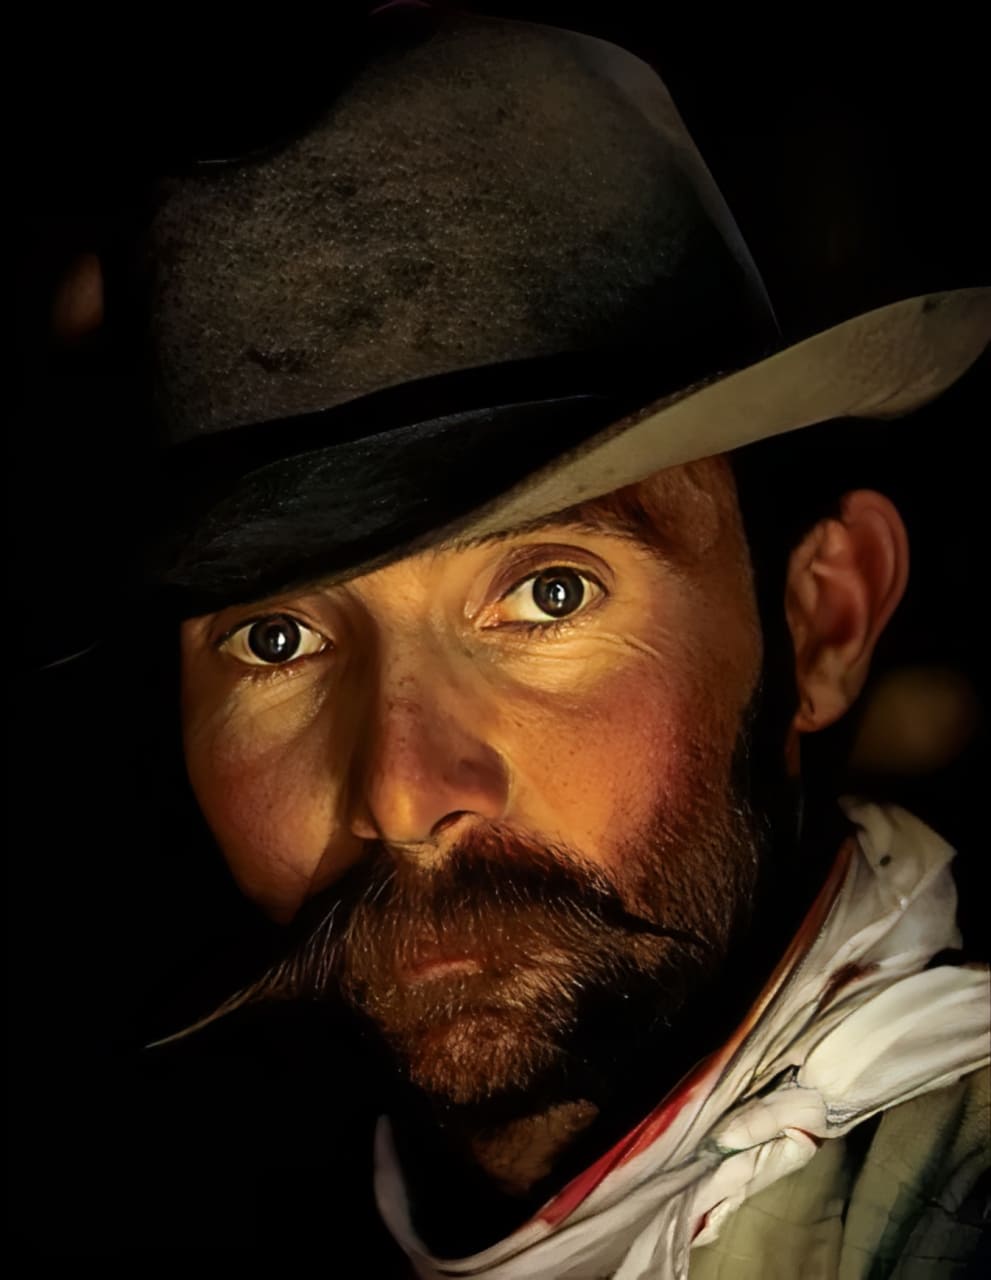
When shooting portraits, try this tip. Especially indoors, light from windows and doors can make beautiful photos. Put the model near the light, underexpose some areas, and control the light so it only lights the most important parts.
3. Capture the Light
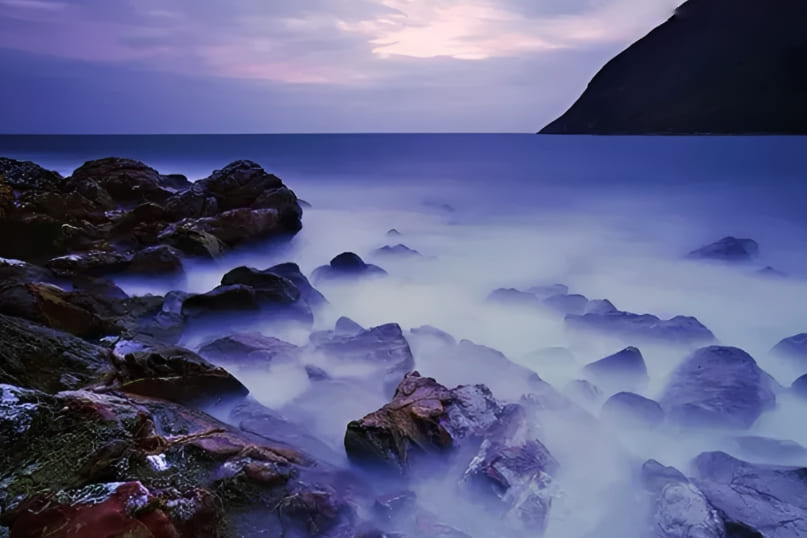
Winter photos are naturally cool in tone. Snow reflects the sky and can look purple at dawn or dusk. In the snowy scene below, the photographer waited until the last sunbeam hit the treetops before pressing the shutter. The contrast between the warm dusk glow and the cool purple snow makes the photo stand out.
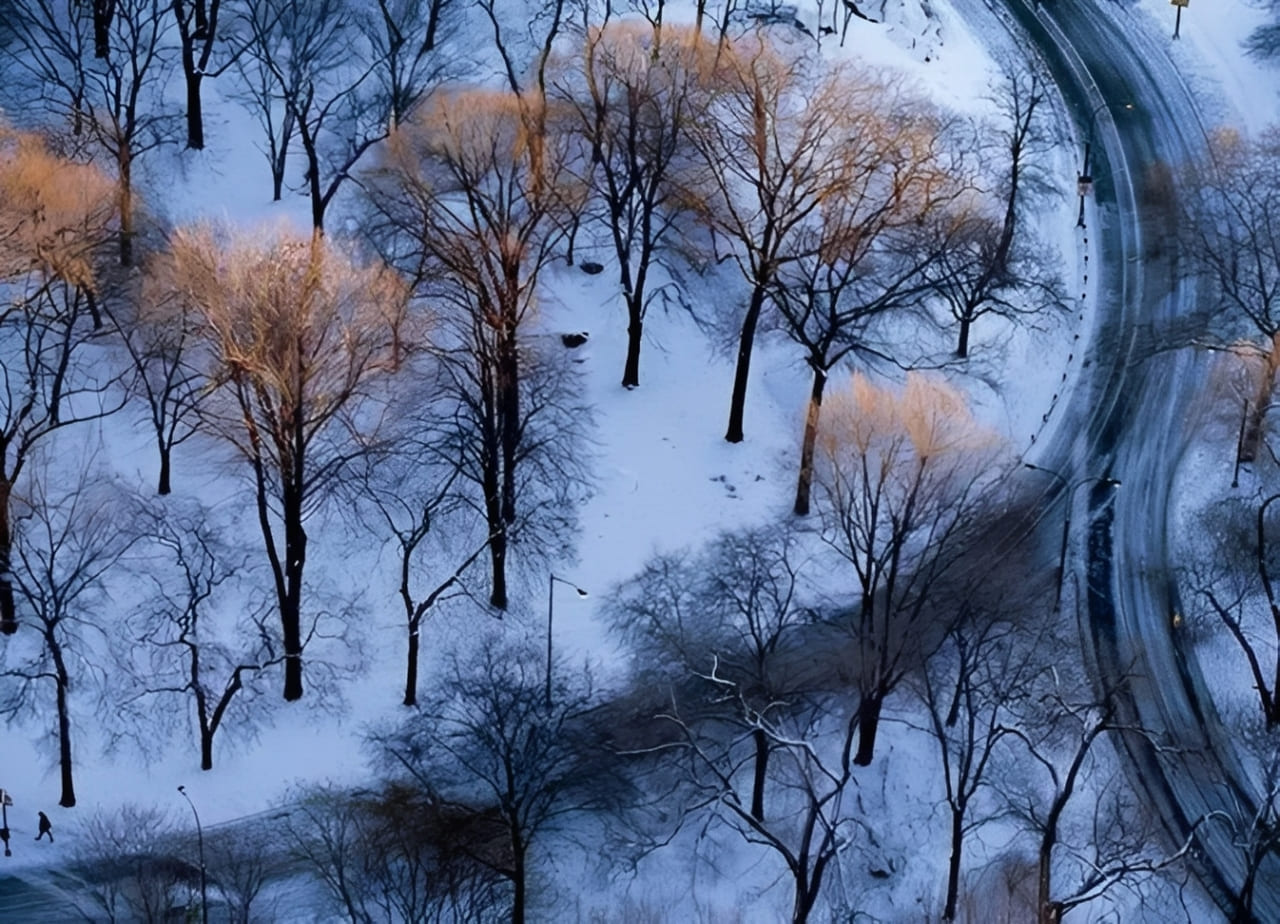
This tip is useful in landscape photography. When shooting at sunset, don't only focus on the sun itself. The best subjects are often the scenes bathed in the sunset glow.
4. Proper Exposure
The photo below shows dynamic symmetry created by light. Bright light on the mountain balances the dark reflection in the water. The photographer used proper exposure to keep the light's detail.
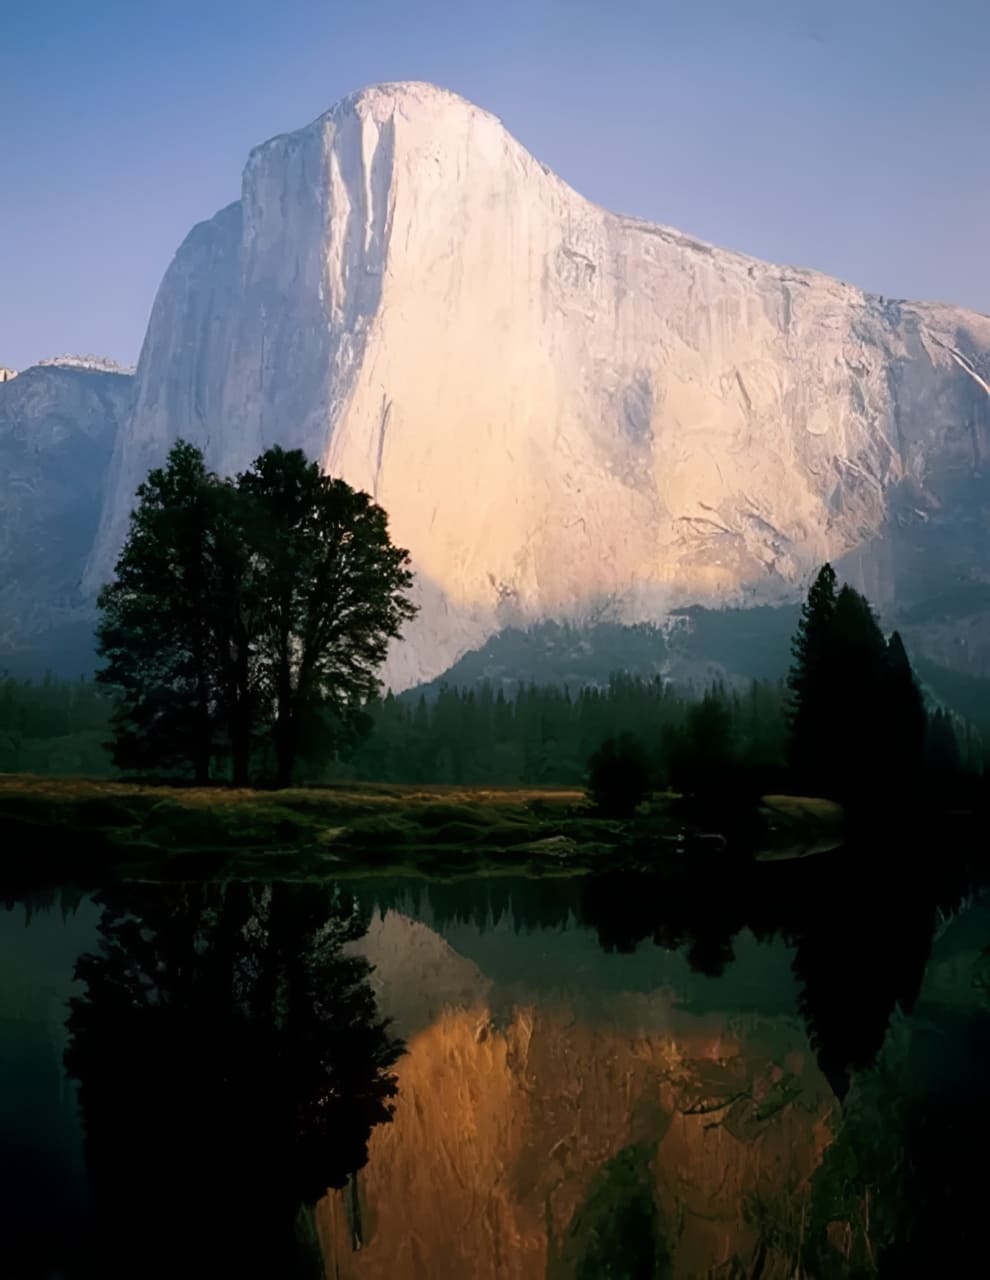
When shooting high-contrast scenes, think carefully about exposure. Try different choices and see which result looks best.
5. Bad Weather Can Make Great Photos
The best kind of bad weather is a storm. Often, the sun breaks through the clouds and lights one spot in the scene. In the storm photo below, that single beam of light made the shot.
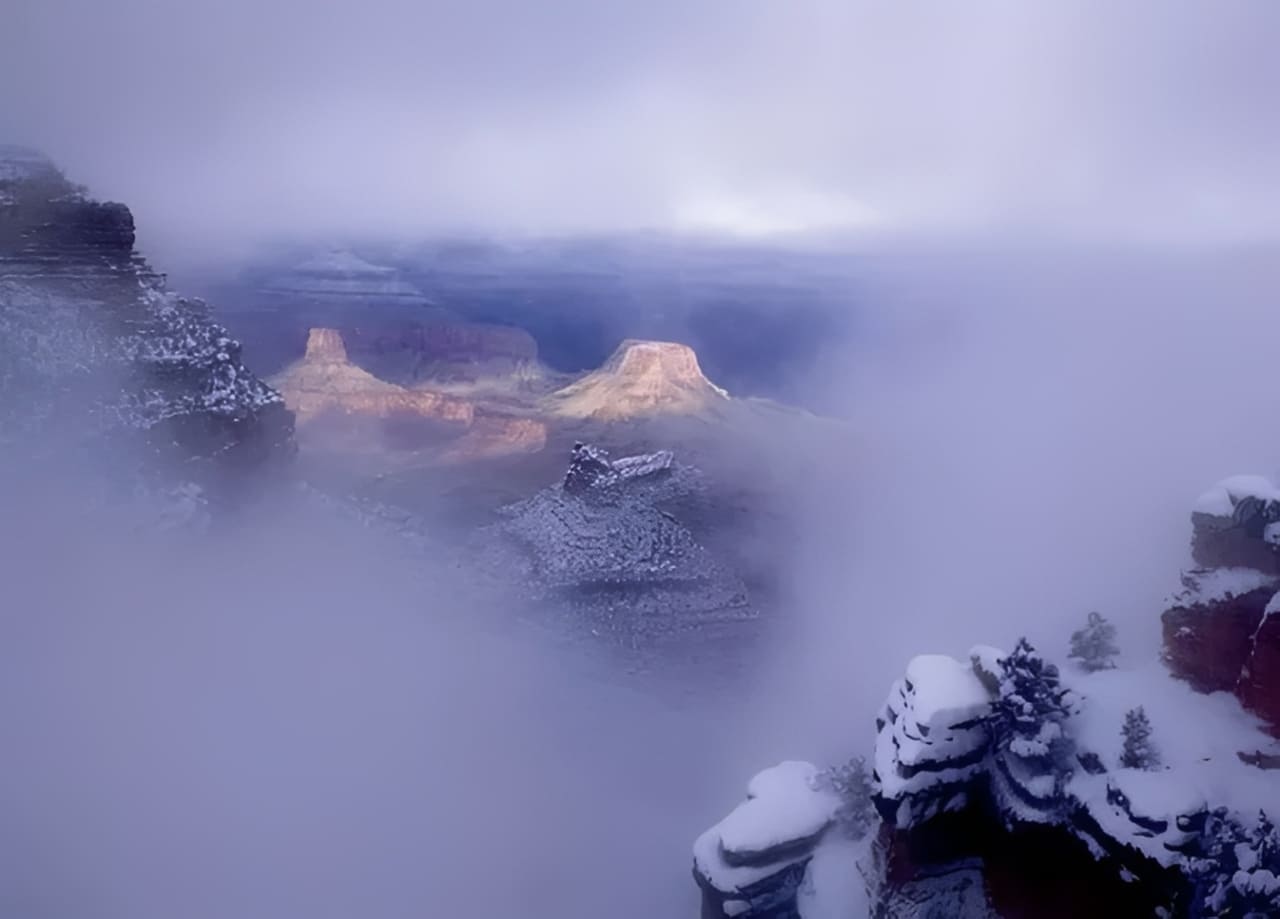
If you like landscape photography, try being a storm hunter. Especially if you want to improve in landscape work, shoot in bad weather (but stay safe). Nothing is more boring than a perfectly clear sky.
6. Make the Most of Different Colored Light Sources
The photo below was taken in Las Vegas. The photographer used many different light sources. Each source had its own color, and together they perfectly captured Las Vegas's mood.

This is especially true at night. Look for different colored lights (especially artificial ones) and use them. They can open up endless creative possibilities.
7. Use Light to Your Advantage
In the photo below, the photographer shot from a low angle, and the subject's body added a lot to the image. Sunlight passed through dust, and the low angle showed that effect. Strong sunlight can remove most shadows; only the parts blocked by the subject form silhouettes that get correctly exposed.
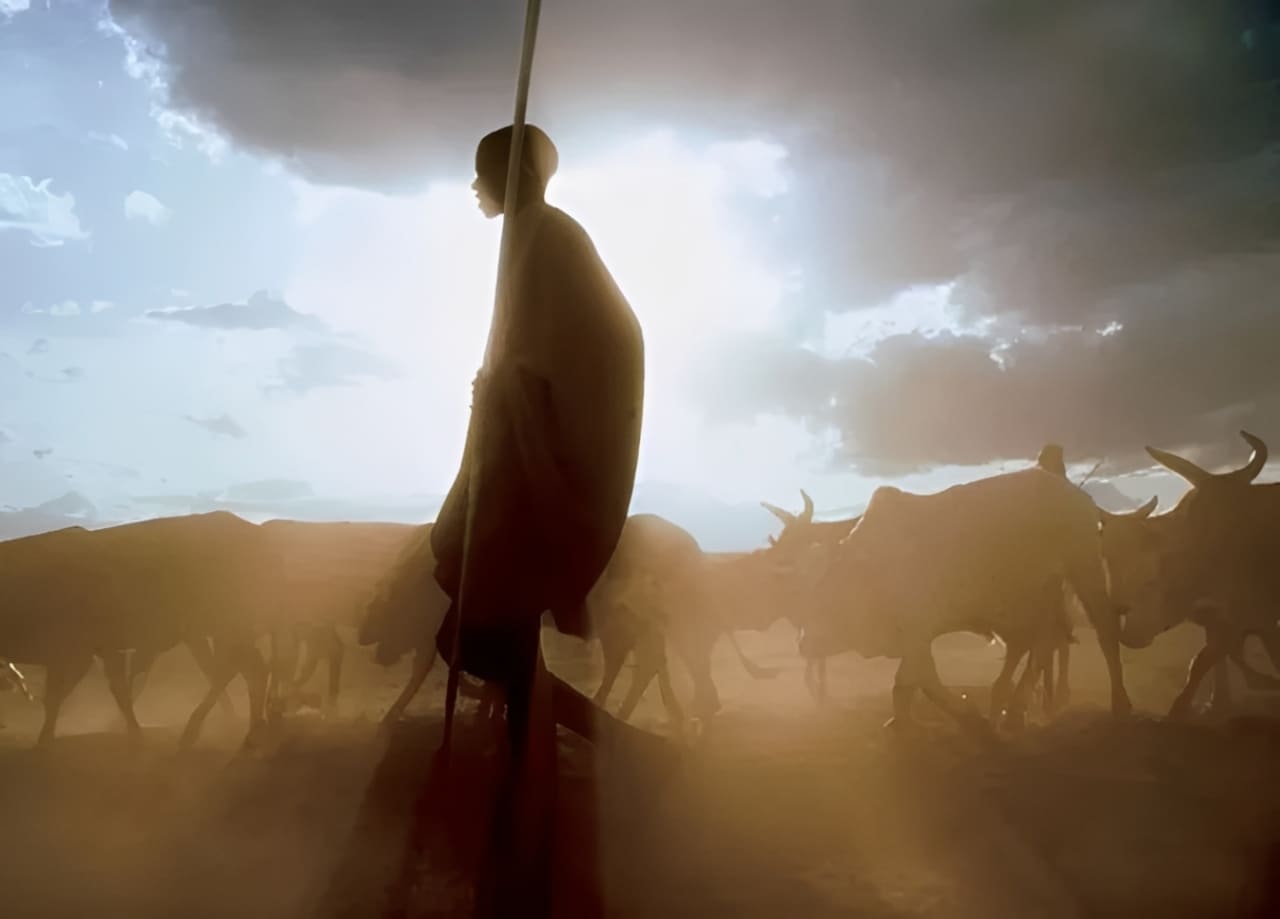
This kind of light is usually not ideal, but if you know how to use it, you can create magical photos. So, try different approaches to make the most of the light on location.
Photography Tip 2: Learn to Use Color
The expressive power of photography comes from many things, and accurate color is one of the most important. Both the natural world and the human-made world are full of rich, changing colors.
In actual shooting, getting the right color balance may mean changing your angle, moving closer or farther, or even switching lenses. Let's look at how to master color balance in your photos and make beautiful images!
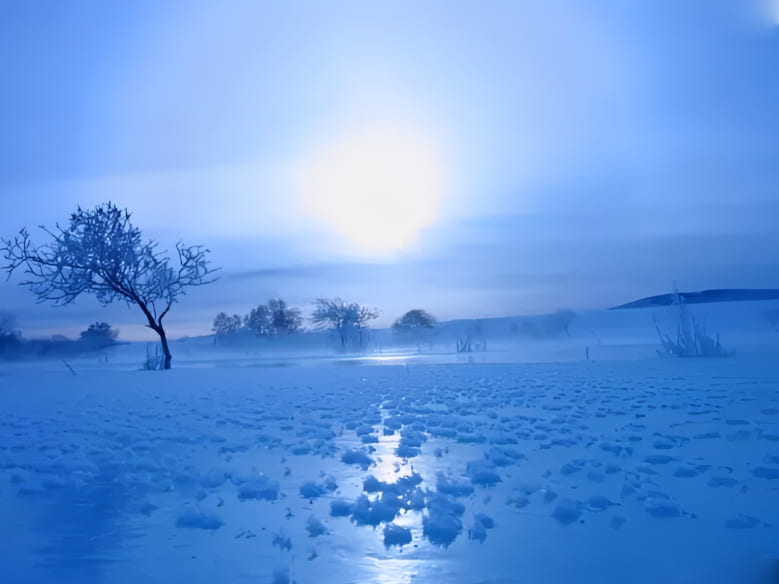
1. Warm and Cool Colors
Color gives a photo strong emotion. For example, blue is a cool color, especially blue with a purple tint. When blue dominates, viewers may feel a chill. If a spot of yellow or red appears in a blue scene, it feels warm. Use color to shape how viewers feel about the whole photo.
The landscape below succeeds with a strong cool blue tone. Everything in the photo suggests winter, peace, and quiet. In the morning, the backlit ice field and the frozen river with small grasses and trees are wrapped in cold mist. Even though the sun is behind clouds, the scene feels sacred and beautiful.
In contrast, warm colors give viewers a feeling of warmth and happiness. They can also add power to an image.

2. Contrasting Colors
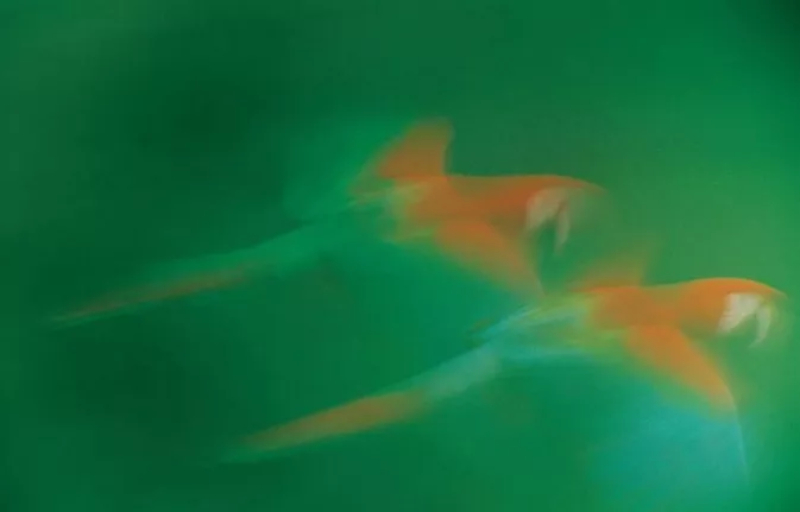
Contrasting colors help viewers find the subject. That gives the photographer more room to create.
In the photo below, color contrast lets us recognize the flying macaw. The bird's bright, distinctive colors show through even with a long exposure and some motion blur.
3. Balancing Color
In a simple-color photo, one different color can add interest. But where that color sits must be thought through to balance the whole image.
In this photo, red leaves lie on the stream and break up the scene. Even though it's a falling-leaf stream, the frozen moment is memorable. In the green-blue moss-reflected water, the red acts as a balance.

4. Similar Colors
Different colors that feel alike can mix to create a unified impression. This works for soft colors and bright colors alike. Putting a group of similar colors against a single-color background can amplify that feeling.
In the photo below, colorful pencils are lined up together. The image feels joyful.

5. Color Sets the Mood
Color is usually tied to emotion. Different colors affect people in different psychological ways. They can stir feelings and create emotional resonance.
Learn a bit of color psychology. Color combinations can make a photo — or ruin one. That way, you'll know what you're doing when you shoot.
Further Reading:
Photography Tip 3: Master Shutter Speed
Generally, the wider the range of shutter speeds you can use, the better. Mastering shutter speed is a prerequisite for making great photos. Many striking, beautiful, and creative images come from changing shutter speed. So learning a few shutter-speed tips is important for every photographer.
1. Long Exposure
Every photo is an exposure of time. A picture can be made in a few seconds or take more than an hour. Many people don't realize they can use time as a creative tool. Remember, shutter speed is controllable. It can be very long or very short.
Long-exposure work has a special magic. It can show things from a different view. It can give a different sense of time. It may also tap into how living things are drawn to light.
Further Reading:
For whatever reason, long exposure is one of the most tried techniques. You must find the right subject and handle light and darkness carefully. You also need to predict how the final image will look.
This technique is honestly quite challenging. It takes steady learning and practice.
2. Rear-Curtain Sync
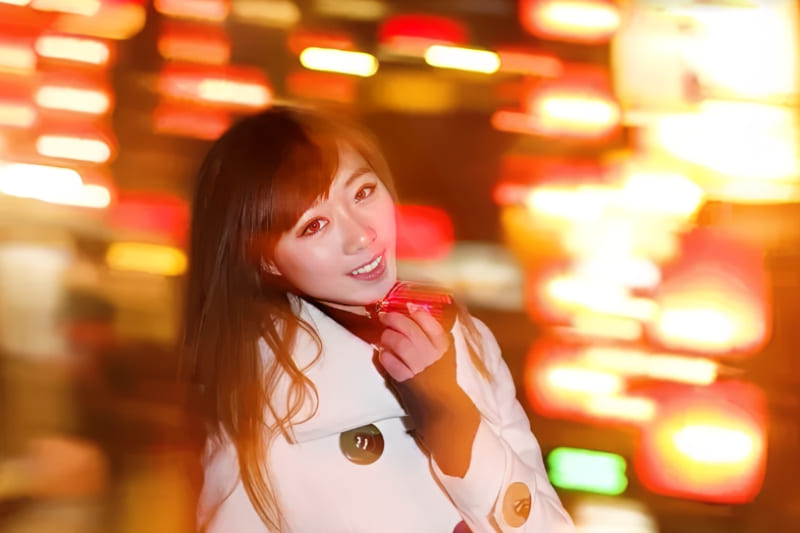
Many photographers don't realize shutter speed is useful when they use flash. A slower shutter can record motion, while a flash freezes the subject. This technique is called rear-curtain sync.
For example, the photo below was made with rear-curtain sync and a slow shutter while moving the camera. The flash froze the girl's figure, and the slow shutter blurred the background lights into motion.
3. Panning
When you shoot moving subjects, use a slow shutter and follow the subject with the camera. This method is called panning. One fun thing about panning is the result is never fully predictable. It often captures scenes the eye can't see.
Photography Tip 4: Simple Post-Processing
Post-processing is an important part of the workflow for every photographer. But for beginners, learning a bunch of confusing tools right away can feel overwhelming.
The truth is, you only need to learn a few basic panels (we'll use Lightroom Classic as an example) plus the Color Mixer / HSL panel to fix most color problems.
1. Basic Panel
Start with white balance (Temp / Tint) so skin tones and whites look natural. Then adjust Exposure to get the overall brightness where you want it. Pull back Highlights to recover blown highlights and lift Shadows to bring out detail in dark areas. Use Whites and Blacks to fine-tune contrast and the true black/white points.
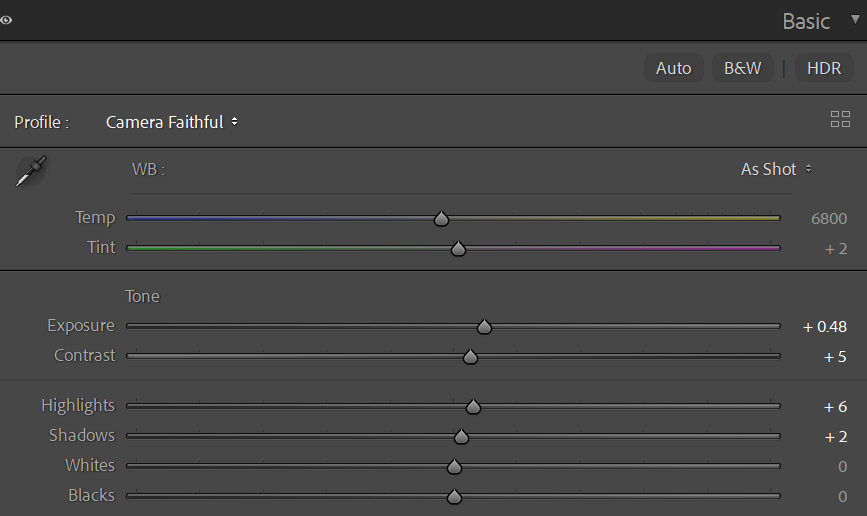
Finally, raise Vibrance a little (it's less likely to overdo skin than Saturation) and add a touch of Clarity or Texture to enhance detail. Don't add too much at once — make small changes and compare to the original often to avoid an overcooked look.
Further Reading:
Basic Panel in Lightroom Classic: How to Rescue Your "Trash" Shots?
2. Color Mixer (HSL)
Think of H (Hue), S (Saturation), and L (Luminance) as your color controls. Want a bluer sky? Raise the blue saturation or lower blue luminance a bit. Want natural skin tones? Slightly lower red/orange saturation and fine-tune orange luminance.
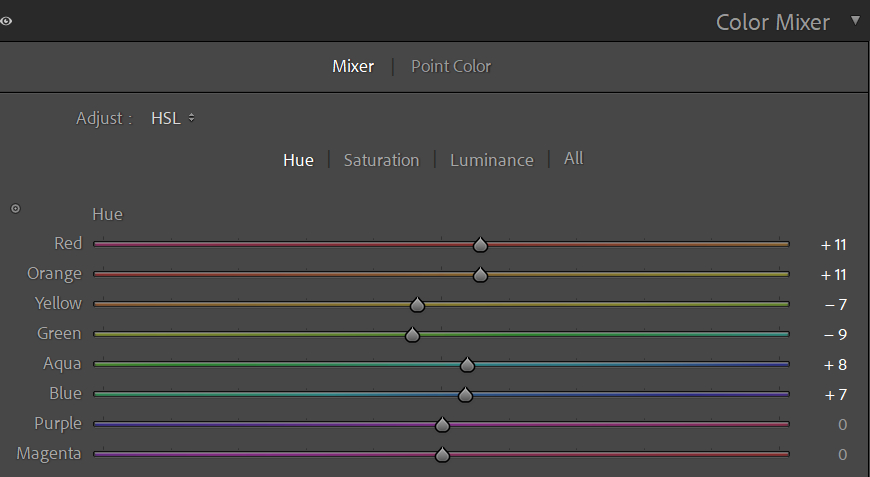
Common routine: use Hue to correct color shifts, but move sliders in small steps to avoid strange tints. Use Saturation to tweak color strength, and Luminance to control how bright or dark that color appears. When needed, use local masks to change only parts of the frame — it's more precise and safer.
Further Reading:
How to Use HSL in Lightroom Classic: A Guide to Color Adjustment
Finally, a quick ad. When you color-grade in Lightroom or edit images in Photoshop, you often need to move sliders. Dragging sliders with a mouse is slow and not very precise.

TourBox can help. You can map common tools and shortcuts to TourBox's physical buttons and knobs. TourBox also has many built-in features that let you get started fast and give you a game-controller–like control experience for easier photo editing.

Also worth mentioning is the Dynamic Panel feature. It lets you open a custom floating color panel anywhere, so you can color-grade a full-screen photo without blocking the main screen. This helps you focus on the image itself. If you prefer a highly customizable workflow, it's worth checking out.
Conclusion
In this blog, we share some photography tips we think are helpful for beginners. Back to photography itself, it's not exactly a low-barrier hobby. You need to keep trying new things and keep learning new skills. It's not easy.
And as your understanding of photography deepens, you'll form your own views about cameras, gear, and techniques. You might criticize other photographers' reviews, opinions, or work on forums and get into heated debates. But that actually pulls you away from why you first started photography.
You took up photography as a hobby, or chose it as a career, because you love using a camera to observe and record the world, whether landscapes, animals, or people. Enjoy the fun of shooting. Enjoy sharing your work. Love the world. We believe that is the greatest joy photography can bring you.