Basic Panel in Lightroom Classic: How to Rescue Your "Trash" Shots?
In the Basic panel of Lightroom Classic, there are not only adjustments for white balance but also many other important parameters that need to be set.
It's safe to say that around 80% of the post-processing adjustments for a photo are concentrated in the Basic panel. Getting these settings right can instantly transform the look of your photo.
We will use Lightroom Classic to show how to use its "Basic" panel for photo post-processing. With just a few simple adjustments, you can rescue photos you once thought were "no good." Of course, you can apply the adjustment ideas we share to Lightroom CC, Camera Raw, and other photo-editing software.
Don't believe it? Well, let's get started and see for yourself.

In this article, you will learn:
- What Is Lightroom Basic?
- How to Use Lightroom Basic Panel?
- Frequently Asked Questions About Lightroom Basic
What Is Lightroom Basic?
Upon opening Lightroom and entering the Develop module, you'll notice that the Basic panel is located at the top of the interface. This indicates that it's not only the first step in the entire post-processing workflow but also the foundation of editing a photo.
Within the Basic panel, there are three main adjustments you can make:
- First, you can fine-tune the white balance.
- Second, you can correct the exposure and overall tones of the photo.
- Third, you can personalize the photo with preferred settings.
Now, let's explore how much of a difference can be made by adjusting solely within the Basic panel.
How to Use Lightroom Basic Panel?
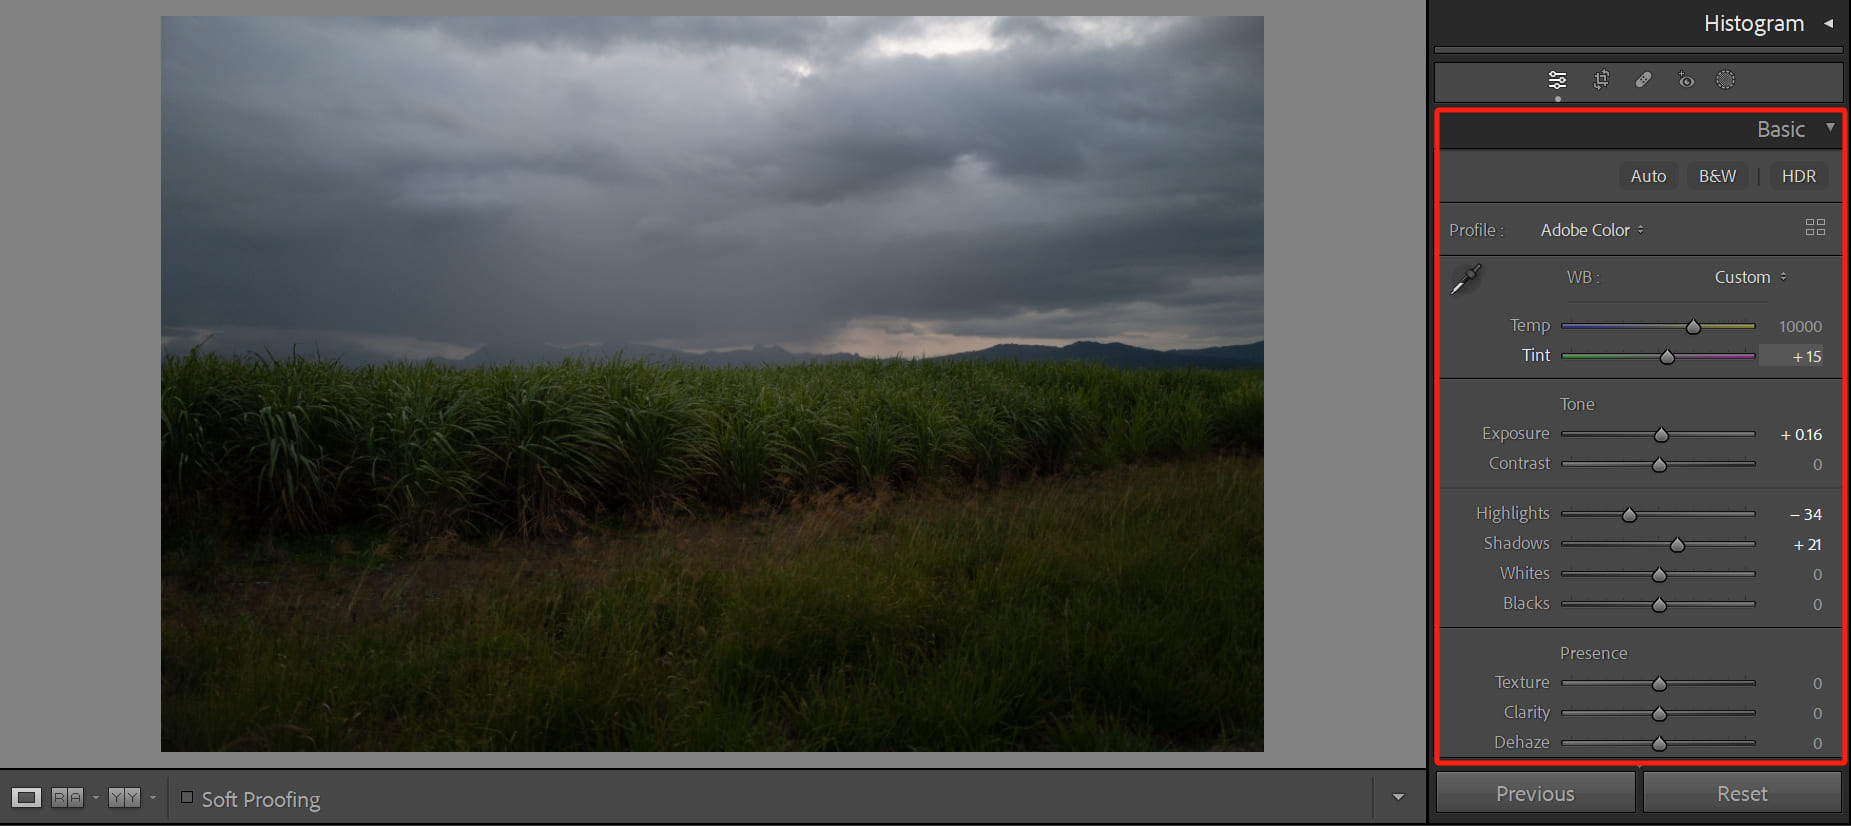
As mentioned earlier, the Basic panel in Lightroom Classic has three main functions: white balance adjustment, tone settings, and presence settings. When post-processing your photos, you can follow a top-to-bottom approach for adjusting the parameters.
Before we begin our tutorial on adjusting colors in the Lightroom Basic panel, if you find using a mouse and keyboard to adjust parameters less intuitive and precise, you may consider TourBox.

With just a single knob, TourBox allows you to master color without having to search for specific parameter sliders within the Lightroom interface.
You can assign various sliders to different buttons and use the knob to quickly adjust parameters, giving you an uninterrupted color grading experience.
TourBox also offers built-in features like the Dynamic Panel, designed for Lightroom workflows, that let you completely break free from the keyboard and mouse and bring you full-screen editing and color grading, real-time control, and a smoother retouching workflow. If you're interested, click our link to learn more.

1. White Balance Adjustment
In the Lightroom Basic panel, the first adjustment you can make is to the white balance of the photo (preferably if it's in DNG format).
For detailed instructions on correcting the white balance, please refer to our tutorial on how to adjust the white balance in Lightroom for the specific steps. We won't go into detail here.
2. Tone Settings
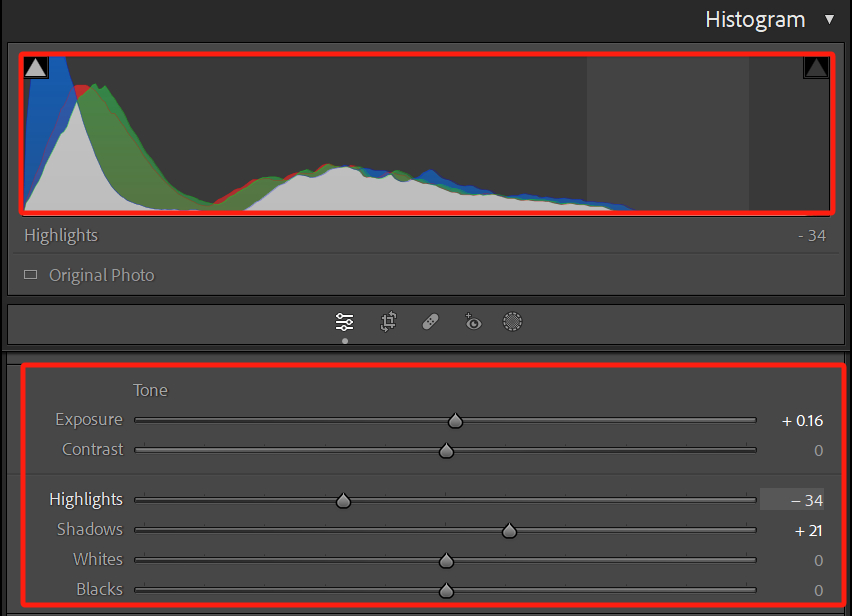
In the tone settings, you will see six values that are used to adjust the exposure of the photo. Any overexposed or underexposed areas in the photo can be addressed here.
When setting each value, you may question what the correct exposure should be. Since every photo is different, there is no one-size-fits-all parameter setting.
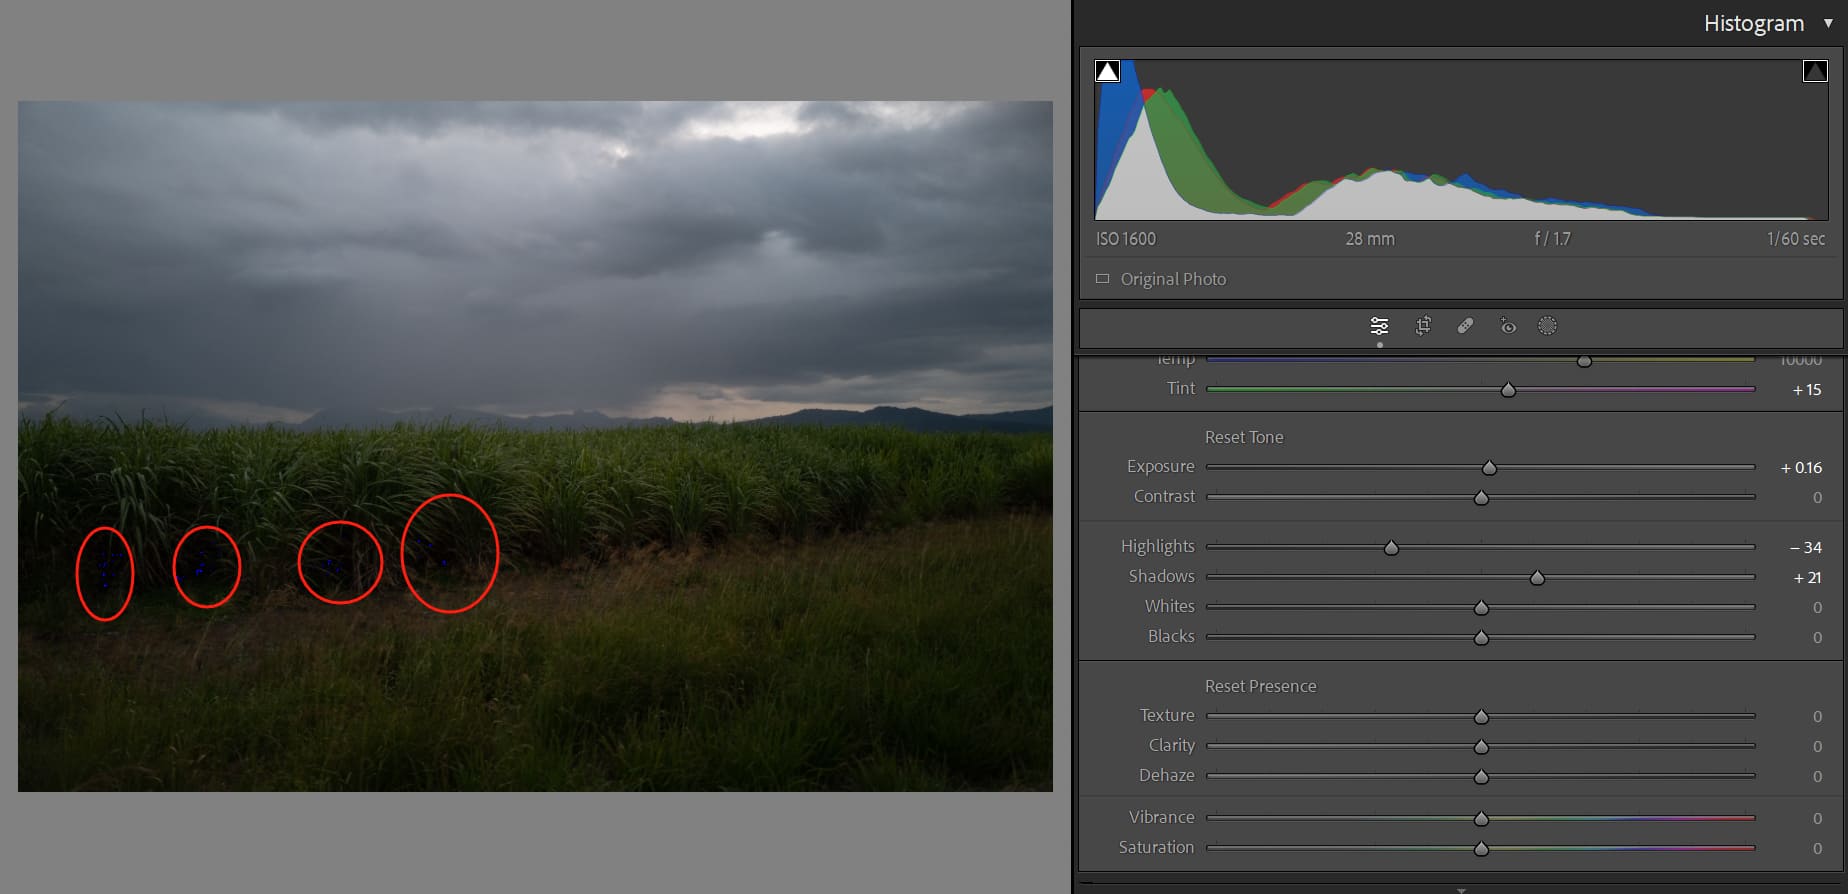
Therefore, when adjusting exposure-related settings, you can use the Histogram curve above the interface to observe if the settings are reasonable.
If you're not familiar with the histogram, don't worry. You can click on the top left and top right corners of the histogram to activate the shadow and highlight clipping functions, respectively.
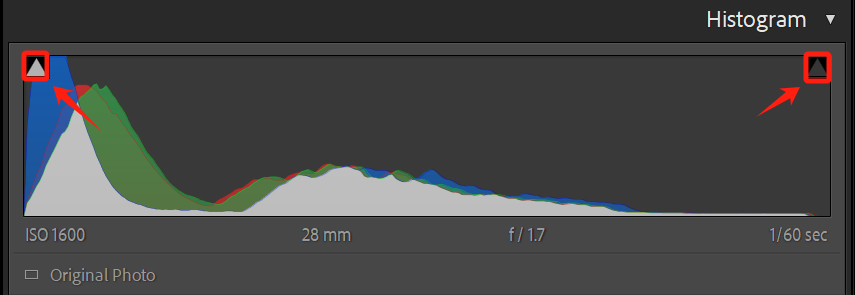
By doing this, you can directly see the changes in highlights and shadows in the photo. If there is an excessive amount of red in a specific area, it indicates overexposure, while an abundance of blue suggests that the area is too dark.
Further Reading:
You might be interested in: "How to Read a Histogram: A Must-Read for Photography Enthusiasts"
In the example below, the DNG photo we imported hasn't undergone any adjustments. However, after enabling the shadow and highlight clipping functions in the histogram, we can clearly see the presence of blue in the photo. This clearly indicates that the area is too dark.
Now we will briefly introduce the six parameters in the Tone section of the Lightroom Basic panel. We believe this will quickly help you grasp the functionality of tone adjustments in Lightroom.
Exposure
When a photo's exposure is incorrect, you can adjust the exposure value to bring it back to the correct level. The exposure value has the most significant impact on the midtones of the photo, which is the middle portion of the histogram. However, it also has a mild effect on the highlights and shadows.
Therefore, achieving the correct exposure during the initial photography stage is crucial. Typically, a photo captured with the correct exposure requires minimal adjustment to the exposure value during post-processing. Excessive increases in the exposure value can introduce more noise.
Contrast
Contrast is used to increase the difference between the highlights and shadows in a photo. This means making the dark areas darker and the bright areas brighter.
On the other hand, reducing contrast can make the dark areas brighter and the bright areas darker, narrowing the gap between highlights and shadows.
Increasing contrast also affects another aspect. Since there are more details between the highlights and shadows, it makes the photo appear more vibrant, as if the saturation has been increased.
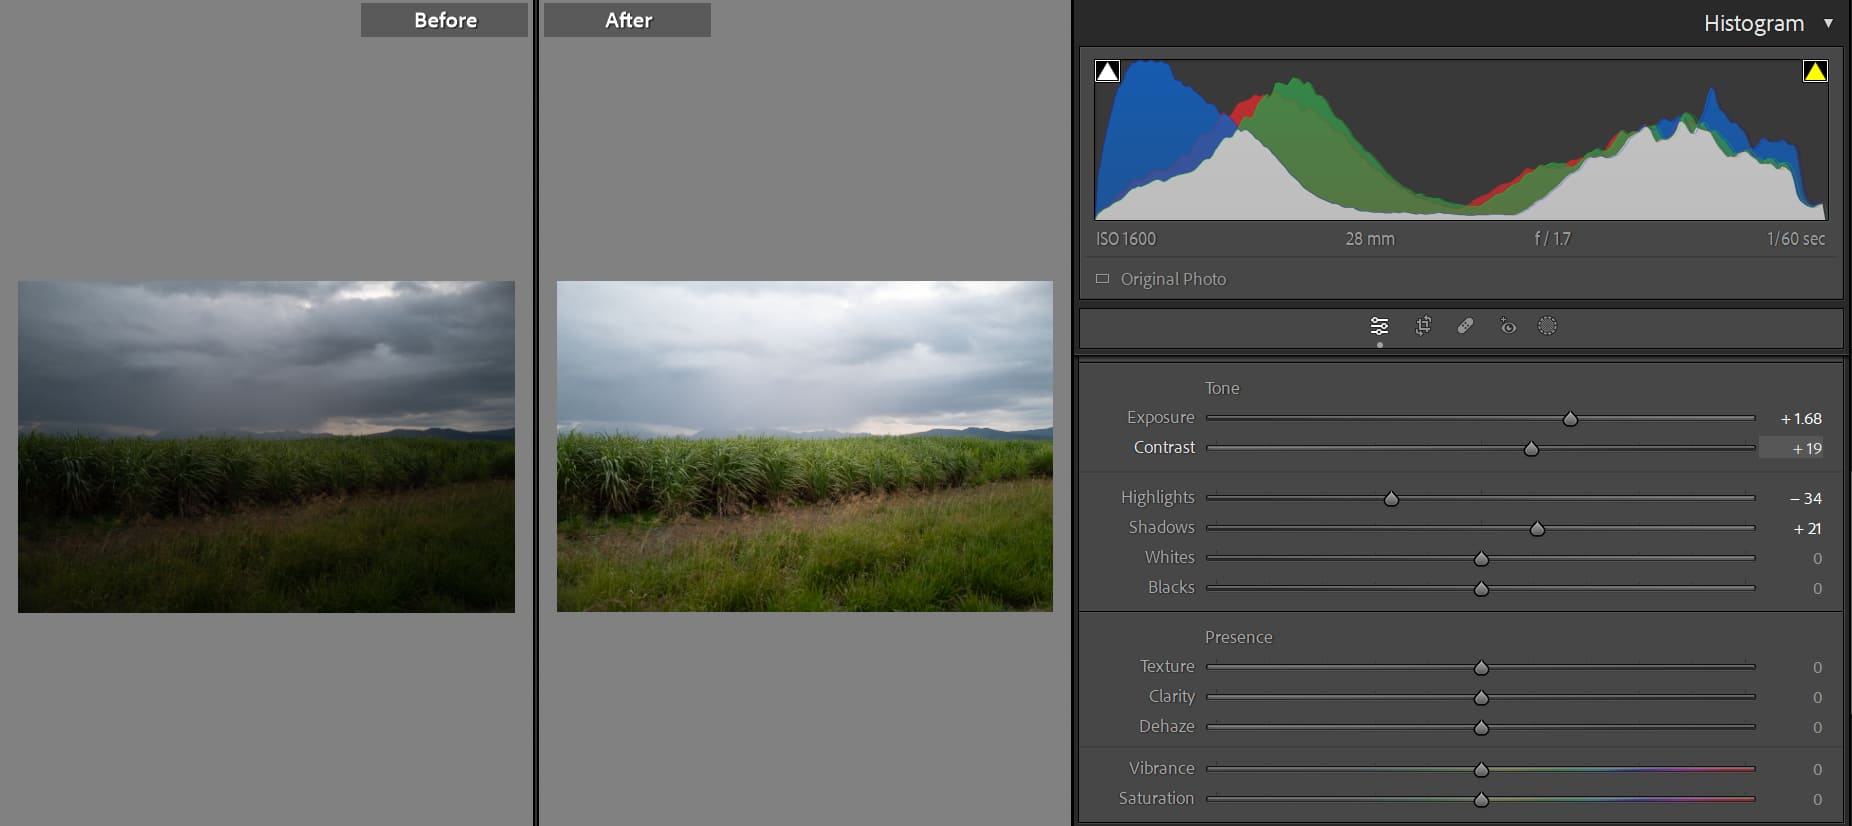
The image below demonstrates the simple adjustment of exposure and contrast parameters in Lightroom Classic. With just these adjustments, you can effortlessly transform a dark photo into a completely different image. It's truly magical!
Highlights
This is a highly useful setting. Taking urban landscape photos as an example, these photos often have many bright areas, such as city lights at night or sunlight shining through glass, which can appear much brighter than normal exposure.
With this setting, you can increase or decrease the exposure of the highlights in the photo to recover some details.
Shadows
Adjusting the shadows is also very handy. Increasing the exposure of the shadow areas allows you to reveal details that were not illuminated. This adjustment is also helpful when shooting night scenes, as it brings out additional content in the photo.
Whites and Blacks
The principle behind adjusting whites and blacks is similar to that of highlights and shadows, but the difference lies in the wider adjustment range for the brighter and darker parts of the photo.
From the histogram, you can see that when adjusting whites and blacks, the fluctuations in the curve are relatively larger compared to highlights and shadows.
Extra Tip:
In addition to using the histogram as a reference, there is a nifty trick to help you judge if you have adjusted too much when working with whites and blacks.
While dragging the sliders, press the Option key on a Mac (Alt key on Windows), and the screen will turn black or white. Overexposed or underexposed areas will be displayed as you drag, making it easier to judge if you have gone too far with the adjustments.
3. Presence Settings
After adjusting the white balance and tone, the photo's basic colors are restored. Correct exposure allows the photo to regain its intended details and depth, providing a foundation for further preference settings.
Presence settings have no fixed standard; they are entirely based on personal preferences. However, excessive adjustments can make the photo look unnatural and overly edited.
Texture
Increasing the texture in a photo enhances the details and textures, especially in the shadowed areas, particularly useful for architectural photos. Architecture often has intricate details that can be highlighted with texture adjustments.
Don't forget that while increasing texture in the architecture, the texture in the sky also increases. This can result in a noticeable discontinuity where the buildings meet the sky. Therefore, when enhancing texture, it's important to ensure that the adjustments remain within a reasonable range.
Clarity
Adjusting clarity is similar to adjusting contrast. You can think of this setting as a fine-tuned version of contrast, enhancing the clarity of details by altering the transitions between highlights and shadows.
For general photos, dragging the clarity slider to the right can increase the texture and shape of the image. However, when it comes to portrait photos, be cautious. This setting can amplify skin imperfections, so it's best to move the slider to the left to reduce clarity and achieve a soft-focus effect.
Dehaze
Dehaze is a highly effective tool for removing haze caused by backlighting or foggy conditions, adding more depth to your photos. It can also be used to effectively reduce atmospheric haze, such as smog. Conversely, adjusting it in the opposite direction can enhance a misty effect.
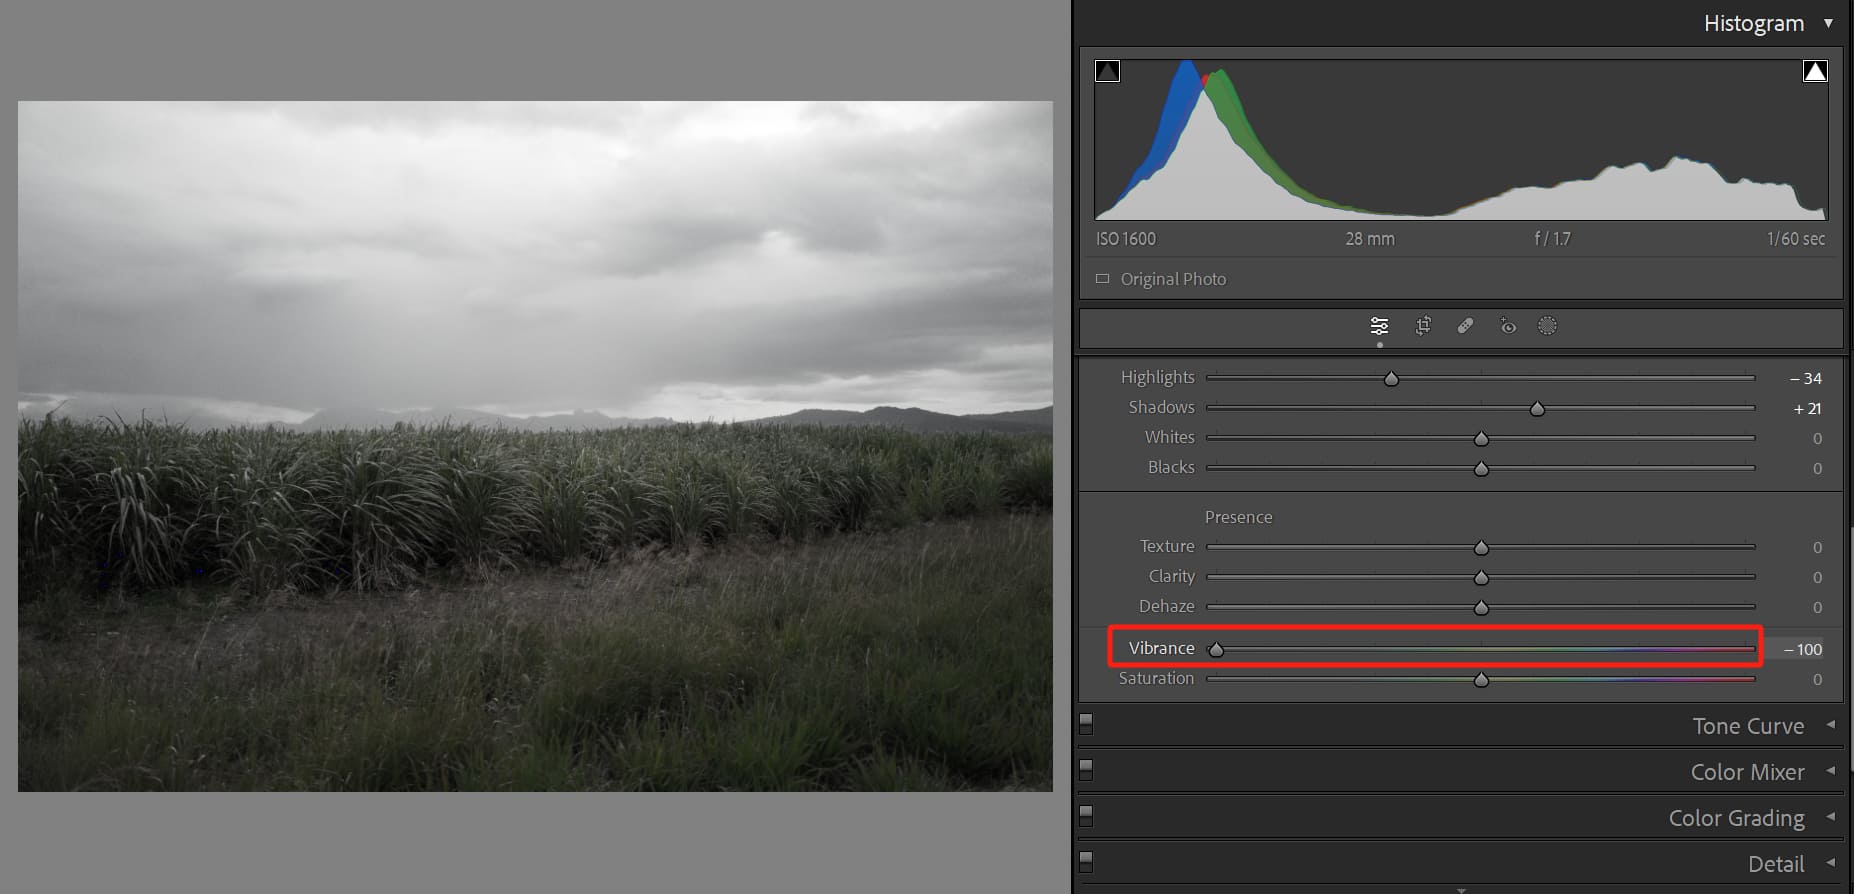
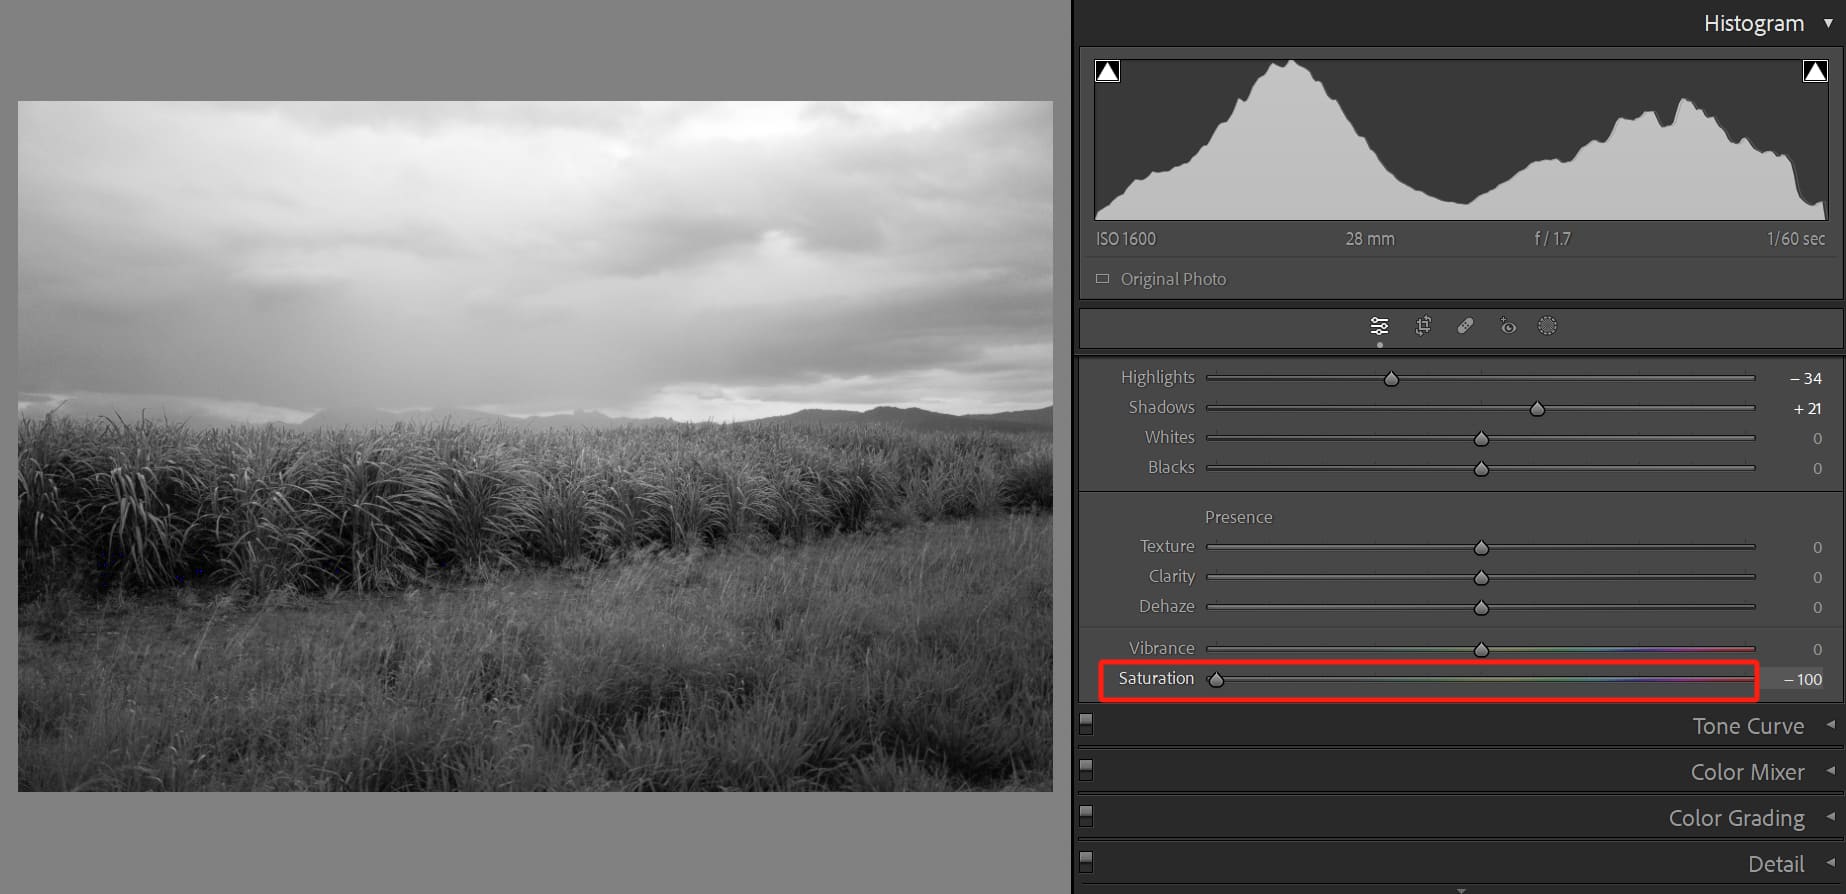
Vibrance and Saturation
These two functions may seem similar at first glance, but they have a distinct difference. Vibrance controls the intensity of colors in the parts of the photo that already have some color, while saturation controls the overall color intensity throughout the entire image.
When you adjust the vibrance to the far left, you'll notice that the photo doesn't turn black and white completely. Some colors still remain.
On the other hand, when you adjust the saturation setting, the entire photo will be desaturated, resulting in a black-and-white image.
4. Conclusion
As long as the focus was properly captured during the initial shooting and there isn't too much exposure deviation, you can rescue them using the basic adjustments in Lightroom.
Now that you have a fresh understanding of "trash" shots, go ahead and dig out those previously unconfidently edited photos and give it a try. Transforming trash into treasure is just that simple.
Frequently Asked Questions About Lightroom Basic
Question: How to Open the Basic Panel in Lightroom Classic?
In the Develop module, the Basic panel is located at the top of the right-hand panel group. If you can't see it, it might be collapsed. Simply click on the word "Basic," and the panel will expand.
Question: What Is White Balance, and How to Adjust it in Lightroom Classic?
White balance is an important concept in photography used to adjust the overall color balance of an image, making it look more natural. In the Basic panel of Lightroom Classic, you can adjust white balance using the "Temp" and "Tint" sliders.
Question: What Is the Difference Between Texture, Clarity, and Dehaze Sliders in Lightroom Classic?
These three sliders all enhance the details in an image, but they work in different ways and affect different ranges. Texture primarily enhances medium-sized details, Clarity affects a broader range of details, and Dehaze enhances global contrast and reduces haze.