Mastering Photoshop Blending Modes: How to Blend in Photoshop?
Welcome to our comprehensive tutorial on Photoshop blending modes. Whether you're a novice or an experienced user, understanding blending modes is essential for creating stunning and professional-looking compositions in Photoshop.
In this tutorial, we will guide you through the process of how to blend in Photoshop and provide detailed explanations of various blending modes.

In this article, you will learn:
- Getting Started With How to Blend in Photoshop
- Demystifying the Photoshop Blending Modes
- A Simple Demo: Tips for Using Blending Modes in Photoshop
- Final Thoughts About Photoshop Blending Modes
Getting Started With How to Blend in Photoshop
When it comes to blending layers, it's essentially about how overlapping layers combine and blend to create the final effect. In Photoshop, layer blending involves two main settings: blending modes and opacity.
- Blending Modes: When layers are overlaid, the pixels of the upper and lower layers blend together, resulting in a different image effect.
- Opacity: Determines the extent to which the selected layer masks or reveals the layers beneath it. A layer with 100% opacity is completely opaque.
Note: The opacity of the background layer or locked layers cannot be changed, and layer blending modes cannot be set.
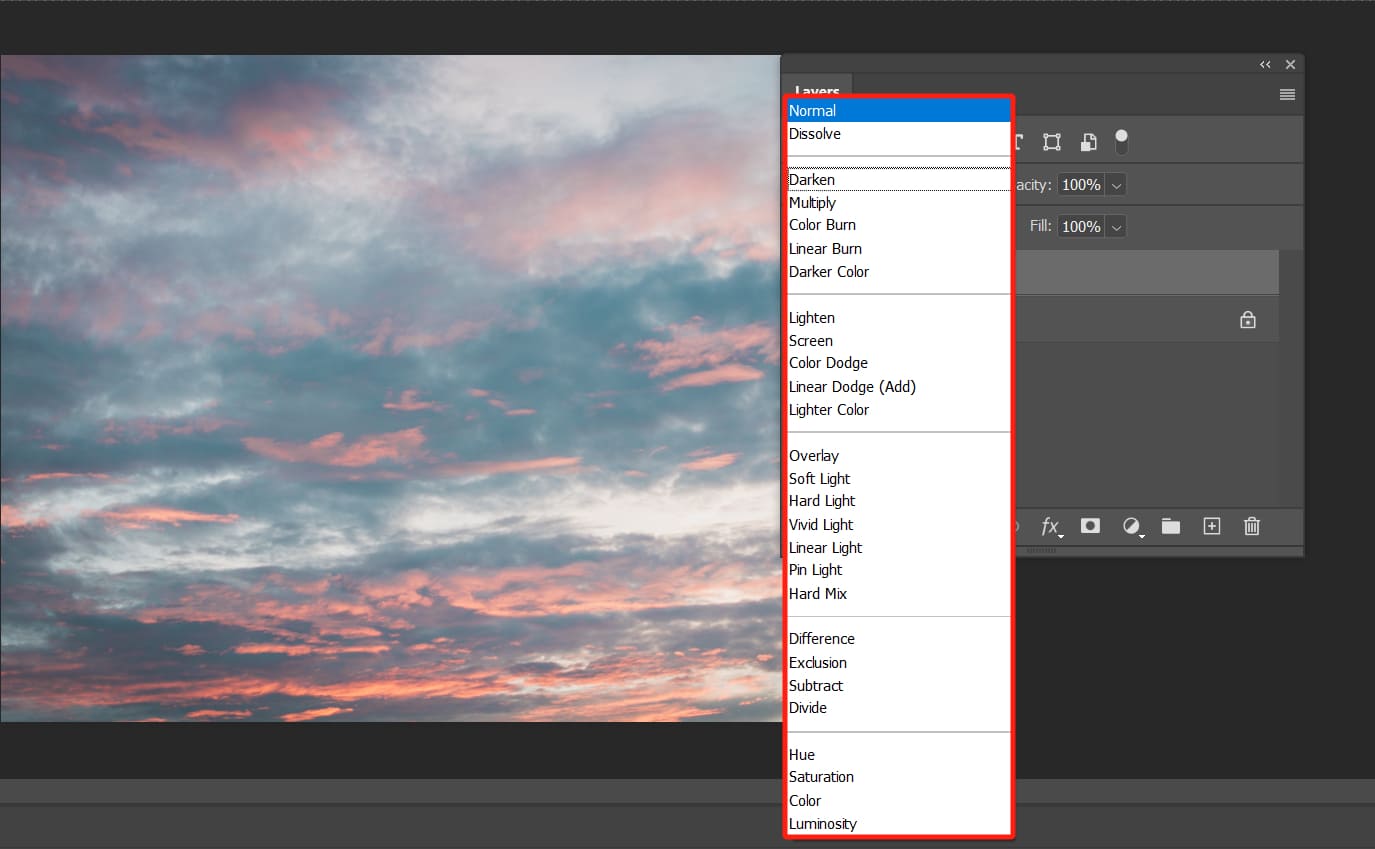
1. Blending Modes in the Layers Panel
You can access the Layers panel in Photoshop, where each layer is initially set to the "Normal" blending mode. Clicking on it reveals a dropdown menu with all the available blending modes for layers.
You can also adjust the opacity of the currently selected layer here.
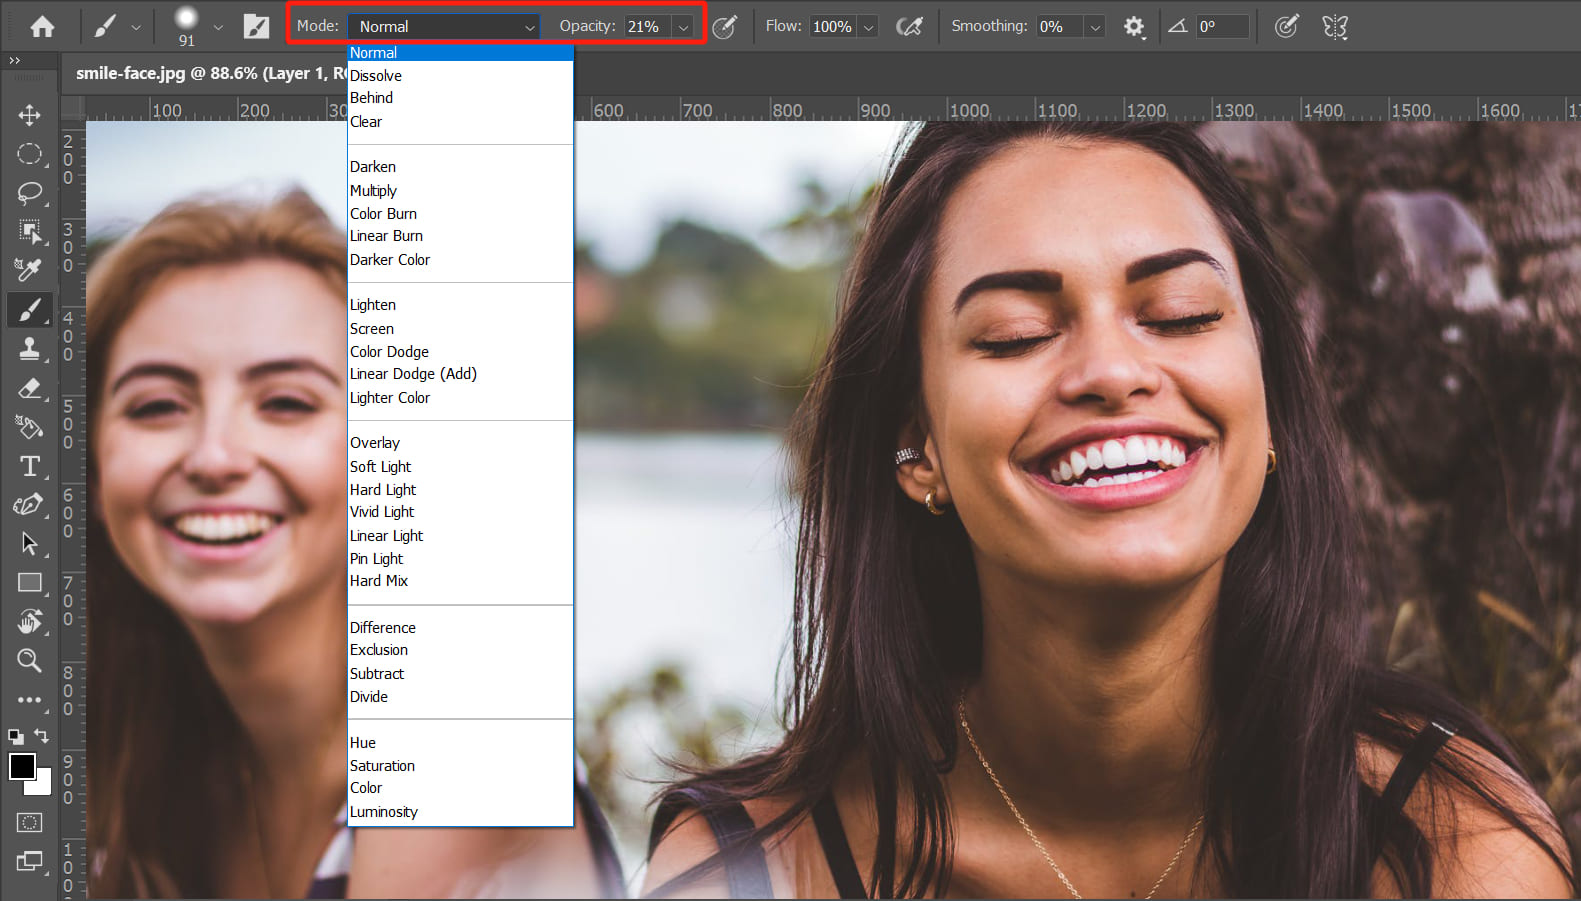
2. Blending Modes in the Brush Tool
In addition to finding layer blending modes in the Layers panel, Photoshop also includes blending modes for the Brush tool. When the Brush tool is active, you can find the blending mode and opacity settings in the options bar at the top.
The blending mode of the Brush tool controls how it interacts with the layer. Clicking on the blending mode option in the options bar opens up the full list of blending modes for the Brush tool, most of which are the same as those in the Layers panel.
Using blending modes with the Brush tool is a common Photoshop technique in post-processing, especially for portrait retouching and adjustments of light and shadows.
Demystifying the Photoshop Blending Modes
Blending modes are at the core of Photoshop's blending capabilities. In this chapter, we will delve deep into each blending mode, giving you a comprehensive understanding of how to creatively utilize them.
The blending options in the Layers panel, tools in the Brush tool group, and other related options in Photoshop are all about pixel editing.
Pixel editing in Photoshop involves the question of how pixels blend, which is why most of these operations have a dropdown list for "Mode" in their respective options bars.
Here are three fundamental concepts you need to understand before diving deeper into Photoshop blending modes:
- Base Color: The original color in the image, refers to the pixel colors in the layer below when we use blending mode options.
- Blend Color: The color is applied through painting or editing tools, which refers to the pixel colors in the layer above when we use blending mode commands.
- Result Color: The color obtained after blending the base color and blend color together.
In fact, each blending mode in Photoshop is a separate mathematical function. However, you don't need to remember or understand these complex formulas. All you need to know is the common layer blending modes and their respective blending effects.
When you look at the blending mode options in Photoshop, you'll notice that Photoshop categorizes similar functions of blending modes with an underline. Next, we will introduce each category based on these blending mode groups.
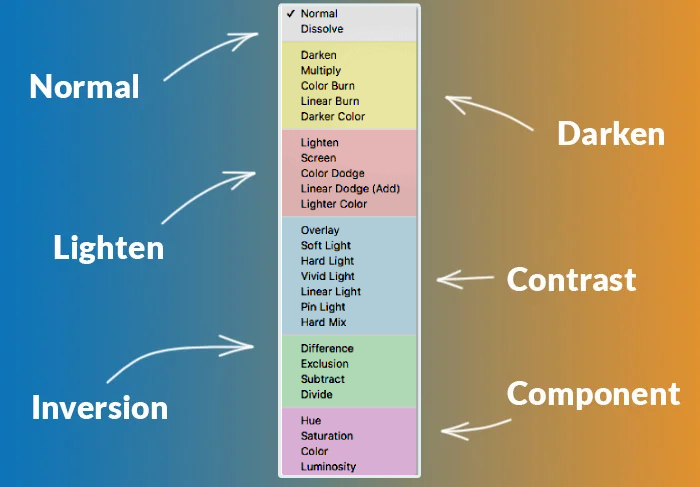
1. Normal Group
There are two blending options in the Normal group, and the common feature of these two blending options is that they individually take pixels from the two layers, either A or B.
Normal Blending Mode
In Normal mode, editing each pixel directly forms the result color. This is the default mode and the initial state of an image. In this mode, you can adjust the parameters of layer opacity and layer fill value to display the content of the next layer to varying degrees.
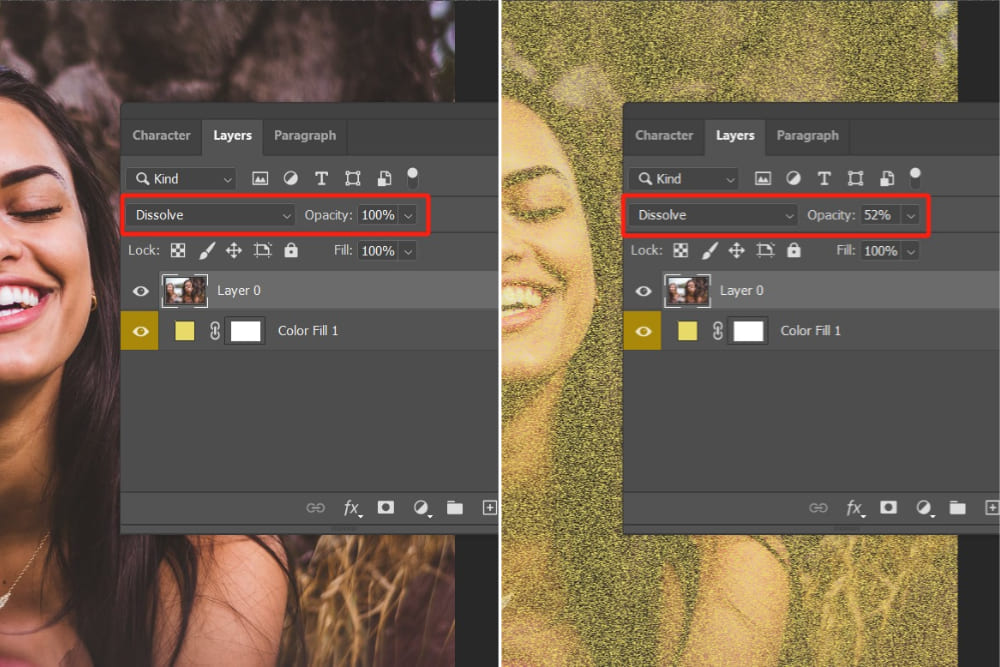
Dissolve Blending Mode
When you select this blending mode, Photoshop randomly samples some pixels from the upper layer as transparent, allowing you to see the lower layer.
The more transparent the upper layer, the more visible the lower layer region. If the upper layer is completely opaque, the effect will be the same as the Normal blending mode.
Therefore, the Dissolve mode works best with some coloring tools in Photoshop, such as the Brush tool, Eraser tool, and so on.
When you change the layer blending mode to Dissolve, it may seem similar to the Normal blending mode. However, as we've mentioned before, the level of dissolving depends on the opacity of the upper layer.
Now you can lower the opacity of the upper layer to see the effect, as shown in the following image.
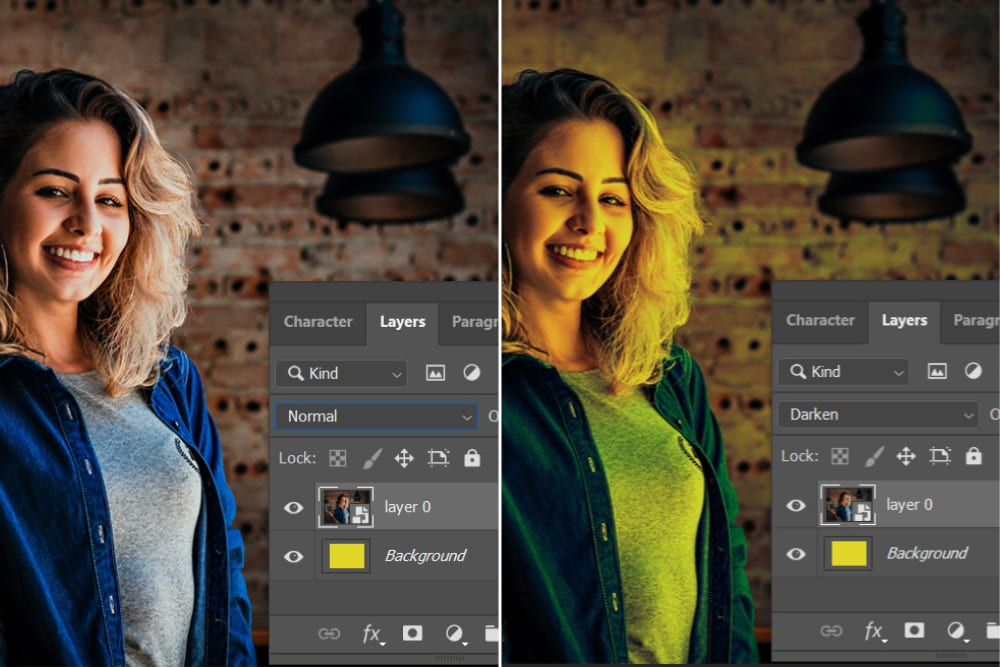
2. Darken Group
The Darken group is what we commonly refer to as the subtractive blending mode. Their common feature is that they achieve darkening of the image by filtering out the highlights.
Darken Blending Mode
In Darken blending mode, the brightness of the blend color is compared to the base color. Colors that are brighter than the base color are replaced, while colors that are darker than the base color remain unchanged.
You can see in the image below that areas that are brighter than the base color (background layer below) have been replaced with the base color, while areas that are darker than the base color have remained unchanged.
Multiply Blending Mode
The Multiply blending mode is used to examine color information in each channel, and it creates a slide-like effect of light passing through layers.
Essentially, it involves multiplying the base color by the blend color and then dividing by 255 to obtain the color value of the result color. The result color is always darker than the original color.
In simple terms, in the RGB color mode, there are three color channels: red, green, and blue, with values ranging from 0 to 255. The higher the value in each color channel, the brighter the color appears, and the lower the value, the darker the color appears.
When we multiply the base color by the blend color and then divide by the maximum value of 255, the overall image becomes darker.
Note:
- When any color is multiplied by black in the Multiply blending mode, the result color remains black because black pixels have a value of 0.
- When any color is multiplied by white in the Multiply blending mode, the color remains unchanged because white pixels have a value of 255.
Color Burn Blending Mode
Color Burn blending mode works by examining the color information in each channel and increasing the contrast between the base color and the blend color to darken the base color and reflect the blend color.
As you can observe in the image below, the dark areas of the original image become significantly darker, while the brighter areas darken to a lesser extent, resulting in increased contrast.
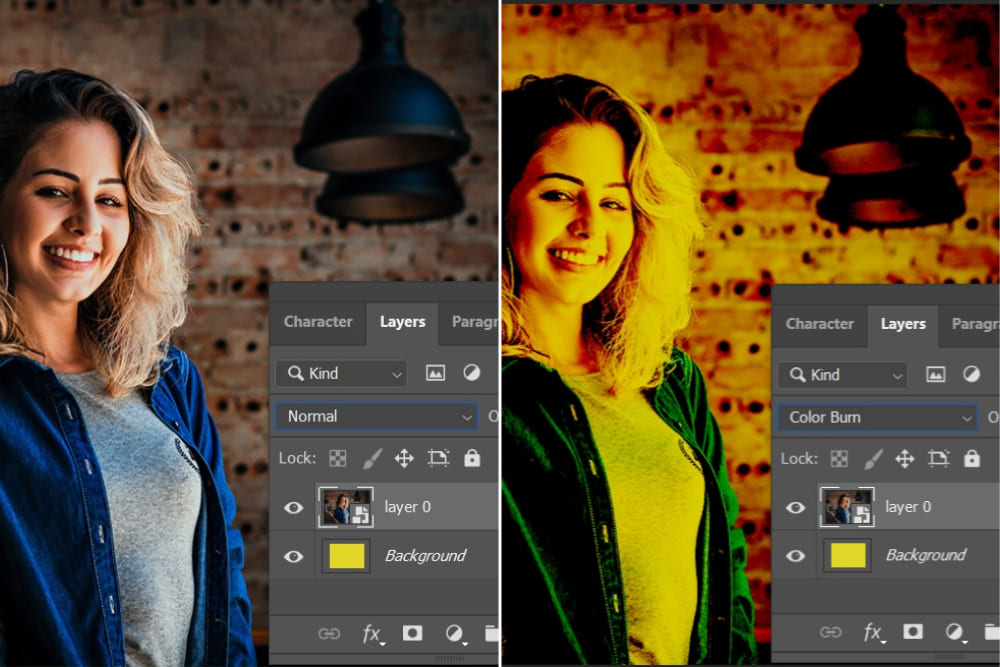
The Color Burn blending mode can be used to quickly enhance the shadows in an image.
For example, if you want to add some shadows or low-light effects to an image, you can place a grayscale image on top of the original image below, and then change the blending mode of the grayscale image to Color Burn.
This way, the brighter areas of the grayscale image will darken the original image, while the black areas of the grayscale image will be ignored, leaving only the original image.
Color Burn blending mode can also be used to adjust the contrast of an image.
For instance, if you want to make the highlights brighter and the shadows darker in an image, you can place a curve adjustment layer on top of the original image below, and then change the blending mode of the curve adjustment layer to Color Burn.
This way, the S-shaped curve in the curve adjustment layer will make both the highlights and shadows of the original image more extreme.
Note:
- The layer order affects the result.
- When blending with white, the image remains unchanged.
Linear Burn Blending Mode
The Linear Burn blending mode operates by analyzing the color information in every channel and reducing the brightness to darken the base color, creating a reflection of the blend color. Similarly, if the blend color is white, there will be no change after blending.
Darker Color Blending Mode
The Darken blending mode compares the sum of all channel values between the blend color and the base color and displays the color with the lower value.
In simple terms, the Darken mode primarily selects the color with lower brightness as the result color, which is either the base color or the blend color.
3. Lighten Group
Lighten Group refers to what we commonly call the additive blending modes. Their common characteristic is that they achieve a brightening effect by filtering out the dark areas in the image.
Lighten Blending Mode
The Lighten blending mode produces the opposite result compared to the Darken blending mode. In Photoshop, it compares the base color with the blend color and replaces the pixels that are darker than the blend color.
Pixels that are brighter than the blend color remain unchanged, resulting in an overall brightening effect for the image.
You can try an experiment by setting the background layer to white and using the Lighten blending mode on a layer above it. You will notice that what you see in front of you is a white expanse. This is because no pixel can appear brighter than white.
In essence, the Lighten blending mode compares the two layers and displays whichever layer is brighter.
Screen Blending Mode
The Screen blending mode is the opposite of the Multiply blending mode. It examines the color information in each channel and combines the base color of the image with the blend color to produce a third color that is lighter than both colors.
It does this by multiplying the complementary color of the drawn color with the base color, then dividing the result by 255 to achieve the blending effect. The result color after applying this mode is usually very light as if it has been bleached.
If you find that an image has insufficient exposure or appears overall too dark during your editing process, you can use the Screen blending mode. You will clearly notice that the overall image becomes brighter.
Color Dodge Blending Mode
The Color Dodge blending mode works by examining the color information in each channel and increasing the brightness of the base color by reducing the contrast between the two colors, resulting in a reflection of the blend color.
Color Dodge blending mode is commonly used for:
- Adding highlights to images, such as metal, crystal, glass, etc.
- Creating a halo effect, such as the sun, lights, sparks, etc.
- Adding gradient effects, such as rainbow, neon, dreamy, etc.
Note:
- The layer order affects the result.
- Blending with black does not produce any change.
Linear Dodge Blending Mode
The Linear Dodge blending mode produces the opposite effect compared to the Linear Burn blending mode. It lightens colors by increasing the brightness, resulting in a stronger brightening effect compared to the Screen and Color Dodge blending modes.
When you use the Linear Dodge blending mode, Photoshop will examine the color information in each channel and increase the brightness of the base color to reflect the blend color.
Lighter Color Blending Mode
Lighter Color blending mode compares the sum of all channel values between the blend color and the base color and displays the color with the higher value. It selects the maximum channel value between the base color and the blend color to create the result color.
In simple terms, the result color is either the base color or the blend color.
4. Contrast Group
Contrast Group combines the algorithms of both Darken and Lighten modes, dividing the image based on 50% neutral gray. To understand the usage of Contrast Group, it may be helpful to have some understanding of neutral gray.
Overlay Blending Mode
The Overlay blending mode is essentially a blend of the Multiply and Screen modes. In this mode, the blend color is overlaid onto the base color, depending on the base color itself. Patterns or colors are superimposed on existing pixels while preserving the brightness and contrast of the base color.
In other words, the underlying image controls the layer above it, allowing it to become either brighter or darker.
Areas in the base color that are darker than 50% neutral gray will be darkened using the Multiply mode, while areas that are brighter than 50% neutral gray will be brightened using the Screen mode.
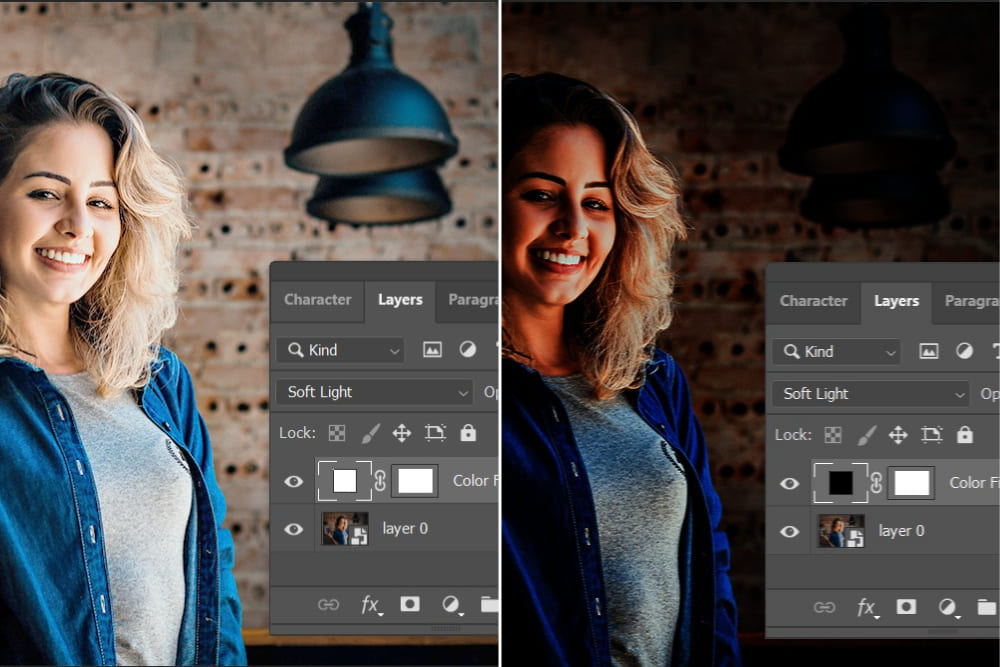
Soft Light Blending Mode
The Soft Light blending mode produces a similar effect to a diffused spotlight shining on an image. The mode determines whether the image becomes brighter or darker based on the brightness of the blend color.
If the blend color is brighter than 50% neutral gray, the result color will be brighter. If the blend color is darker than 50% neutral gray, the result color will be darker, increasing the overall contrast of the image.
If you use a layer that is pure black or pure white as the blend color on the layer above, you can achieve a noticeable darkening or brightening effect by using the Soft Light blending mode.
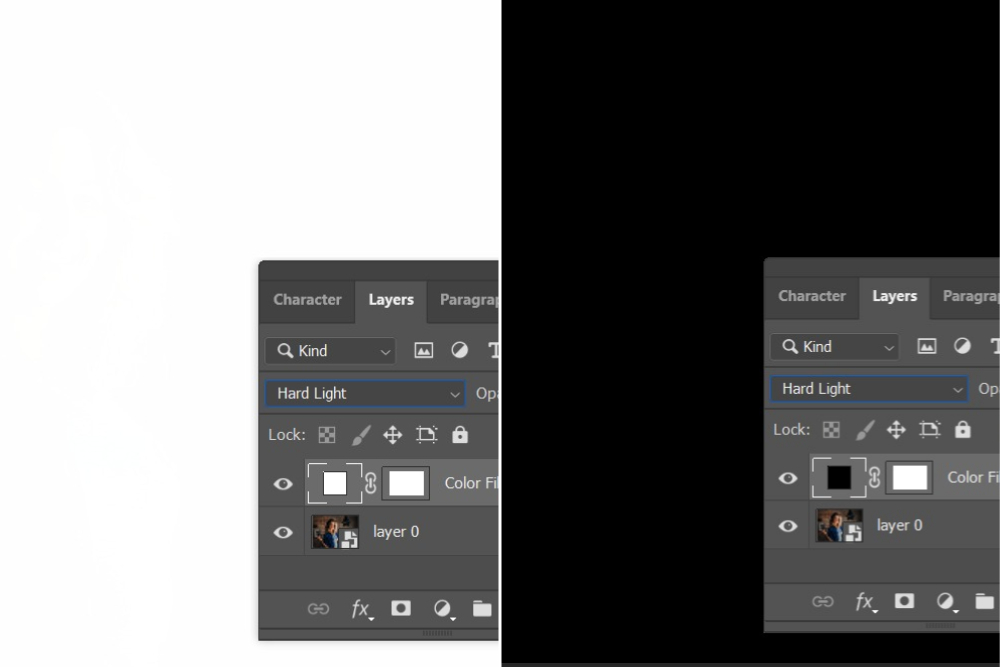
Hard Light Blending Mode
The Hard Light blending mode combines the effects of the Multiply and Screen modes. It can create a strong spotlight effect, determining whether the final result becomes brighter or darker based on the brightness of the blend color.
If the blend color is brighter than the pixels of 50% neutral gray, the result color will be brighter. If the blend color is darker than the pixels of 50% neutral gray, the result color will be darker.
This mode is essentially similar to the Soft Light mode but with a stronger effect. It is particularly useful for adding shadows to an image.
If you use pure black or pure white as the blend color, the result color will be pure black or pure white, as shown in the image below.
Vivid Light Blending Mode
The Vivid Light blending mode deepens or lightens colors by increasing or decreasing the contrast.
If the pixels in the current layer (blend color) are brighter than 50% neutral gray, the image is made brighter by reducing the contrast. If the pixels in the current layer (blend color) are darker than 50% neutral gray, the image is made darker by increasing the contrast.
The Vivid Light mode is a combination of the Color Dodge and Color Burn modes, which enhances the saturation of the blended color.
Linear Light Blending Mode
The Linear Light blending mode is a combination of the Linear Dodge and Linear Burn modes. The Linear Light mode deepens or lightens colors by increasing or decreasing the brightness of the current layer.
If the blend color is brighter than 50% neutral gray, the image is brightened by increasing the brightness. Conversely, if the blend color is darker than 50% neutral gray, the image is darkened by decreasing the brightness.
Compared to the Hard Light mode, the Linear Light mode creates higher contrast in the image and can cause more areas to become black or white.
Pin Light Blending Mode
The Pin Light blending mode essentially replaces colors based on the color of the blend color.
If the blend color is brighter than 50% neutral gray, pixels that are darker than the blend color are replaced, while pixels that are brighter than the blend color remain unchanged.
If the blend color is darker than 50% neutral gray, pixels that are brighter than the blend color are replaced, while pixels that are darker than the blend color remain unchanged.
If you want to create a unique effect for your image, you can try using this blending mode.
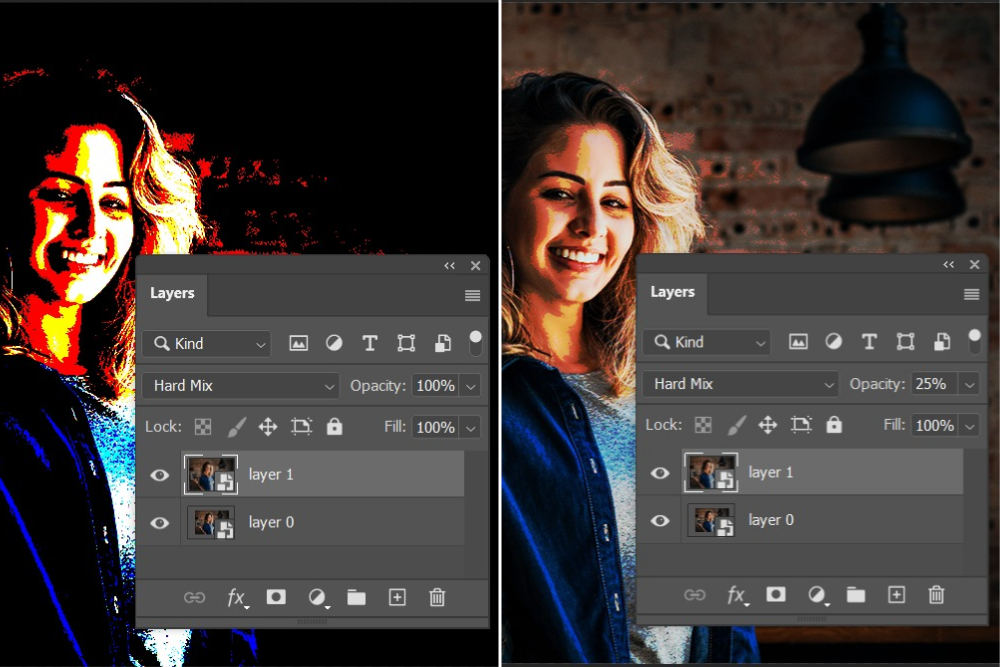
Hard Mix Blending Mode
The Hard Mix blending mode injects the RGB values of the blend color into the existing RGB values of the base color. If the sum of these values is greater than or equal to 255, the value becomes 255. If the sum is less than 255, the value becomes 0.
As a result, all blended pixels will have either a red, green, or blue channel value of either 0 or 255. This means it will only produce black, white, and six colors: red, green, blue, cyan, magenta, or yellow.
This mode typically creates an extreme color separation effect in the image, and you can achieve a softer effect by adjusting the layer opacity. As shown in the image below.
5. Inversion Group
The Inversion Group consists of four blending modes that calculate color information in the channels to display changes in the result color in different ways.
Difference Blending Mode
The Difference blending mode compares the blend color with the RGB values of the base color, calculating the difference between the higher and lower values to determine the resulting pixel value.
You can do a test. Set a layer in Photoshop with pure red, RGB values (255, 0, 0), and another layer with pure green, RGB values (0, 255, 0). When using the Difference blending mode, the result color from blending these two layers will be pure yellow, with RGB values (255, 255, 0).
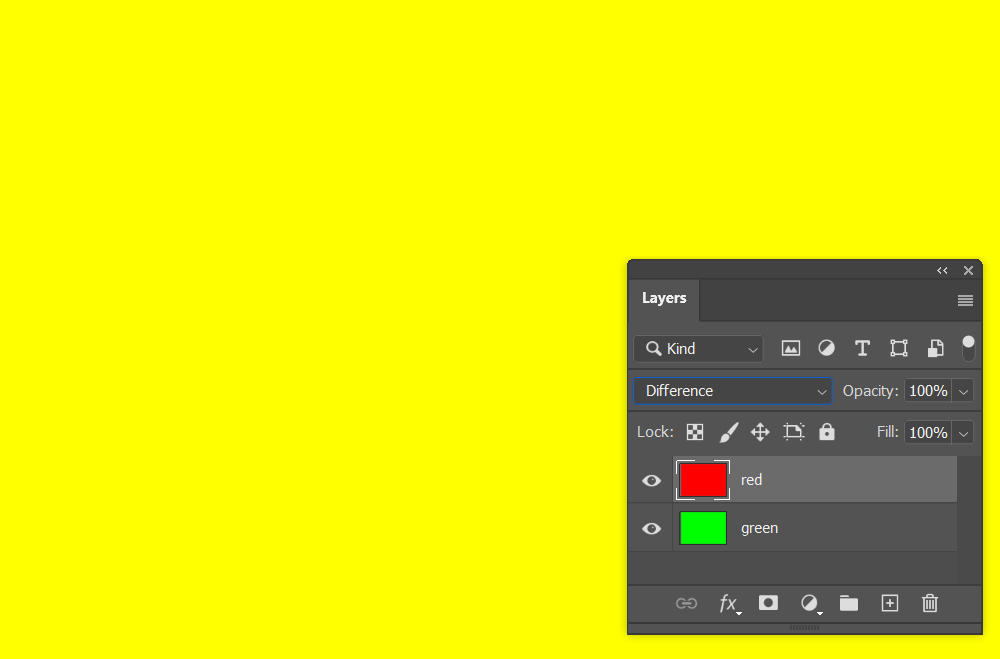
Blending white with any color results in the color's inverse, and blending black with any color keeps the color unchanged.
Exclusion Blending Mode
The Exclusion blending mode has a similar effect to the Difference blending mode, but with less contrast in the result color. The Exclusion blending mode produces a softer and brighter effect compared to the Difference blending mode.
Subtract Blending Mode
The Subtract blending mode calculates the result color by examining the color information in each channel and subtracting the blend color from the base color. If a negative value occurs, it is set to zero.
As a result, there are three possible scenarios:
- Blending a color that is the same as the base color will result in black.
- Blending white with the base color will also result in black.
- Blending black with the base color will simply yield the base color.
Divide Blending Mode
In the Divide blending mode, when the value of a channel in the base color is greater than or equal to the value of the corresponding channel in the blend color, the result color is white.
When the value of the base color is less than the blend color, the result color is darker than the base color.
As a result, the result color has a very strong contrast.
6. Component Group
Component Group primarily focuses on blending based on various color properties, and the four blending modes within it are also quite easy to understand.
Hue Blending Mode
In Hue blending mode, the hue value of the blend color is used to replace the hue value of the base color, while the saturation and brightness remain unchanged.
The parameters that determine the result color include the brightness and saturation of the base color, as well as the hue of the blend color. (The hue, saturation, and brightness mentioned here are a color model known as HSB mode.)
Hue mode cannot be used to add color to black-and-white photos; it can only be applied to colored images.
Saturation Blending Mode
In Saturation blending mode, the saturation value of the blend color is used to replace the saturation value of the base color, while the hue and brightness remain unchanged.
The parameters that determine the result color include the brightness and hue of the base color, as well as the saturation of the blend color. Saturation only controls the intensity or vividness of the color, so the blend color only affects the saturation or vibrancy of the image and does not impact the actual color itself.
Color Blending Mode
In Color blending mode, the hue and saturation values of the blend color are used to replace the hue and saturation values of the base color, while the brightness remains unchanged.
The parameters that determine the result color include the brightness of the base color, as well as the hue and saturation of the blend color. In this mode, the blend color controls the overall color of the image, making it an excellent choice for adding color to black-and-white photos.
Color blending mode allows for coloring black-and-white photos, which is the main difference compared to the Hue blending mode.
Luminosity Blending Mode
In Luminosity blending mode, the brightness value of the blend color is used to replace the brightness value of the base color, while the hue and saturation remain unchanged.
The parameters that determine the result color include the hue and saturation of the base color, as well as the brightness of the blend color.
In Luminosity bending mode, the blend color only affects the brightness or lightness of the image and does not alter the color of the base color, except for black, white, and gray.
The primary purpose of Luminosity blending mode is to unify the variations in brightness, and it is best used when desaturating an image to ensure consistent brightness throughout.
A Simple Demo: Tips for Using Blending Modes in Photoshop
In the previous chapter, we shared the wide variety of blending modes that Photoshop offers. These blending modes provide powerful tools for creating post-processing effects and design works.
In this section, we will share a simple Photoshop demo to give you a taste of the charm of Photoshop blending modes.
If you want to blend two layers together, the simplest method is to adjust the opacity of the layers. When two layers are stacked together, if the opacity of the top layer is set to 100%, only the top layer will be visible.
However, if the opacity of the top layer is set to 30%, the result will show the top layer partially covering the bottom layer. It will display 30% of the top layer and 70% of the bottom layer, creating a blending effect.
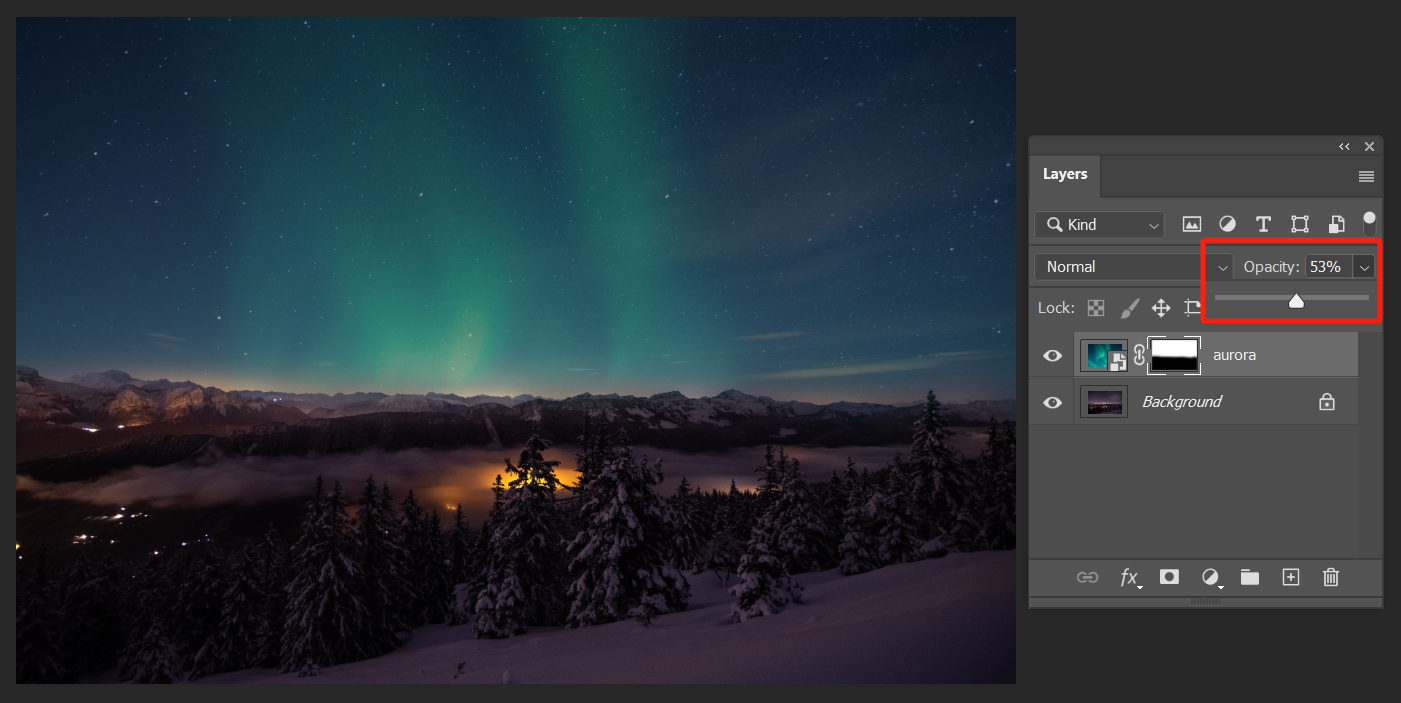
As shown in the image below, we imported two photos into Photoshop. We want to add an aurora effect to the night mountains. We created a layer mask on the aurora image and used a black brush to erase the unwanted parts, as shown in the image below:
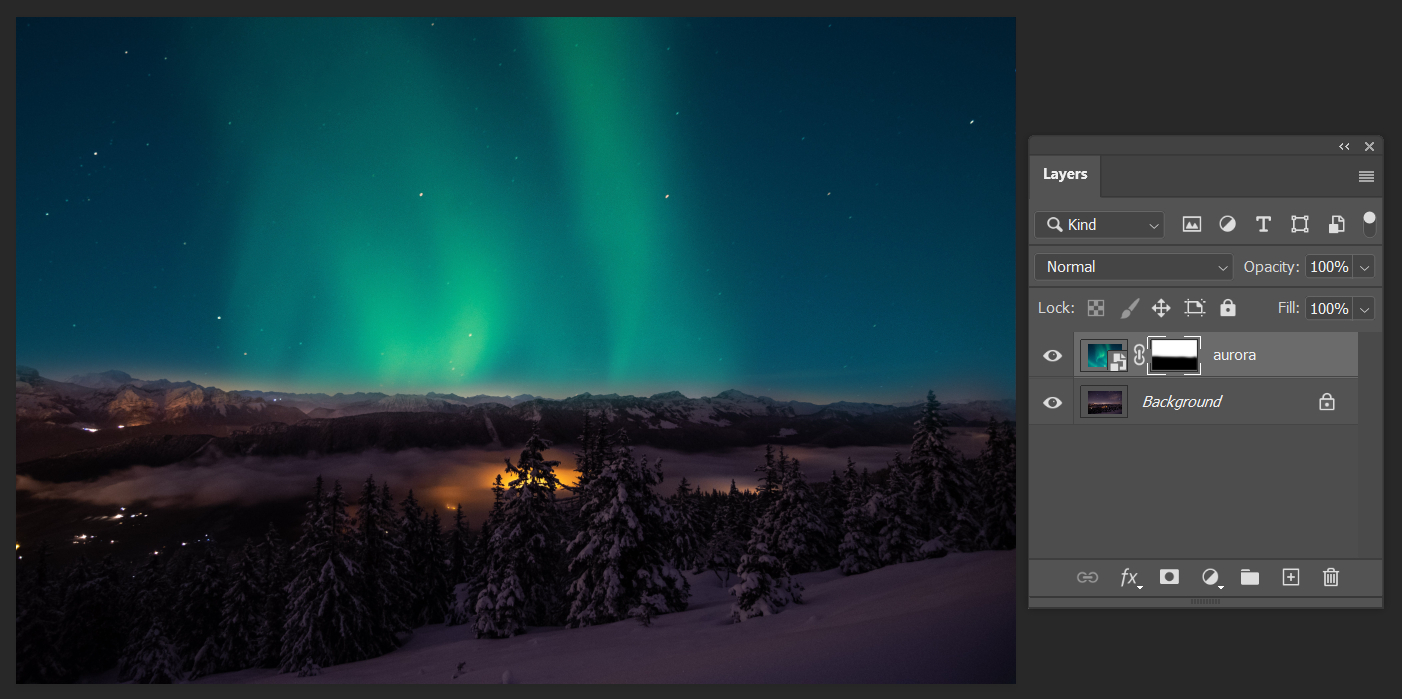
Doesn't it still look a bit unnatural? Let's try reducing the opacity of the aurora layer and see how it affects the overall result.
Changing the opacity (or using a layer mask) for blending layers, while simple, has its limitations. This is where Photoshop blending modes come in, allowing for faster and more complex blending.
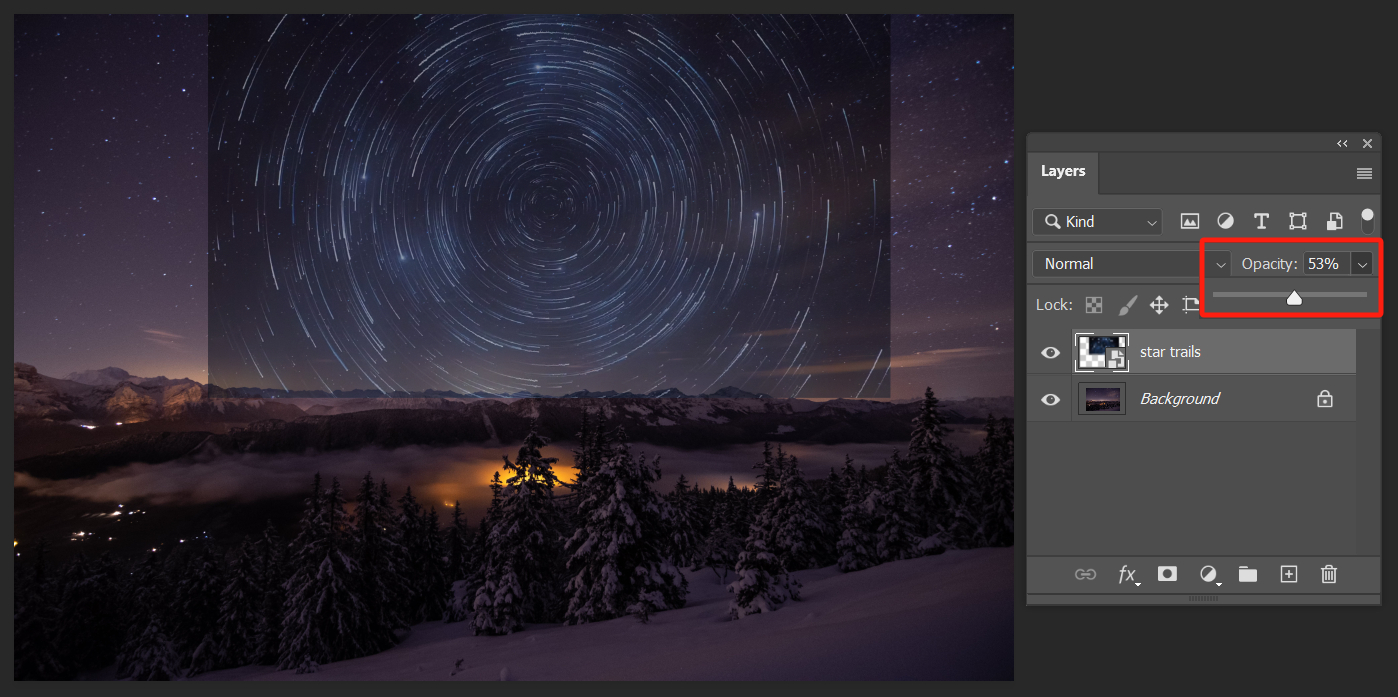
For example, if we want to add star trails to the sky of the night mountains, using the opacity and layer mask method mentioned earlier would obviously be impractical.
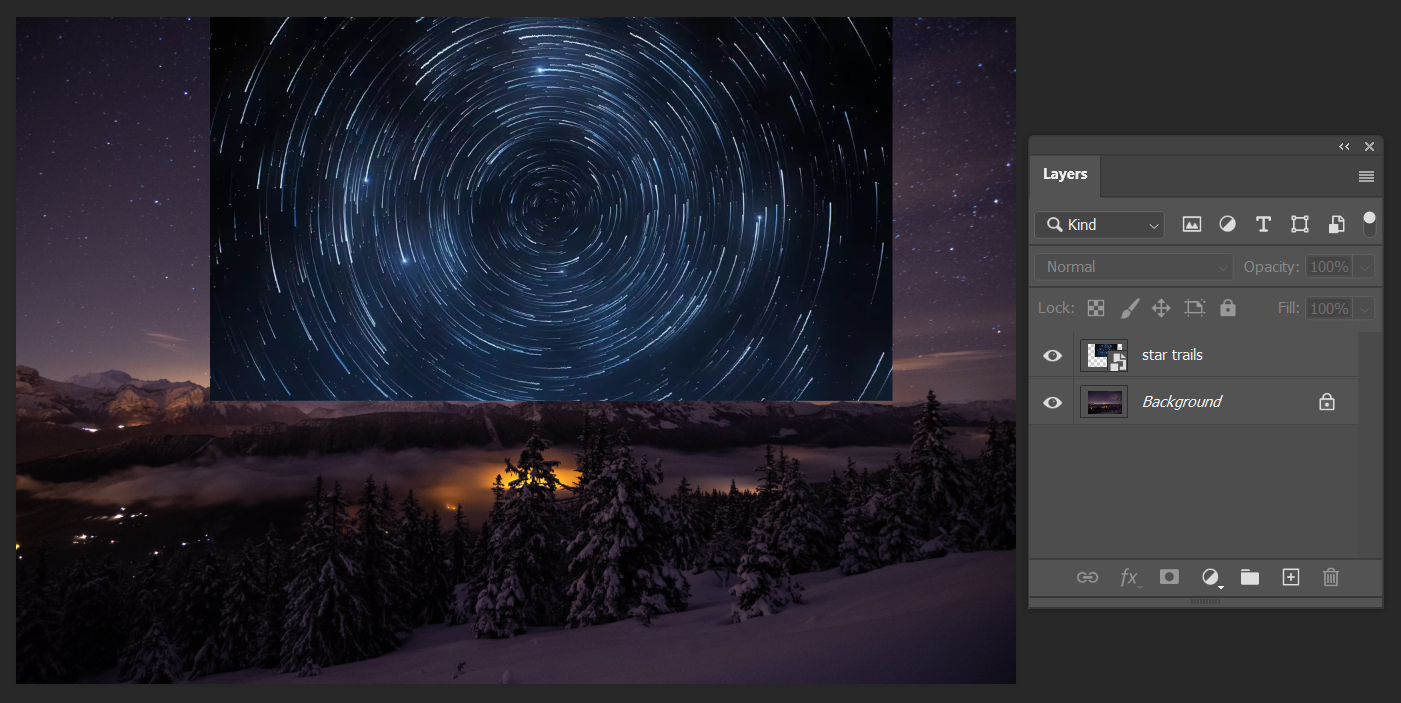
As shown in the image below, adjusting the opacity of the star trail image results in a strange and harsh effect.
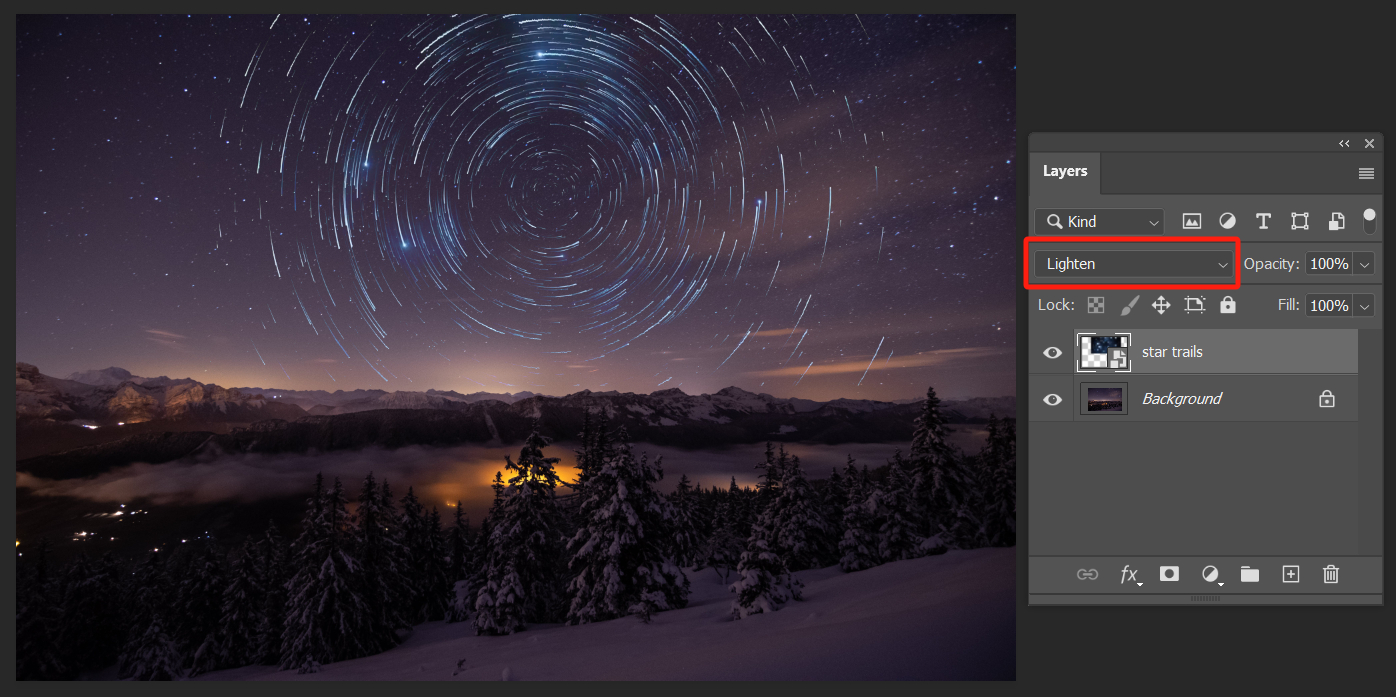
However, if we use the Lighten blending mode, we can effortlessly create a perfect star trail in just a second.
Final Thoughts About Photoshop Blending Modes
As we come to the end of our tutorial on Photoshop blending modes, we believe that by now, you have gained a solid understanding of the basics of how to blend in Photoshop.
However, there is so much more to explore beyond what we have covered. In addition to the blending modes found on the Layers panel, blending modes can be used in conjunction with the brush tool and adjustment layers.
This tutorial is just the beginning, a stepping stone to ignite your creativity.
If you're looking to take your Photoshop skills and creativity to the next level, or if you want to greatly optimize your post-processing workflow for your photography, we highly recommend considering TourBox.

The TourBox is a game-changer. Its intuitive design and customizable buttons seamlessly integrate with Photoshop, allowing you to effortlessly access and adjust various parameters, including blending modes, brush settings, and adjustment layers.
You can set the built-in "Blend Mode" function to the scroll wheel in TourBox Console, to easily scroll and apply blend modes.
Whether you're a seasoned professional or an aspiring enthusiast, the TourBox can greatly enhance your productivity and control, enabling you to unlock new levels of creativity.
We've come to the end of our tutorial on Photoshop blending modes, and we believe that by now you have a good grasp of how to blend in Photoshop. So go ahead and embrace the infinite possibilities that Photoshop offers, and continue taking your Photoshop skills to new heights.