How to Colorize Black and White Photos in Photoshop?
In the early days of photography, the world was captured only in black and white. As time went on, photographers learned how to breathe life into these monochromatic images by adding vibrant colors.
This tutorial will take you into the artistic world of coloring black-and-white photos, reviving memories from the past.
Are you ready? Let's embark on the magical journey of infusing color into those frozen black-and-white moments together.

In this article, you will learn:
- What Should You Consider When Coloring Black and White Photos?
- How to Colorize Black and White Photos?
- How to Colorize Black and White Photos Using Photoshop Neural Filters?
- Final Thoughts About Colorizing Black and White Photos
What Should You Consider When Coloring Black and White Photos?
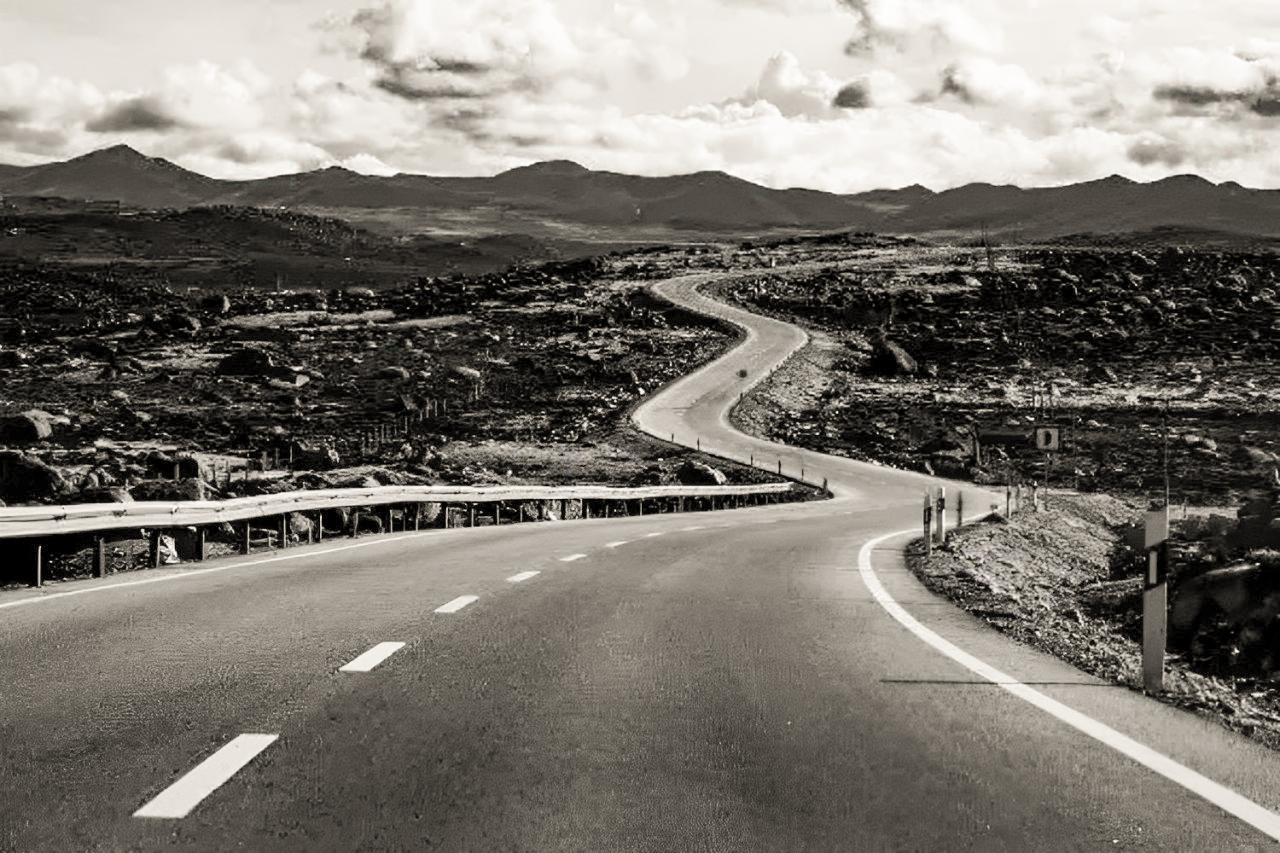
Black and white photos are characterized by the absence of color, using shades of black, white, and gray to convey texture.
For example, the photo below is a typical black-and-white landscape shot, with a well-defined foreground, middle ground, background, and distinct contrasts in light and texture.

Ansel Adams, a legendary figure in contemporary photography, was particularly fond of the black-and-white style. While black-and-white photography is fantastic on its own, how should you go about it if you want to colorize black-and-white photos?
Before diving into specific coloring techniques, there are three key points to consider when colorizing black-and-white photos.
1. Infuse Subjective Emotions
When you colorize black and white photos, the first thing to consider is incorporating your subjective emotions.
Adding color to black-and-white photos allows for expressing different emotions, with yellow and orange being the most common choices.
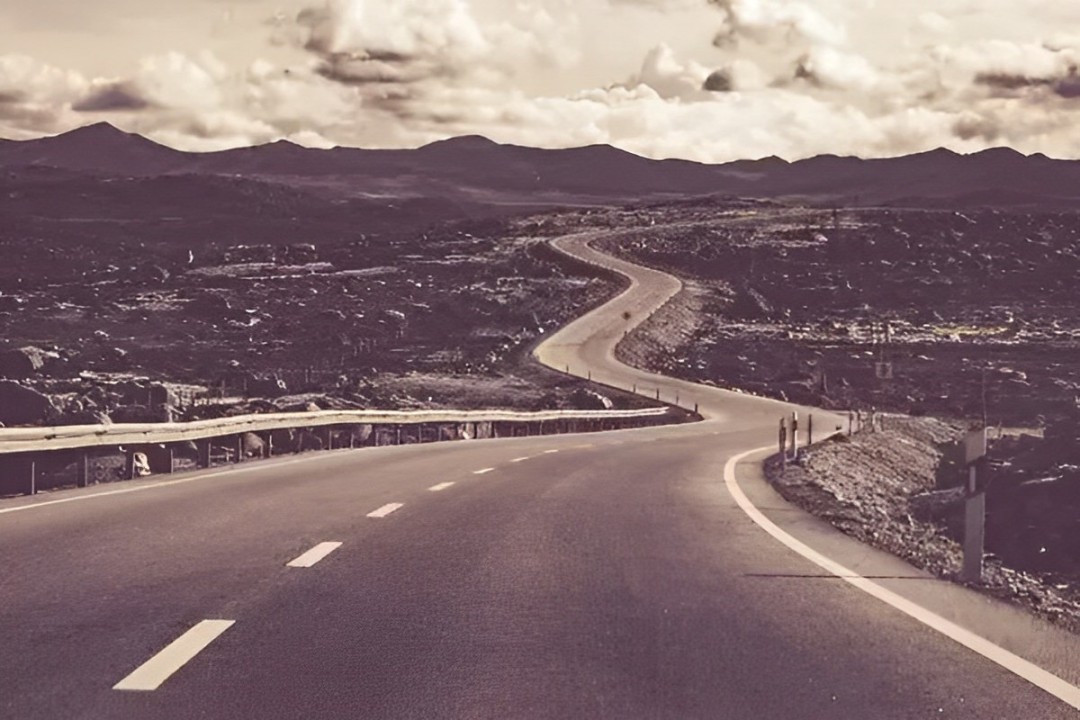
If you have old family photos, they often have a yellowish tint, which evokes a sense of nostalgia.
Adding a yellowish tone to black-and-white photos is simple, as various tools in post-processing software, such as photo filters or automatic color adjustment, can easily achieve this effect.
2. Introduce Color Contrast
Let's try something different. In contrast to the previous photo, you can introduce some "conflict" into this image.
Conflict refers to contrasting colors that do not harmonize well, such as the bright orange-yellow and dark purple in the example below. These two colors are not similar. They form a classic complementary color pair.
In contrast to the overall yellowish tone of the photo, the dark areas become purple. This combination immediately gives the photo a contemporary feel, rather than a nostalgic one, with distinct digital post-processing characteristics.
This type of coloring for black and white photos does not have a strong, explicit emotional direction, but it provides visual enjoyment.
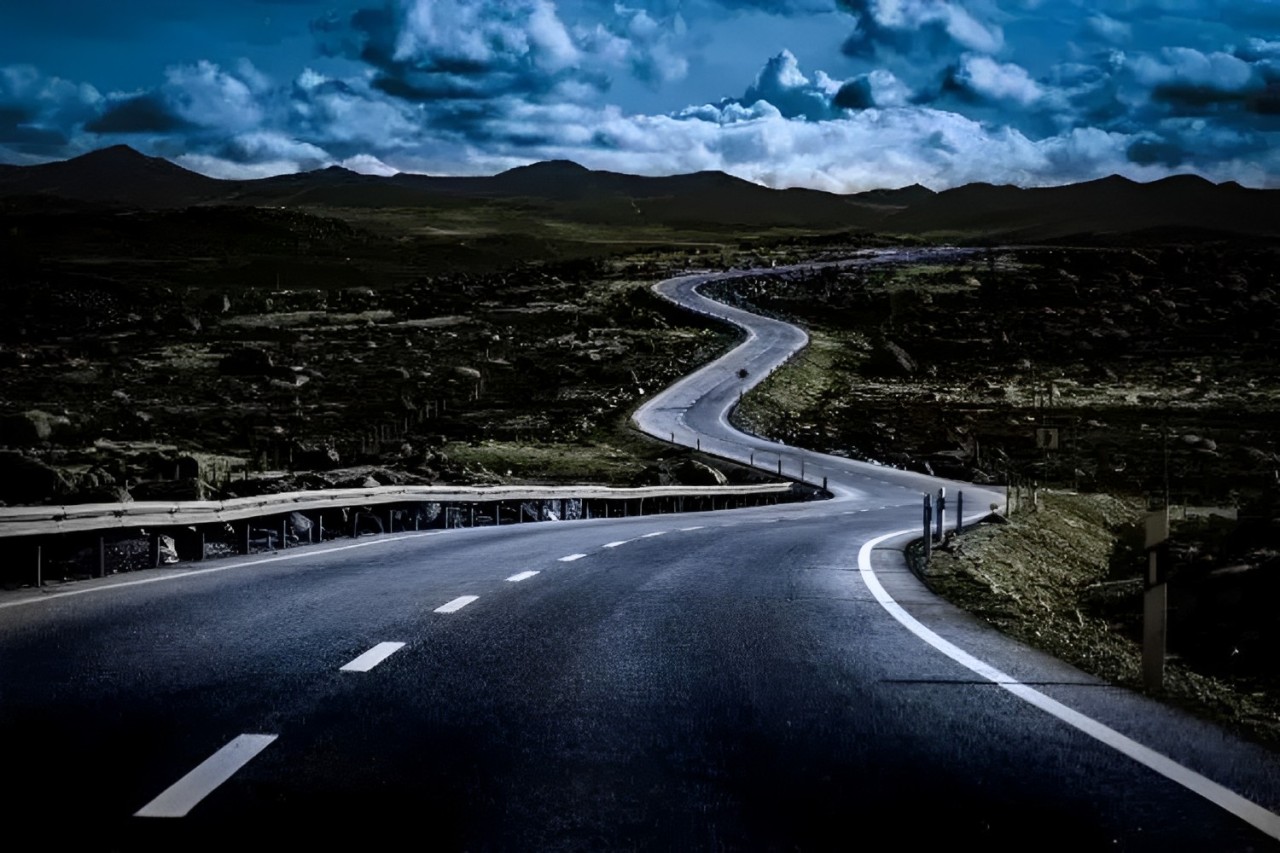
3. Reshape Colors
What you've seen so far is simply adding color tones to monochromatic photos. However, you can also add different color tones to different areas of the photo, making it appear as if it were in full color.
For example, in the image below, the sky is turned blue, the ground is yellow, and the road remains black and white. This creates a dramatic effect in the composition.
These are three different approaches to colorizing black and white photos. In the following sections, we will provide detailed instructions on how to colorize black-and-white photos in Photoshop.
How to Colorize Black and White Photos?
First, open the black-and-white photo you want to color in Photoshop. At this point, you will see the "Background" layer in the Layers panel.
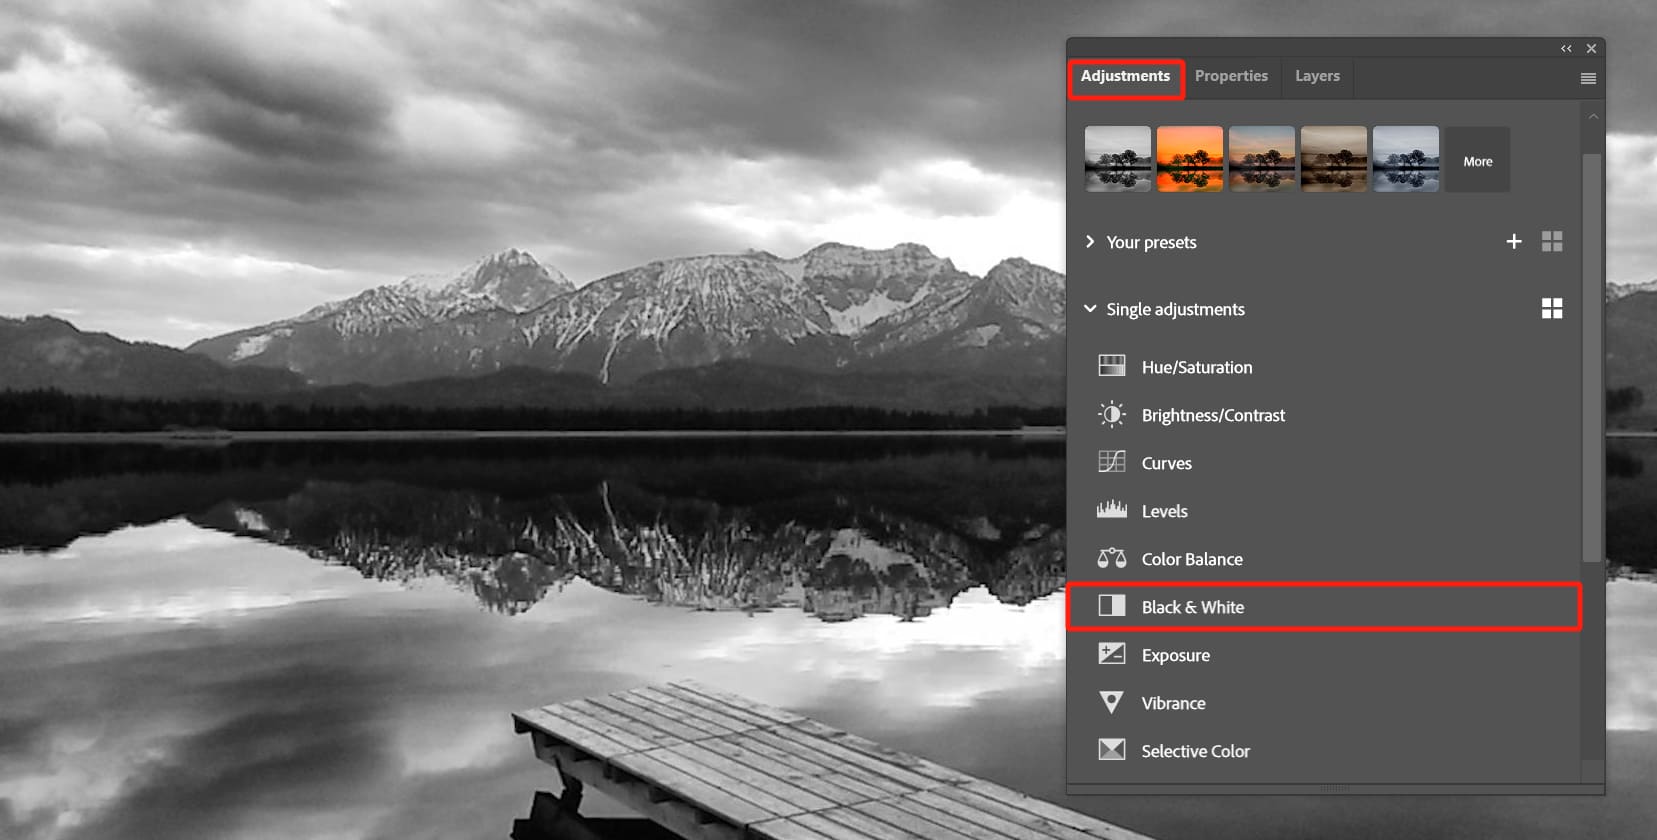
Find the Adjustments panel in Photoshop. If you can't locate the Adjustments panel, you can bring it up by clicking "Window" at the top menu bar and selecting "Adjustments."
In the Adjustments panel, locate the icon for "Black & White" and click on it.
In the resulting "Properties" panel, check the "Tint" option, and then click on the color box next to "Tint" to bring up the Color Picker panel.
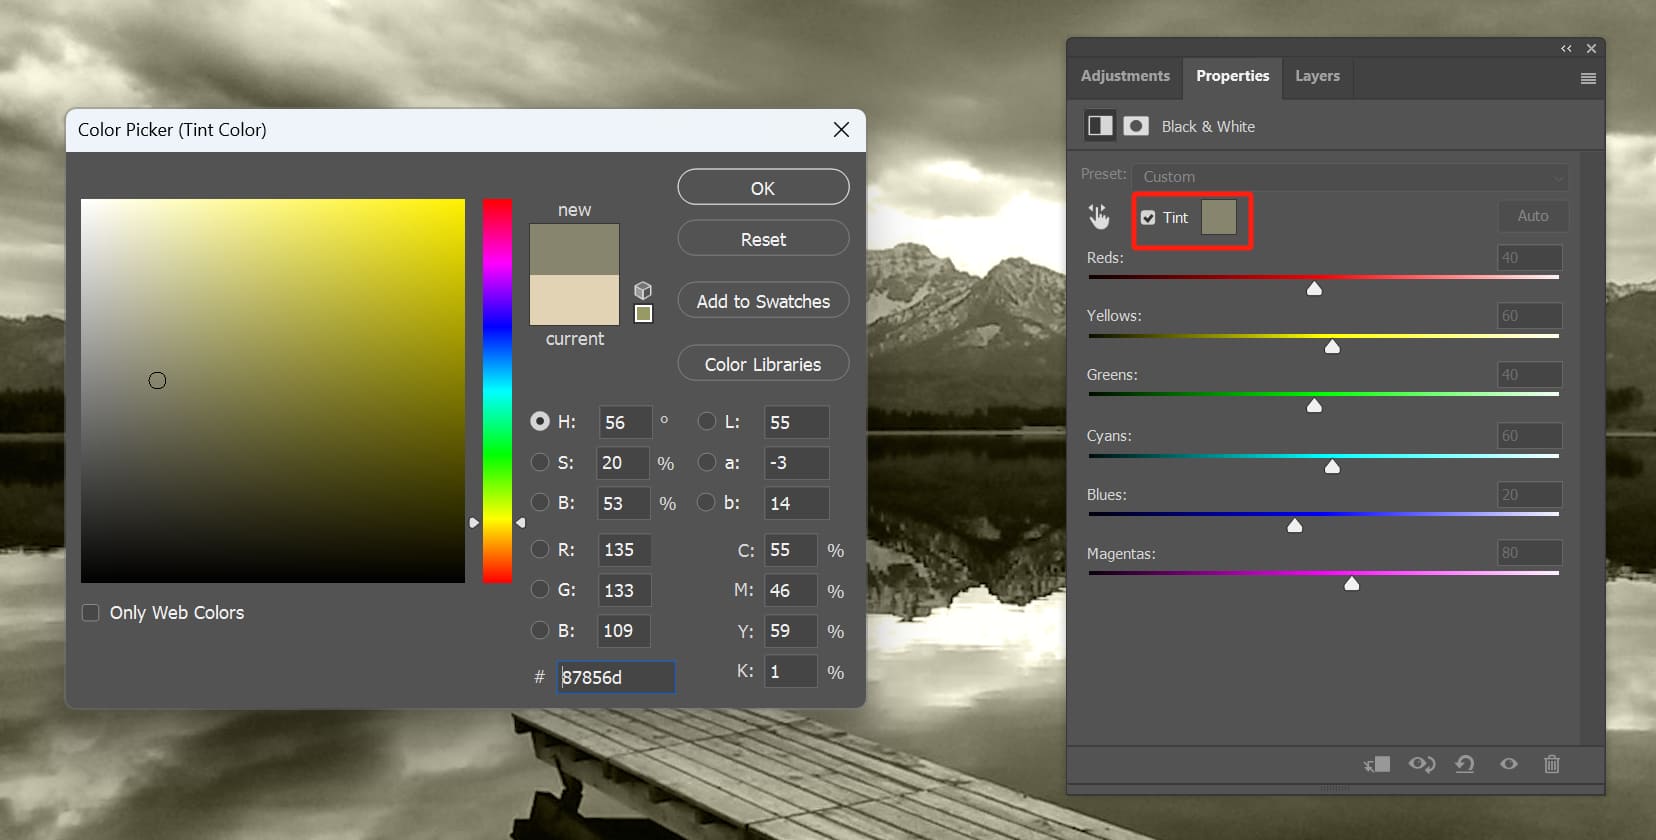
In the Color Picker panel, you can choose the desired color. As you make adjustments, Photoshop will display the color in real time. The Color Picker is straightforward to use: the rainbow strip on the right adjusts the hue, while the square on the left allows you to adjust saturation and brightness.
We recommend selecting colors with relatively low saturation and brightness for a pleasing look(located in the bottom left of the Color Picker). Once you're satisfied, click "OK" to apply the adjustment.
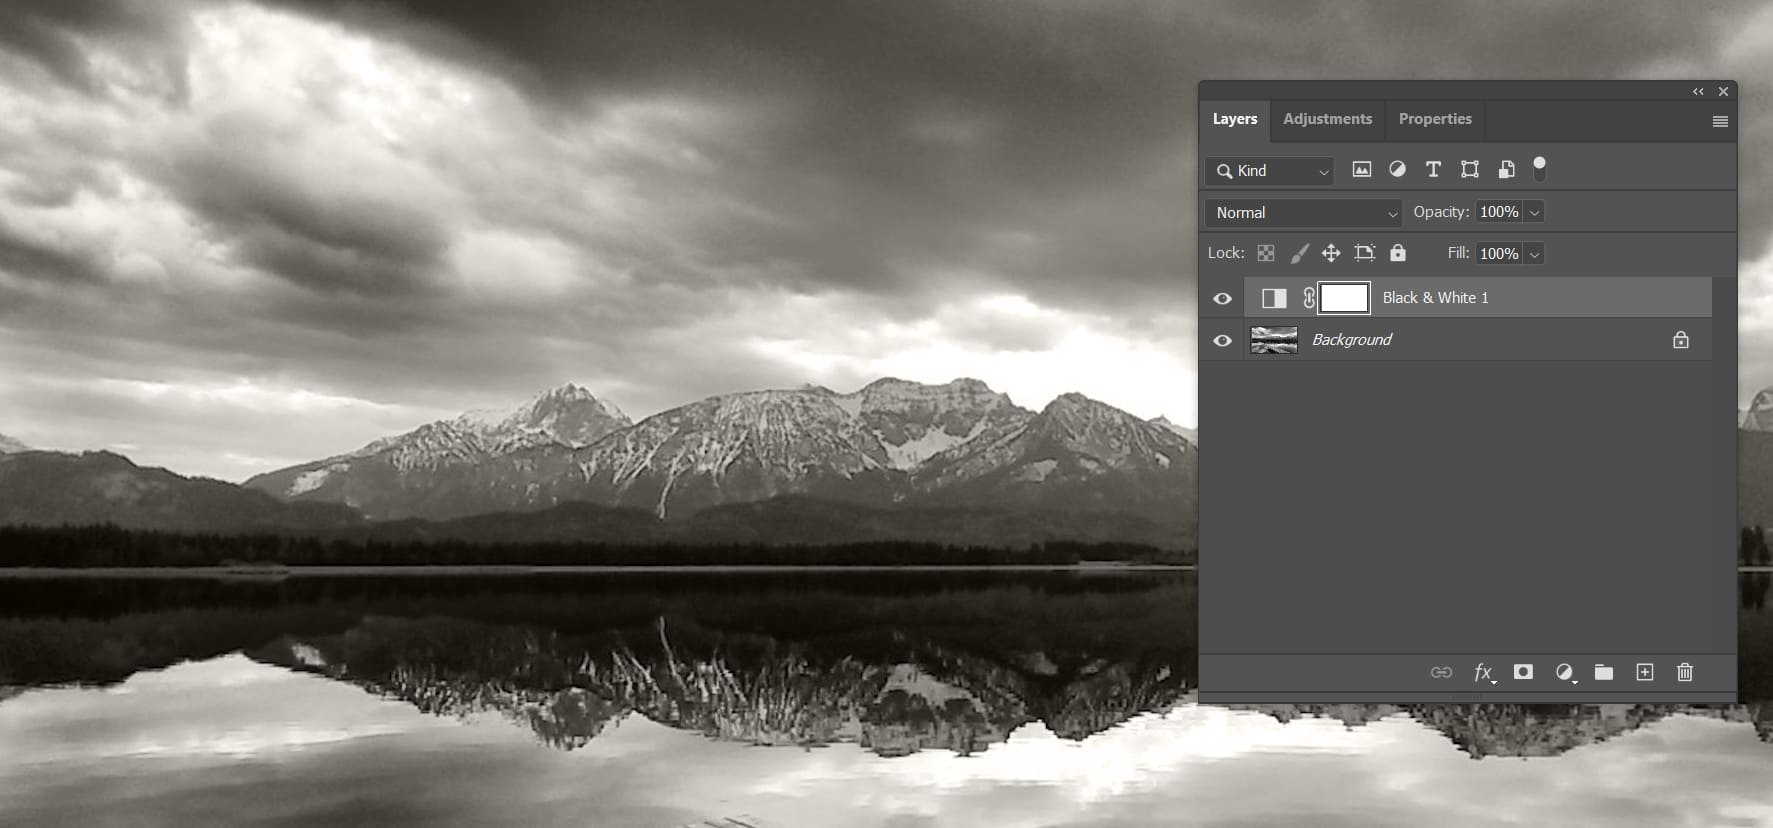
By following these simple settings, you can give a black-and-white photo a monochrome effect.
Take a look at the Layers panel, and you'll notice that the adjustment you just made doesn't directly alter the photo itself. Instead, it is applied as an effect layer. In other words, the adjustment you made is actually added as an adjustment layer.
If you want to add more personalized custom colors to this black-and-white photo, you'll need to use the selection tools in Photoshop.
Let's take the Quick Selection Tool as an example. If you have some basic knowledge of Photoshop, you can choose the tool that suits your preference, such as Lasso, Pen, Channels, Masks, and so on, as long as you can create the desired selection.
Using the "Quick Selection Tool," drag along the sky to select it. Pay attention to the dashed lines where the sky meets the mountains, making sure that the selection doesn't enclose parts of the mountains or miss any portions of the sky. Make any necessary adjustments.
Extra Tip:
Pressing the Alt/Option key subtracts from the selection while holding down the Shift key adds to the selection.
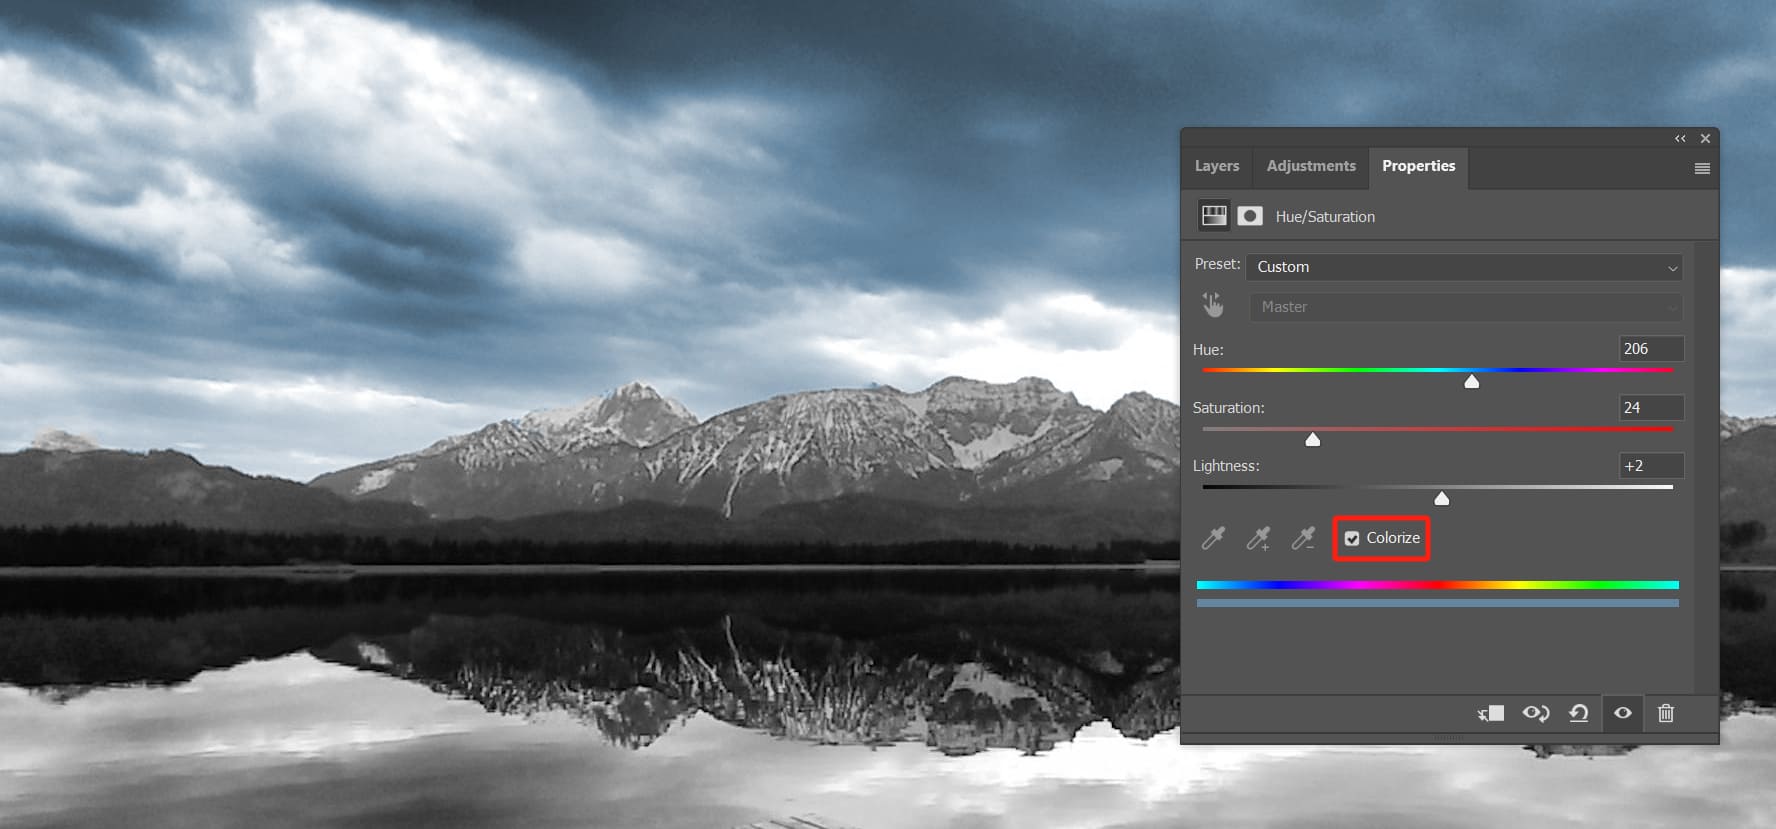
Once you have selected the sky, click on "Hue/Saturation" in the Adjustments panel. (If you want to fine-tune the colors in the highlights, midtones, and shadows, you can choose "Color Balance.")
In the "Hue/Saturation" window that pops up, check the "Colorize" option. Use the small sliders to adjust the hue, saturation, and lightness parameters and observe the real-time changes in the image until you achieve the desired color. Voila! The sky is now colored!
Extra Tip:
You can use Photoshop's sky replacement feature to add more interesting variations to the sky area.
Repeat the previous steps by selecting the corresponding areas, then click on "Hue/Saturation" in the Adjustments panel and check the "Colorize" option. Adjust the hue, saturation, brightness, and other parameters.
Extra Tip:
Make sure you have selected the background layer in the Layers panel when making the selections.
At this point, the coloring process is mostly complete. You can further enhance the coloring effect by using tools like the Pen tool to select and colorize specific details or adjust the overall white balance of the photo.
You may find yourself frequently using the mouse to bring up the corresponding adjustment layers and tweaking the sliders when coloring black-and-white photos. Not only is this process tedious, but it also distracts you from focusing on the design and creative aspects.
That's where TourBox, a creative tool beloved by photographers and digital artists, comes in handy.

You can set your frequently used adjustment layers to the buttons on TourBox or group them in the TourMenu. With TourBox's rotation controls, you can easily adjust the parameters single-handedly.
TourBox significantly boosts your workflow efficiency, and its ergonomic design ensures an excellent user experience. Visit our photo editing page to learn more about TourBox and its features.
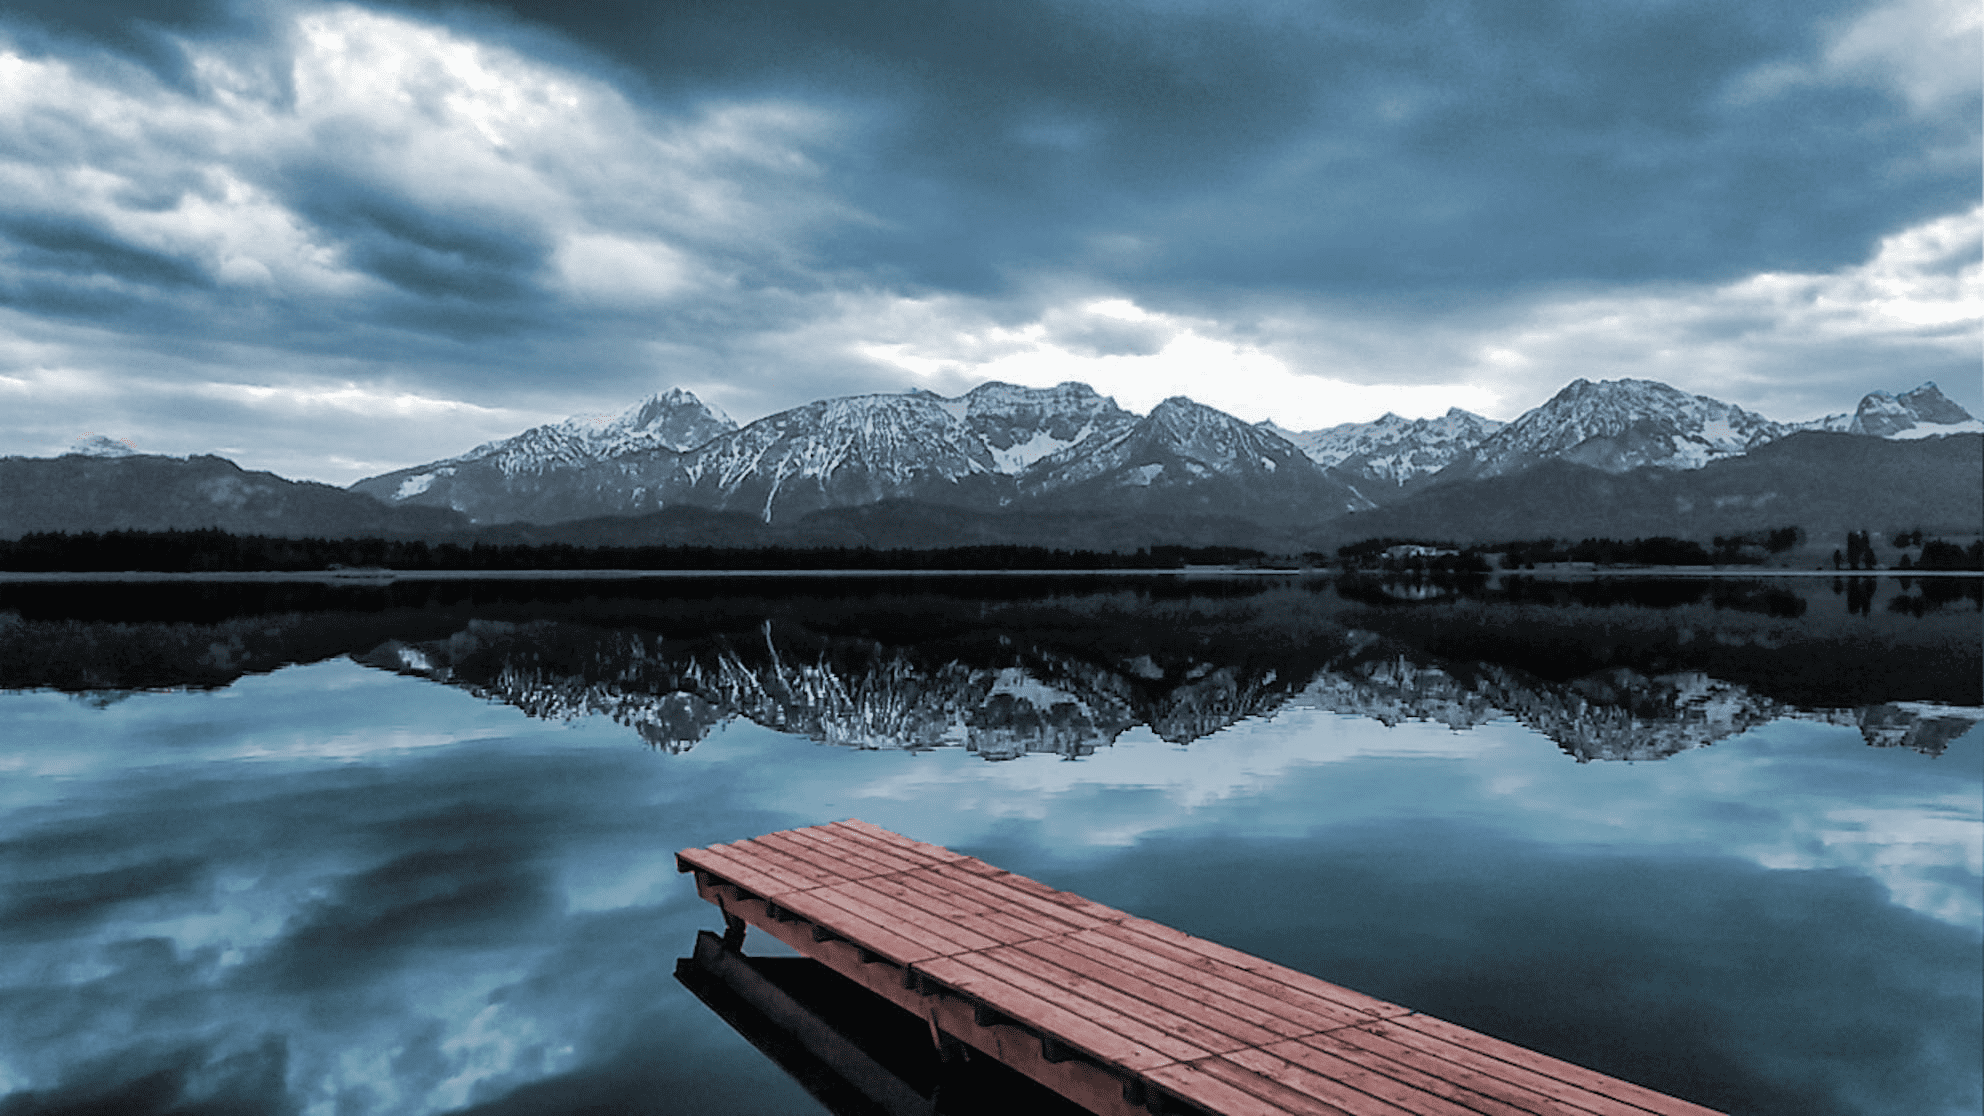
Finally, let's take a look at the final result.
How to Colorize Black and White Photos Using Photoshop Neural Filters?
In the previous section, we explored the process of coloring black-and-white photos using Photoshop's selection tools and adjustment layers.
However, nowadays, many artificial intelligence tools, such as Photoshop's Neural Filters, offer a one-click colorization feature for black-and-white photos.
To access the Neural Filters panel, click on the "Filter" dropdown menu in the top menu bar of Photoshop. Then select "Neural Filters" (requires signing in to your Adobe account).
Inside the Neural Filters panel, enable "Colorize" and wait a moment for Photoshop to add color to your black-and-white photo. Let's see the colorization effect of the Neural Filters.
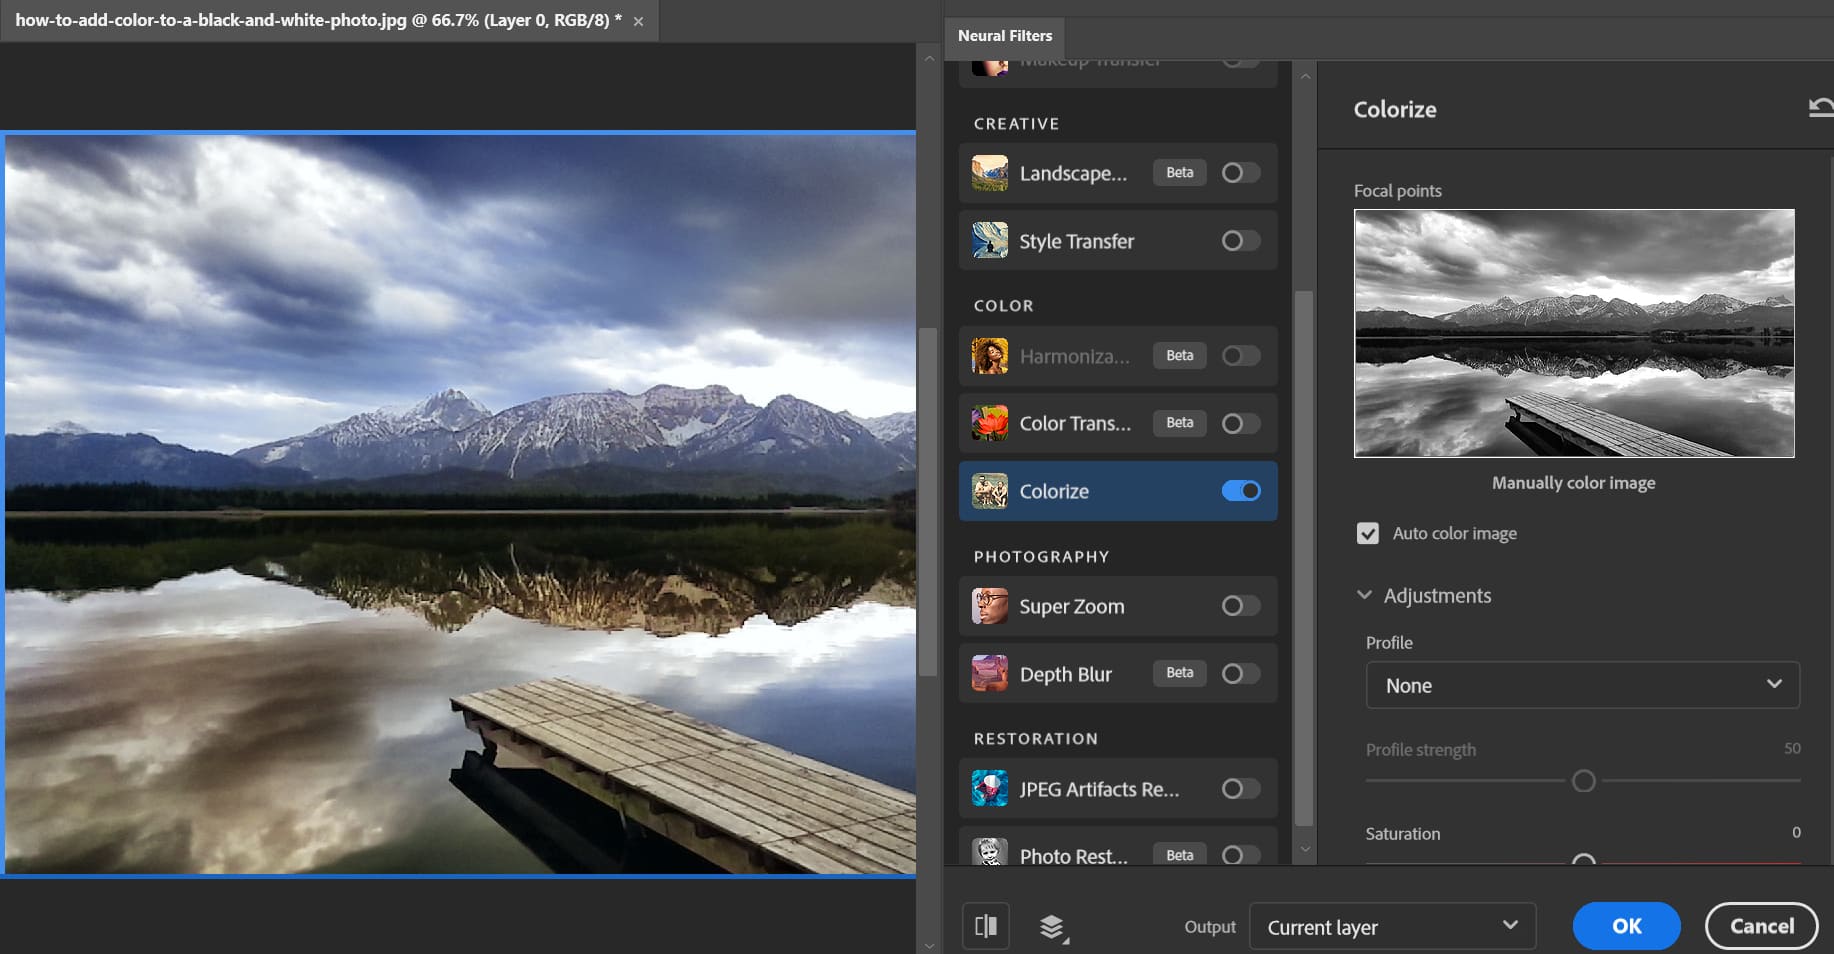
If you are unsatisfied with the AI colorization result, you can also adjust the colors using the sliders below.
However, you may find that while Neural Filters are an interesting experiment, the results may not be entirely satisfactory at this stage. Using Neural Filters as a preliminary coloring step and then further refining the colors using tools like Color Balance could be a better choice.
This way, your creations will reflect your personal creativity, which is something that AI cannot replicate.
Final Thoughts About Colorizing Black and White Photos
This tutorial is meant to provide a general idea, so it's important not to memorize each step rigidly. Understanding the principles and grasping the overall concept is what matters most.
The basic logic of coloring a black-and-white photo in Photoshop is to use Hue/Saturation to color specific selected areas individually. You can divide the photo into as many parts as you want to color and color each area separately.
If some parts of the image are difficult to select, don't worry. You can start by making a rough selection and coloring that area. Then, you can use the Pen tool to make more precise adjustments to the edges.
Product Recommendation:
If you're interested in TourBox, why not start with our cost-effective new product, TourBox Lite? It's very easy to get started with TourBox Lite, making it perfect for first-time users of TourBox.

And that concludes our tutorial on how to colorize black-and-white photos. In this tutorial, we have covered the approach and techniques for adding color to black-and-white photos. We hope this tutorial proves helpful to you.