3 Essential Tips to Boost Color Grading Efficiency in DaVinci Resolve
Color grading is a crucial step in making your visuals shine, but a slow process can dampen the joy of creativity. As a DaVinci Resolve user, you're likely seeking more efficient ways to color grade, right?
Today, we want to share three simple and practical color grading tips for DaVinci Resolve. These tricks not only save time but also organize your creative process, maximizing efficiency!
Let's dive in and see how easily you can master these techniques.

In this article, you will learn:
- Tip 1: Create Your LUT Library
- Tip 2: Use PowerGrade
- Tip 3: Use Still
- Ultimate Ideas to Boost DaVinci Resolve Color Grading Efficiency
Tip 1: Create Your LUT Library
If your workflow involves switching between different color grading or editing software, exporting LUTs (Look-Up Tables) is a great way to maintain consistent color tones.
Whether you've used a single node or multiple nodes in your grade, any node that relies on basic color tools, Curves, or compatible Resolve FX plugins (like Color Space Transform, ACES Transform, or Gamut Mapping) can be converted into a LUT.
However, keep in mind that nodes using Qualifier, Windows, incompatible filters (like sharpening or blurring), or unsupported Resolve FX / Open FX plugins will be completely ignored during the conversion. Any corrections applied within those nodes won't make it into the LUT.
When exporting, you can create a dedicated folder to save your custom LUTs, keeping things neat and organized.
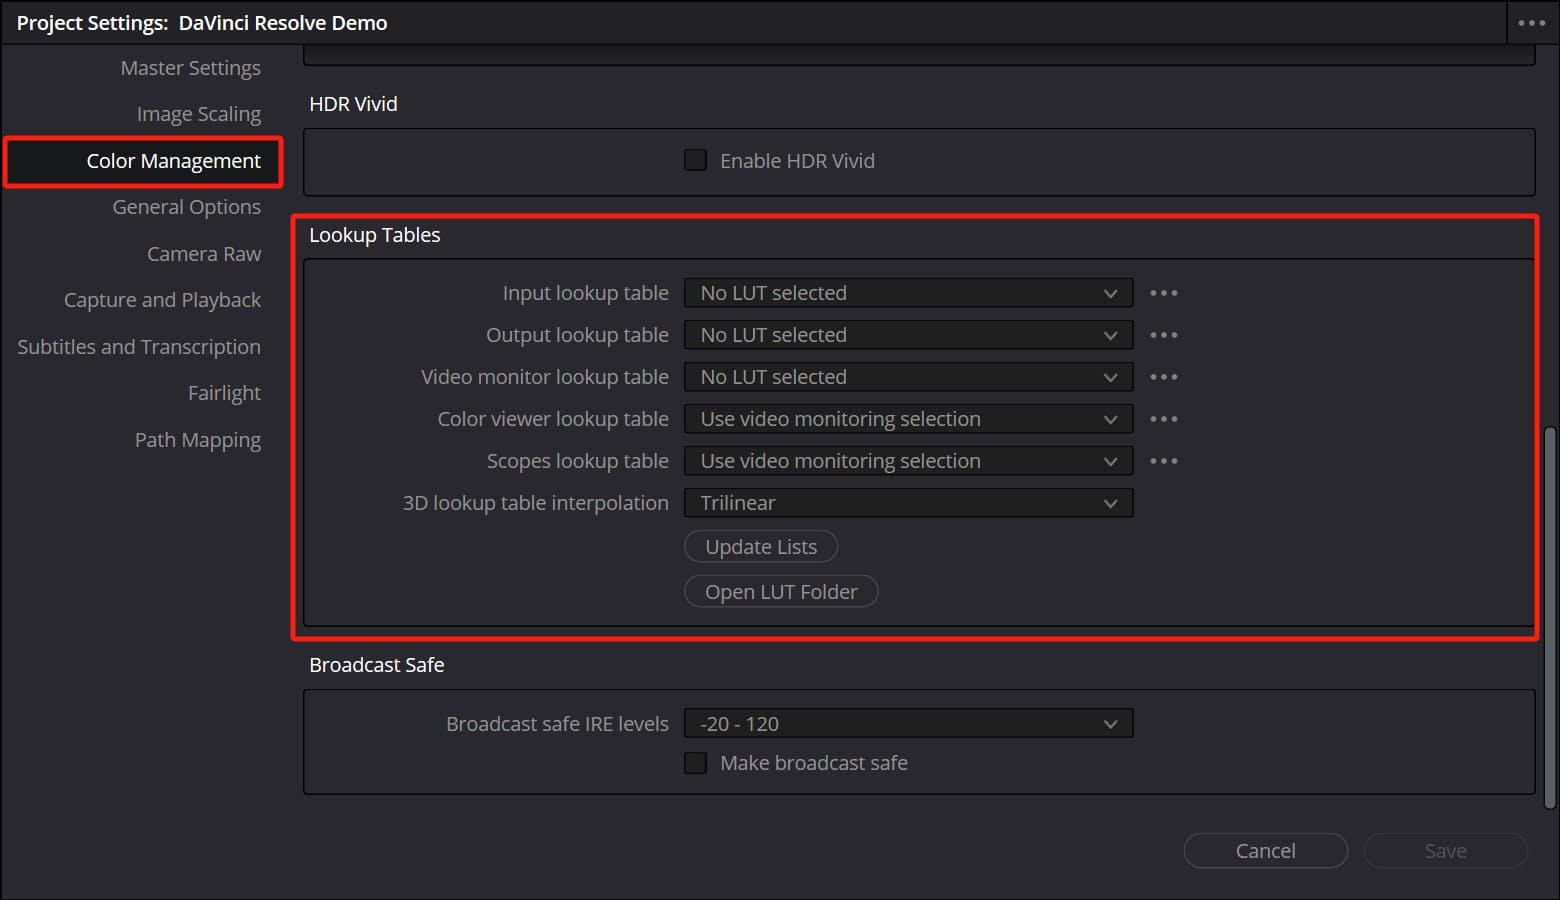
Once created, the LUTs can be directly applied to nodes in DaVinci Resolve or set as a project-wide look via the Color Management panel in the project settings.
You can also copy your LUTs to external storage for use with cameras during on-set monitoring, or share them with collaborators who need to use the LUT in their software.
So, how exactly do you create a LUT in DaVinci Resolve? Let's break it down step by step:
Step 1
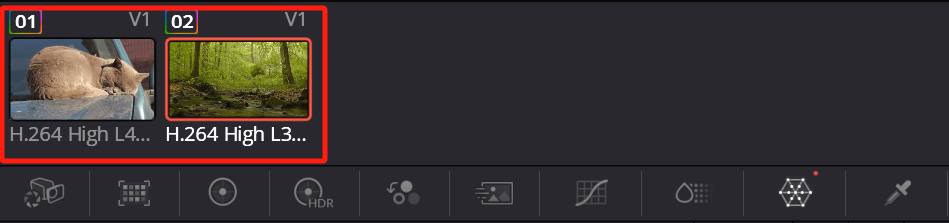
Press "Shift + 6" to switch to the Color page, then click the Clips button in the top-left corner.

At this point, you will see thumbnail previews of your clips appear above the toolbar in the Color page.
Step 2
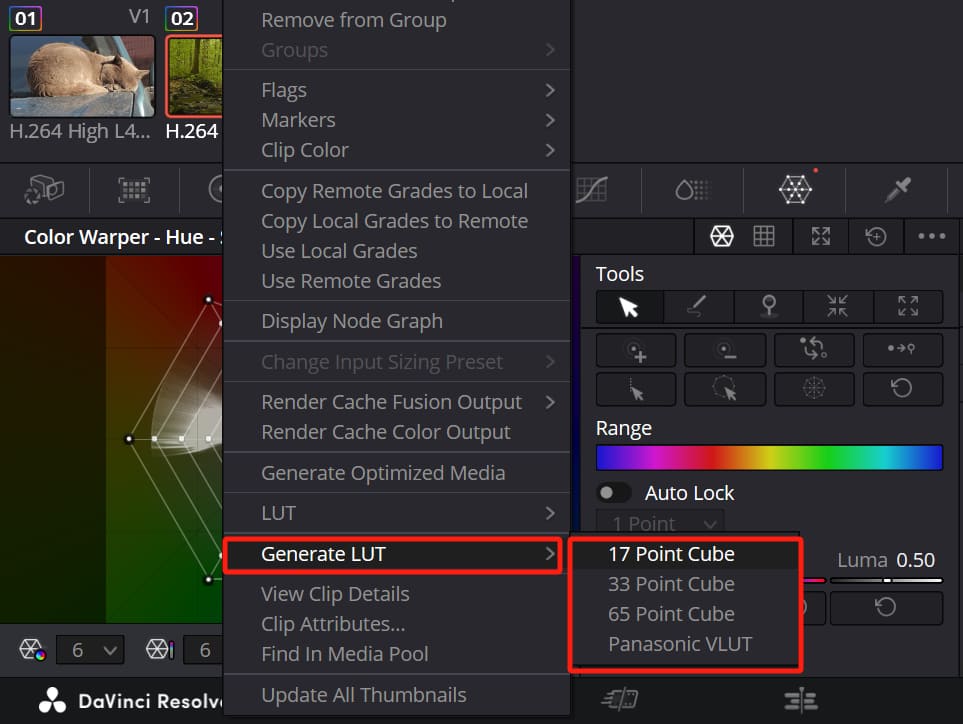
Right-click on the clip you've finished color grading, then select "Generate LUT" and choose either "17 Point Cube" or "33 Point Cube" (pick the format that best suits your needs).
- 17 Point Cube: This low-resolution LUT has fewer sampling points, making it smaller and ideal for quick processing and real-time previews on lower-performance devices. However, its lower precision may cause less smooth color transitions, which is unsuitable for high-precision grading.
- 33 Point Cube: The 33 Point Cube is the most commonly used resolution, striking a balance between file size and color accuracy. It's versatile and works well for most use cases, including color grading, monitoring, and delivery.
- 65 Point Cube: As the highest-resolution LUT, it ensures smooth color transitions and maximum accuracy, ideal for precision work in feature films or high-budget projects. However, it comes with larger file sizes and higher computing demands.
- Panasonic VLUT: This LUT format is specifically designed for Panasonic devices, such as the Varicam cameras. It's fully compatible with Panasonic's color science, ensuring accurate color reproduction when applied to monitoring or output workflows on Panasonic equipment.
How to Choose?
- For basic monitoring or quick sharing, the 17-Point Cube gets the job done.
- For most color grading and production needs, go with the 33-Point Cube.
- Need the highest color accuracy? Opt for the 65-Point Cube.
- Using Panasonic gear or workflows? Stick with Panasonic VLUT.
Step 3
In the pop-up dialog, navigate to the default folder and create a folder named "New LUTs" for your own LUT. Rename the LUT to "Forest." (This name is just for demonstration purposes.)
The default file path depends on our operating system. Saving it here will make it accessible for future use in DaVinci Resolve.
- Mac OS: Library/Application Support/Blackmagic Design/DaVinci Resolve/LUT/
- Windows: C:\ProgramData\Blackmagic Design\DaVinci Resolve\Support\LUT
- Linux: /home/resolve/LUT
Step 4
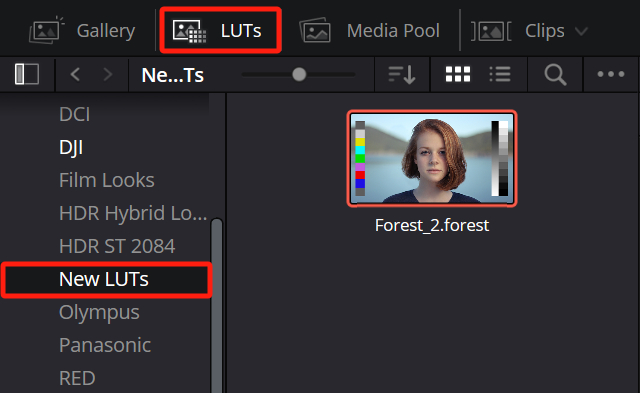
Open a new project and click the "LUTs" button at the top left of the Color page. Then, navigate through "LUTs" -> "New LUTs" to find your custom LUT.
Here are ways to apply color grading:
- Method 1: Select a node on the footage clip, and drag the LUT onto the Viewer to apply the color grade to that node.
- Method 2: Choose a node on the footage clip, then right-click the LUT -> select "Apply Lut to Current Node".
- Method 3: Right-click on a node on the footage clip -> from the pop-up context menu, and choose "LUT" -> "New LUTs" -> "Forest".
Tip 2: Use PowerGrade
Building a shared PowerGrade is a powerful tool for enhancing color grading efficiency, and it can be utilized across any project within DaVinci Resolve.
1. How to Create a PowerGrade Album?
Click the "Gallery" button at the top left of the Color page, then select the "Still Albums" button in the top left corner to reveal a list containing "Stills 1," "PowerGrade 1," and "Timeline."
Right-click on the blank space to the left of "Gallery," choose "Add PowerGrade Album" from the pop-up menu, and double-click to rename it for organization purposes.
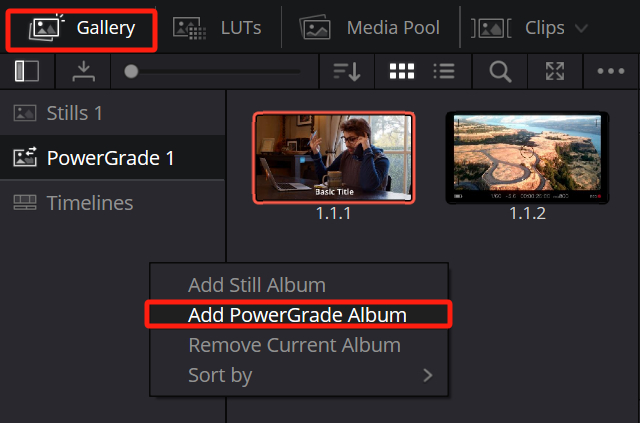
For example, let's name it "MyPowerGrade" for demonstration purposes.
2. How to Import Color Presets into a PowerGrade Album?
Method 1
Select the newly created "MyPowerGrade" album.
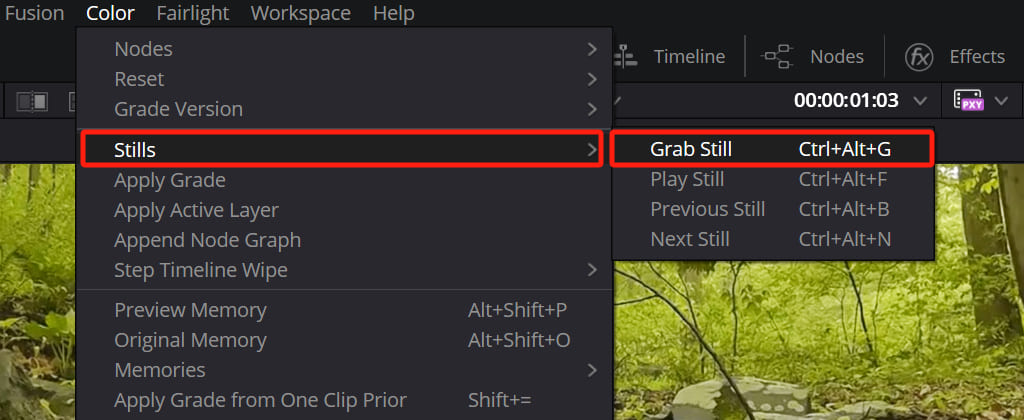
On the footage with color grading already applied in the timeline Viewer, right-click -> choose "Grab Still."

Alternatively, you can also navigate in the DaVinci Resolve top menu to "Color" -> "Stills" -> "Grab Still" (shortcut: "Alt/Option + Ctrl/Command + G").
Method 2
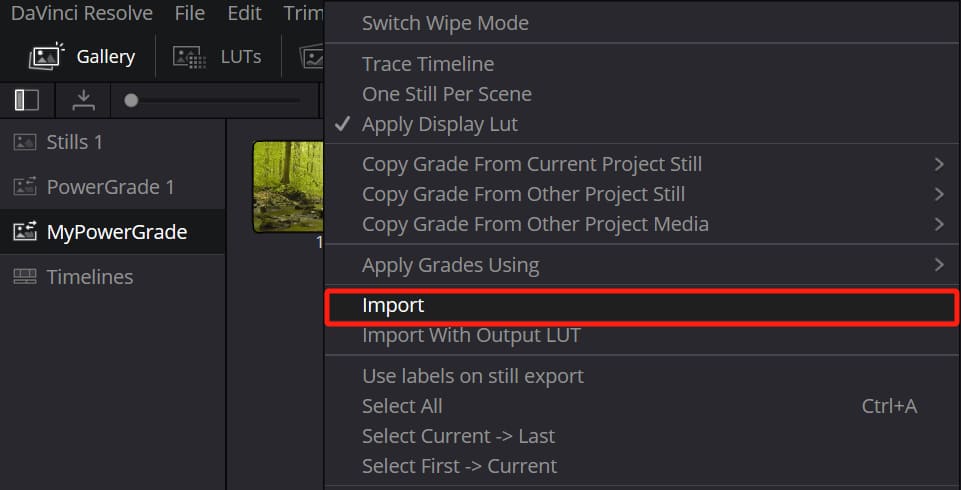
Select the newly created "MyPowerGrade" album.
Right-click in an empty space within the folder, choose "Import," and you can then import the ".drx" file that you have downloaded to your local folder into your PowerGrade album.
3. How to Apply PowerGrades?
The following three methods allow us to quickly apply color presets from the PowerGrade album to clips, and after applying, we can further fine-tune by selecting the respective nodes in the Node panel.
Method 1
Start by selecting an ungraded clip in the timeline thumbnail view, then use the middle mouse button to click on the preset in the "MyPowerGrade" album. This action applies the preset in one click, overwriting all existing nodes.
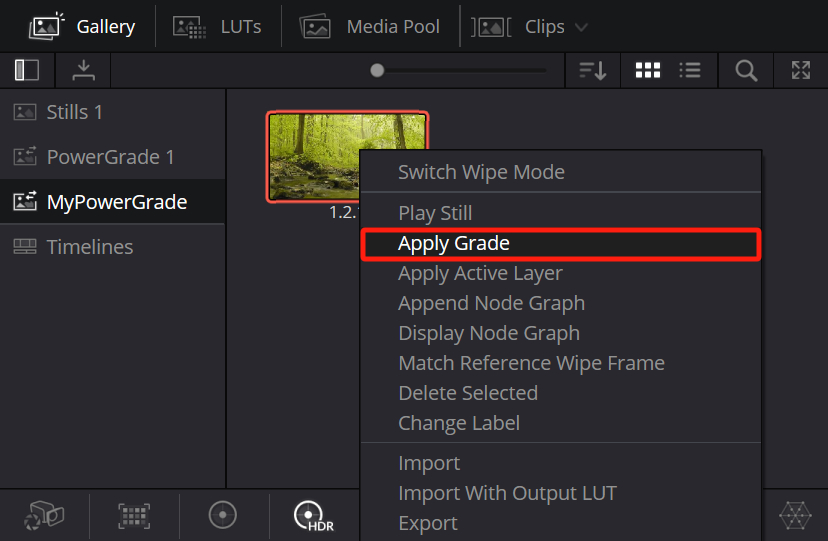
Method 2
Select an ungraded clip in the timeline thumbnail view, right-click on the preset in the "MyPowerGrade" album, and choose "Apply Grade." This method also overwrites all nodes.
Method 3
Select an ungraded clip in the timeline thumbnail view, then simply drag the preset from the "MyPowerGrade" album directly onto the Viewer. This action applies the preset in one click, overwriting all nodes.
Tip 3: Use Still
In DaVinci Resolve, besides PowerGrade albums, there are also Still albums. However, Still albums are project-specific and are handy for storing multiple color versions, making it easy to showcase different grading effects to collaborators and clients.
Right-click on the blank space to the left of "Gallery," choose "Add Still Album" from the pop-up menu, and double-click to rename it for organization purposes.
We can also add color presets using the "Grab Still" and right-click "Import" methods. To apply color in the nodes, you can refer to the section where we discussed applying PowerGrade color presets.
One important note is to select our "Still Album" first. Then, the stills added via "Grab Still" will automatically go into that specific "Still Album."
Ultimate Ideas to Boost DaVinci Resolve Color Grading Efficiency
Color grading in DaVinci Resolve is a meticulous process that requires time and attention to detail, but efficiency and creativity are not mutually exclusive.
Further Reading:
You can quickly access desired color styles by creating your own LUT library. Utilizing shared PowerGrade galleries can enhance your team's collaborative workflow. Still albums allow you to review and compare every highlight moment in your creations easily.
Mastering these three techniques can elevate both the speed and quality of your color grading in DaVinci Resolve.
However, even with good techniques, having the right tools is crucial. We'd like to recommend TourBox to you, a controller beloved by many colorists, content creators, and video editors.

Imagine controlling TourBox with your left hand while wielding the mouse with your right, with the images on the screen flowing at your fingertips—it's an incredible feeling. Whether you're a novice or a seasoned pro in color grading, TourBox will be a valuable companion in your workflow.

On the color grading journey, having both the right methods and tools is essential. We hope this article, like TourBox, injects more inspiration and convenience into your creative process!