How to Increase the Resolution of Images in Photoshop?
Are you looking to enhance the resolution of your images in Photoshop? Look no further! In this tutorial, we'll walk you through the process of increasing the resolution of your photos, allowing you to achieve sharper and more detailed results.
Let's dive right in and unlock the secrets of enhancing image resolution in Photoshop.

In this article, you will learn:
- What Is Image Resolution?
- How to Increase the Resolution of Images in Photoshop?
- Frequently Asked Questions About Increasing Resolution of Image
What Is Image Resolution?
When we talk about the resolution of an image, we are usually referring to its clarity. Resolution is a parameter that measures the amount of information contained in an image and is typically expressed in dots per inch (DPI) or pixels per inch (PPI).
What Is the Difference Between DPI and PPI?
- DPI, which stands for dots per inch, is used in printing to measure the quality of an image printed by a printer.
- PPI, which stands for pixels per inch, is used in design and digital devices to measure the number of pixels in an image. The higher the PPI, the more detailed the image.
Unless you are specifically printing an image, PPI is generally used as the unit of resolution for digital devices and screens.
For example, let's say you have a photo with dimensions of 1000x1000 pixels. If you were to print it on a 1x1 inch paper, its resolution would be 1000 DPI. This means there are 1000 pixels per inch of paper, resulting in a very sharp print.
However, if you were to print the same photo on a 10x10 inch paper, the resolution would become 100 DPI, as there are only 100 pixels per inch of paper. This print would appear less sharp due to the lower resolution.
Therefore, resolution is an important factor that affects image clarity. The higher the resolution, the sharper the image. However, increasing the resolution does not add more detail to the image; it simply makes it appear clearer when printed or displayed.
How to Increase the Resolution of Images in Photoshop?
If you find that the resolution of your image is not meeting your needs, you can definitely increase the resolution in Photoshop.
Note:
While Photoshop is a powerful tool, it may not be able to magically transform a low-resolution photo into professional-grade quality. The steps we're about to share on how to increase image resolution in Photoshop will indeed enhance the resolution, but the amount of improvement will depend on the initial resolution of the image.
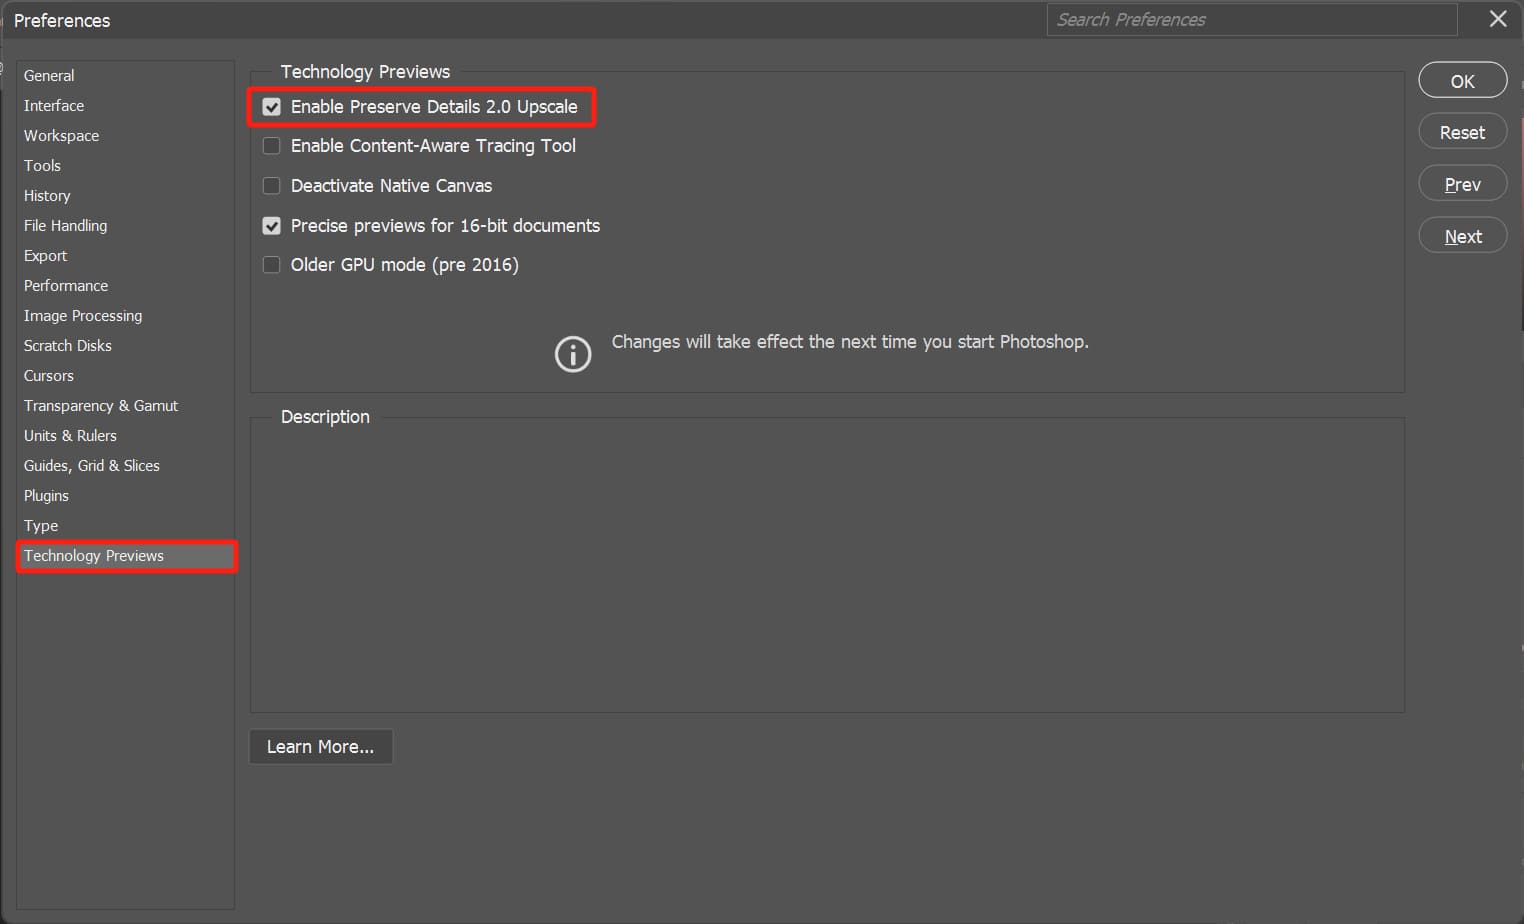
Before making any adjustments to the image, go to "Edit" > "Preferences" > "Technology Previews". Make sure to enable the "Enable Preserve Details 2.0 Upscale" option.
Once done, click OK. As the name suggests, this option preserves the original details in the image when changing the resolution.
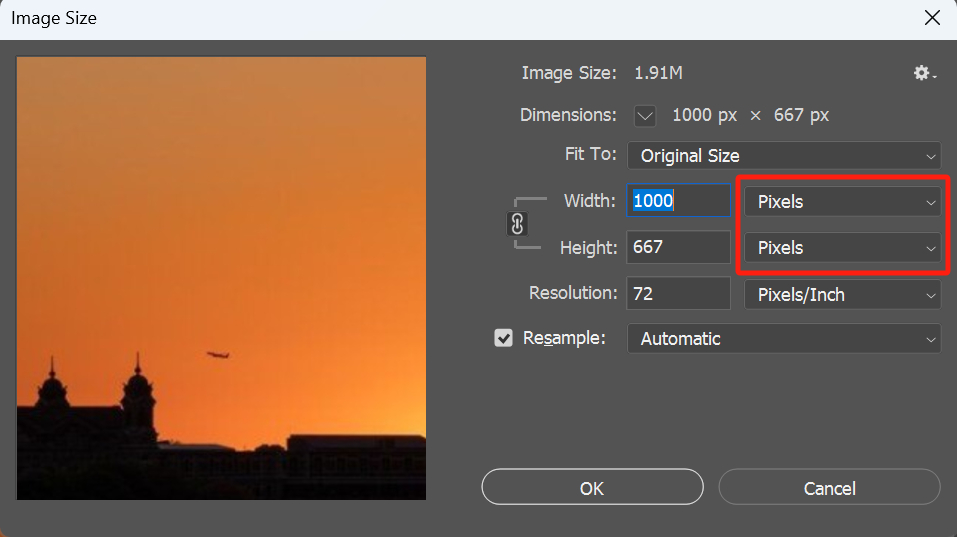
Now, you can navigate to "Image" > "Image Size" to open the Image Size panel. Make sure to set the dimensions of width and height to pixels.
In the dropdown menu for width and height dimensions, there are various options available. Since our goal is to change the resolution, the dimensions must be set in pixels.
Before changing the image resolution, you must enable the resampling option. Resampling alters the number of pixels in the image.
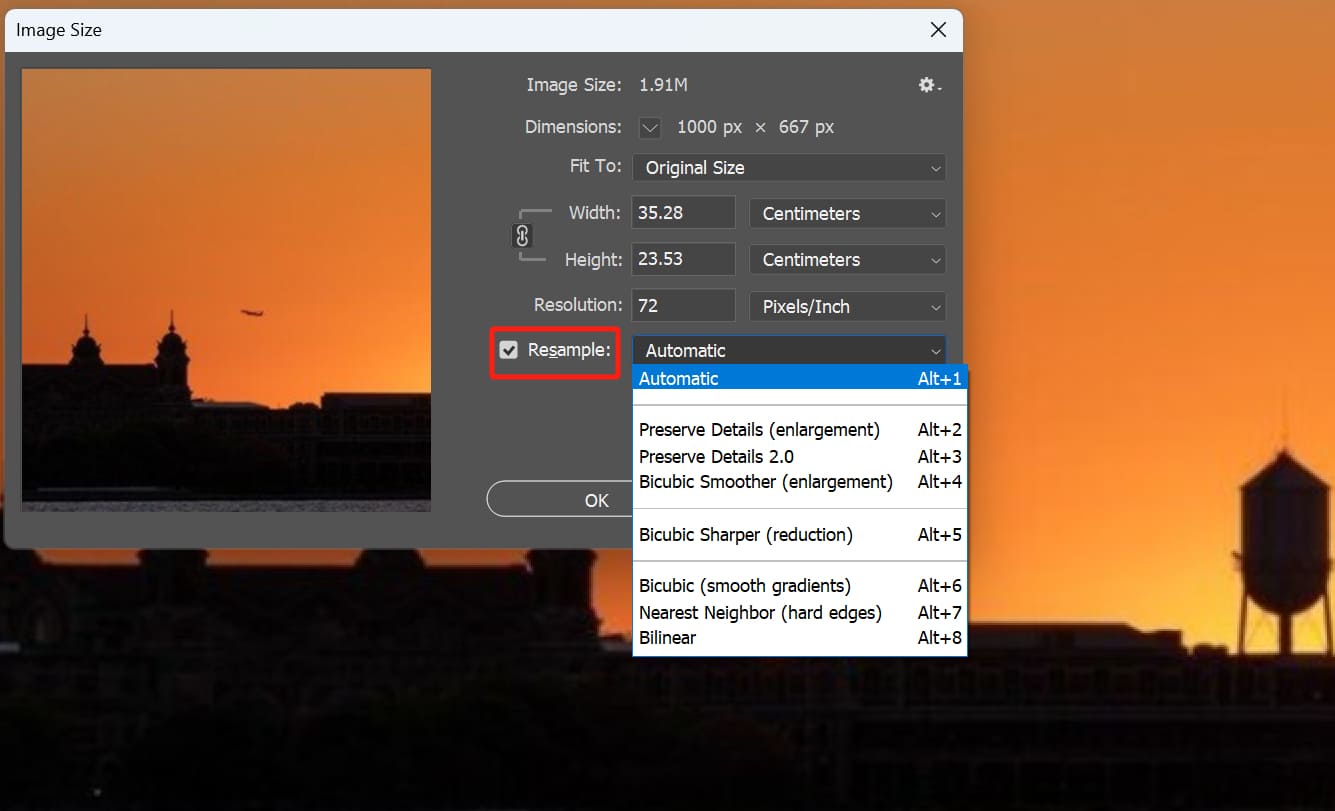
Here are the differences between these interpolation options, and you can choose one based on your specific needs:
- Automatic: Photoshop interprets your image and selects the most suitable resampling method for it.
- Preserve Details (enlargement): This mode aims to preserve the clarity of the image when enlarging it. However, if the enlargement is too significant, the image may appear overly sharp.
- Preserve Details 2.0: This is an advanced resampling method that detects and preserves important image details while avoiding excessive sharpening in other areas. Compared to "Preserve Details (enlargement)", it largely avoids over-sharpening of fine details like skin texture.
- Bicubic Smoother (enlargement): It samples pixels from different positions to estimate the best size for the pixels to be added to the image, and it smooths the pixels that make up the image. This often results in a visually improved image at the end of the process. This method is one of the most accurate and precise, but it takes longer to process changes in the image.
- Bicubic Sharper (reduction): It determines which pixels can be removed from the image in a highly accurate manner. Additionally, it sharpens some pixels that need sharpening, such as those at the edges of the image.
- Bicubic (smoother gradients): This is another form of bicubic interpolation that takes into account the gradients of the pixels in the image while estimating the size of the pixels to be added.
- Nearest Neighbor (hard edges): Photoshop duplicates pixels adjacent to the area where new pixels will be placed. This method is less precise compared to other available methods. So if your image is pixelated, this method may not make a significant difference. If you're working on pixel art or using simple graphics, we recommend using this method.
- Bilinear: The pixels added to the image are calculated based on two pixels located at different positions but linearly aligned with each other. This method is less precise in image processing.
Additional Tip:
In this case, the best interpolation method to use is "Preserve Details 2.0" because we want to increase the image resolution while preserving the original details of the image.
After selecting the interpolation method to resize the image, you can change the resolution of the image. In our example, we can see that the original size of the image is 72 PPI.
To increase the resolution of the image, input a value in the "Resolution" box until the pixelated appearance of the image is eliminated. Generally, changing the resolution to 300 PPI will yield a good result.
When you choose "Preserve Details 2.0" and adjust the resolution value, a slider to reduce noise will appear at the bottom of the Image Size panel.
The value of this slider depends on how much noise is present in your image. If changing the image resolution has made a significant difference and the image does not have much noise, you can simply increase the noise reduction slider to around 10%.
When using digital creative software like Photoshop, it's not always easy to precisely control every parameter. Repetitive and tedious operations can leave you feeling exhausted.

That's where the TourBox creative controller comes in and revolutionizes your workflow. In Photoshop, you can use TourBox to control brush size, adjust parameters, zoom, rotate, and resize images with just one hand.
This frees you from the inefficiency of using a keyboard and mouse combination. With TourBox, you can focus on your creativity and artistic process, significantly improving your work efficiency.
TourBox seamlessly integrates with various image editing, video editing, digital painting, and office software. Its combination of actions, TourMenu, and macro functions enriches your workspace, allowing you to unleash the full potential of TourBox with just one hand.
After making all the necessary adjustments, you'll find that the image looks better than the original version. However, you can further enhance it by sharpening the photo.
Here, we recommend the high-pass sharpening method, and if you're interested, you can check it out: "How to Sharpen Your Photos With the High Pass Filter in Photoshop?"
The process itself is quite simple, following these steps:
- First, duplicate the image layer, then go to Filter > Other > High Pass.
- Increase the radius value until the edges of the image become more pronounced. However, be careful not to increase the radius too much, as it may end up emphasizing other parts of the image and result in over-sharpening.
- Finally, go to the Layers panel and change the blend mode of the top layer (the duplicate layer) to Overlay.
Note:
Converting low-resolution photos to high resolution can significantly improve the image compared to the original version. If the above steps still don't achieve the desired image quality, it may be due to the low quality of the initial image itself.
Frequently Asked Questions About Increasing Resolution of Image
Question: Why Is It Important to Increase Image Resolution?
Increasing image resolution can improve the clarity and detail of an image. This is crucial for printing, displaying, and publishing high-quality images.
Question: Does Increasing Resolution Make the Image Sharper?
Not necessarily. Increasing resolution increases the number of pixels in the image but does not guarantee improved sharpness. If the original image has a low resolution, increasing it may result in a blurry image.
Question: What Is the Optimal Image Resolution?
The optimal image resolution depends on the purpose. For printing, it is generally recommended to use 300 PPI. For on-screen display, 72 PPI or higher resolution is sufficient.
Question: How to Avoid Image Distortion?
When increasing the resolution, make sure to check the "Resample" option to avoid image distortion.
Product Recommendation:
If you're interested in TourBox but haven't tried it yet, you might want to consider the latest product, TourBox Lite. It's more affordable and has simpler settings, making it perfect for first-time users of TourBox.

Our tutorial on how to increase image resolution in Photoshop comes to an end. Thank you for reading, and we hope it has been helpful for your creative journey.