How to Mask in Photoshop: A Simple Guide
In Adobe Photoshop, masks are a super handy tool. They let you hide or reveal parts of an image with pinpoint accuracy. That way, you can blend images together or add cool effects without touching the original pixels.
So, what kinds of masks can you find in Photoshop? And how do you actually use them? Let's dive in and take a look.

In this article, you will learn:
Layer Masks
Layer masks are the most common type of mask in Photoshop. They live on a layer as a black-and-white (grayscale) image:
- White areas show that part of the layer.
- Black areas hide that part of the layer.
- Gray areas show the layer partly. You'll see different levels of transparency depending on how light or dark the gray is.
You can paint on a mask with black, white, or gray brushes:
- Use a white brush to bring back (reveal) hidden parts.
- Use a black brush to hide parts again.
- Use a gray brush to make semi-transparent areas.
By changing your brush's opacity and hardness, you can control the mask more finely. Besides the brush tool, you can use the Gradient tool on a mask to create smooth fades and other cool effects.
1. When Would You Use a Layer Mask?
Layer masks let you tweak only certain parts of an image. You'll see them a lot in tasks like image blending, cutting subjects out, or adjusting local transparency.
For example, when you want to merge two photos, a layer mask helps you blend the edges so they look seamless.
2. How to Use a Layer Mask in Photoshop?
To add a layer mask, first click the layer you want in the Layers panel and then click the "Add Layer Mask" button at the bottom. You'll get a white mask that shows the entire layer by default.
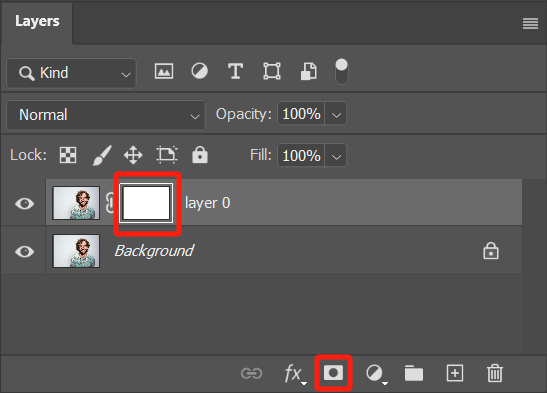
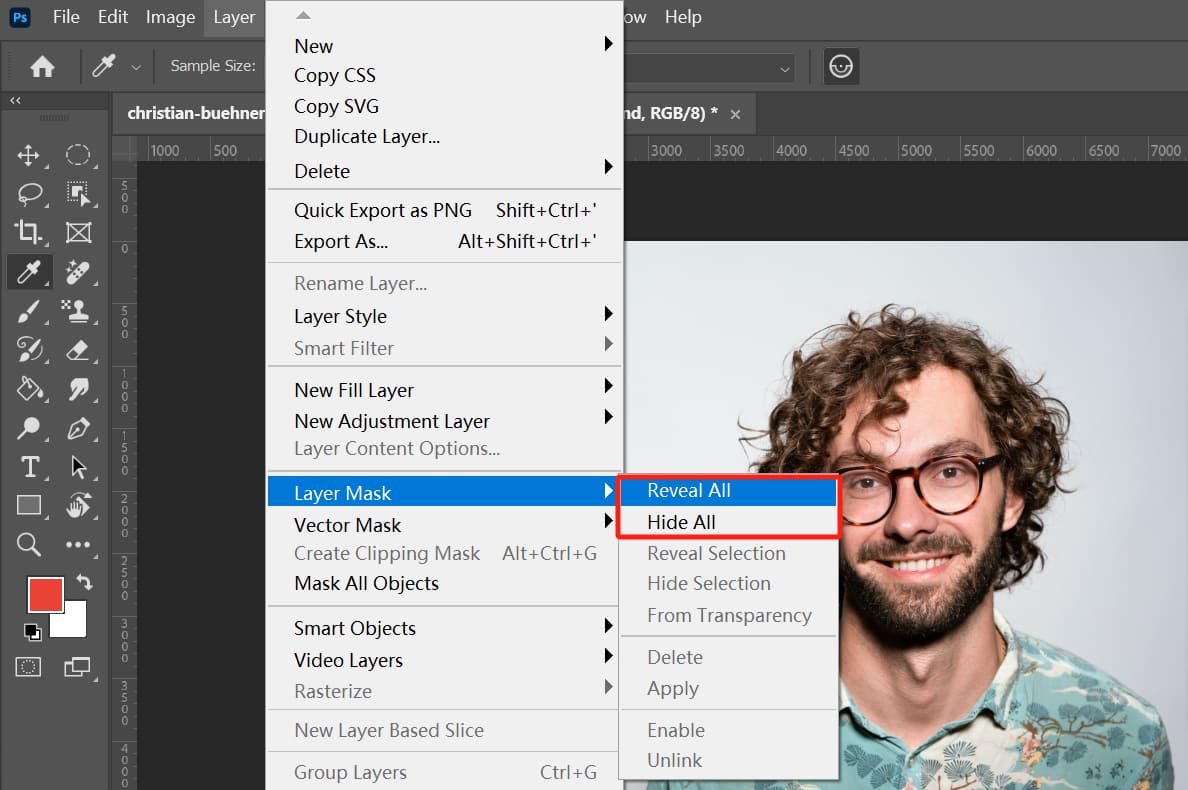
You can quickly show or hide all masks by going up to Layer > Layer Mask > Reveal/Hide All in the top menu.
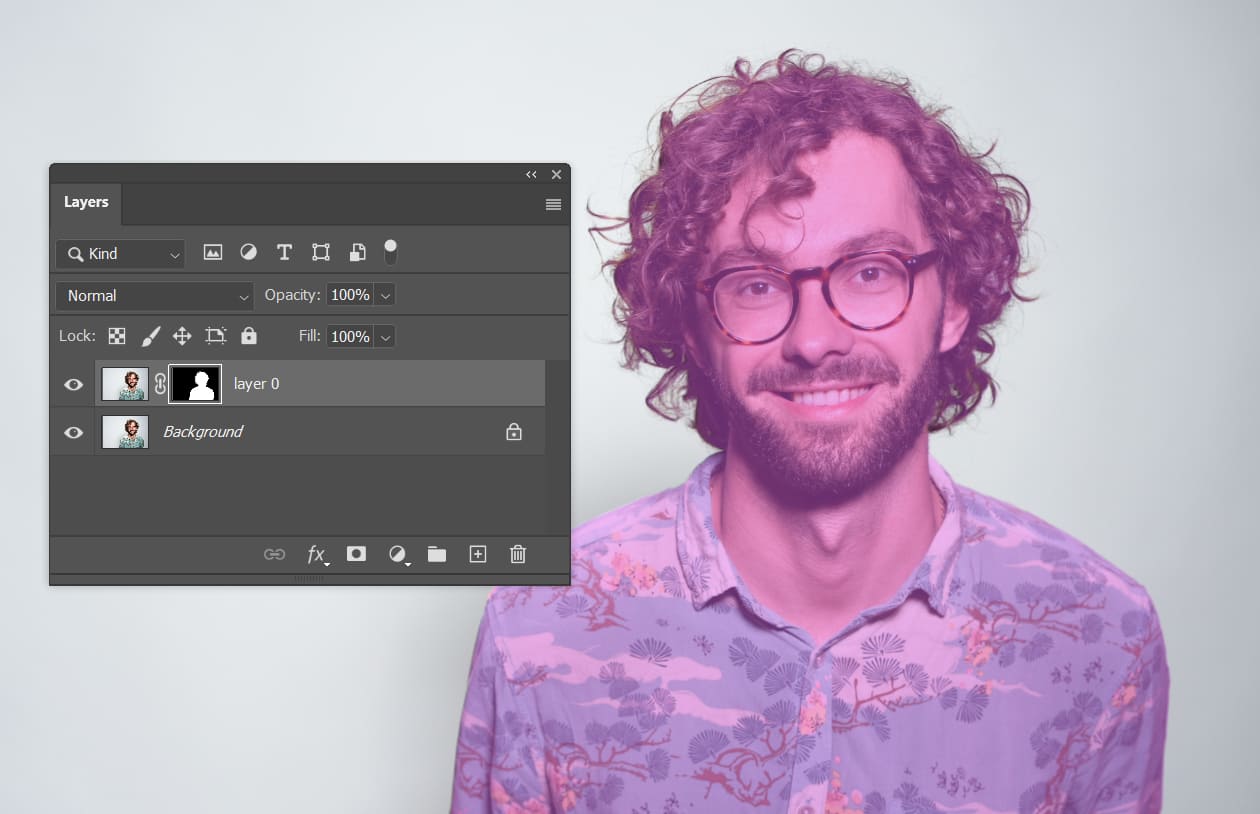
With the Brush tool selected, set your foreground color to black and paint on the mask to hide parts of the layer. Switch to white to bring those areas back, or pick a gray shade to make them partly see-through.
If you make a selection before clicking "Add Layer Mask," Photoshop will use that selection as your new mask. From there, you can paint with black or white to fine-tune tricky edges.
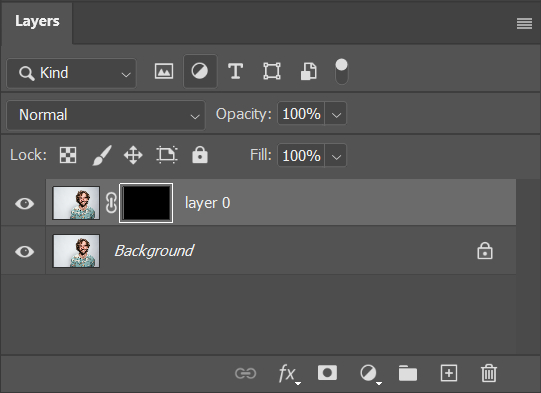
Hold Alt (Windows) or Option (Mac) while clicking the "Add Layer Mask" button to create a black mask that hides everything. Then paint with white to reveal, black to hide more, and gray for semi-transparent effects.
Here are a couple of handy shortcuts:
- You can press X to swap your brush colors between Foreground color and Background.
- Press Ctrl (Windows) / Command (Mac) + I to invert your mask: white turns to black and black turns to white.
Besides the Brush tool, you can also use the Gradient tool on a mask to make smooth transitions and other cool effects.
3. Quick Tricks for Layer Masks
Here are a few more quick tricks for working with layer masks:
- Right-click a mask thumbnail to open its options menu.
- Hold Alt (Windows) or Option (Mac) and click the thumbnail to see the mask as a black-and-white image.
- Hold Shift and click the thumbnail to temporarily disable the mask. Click again to turn it back on.
You might try using a TourBox creative controller. Map your most-used mask shortcuts, like adding a layer mask or swapping black and white, to the TourBox buttons. That way, you can trigger them instantly without touching the keyboard.

TourBox also has built-in controls for things like rotating the canvas or changing brush size. With just a few settings, you can work and create as easily as you'd play a game with a controller.
Further Reading:
How to Use Layer Masks to Create Stunning Effects in Photoshop?
Vector Masks
A vector mask uses vector shapes instead of pixels. Think of it as a path-based mask you can scale, rotate, or resize as much as you like without any loss of quality or jagged edges.
It's made from paths you draw with the Pen tool, Shape tools, or other vector tools. The big advantage is that you can resize or reshape it freely, and it will always stay crisp.
1. When Would You Use a Vector Mask?
Use it when you need clean, precise edges — like making icons, clipping text effects, or any design work where sharp lines matter.
2. How to Use a Vector Mask?
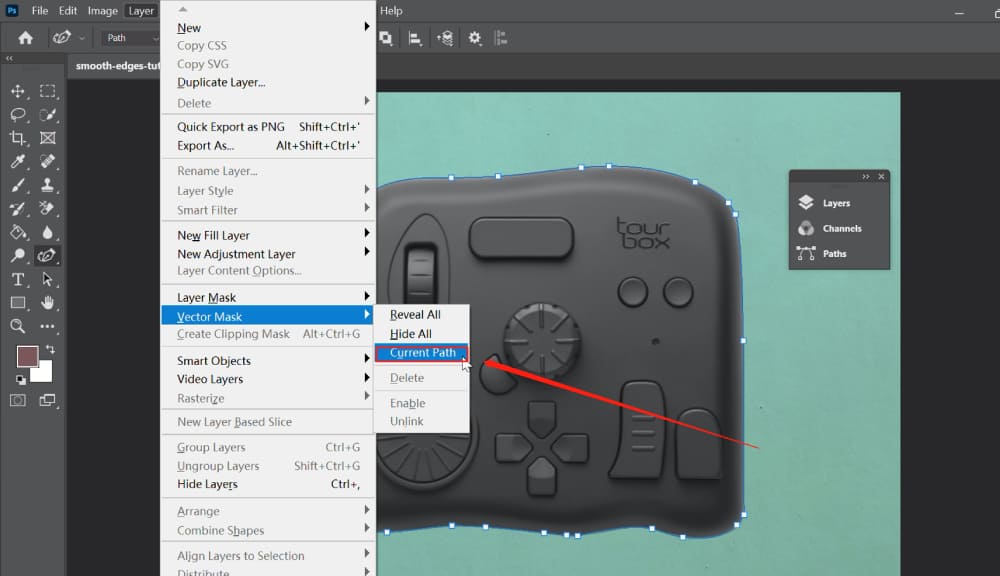
- Draw a path over your image using the Pen tool or a Shape tool.
- Go to Layer > Vector Mask > Current Path.
- Everything inside the path (shown in white) will be visible. Everything outside (gray) will be hidden. To tweak the mask, just edit the original path.
In the Layers panel, a vector mask shows up as a little thumbnail next to your layer's thumbnail. That mini-icon represents the path you cut out from the layer.
Further Reading:
Clipping Masks
A clipping mask uses the content of one layer to show or hide parts of the layer above it. The bottom layer is the base, and the top layer is the clipped layer. The clipped layer only shows where the base layer has pixels or shapes.
1. When Would You Use a Clipping Mask?
Use a clipping mask to fill text with an image, or to give a photo a custom-shaped border.
2. How to Use a Clipping Mask?
Make sure you have at least two layers: the base layer on the bottom and the layer you want to clip on top. The base layer needs real content (pixels, shapes, or text).
There are three ways to make a clipping mask:
- Right-click the top (clipped) layer and choose Create Clipping Mask.
- Press Ctrl + Alt + G (Windows) or Command + Option + G (Mac).
- Hold Alt (Windows) or Option (Mac) and hover between the two layers in the Layers panel. When your cursor turns into two overlapping circles, click to create the mask.
To release a clipping mask, right-click the clipped layer in the Layers panel and choose Release Clipping Mask. Or press Ctrl + Alt + Shift + G (Windows) or Command + Option + Shift + G (Mac).
Further Reading:
Quick Mask
Quick Mask is a temporary mask you use to quickly make or edit selections. When you switch into Quick Mask mode, you can paint right on the image. The painted parts show up in a semi-transparent color (red by default), marking the masked area.
1. When Would You Use a Quick Mask?
Quick Mask is great for grabbing tricky, irregular shapes fast, like hair, leaves, or any subject with lots of tiny details.
2. How to Use a Quick Mask?
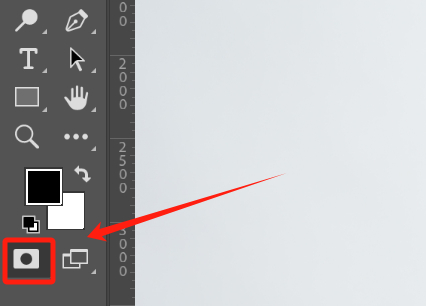
To use Quick Mask, click the Edit in Quick Mask Mode (Q) button at the bottom of the left toolbar.
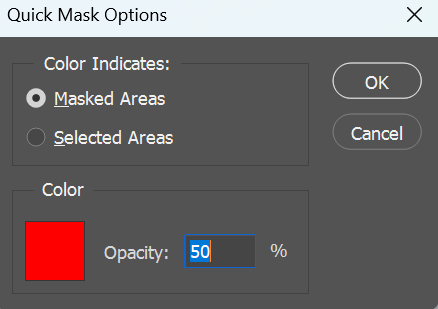
If you double-click that button, you'll open Quick Mask Options, where you can change how it works (the default is Masked Areas).
With the Brush tool, paint over the area you want to select. You'll see it turn semi-transparent red. When you're done painting, press Q again to exit Quick Mask mode. The red parts become the mask, and the unpainted parts become an active selection. You can then tweak the selection as needed.
If you set Color Indicates to Selected Areas in Quick Mask Options, painting in red will create the selection directly, and the rest becomes the mask.
Tip: Your foreground color must be black before you use Quick Mask mode.
Further Reading:
How to Mask in Photoshop?
That's a quick overview of the four Photoshop masks. At the end of each section, you'll find a link to a deeper dive with more tips and tutorials. Feel free to click through if you want to learn more.
Using different masks together based on what you're doing will help you work faster and get better results in Photoshop.

Finally, if you're curious about TourBox, take a look at our TourBox Elite Plus. It works on both PC and iPad, and you'll love how it speeds up your creative process.