Mastering White Balance in Lightroom: Tips for Correcting Color Cast
When it comes to city and landscape photography, whether setting camera parameters before shooting or post-processing using software, the ultimate goal is to restore all colors in the photo to their most authentic tones. And setting the white balance is crucial and should not be overlooked.
Using white balance during post-processing can correct any color casts that occurred during the shoot.
But have you ever wondered if the colors you see with your own eyes are accurate? Is the photo really green-tinted when you think it is? Can an inaccurate monitor affect color adjustments?
In this article, we will share the techniques on how to adjust white balance in Lightroom, providing you with the skills to achieve accurate color representation.

In this article, you will learn:
- What Is White Balance?
- Why White Balance Adjustment Is Needed?
- How to Adjust White Balance in Lightroom?
- Frequently Asked Questions About Lightroom White Balance
What Is White Balance?
In simple terms, white balance is about making white look like white. Wait, if white isn't white, does that mean it's yellow?
Let's take an example. Imagine you have a white dog, and you want to capture an adorable photo of your furry friend. Will the white dog appear white in your photo?
The answer is, it might or it might not. For instance, if your dog is standing under a dim yellow streetlight, what color will the dog appear in the photo? Will it still be white?
To ensure that your white dog appears white in the photo, you must adjust the white balance to correct the color tones.
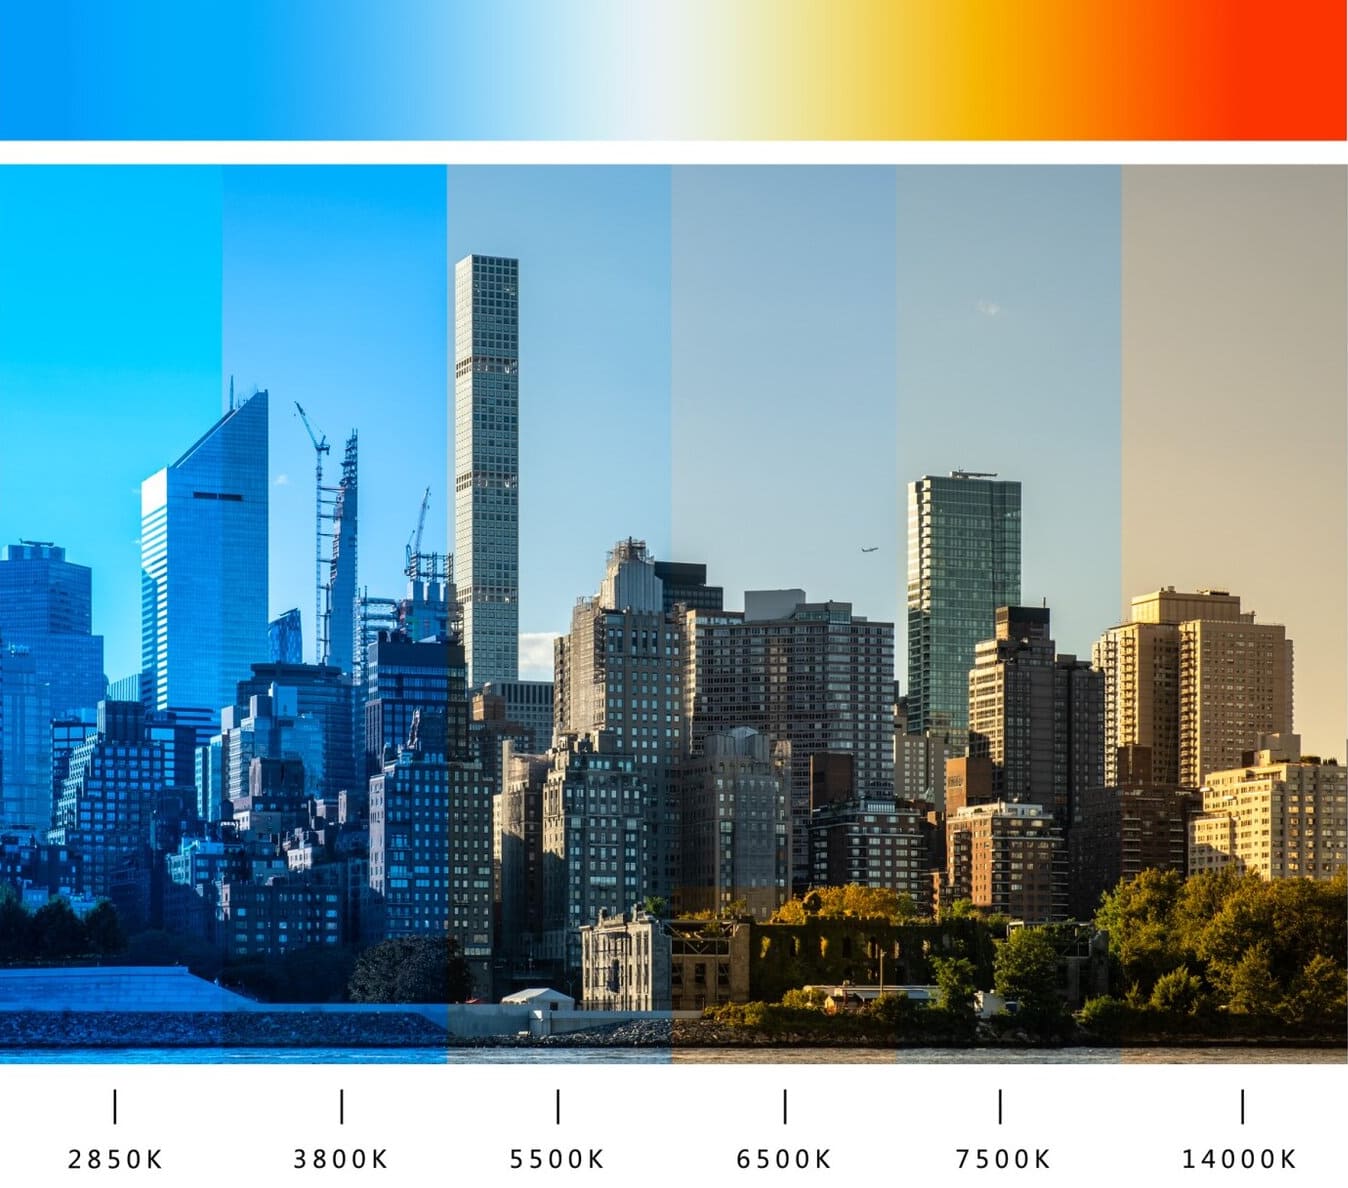
We refer to the changes in color as color temperature, which represents the warmth or coolness of the colors. The unit of color temperature is Kelvin (K). Warm color temperatures are associated with hues like orange and red, while cool color temperatures are associated with blues.
In between these warm and cool temperatures, there are countless transitional colors. The color temperature values range from a minimum cool temperature of 2000K to a maximum warm temperature of 50000K. With so many different numbers, choosing the right white balance setting can be overwhelming.
The simplest way to remember is that smaller numbers represent cooler temperatures, while larger numbers represent warmer temperatures, just like an oven.
If you want to learn more about white balance in photography, check out our article: "White Balance in Photography: Mastering the Art of Color".
Why White Balance Adjustment Is Needed?
In reality, light consists of various colors. There is a saying that New York's sunset has nine different colors, although we won't dwell on whether that's entirely true or not.
We all know that sunlight at sunrise appears orange, candlelight and bonfire light appear as a deeper shade of red than orange, and daylight appears blue. Digital cameras use image sensors to determine these colors when capturing photos.
However, digital cameras can sometimes misjudge the white balance, which is the real reason why the photos may not accurately reflect the scenery we see.
You can correct and adjust the white balance values during shooting and post-processing to restore the true colors as seen with the naked eye or to create special artistic effects.
For example, the light we perceive with our eyes is much warmer than what the camera captures. In the image on the left below, it fails to showcase the beautiful warm light that was present during the almost-sunset moment.
By adjusting the color temperature, you can create a specific atmosphere. So, there is no "correct" value; it all depends on the type of visual experience you desire, whether you prefer a warm or cool color palette.

How to Adjust White Balance in Lightroom?
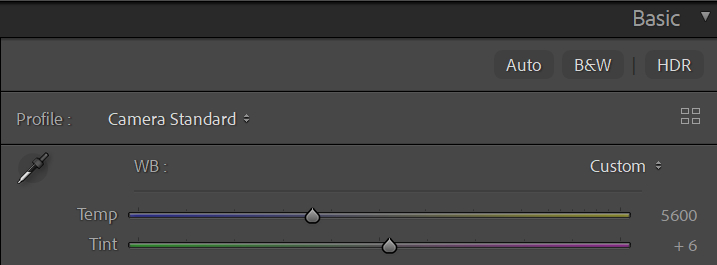
White balance settings can be found in the "Basic" panel of Lightroom Classic. The basic colors of a photo are determined by white balance. If the basic colors are not correct, it becomes difficult to achieve the right tones during post-processing.
So, when you open a photo to prepare for editing, the first step should be correcting the white balance in terms of temperature and tint. This is why the white balance settings are placed at the top of the Lightroom Classic interface.
Method 1: Adjust the Values to Change White Balance
In the Basic panel of Lightroom, a straightforward way to adjust the white balance is by directly dragging the Temp(temperature) and Tint values with your mouse.
However, if you're not familiar with how it works, this can be confusing. You might not know how much value to input, and using the mouse to drag values might not be convenient or time-efficient.
Tip:
To reset the white balance values, you can double-click the Temp and Tint sliders or double-click "WB"(White Balance).
Method 2: Use the White Balance Presets
If you're working with RAW files, you can click the drop-down menu, and choose white balance presets to find the appropriate values.
The presets available here are the same as those on your camera, so you don't have to worry if you didn't select the right white balance while shooting. Lightroom Classic gives you a second chance to make corrections.

Even if you're working with JPEG files, you can still adjust the white balance. However, the interface display will be slightly different from RAW files, offering only the options of "As Shot" and "Custom."
Tip:
We recommend using RAW format for storage whenever you're capturing photos. RAW files can capture colors to the fullest and store a vast amount of information. Even if you didn't set the white balance correctly while shooting, you can easily modify it during post-processing without losing color data.
For example, when adjusting Temp and Tint values in Lightroom, JPEG files won't encounter significant issues with minor adjustments.
However, if you make too many adjustments, you may lose details, considering that JPEG files don't store as much data as RAW files. So, if you have the option, it's better to shoot in RAW format.
The downside of the RAW format is that the files are quite large and take up a lot of space. You'll need a large memory card to store these files.
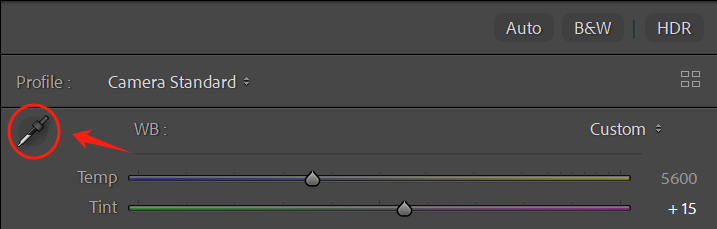
Method 3: Use the White Balance Selector
There are four possible color casts in a photo's white balance: too blue, too yellow, too green, and too magenta. The Temp and Tint settings in white balance are used to adjust these color casts.
When the color is too blue, you can increase the Temp value by moving it to the right. If the Tint is too magenta, you can decrease the value by moving it to the left. These adjustments rely on your visual judgment.
To improve accuracy, you can use a local sample for calibration. On the left side of the white balance settings, there is a dropper icon called the "White Balance Selector." Move the dropper to the part of the photo that should be a neutral color, such as white or gray, and take a sample.
At the bottom of the "Pick a target neutral", three RGB values will be displayed, representing the primary colors of light: Red, Green, and Blue. When these three numbers are very close, it indicates a neutral color, which means the correct white balance.
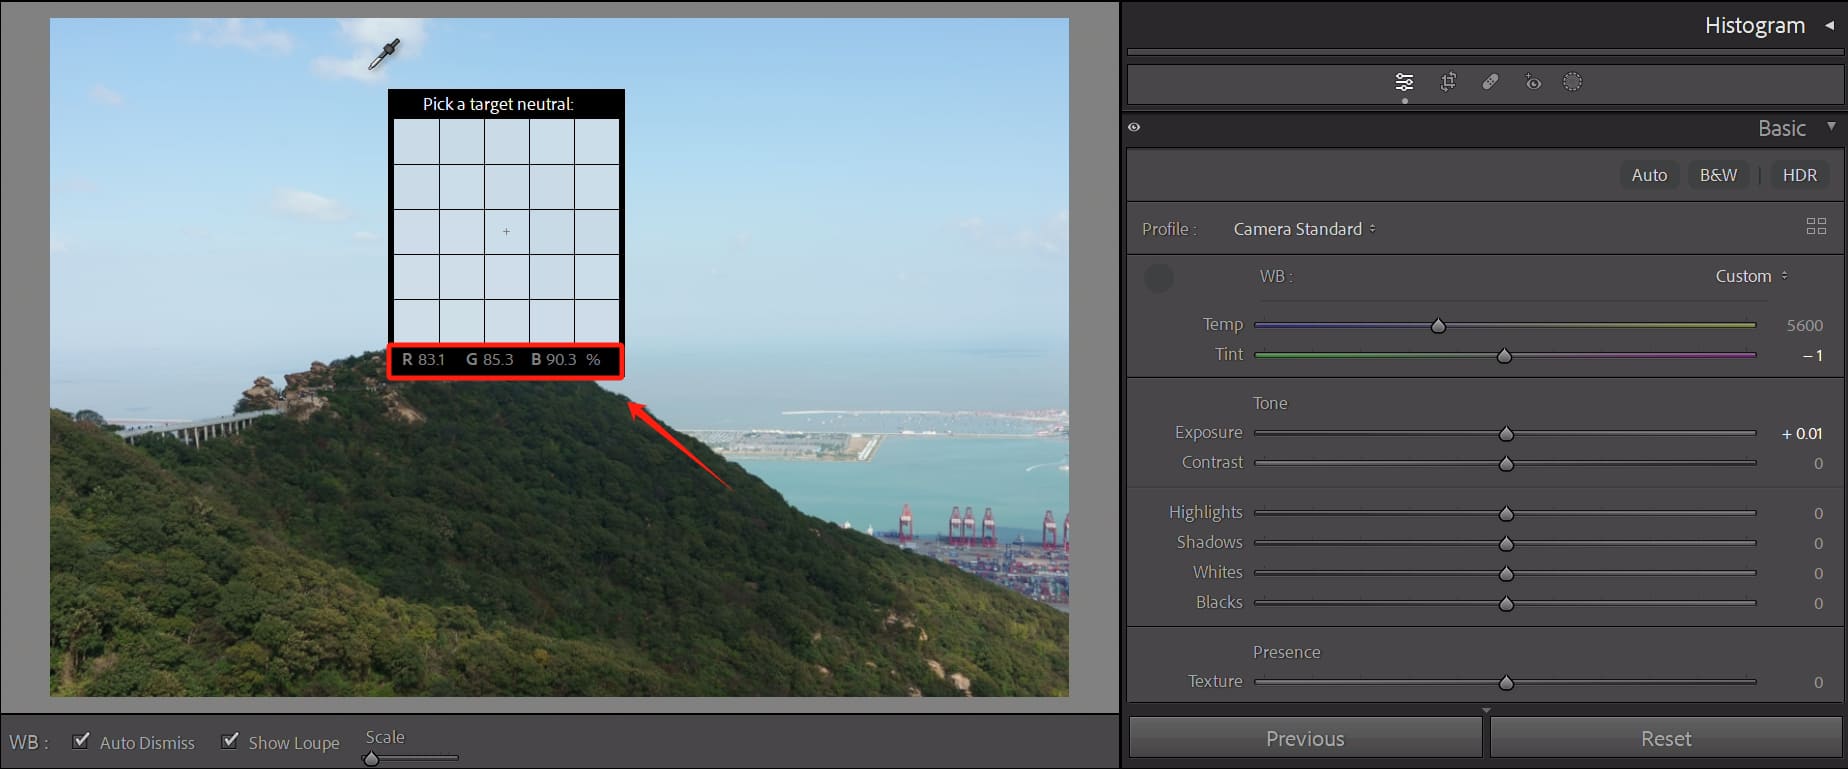
If one of the numbers is higher than the other two, it means that there is an excess of a particular color in the image and requires adjustment. Clicking the mouse will automatically correct the white balance based on the sampled point.
If you're not satisfied with the result of the automatic white balance correction, you can also make manual adjustments.
Place the dropper on a neutral color, but don't click the mouse. Use the arrow keys on your keyboard to adjust the Temp and Tint values until the three RGB numbers are very close.
Method 4: Use the TourBox
When adjusting white balance or other color parameters in Lightroom Classic, you may encounter a problem: the process can be cumbersome and difficult to control accurately.
You have to find the corresponding sliders, input specific values, or drag the sliders to adjust the parameters. However, you may need to constantly fine-tune, which can be very tedious.
Why not try using TourBox? TourBox is a tool designed specifically for creative professionals. It allows you to break free from traditional keyboard and mouse operations and achieve precise photo color adjustments with just one hand.

In simple terms, you can assign commonly used photo adjustment functions (such as Temp and Tint in white balance) to the buttons on TourBox. With just one click, you can activate the function and use the rotating controls on TourBox to adjust the parameters.
The adjustment process is very intuitive. You can see the clear changes brought by adding or subtracting 1 from the value, without the need for any mouse or keyboard operations.
Don't be intimidated by the complexity of setting up TourBox. The built-in functions provided by TourBox Console allow you to quickly configure it.
Moreover, with TourMenu and macro settings, you can achieve even more possibilities in your operations. In other words, you can control all the operations in Lightroom Classic using just one hand with TourBox.
Frequently Asked Questions About Lightroom White Balance
Question: What Is White Balance?
White balance is an adjustment made to the colors in a photo to make white objects appear white, thus restoring the true colors of the subject.
Adjusting white balance can affect the tone and atmosphere of a photo, making it more true to what the human eye sees or aligning with creative intent.
Question: How to Adjust White Balance in Lightroom?
In Lightroom, there are several ways to adjust the white balance. The simplest method is to use the white balance selector tool.
Click on a neutral gray or white area in the photo, and Lightroom will automatically adjust the white balance of the entire image based on the temperature and tint of that area.
You can also try TourBox, a creative tool that makes all your operations easier than ever before.
Question: What Are Temp and Tint?
Temp refers to the color of the light source, measured in Kelvin (K). Higher-temperature light sources (like a blue sky) emit bluish light, while lower-temperature light sources (like a candle) emit yellowish light.
Tint refers to the color bias in the image, represented by purple and green. Tint can be adjusted to correct color casts in photos, such as removing a yellow or green tint from portraits.
How to Batch Adjust White Balance in Lightroom?
If you have multiple photos taken under the same lighting conditions, you can save time and effort by batch editing the white balance in Lightroom. Here are the steps:
- In the Library module, select a photo that needs white balance adjustment and go to the Develop module.
- Use the white balance selector tool or the temperature and tint sliders to adjust the white balance of that photo until you're satisfied.
- Go back to the Library module and hold down the Ctrl key (Windows) or Command key (Mac) while selecting the other photos that need white balance adjustment.
- Click the Sync Settings button, check the White Balance option, and click Synchronize.
This way, the white balance of all selected photos will be synchronized to the white balance settings of the first photo.
The above steps might sound a bit complicated, but you can also achieve batch editing and color adjustments in Lightroom using TourBox. With TourBox, you can do all these operations without even using a mouse or keyboard, controlling everything with just one hand.
Product Recommendation:
At the end of our tutorial on white balance in Lightroom, we would like to introduce the brand-new TourBox Lite.

It's a product launched by TourBox that comes at a more affordable price and with a simpler setup. This makes it ideal for beginner photographers and creative enthusiasts who want to get started quickly.
In addition to photo editing software, TourBox can also be used with video editing software, digital art software, office software, and more. Take a moment to explore and see how TourBox can bring about a significant change for you.