How to Fully Harness Photoshop Brushes: From Beginner to Pro
Do you ever find yourself puzzled by this: why do others seem to use Photoshop brushes so impressively, while you've collected many brushes but never quite achieved their true effects?
In reality, Photoshop's brush functionality is far more versatile than you might think. In this tutorial, we will share some practical tips to help you unleash the full potential of these Photoshop brushes!

In this article, you will learn:
- How to Access Photoshop Brush Settings Panel?
- How to Import & Make Brushes in Photoshop?
- How to Use Photoshop Brushes?
- Conclusion
How to Access Photoshop Brush Settings Panel?
The Brush Settings panel is a vital tool in Photoshop for tweaking and customizing brush effects, enhancing the flexibility of your brush usage to meet various painting or design needs.
The majority of advanced techniques for using Photoshop brushes are tucked away within this Brush Settings panel.
To open the Brush Settings panel, go to the top menu bar and click Window > Brush Settings.
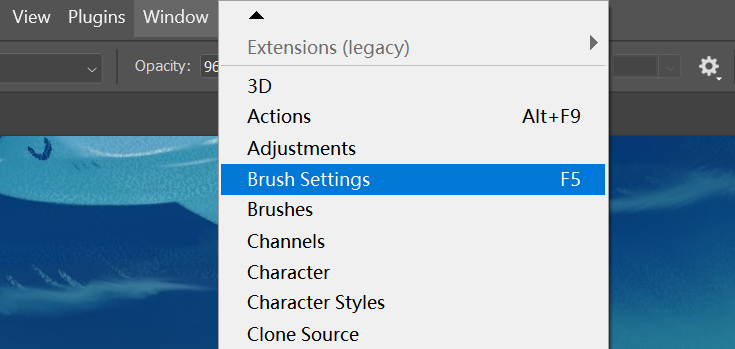
Alternatively, when you select the Brush tool in the left toolbar of Photoshop, you can directly open the Brush Settings panel by clicking on a small brush-shaped icon in the top settings bar.

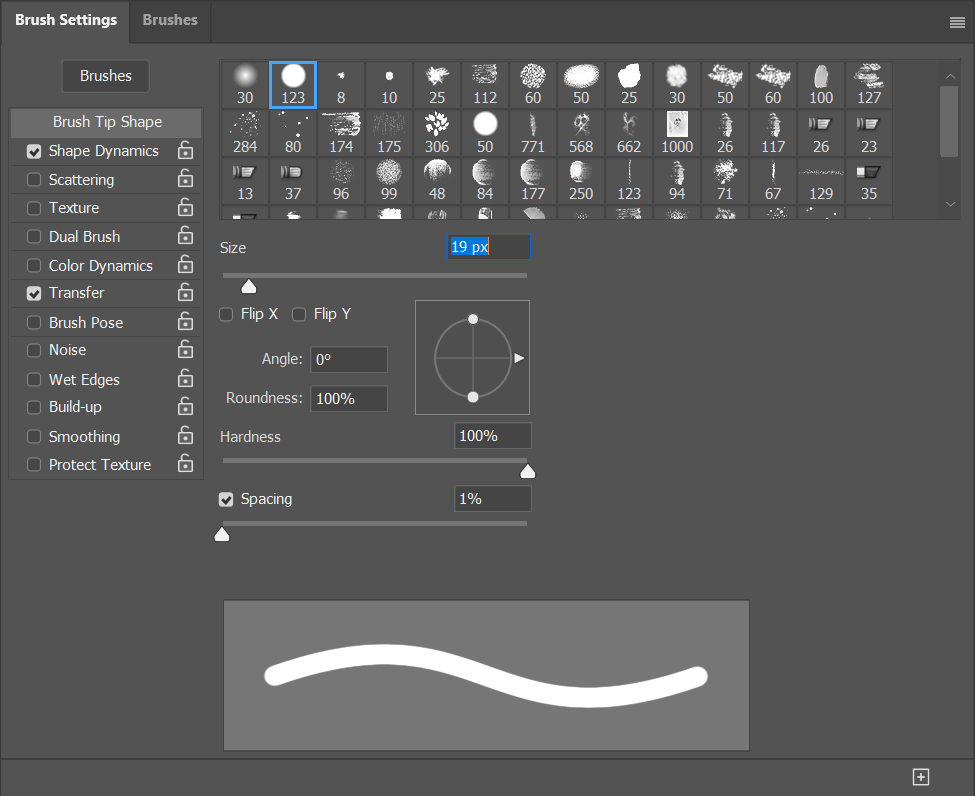
The Brush Settings panel offers many options, allowing you to fine-tune brush details for different scenarios.
By adjusting brushes to suit diverse painting requirements, you can personalize brush effects, ensuring each use produces a unique result.
From gentle shadows to intricate lines, you can tailor different brush styles based on your needs.
How to Import & Make Brushes in Photoshop?
Many beginners in digital painting often get caught up in collecting brushes. On the internet, there are plenty of free and paid brushes available for download.
Importing brushes into Photoshop is quite simple, and we have previously shared detailed steps on how to do it. If you're interested, you can click on the link below to check it out.
Further Reading:
Now, a common question is, where do those brushes shared by professional artists and painters on the internet come from?
All third-party brushes have original creators, meaning anyone can create their own brushes, essentially by making brushes in Photoshop.
If you're curious about how to make brushes in Photoshop, please click on the link below for more information.
Further Reading:
How to Use Photoshop Brushes?
Are the brushes used by renowned digital artists truly all-purpose tools? Definitely not. We need to analyze based on the actual usage scenarios.
For example: in the image below, the rock is a hard material, but upon observing its edges, we notice they are not perfectly smooth; there are many small irregularities. In this case, which of the three brushes provided in the image would you choose?
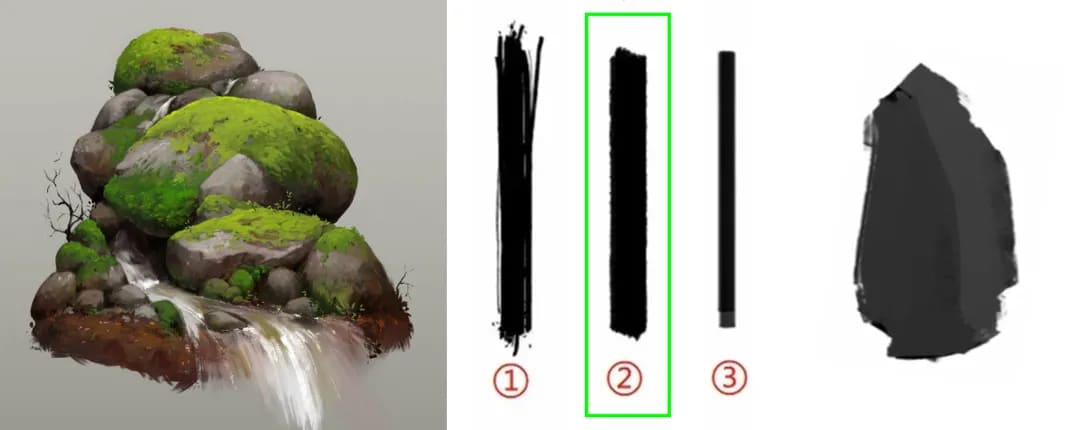
Undoubtedly, the second brush is the most suitable. With just a few strokes, you can feel the texture of the brush.
This means brushes are not just used randomly! Before starting to paint, you must have a clear understanding of the nature of the object you are painting.
Knowing its "structure, softness or hardness, and the cleanliness of its edges" will help you choose the right brush for the job.
When using Photoshop brushes, you may find yourself constantly adjusting the brush size, opacity, and various brush parameters.
While these adjustments are simple, sliding sliders back and forth can be a highly repetitive and tedious task. What's worse, it can disrupt your creative flow.
We'd like to introduce you to TourBox, a controller beloved by many digital artists and painters. One of its features allows you to effortlessly and precisely adjust selected parameters by simply turning the TourBox Dial.

For adjustments requiring specific numerical inputs, there's also a Virtual Numeric Keyboard feature to help you input values quickly. If you're interested, please visit our digital painting page to learn more about the wonders of TourBox.

Once you've selected a brush, you can open the Brush Settings panel to make specific adjustments to the brush details.
1. Brush Tip Shape
Adjusting the spacing of the brush tip shape is a commonly used function.
For example, selecting a hard round brush and adjusting the brush spacing can be used to draw items like pearl necklaces, bracelets, and other accessories.
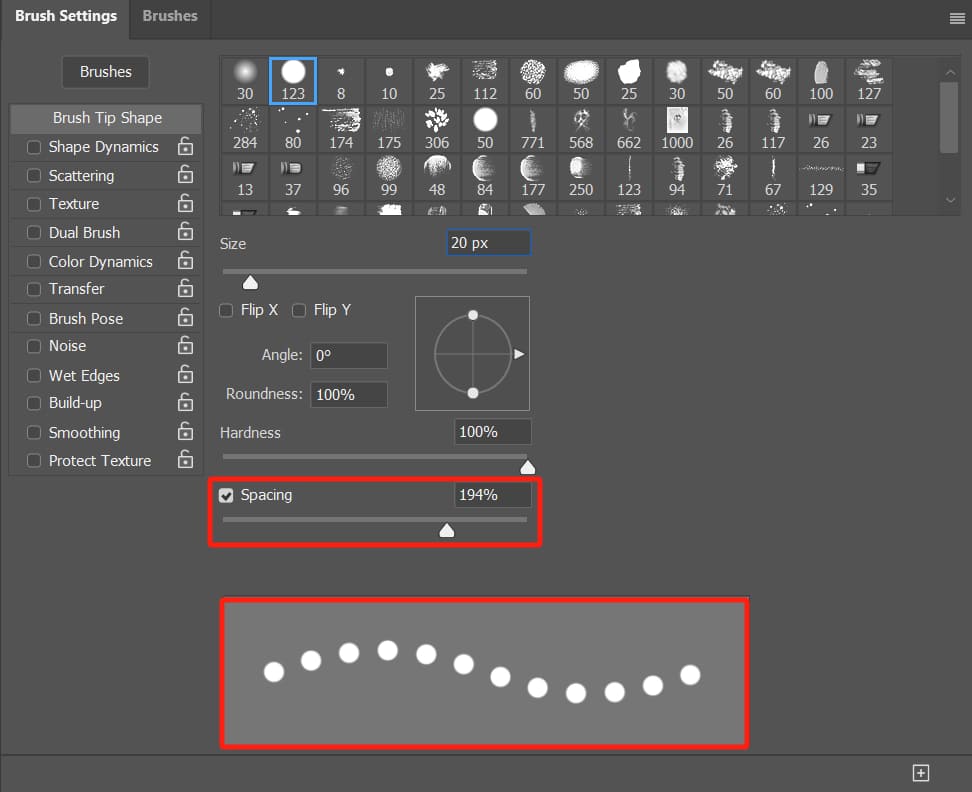
Afterward, you can use the Lasso and Free Transform tools to adjust perspective and position, making it practical and convenient.
2. Scattering
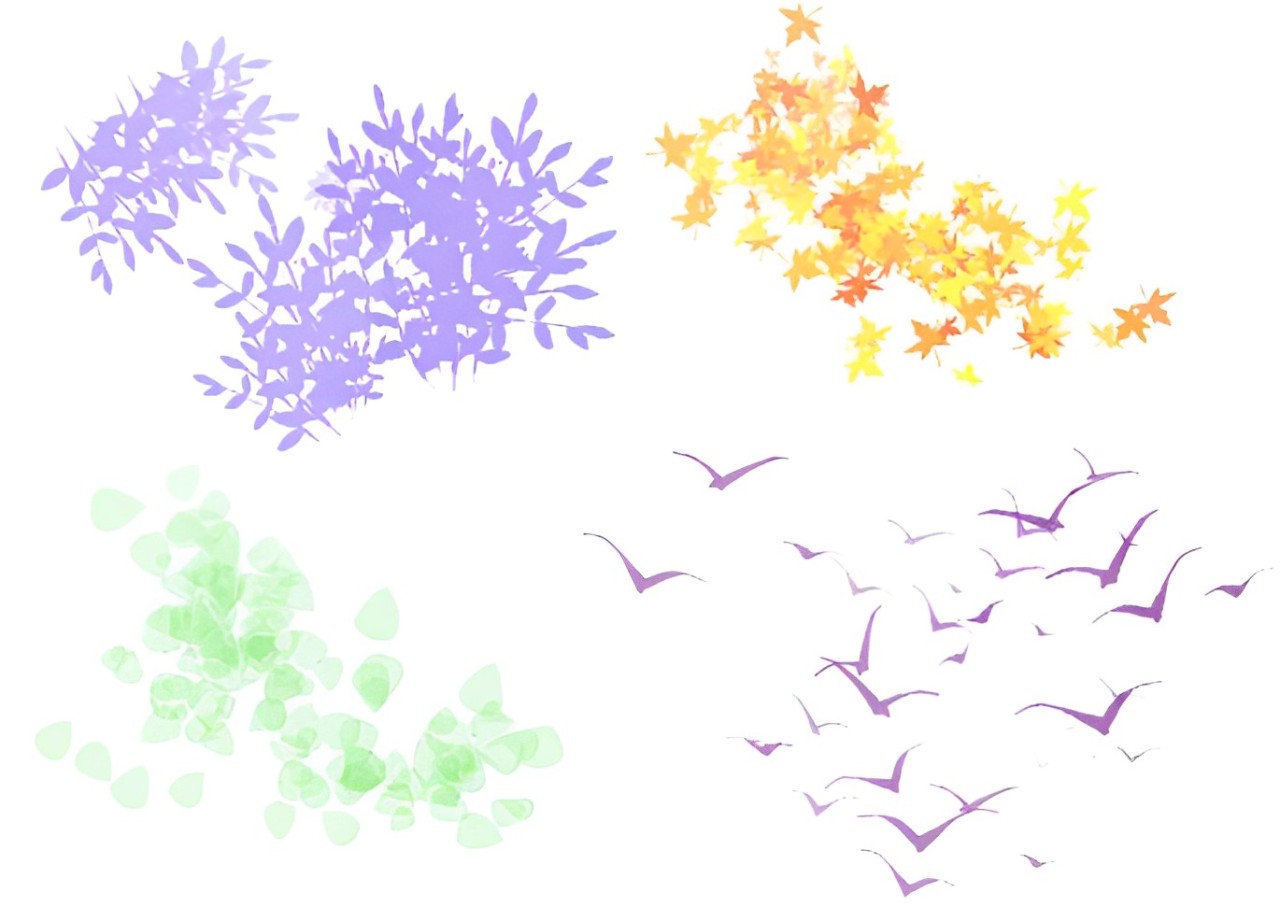
Scattering is often used when drawing dispersed or scattered shapes. You can control the distribution range of brush strokes in the Scattering panel to add more randomness to the brush effects.
By using brushes with scattering effects, with just a few strokes, you can digitally create flowers, stars, snowflakes, flocks of birds, clouds, and more.
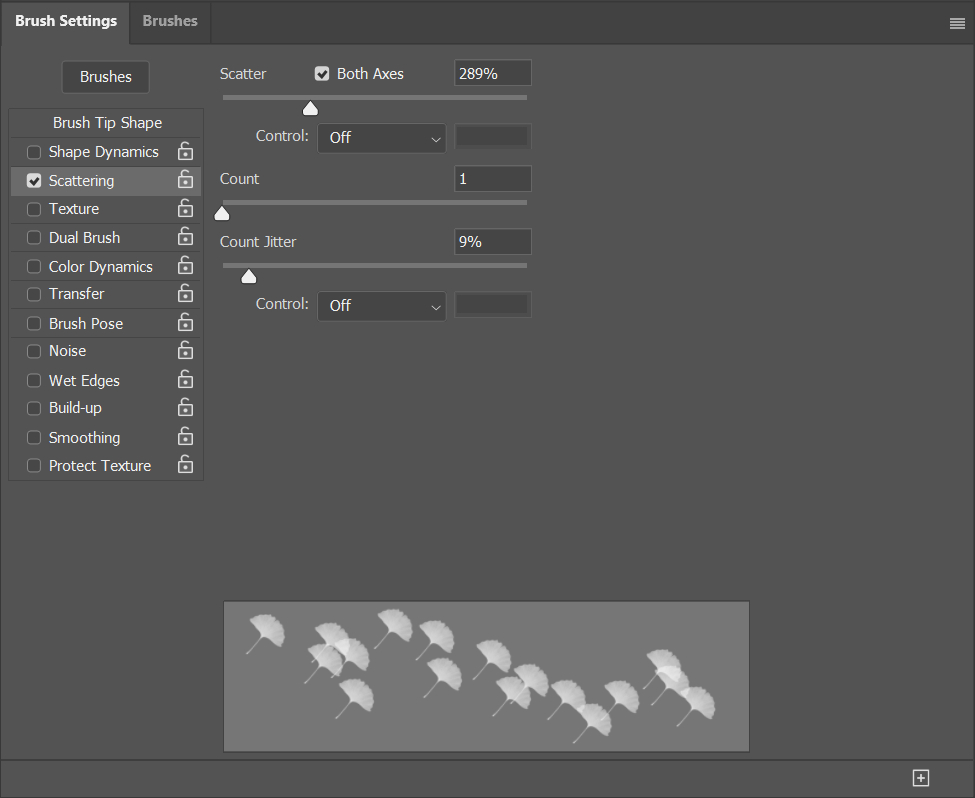
Within the Scattering panel, there are settings that can bring more variation to your brushes:
- Scatter: Adjusts the distribution of brush strokes. A higher scattering percentage results in a wider distribution of brush strokes. Brushes with different textures show noticeable differences in effects. If you are using a drawing tablet, you can also set the Control mode to Pen Pressure.
- Both Axes: Determines the direction of scatter for the brush strokes.
- Count: Determines how many brush strokes are generated each time you make a brush stroke.
- Count Jitter: Adds randomness by varying the number of brush strokes with each stroke, creating an unpredictable effect each time.
3. Color Dynamics
If you find that your brush strokes are too monotonous in color and you want to add more richness to your artwork, you can enhance color variations by checking "Color Dynamics" in the brush settings panel.
By increasing the percentages of Foreground/Background Jitter, Hue, Saturation, Brightness Jitter, and other parameters, you can make the color dynamics more pronounced.
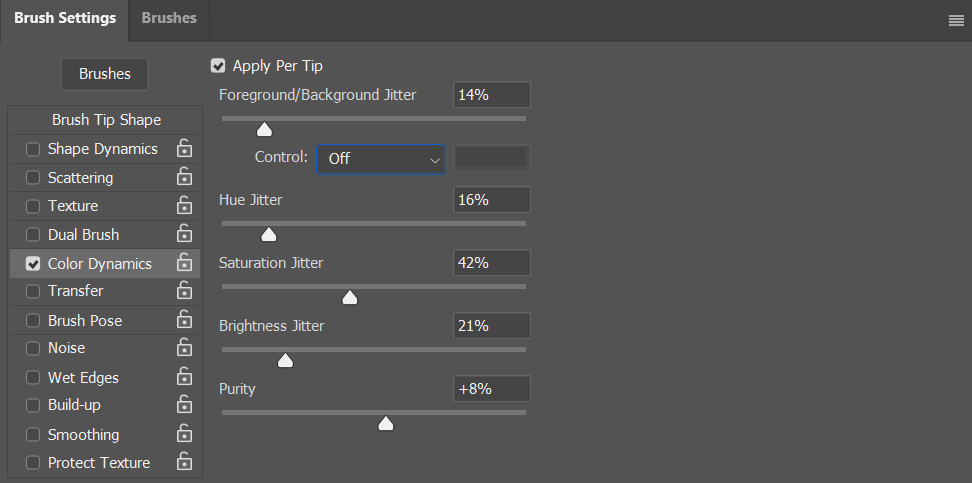
Especially when using watercolor brushes, enabling "Color Dynamics" allows you to effortlessly create beautiful color blends with just a few strokes.
4. Other Brush Settings Options
In addition to the three commonly used brush settings we discussed earlier, the brush settings panel offers some other frequently used settings. Let's briefly introduce them here:
- Shape Dynamics: Adjusts the size and angle variations of the brush during use, allowing for natural brush effects based on pressure sensitivity (requires a device that supports pressure sensitivity).
- Texture: Adds texture effects to the brush, enhancing the tactile feel of your artwork, such as simulating canvas textures.
- Dual Brush: Combines two brushes for unique textures and effects.
- Transfer: Controls brush opacity and flow, enabling gradient and soft effects.
- Noise: Adds a speckled effect to the brush. This effect is most noticeable with soft brushes, less so with harder brushes.
- Wet Edges: Emphasizes watercolor-like edges in brush strokes, commonly used for wet medium brushes like watercolor and ink brushes. Brushes with wet edges appear more pronounced.
- Built-up: Mimics the effect of a spray gun, akin to the "Airbrush" option in the brush settings panel. Typically used with airbrush brushes, the stroke thickness and color intensity vary with pressure, resulting in a layered effect.
- Smoothing: Enhances the smoothness of brush strokes, reducing unnecessary jitter or jagged edges for a more polished and professional look. Similar to the stabilizer feature in digital art software like Paint Tool SAI.
For beginners, even if you're unsure about the effects of these brush settings, feel free to experiment boldly. The brush settings panel provides a preview feature for you to see the changes, making it convenient and efficient.
Of course, practice makes perfect. Instead of getting caught up in abstract definitions, it's often more beneficial to open Photoshop and experiment with different settings to see the immediate impact on your artwork.
Conclusion
Whether you're into painting, designing, or photo editing, Photoshop brushes are a powerful tool that you shouldn't overlook.
To truly master the secrets of Photoshop brushes, it's not just about understanding their functions but also about practicing repeatedly.
In your actual creative endeavors, try adjusting different parameters and explore settings that suit your style. You'll discover that each brushstroke can add more uniqueness and expressiveness to your work.
If you're accustomed to using an iPad for drawing, editing, or designing, consider trying out TourBox's latest product, the TourBox Elite Plus.

The TourBox Elite Plus not only introduces support for iPad for the first time but also offers full compatibility with Mac and Windows platforms, providing you with a highly flexible working environment.
If you're looking to enhance your creative process more smoothly and intuitively, the TourBox Elite Plus is definitely worth a try.