[DaVinci Resolve Tutorial] A Beginner‘s Guide for Fusion Page
DaVinci Resolve is an all-in-one post-production software that combines editing, color grading, visual effects, and audio production. More and more people are experimenting with and utilizing DaVinci Resolve for end-to-end project creation.、
In this tutorial, we will delve into some introductory knowledge about Fusion in DaVinci Resolve. Understanding how to use Fusion in DaVinci Resolve can streamline your workflow and help you complete projects more efficiently.

In this article, you will learn:
- What Is the DaVinci Resolve Fusion Page?
- Introduction to the DaVinci Resolve Fusion Page
- How to Use Fusion Page in DaVinci Resolve?
- FAQ About DaVinci Resolve Fusion Page
- Final Thoughts About DaVinci Resolve Fusion Page
What Is the DaVinci Resolve Fusion Page?
Fusion was developed as an internal software back in 1987, making it over 30 years old now.
Over the years, Fusion has been widely used for visual effects in popular films like "The Avengers," "Thor," "The Hunger Games," and played significant roles in the production of popular game cinematics like "Dawn Of War III" and "Halo 5."
Initially, this internal software was just a UI framework written in DOS commands to integrate batch files and tools, simplifying their usage. To commercialize Fusion, eyeon Software company was established.
In 2014, Blackmagic Design acquired eyeon Software and carried out significant reforms. That same year, Blackmagic Design unveiled the free Fusion 7 at the IBC trade show.
Before this, high-end tools like Fusion cost thousands of dollars, reserved for top Hollywood effects artists. The free Fusion 7 broke this price barrier, making this powerful Hollywood-level tool accessible to anyone passionate about visual effects.
In August 2018, Blackmagic Design integrated the Fusion effects page into the release of DaVinci Resolve 15, synchronizing the version numbers.
At this point, Fusion started to resemble what we see today, featuring a new user interface and supporting all DaVinci Resolve plugins.
Introduction to the DaVinci Resolve Fusion Page
1. Switch Work Pages
After launching DaVinci Resolve and creating a project, the navigation bar at the bottom of DaVinci Resolve's default display shows up.
You'll see icons for 7 work pages and 2 buttons (Project Manager and Project Settings).
By clicking on the 4th icon, you can instantly navigate to the "Fusion Page."

You can also switch using shortcuts, from left to right: Media Page "Shift+2," Cut Page "Shift+3," Edit Page "Shift+4," Fusion Page "Shift+5," Color Page "Shift+6," Fairlight Page "Shift+7," and Deliver Page "Shift+8."
By the way, Project Manager is "Shift+1," and Project Settings is "Shift+9."
The TourBox, a creative tool beloved by many video creators and content creators, makes it easier for you to navigate between pages in DaVinci Resolve. It also enables you to achieve more precise and efficient control in DaVinci Resolve and other digital software.

Further Reading:
2. Reset the Fusion User Interface
To gain a better user experience in Fusion and to have ample space for your effects composition work by maximizing the Nodes panel and Inspector, it's beneficial to reset the user interface to its most basic layout.
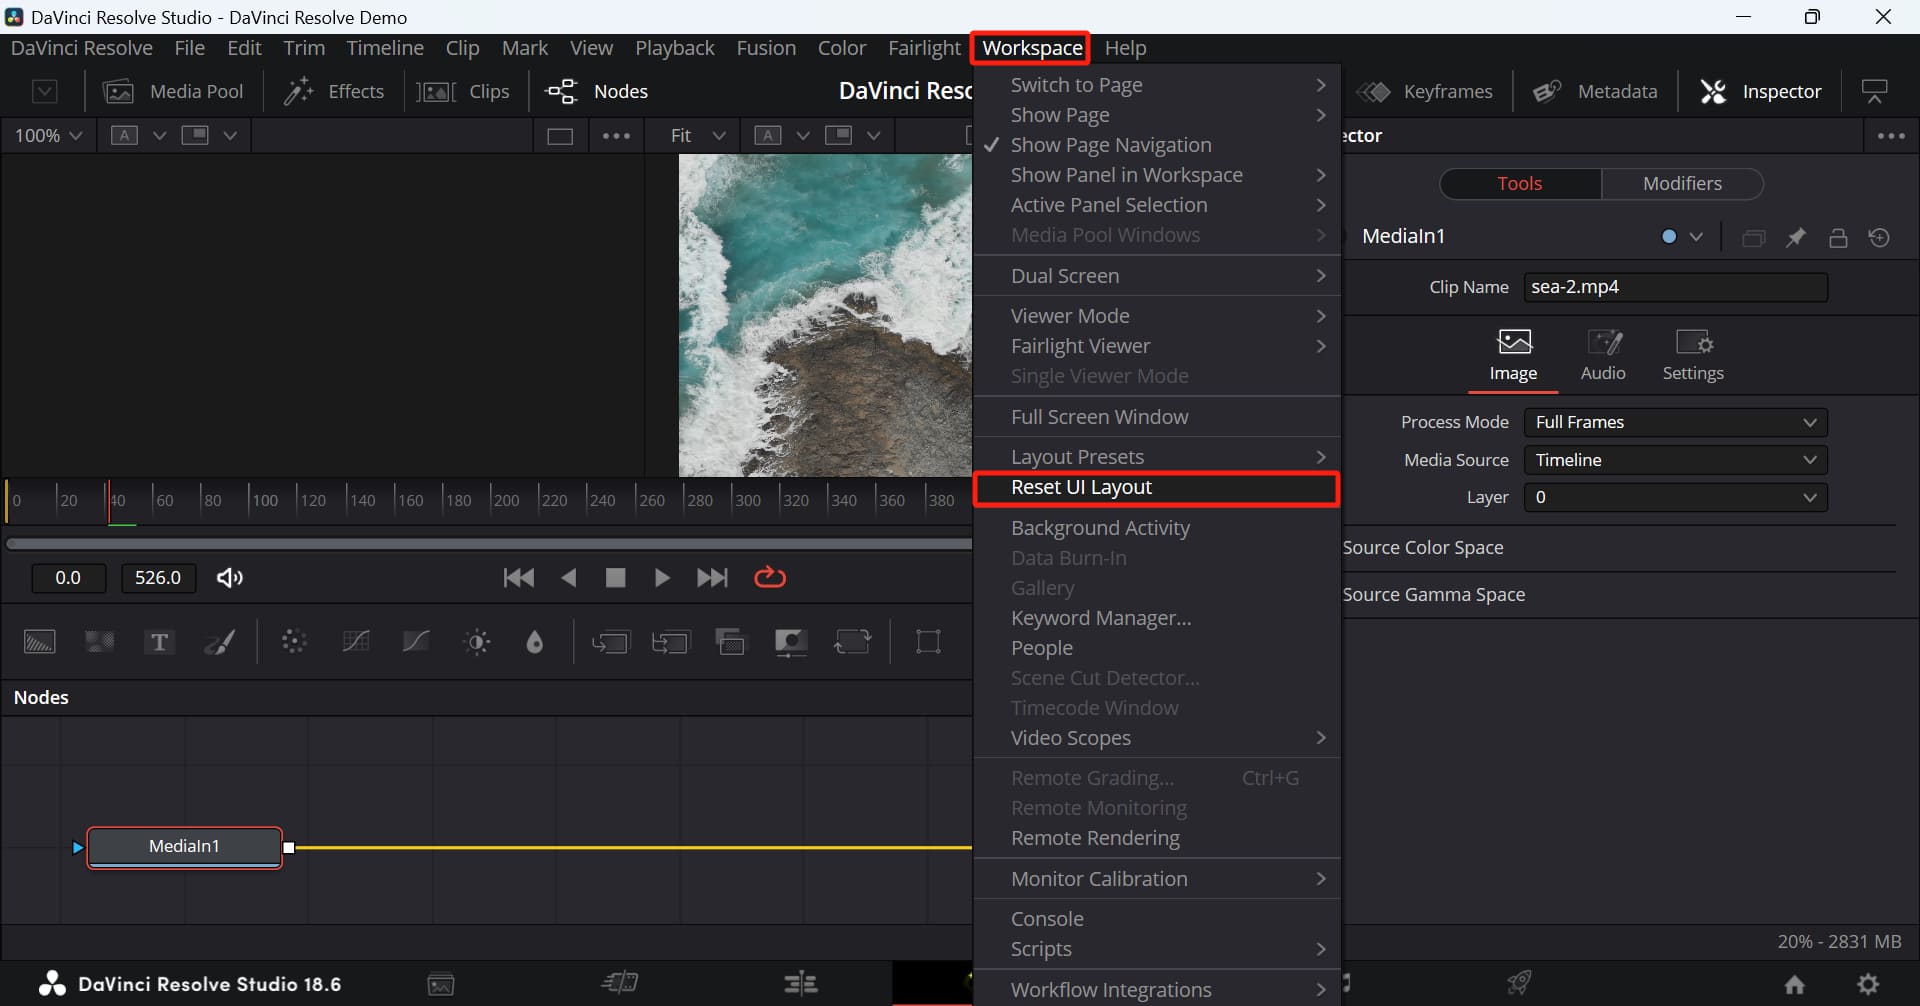
In the Fusion page's top navigation bar, click on "Workspace" → "Reset UI Layout."
When starting your effects creation, you can save your adjusted layout as a preset for easy access to a more personalized workflow.
In the Fusion page's top navigation bar, click on "Workspace" → "Layout Presets" → "Save Layout As Preset," enter a preset name in the dialog box, and save it.
3. Default Fusion Page Layout
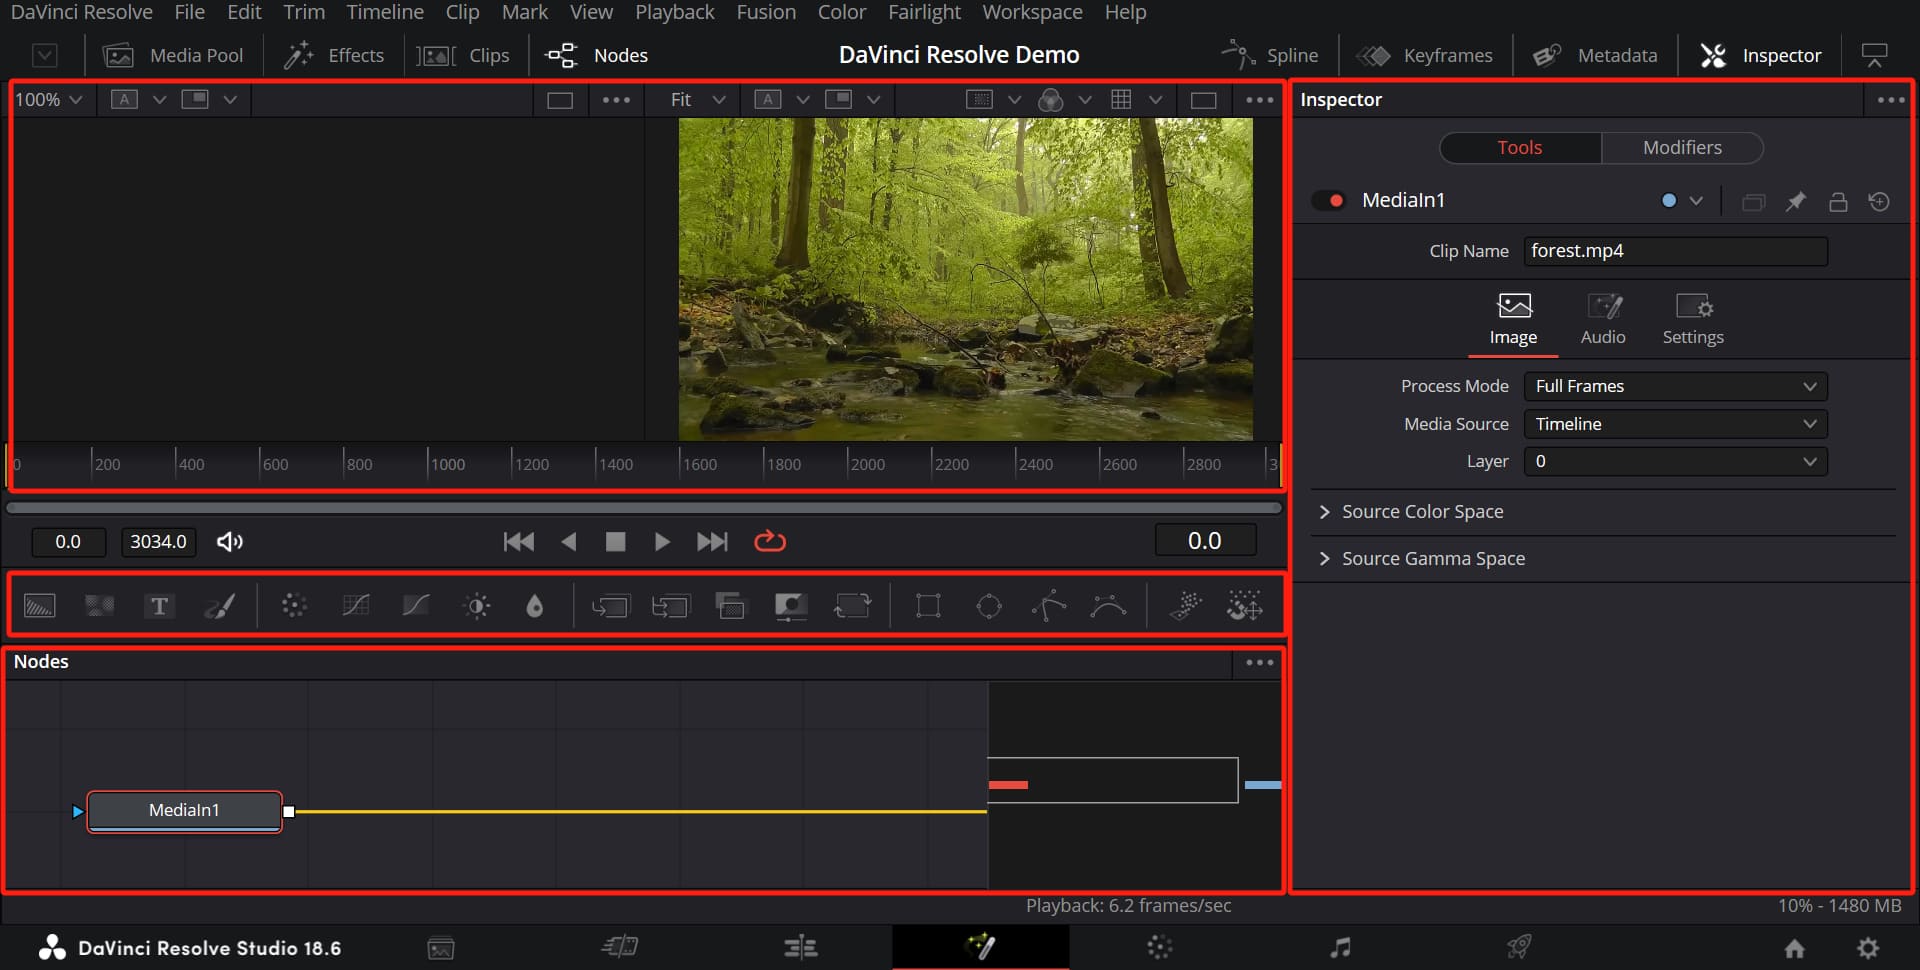
After resetting, the Fusion page displays the default layout, roughly divided into four main sections:
- Viewers: Typically 2, used to display images or effects of nodes in the Nodes panel.
- Toolbar: Customizable, used to add commonly used effects or tools to the Nodes panel.
- Nodes: Where effects are created; the node graph is often called the "node tree."
- Inspector: Used to adjust parameters of selected nodes in the Nodes panel.
Other tabs like "Media Pool," "Effects," "Spline," "Keyframes," and more can be accessed as needed by clicking the corresponding buttons to display them on the Fusion page.
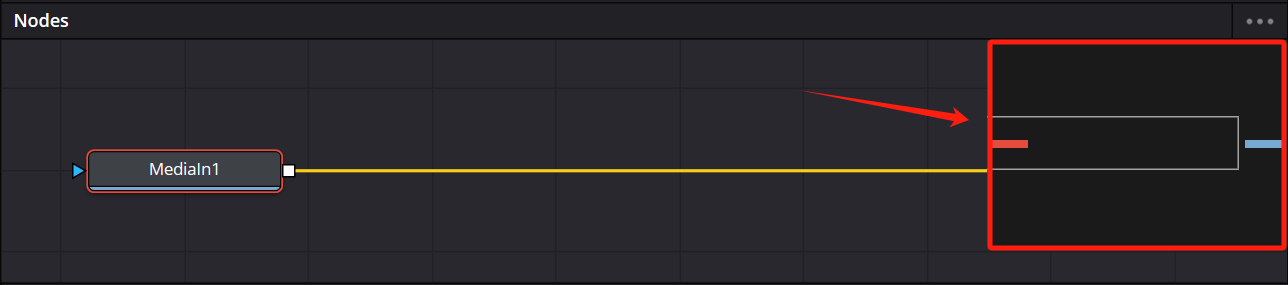
It's worth mentioning that you might come across a floating window in the Nodes Panel, which is Fusion's Navigator window.
The Navigator is like a thumbnail view of your nodes, allowing you to see how nodes are distributed, with the selected node typically highlighted in red. You can toggle the visibility of the Navigator using the shortcut key "V".
How to Use Fusion Page in DaVinci Resolve?
The layout tabs at the bottom of DaVinci Resolve represent the recommended workflow for projects and correspond to the video processing process.
In most cases, after importing media files into the "Media Page," you edit them on the timeline in the "Cut Page" or "Edit Page," composite them in the "Fusion Page," color grade in the "Color Page," work on audio production in the "Fairlight Page," and finally render output through the "Deliver Page."
1. Import a Single Clip
On the "Edit Page," you'll notice that regardless of how many clips and tracks are on the timeline, when you directly switch to the "Fusion Page," the viewer in Fusion defaults to displaying the content of the topmost track where the playhead is positioned on the "Edit Page."
Even if you haven't selected a single clip, Fusion actually imports the content of the topmost track.
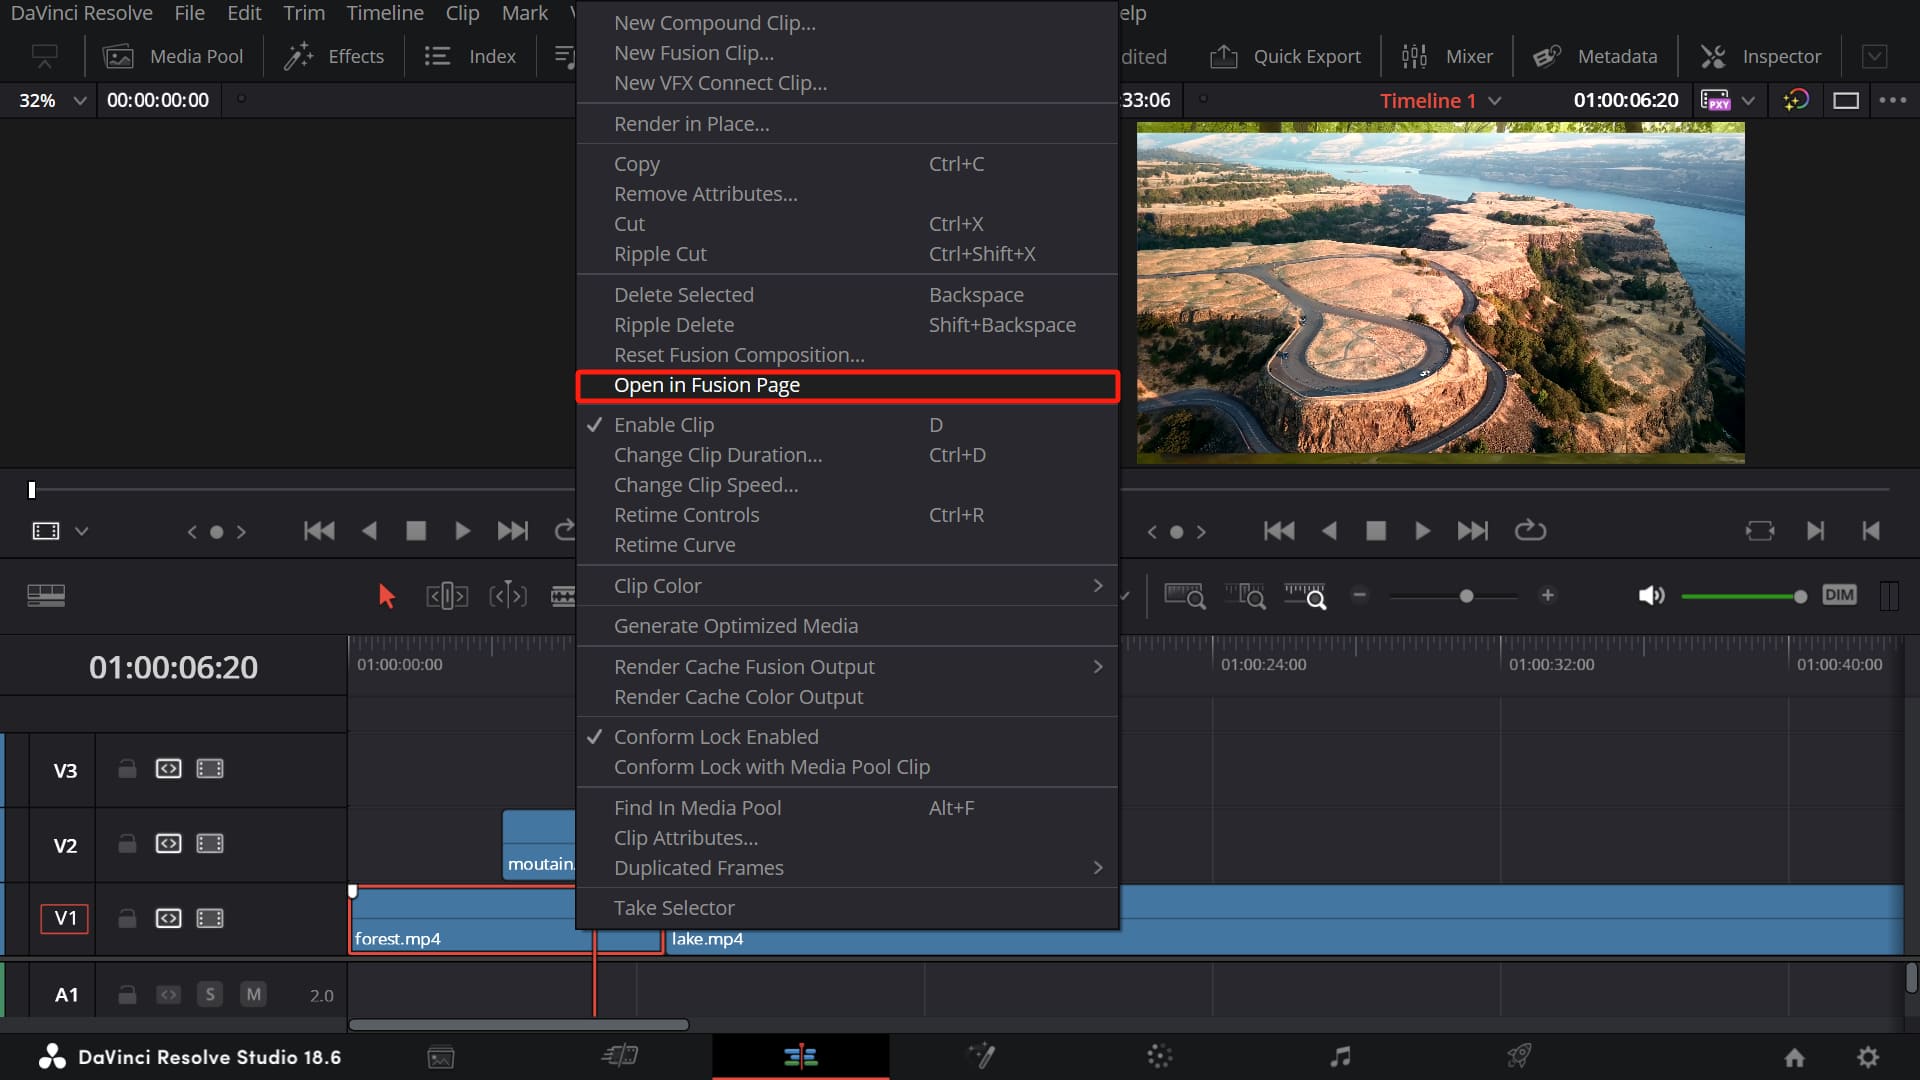
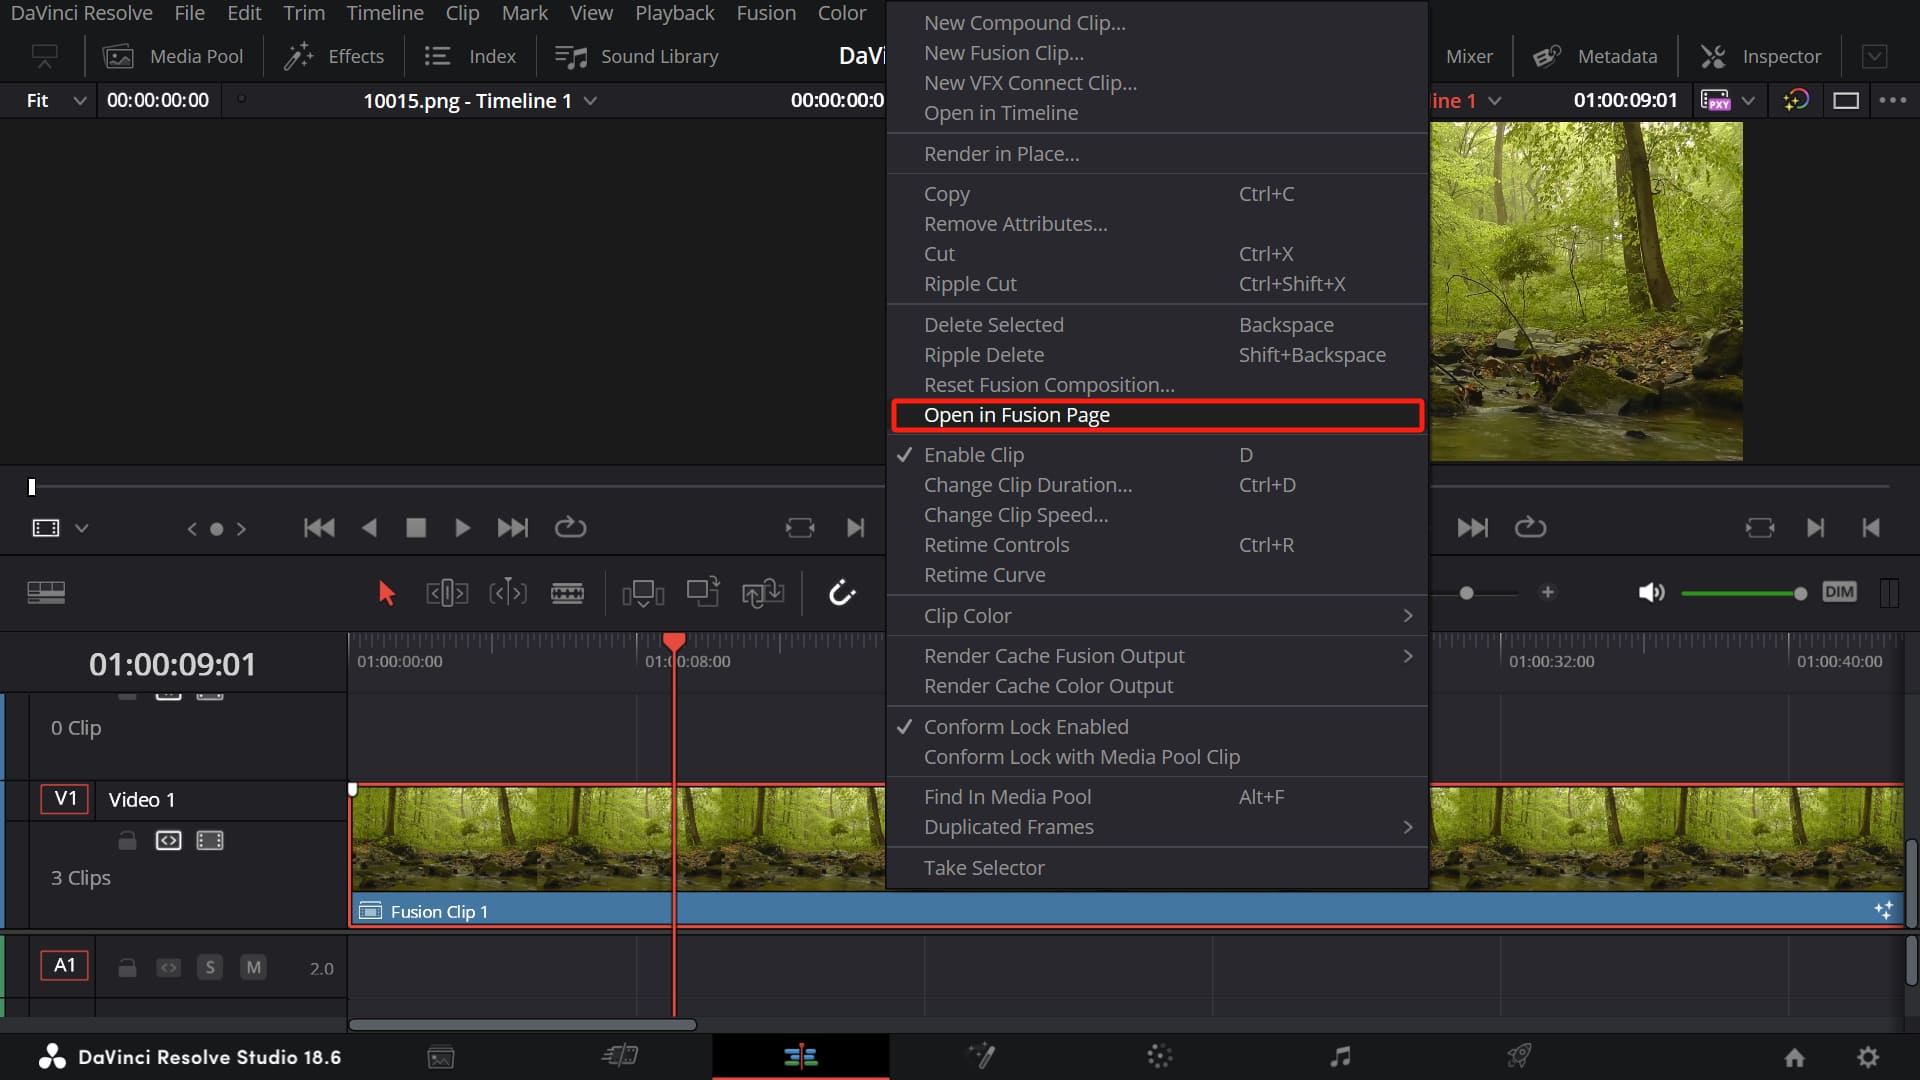
So, when you want to add effects to a specific individual clip more accurately, you can select that clip on the timeline in the "Edit Page" (the selected clip will have a red border), right-click, and choose "Open in Fusion Page."
This action will import that clip into the "Fusion Page."
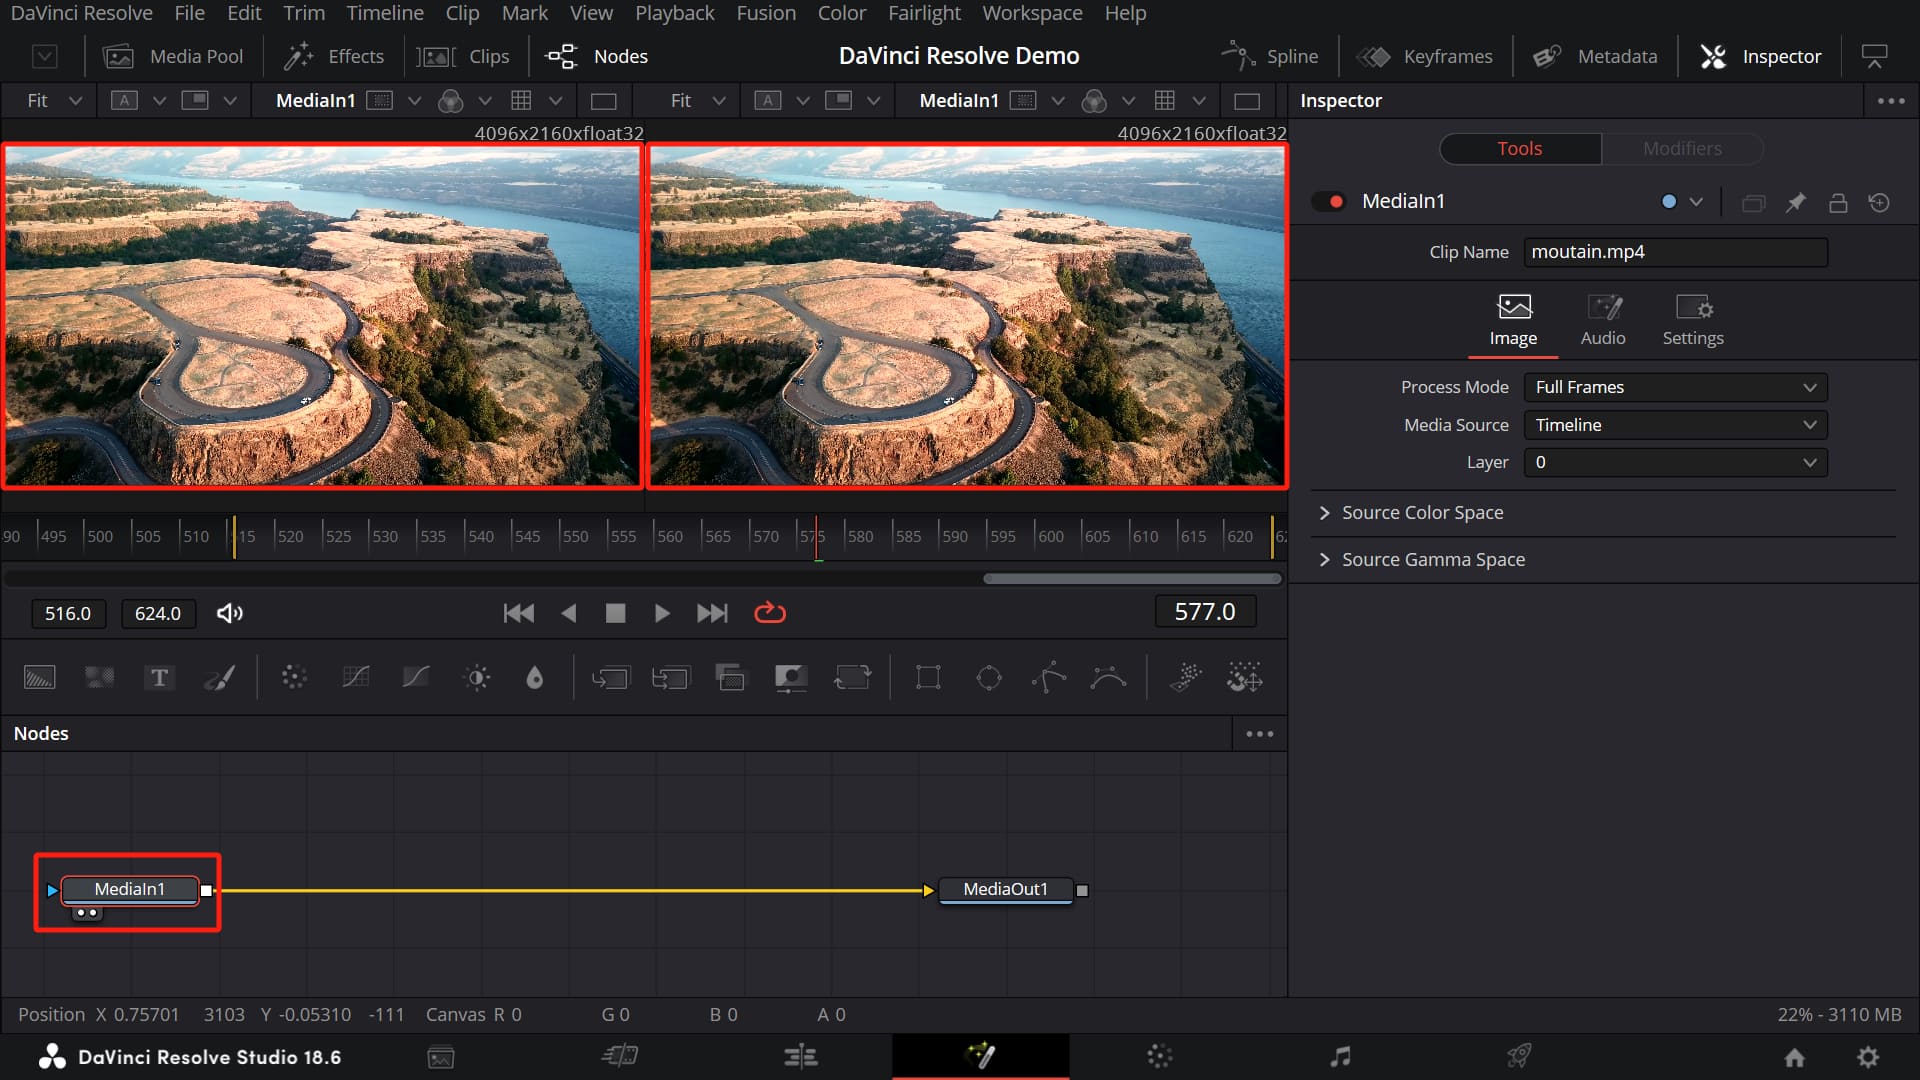
When you import a single clip from the "Edit Page" to the "Fusion Page," take a look at Fusion's Nodes Panel (you can close the Navigator and zoom in/out on the Nodes Panel using the mouse scroll wheel), as shown in the image below.
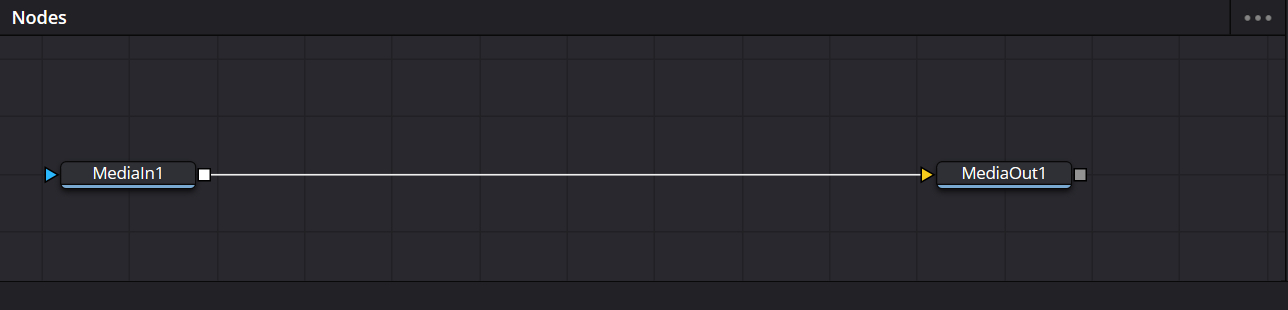
Let's provide a simple explanation of this Fusion node:
- MediaIn1: The "MediaIn1" node is the "Media Input" node, representing the clip from the "Edit Page."
- MediaOut: The "MediaOut" node is the "Media Output" node, indicating that the edited result from the Nodes Panel is sent back to the timeline on the "Edit Page," and it is always the last node connected.
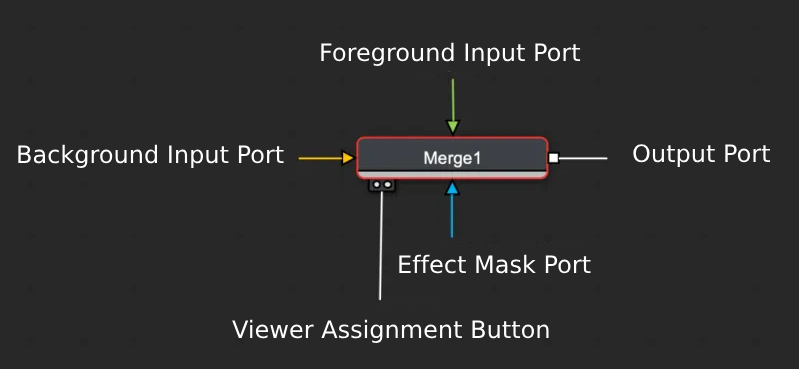
- Yellow triangle: Represents the main input port.
- White square: Represents the output port.
By default, the Fusion page has two Viewers. For clarity, let's refer to the left Viewer as Viewer 1 and the right Viewer as Viewer 2.
After selecting a node, press the number "1" key. At this point, the small white dot on the left side of the viewer assignment button below the node will light up, indicating that the output of this node will be displayed in Viewer 1.
If you wish to view the output of this node in Viewer 2, select the node and then press the number "2" key. Subsequently, the small white dot on the right side of the viewer assignment button below the node will light up.
If you are using a third Viewer, for instance, connecting to a full-screen broadcast-grade monitor through a Blackmagic Design UltraStudio or DeckLink card, select the node and press the number "3" key.
2. Import Two Clips
Next, let's take the two clips we have selected as an example. As shown in the image below, the PNG sequence on Video Track 2 is a foreground material with an Alpha channel, while the MP4 video on Video Track 1 serves as the background.
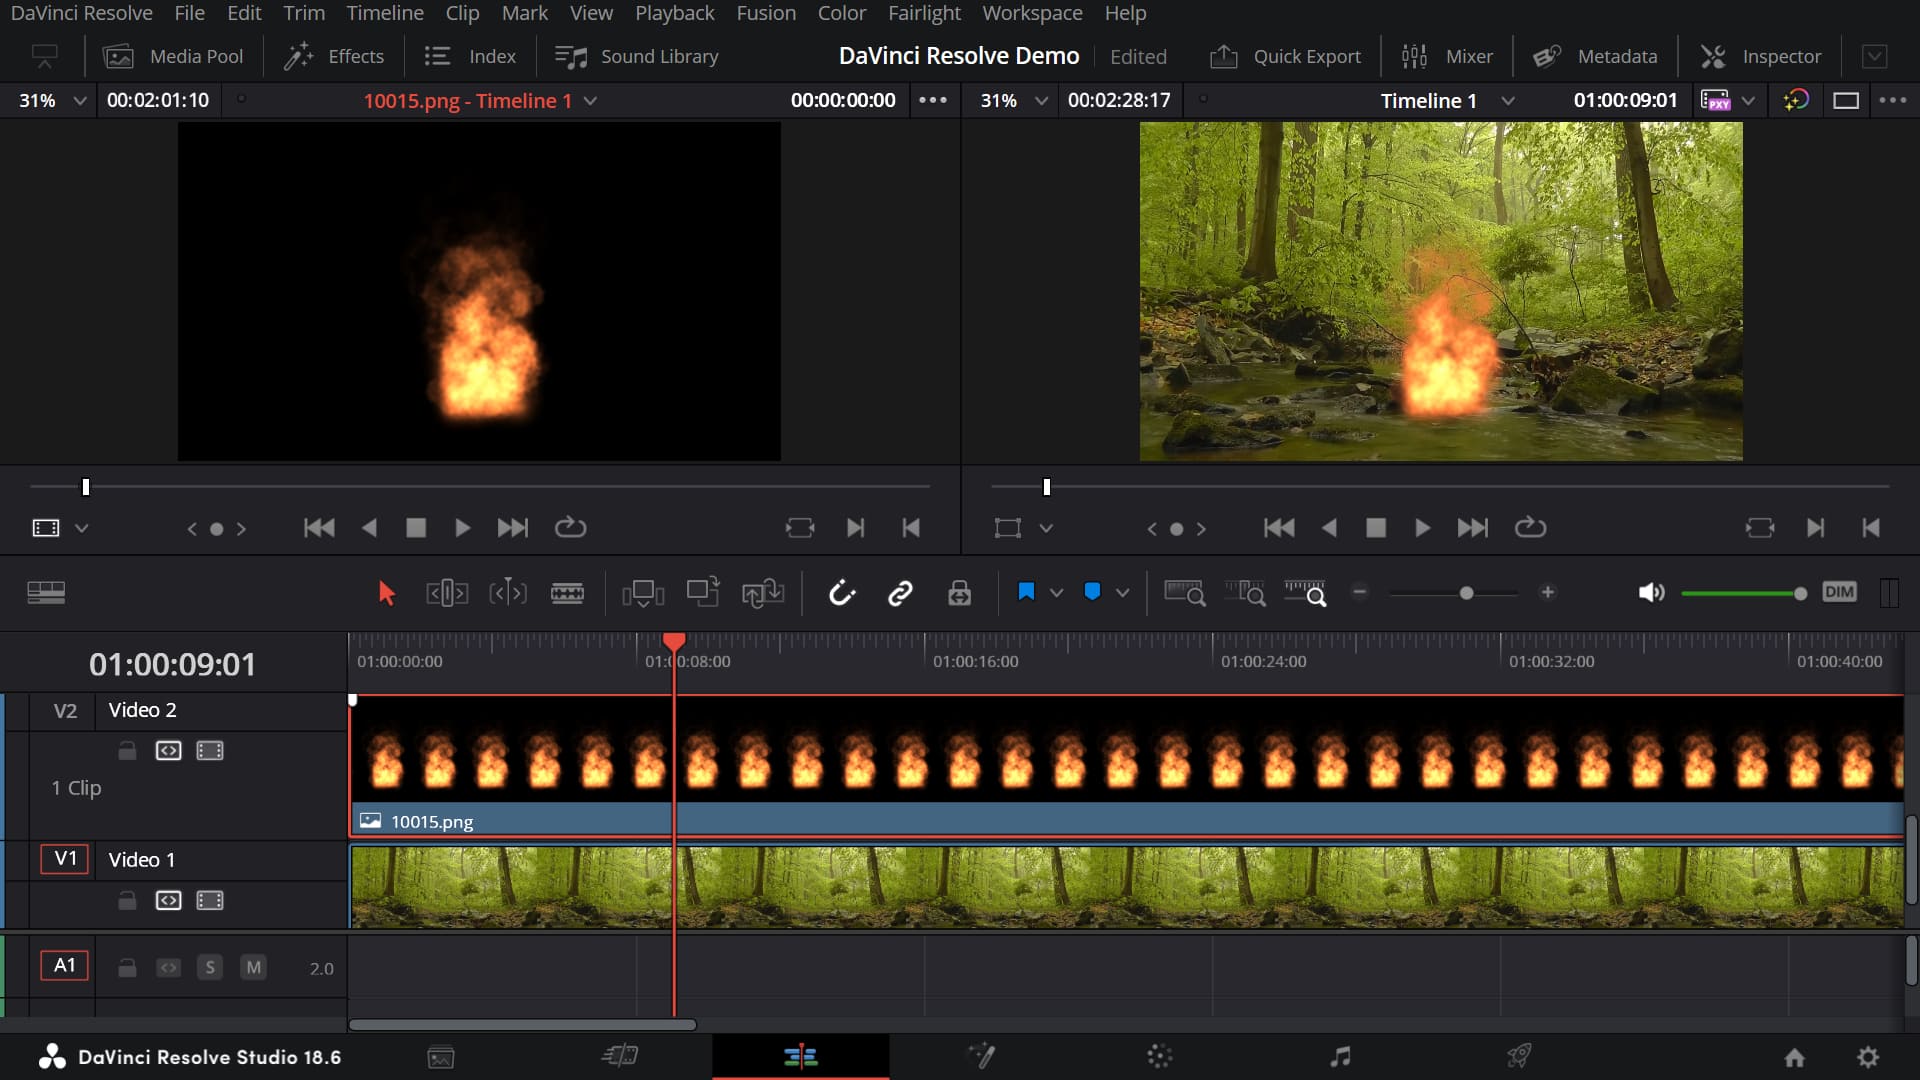
Select both clips simultaneously, right-click, and choose "New Fusion Clip." This action effectively groups the two clips together.
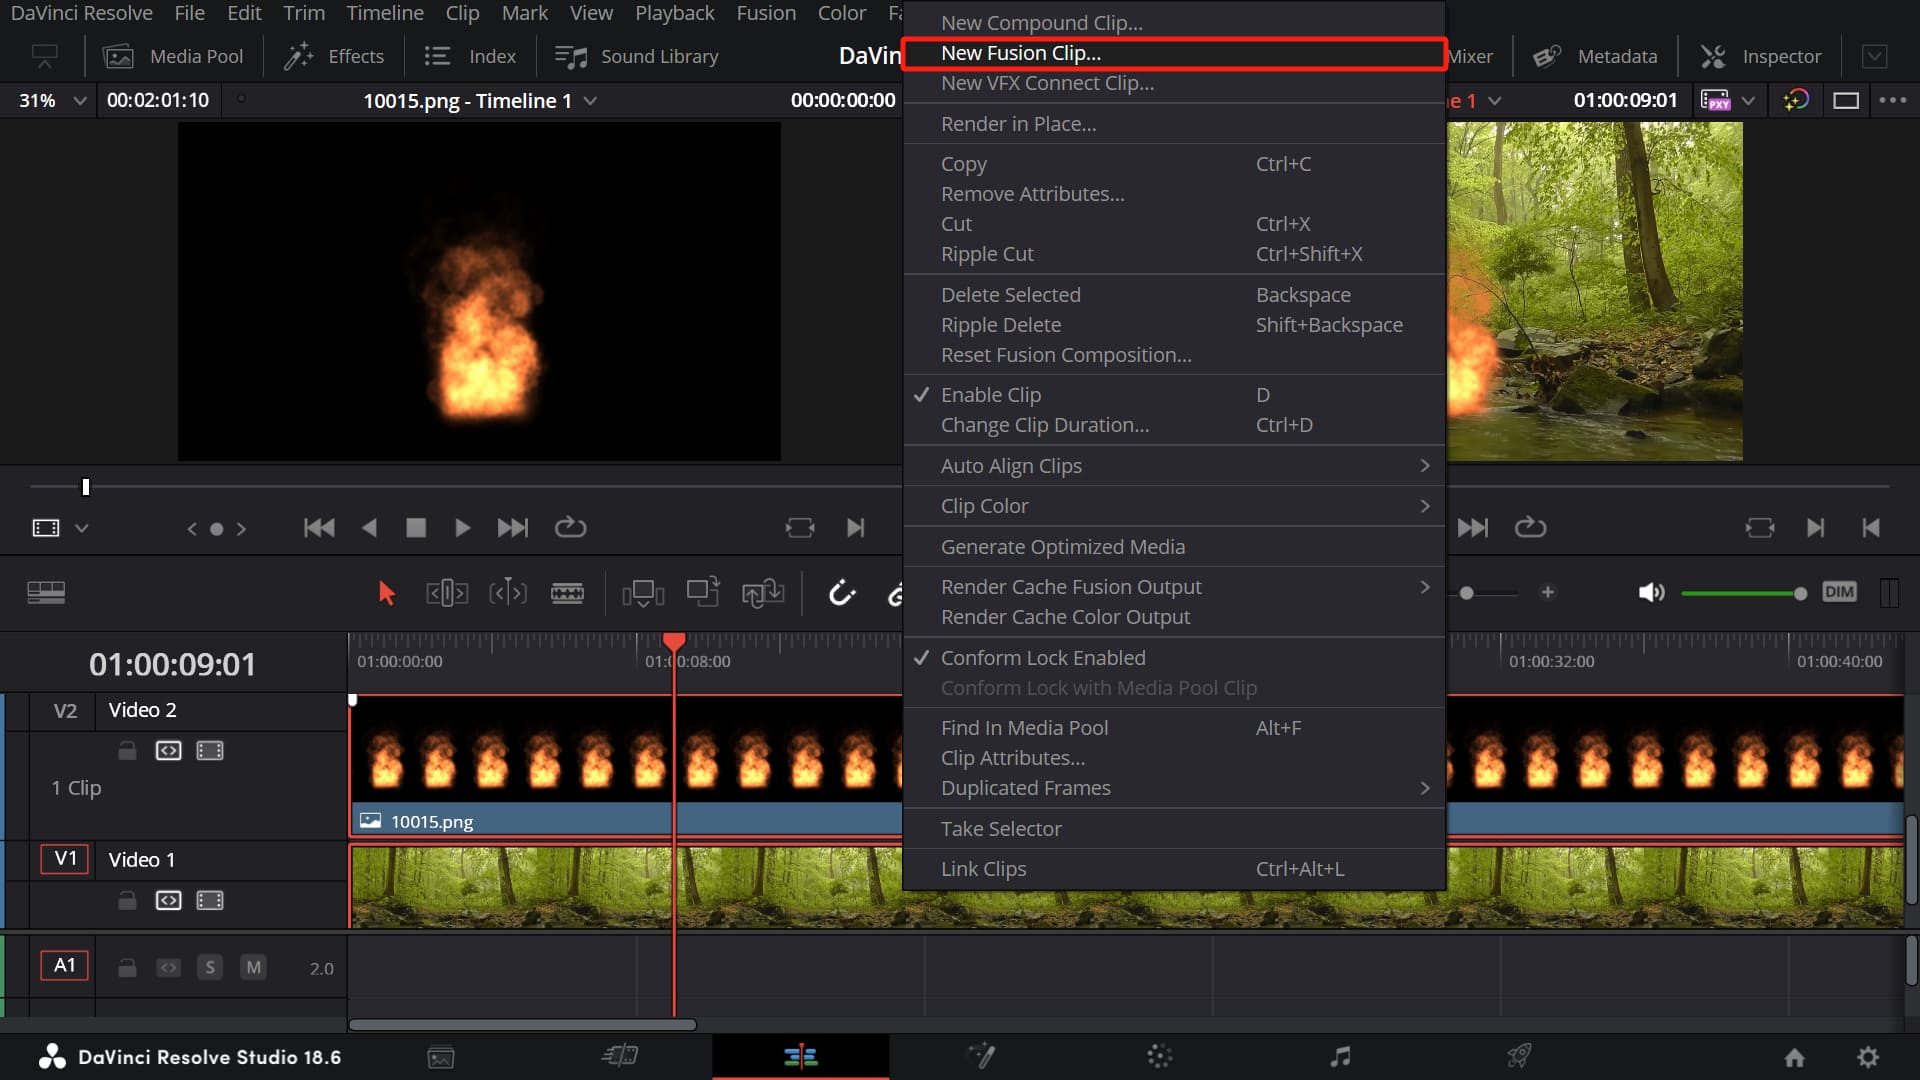
Then, select the newly created Fusion clip, right-click, and select "Open in Fusion Page."
In the "Edit Page," these two clips are stacked together to create a new composite, synthesized through the timeline.
However, in the "Fusion Page," compositing is done using nodes, where each image or effect is represented as a node.
As shown in the image below, this is the node setup after importing the two clips into the Fusion page. We use the Viewer assignment buttons to display the "MediaIn 1" node and "MediaIn 2" node in two separate Viewers.
At this point, the "MediaIn 1" node represents the background material from the V1 track, while the "MediaIn 2" node represents the foreground material from the V2 track.
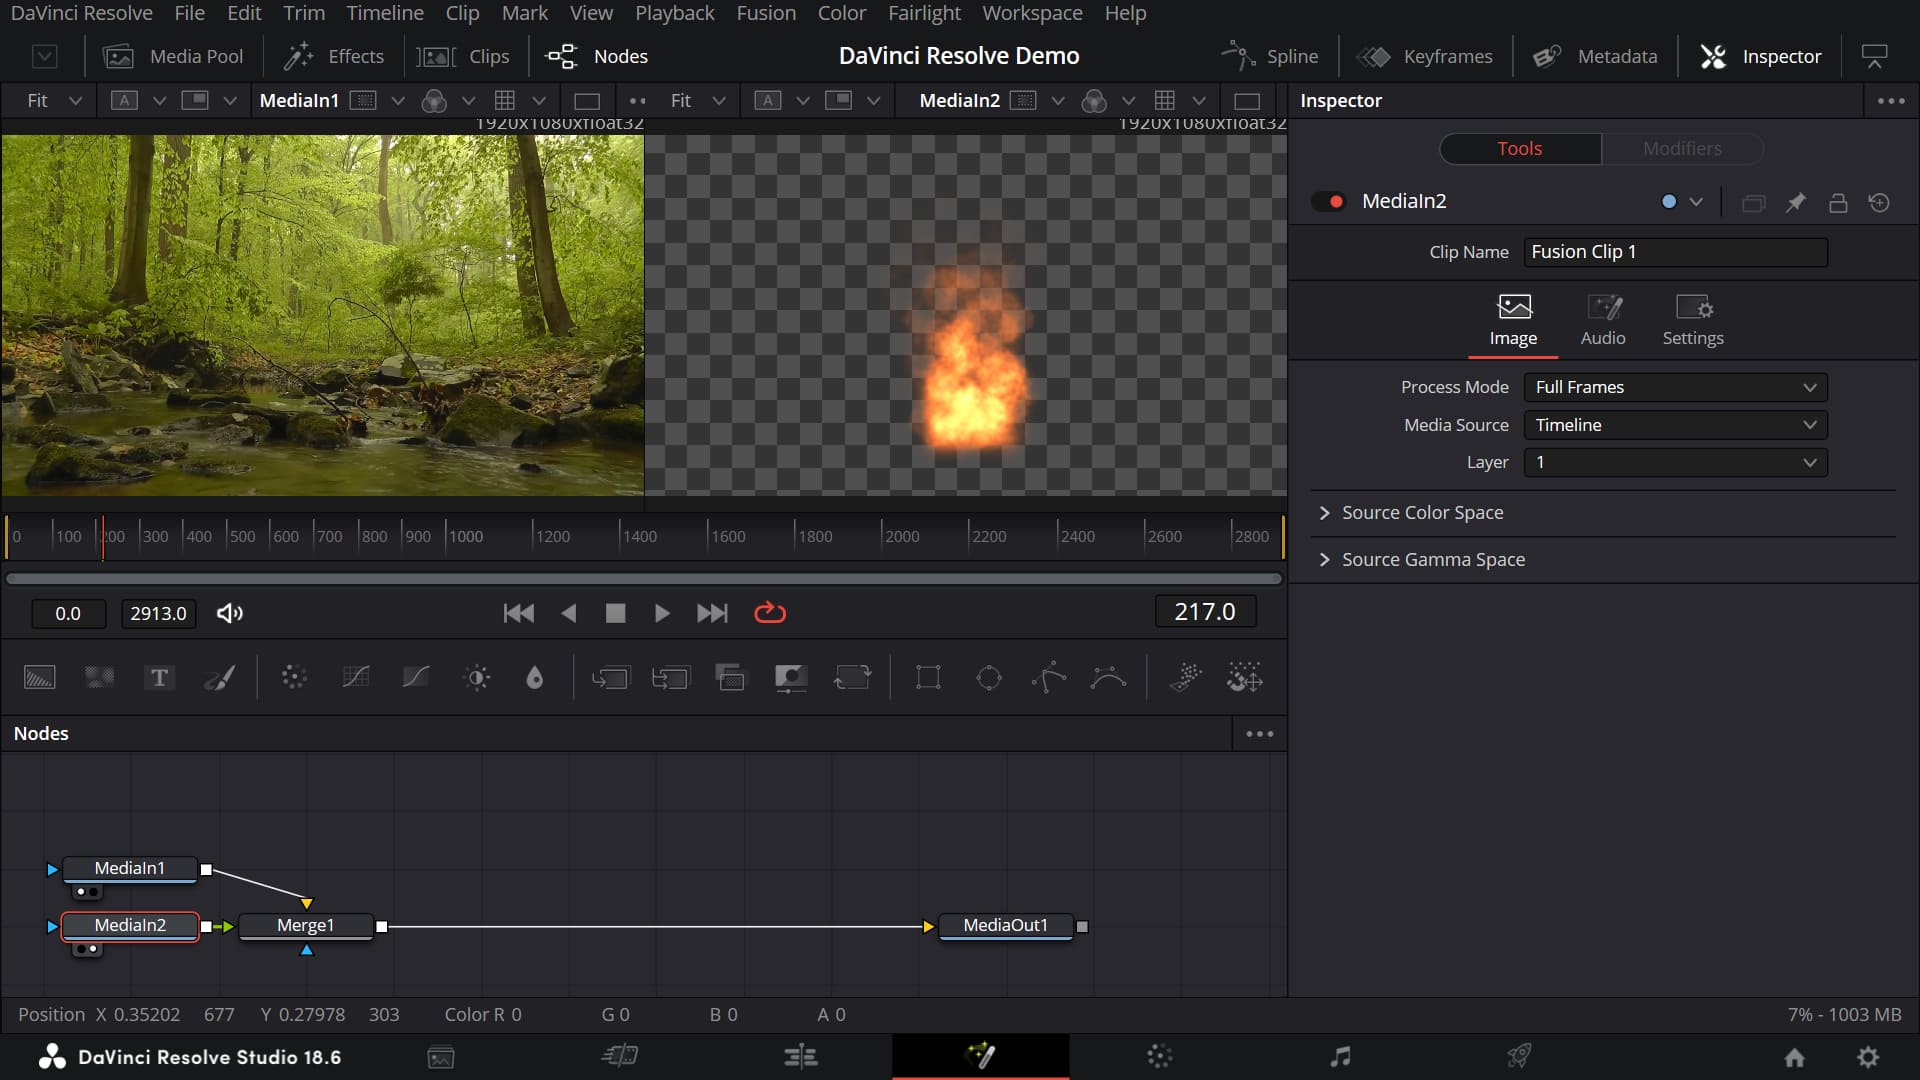
In the Fusion page, a new node called the "Merge" node is also created to composite the foreground and background materials onto the same frame.
The "Merge" node is a vital and commonly used tool on the Fusion page, as it deals with two images at a time: the foreground and the background.
If you want to add additional images or elements to the Merge node, you must correctly connect the output port of one "Merge" node as the background (or foreground) of another "Merge" node.
3. Import the Third Clip
Building upon the existing two clip compositions, if you wish to add a new element to the Merge node you just created in the Nodes panel, you will need to add another "Merge" node.
To do this, you will import clips from the media pool and establish the correct connections to composite a new image.
3.1. How to Add the Merge Node?
There are several ways to add a new node (using the creation of a new "Merge" node as an example). Common methods include:
Method 1:
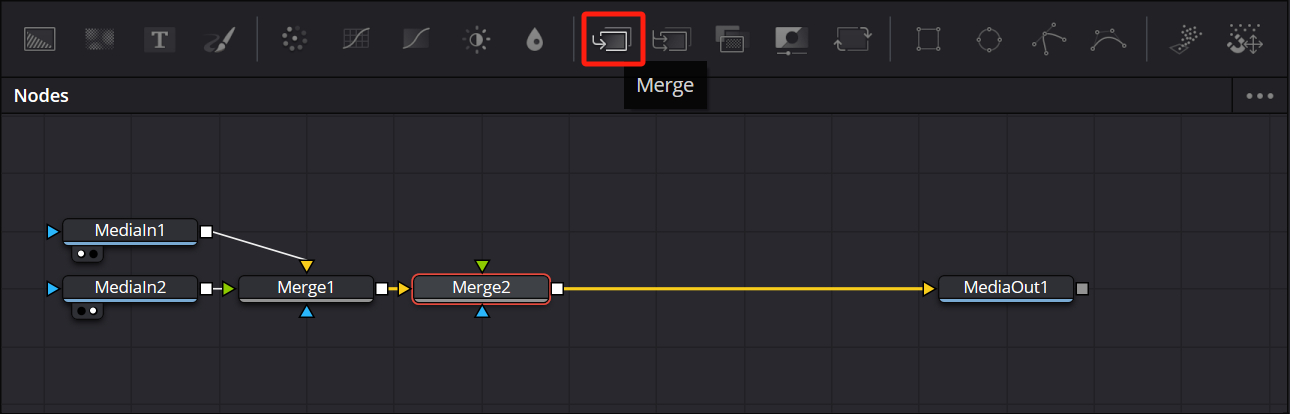
- Select the "Merge 1" node (the selected node will have a red border).
- In the toolbar above the Nodes panel, click on the "Merge" tool icon. The new node will be added directly after the selected node in the Nodes panel.
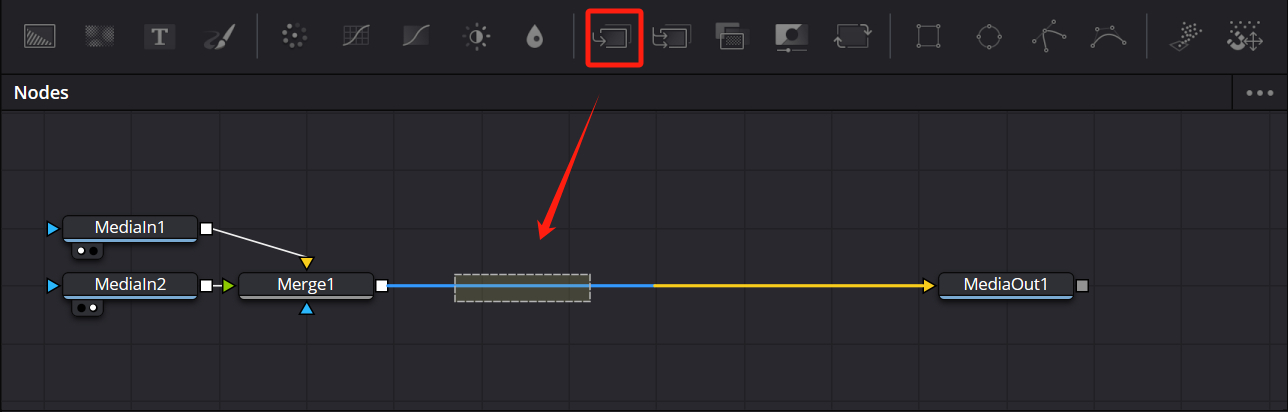
Method 2:
- Drag the "Merge" tool from the toolbar onto the connection line between the "Merge 1" node and the "MediaOut 1" node.
- Release the mouse when the connection line turns blue to insert this node into the node graph.
Method 3:
- Drag the "Merge" tool from the toolbar to a suitable position in the blank area to automatically create the "Merge 2" node.
- Or, click on an appropriate empty area in the Nodes panel, then select the "Merge" tool from the toolbar. The new node "Merge 2" will be created at the location where you clicked.
- Drag a connection line from the output port of "Merge 1" node to the (yellow) background input port of "Merge 2" node, and then drag another connection line from the output port of "Merge 2" node to the background input port of the "MediaOut 1" node.
Method 4:
- Drag the "Merge" tool from the toolbar to a suitable position in the blank area to create the "Merge 2" node.
- While holding the Alt/Opt key, drag a connection line from the output port of "Merge 1" node to "Merge 2" node. Release the mouse, and on the "Merge 2" node, three options will appear: Background / Foreground / Effect Mask (options vary based on the node).
- Choose the "Background" option, and the connection will automatically link to the (yellow) background input port of that node.
- Drag a connection line from the output port of "Merge 2" node to the background input port of the "MediaOut 1" node.
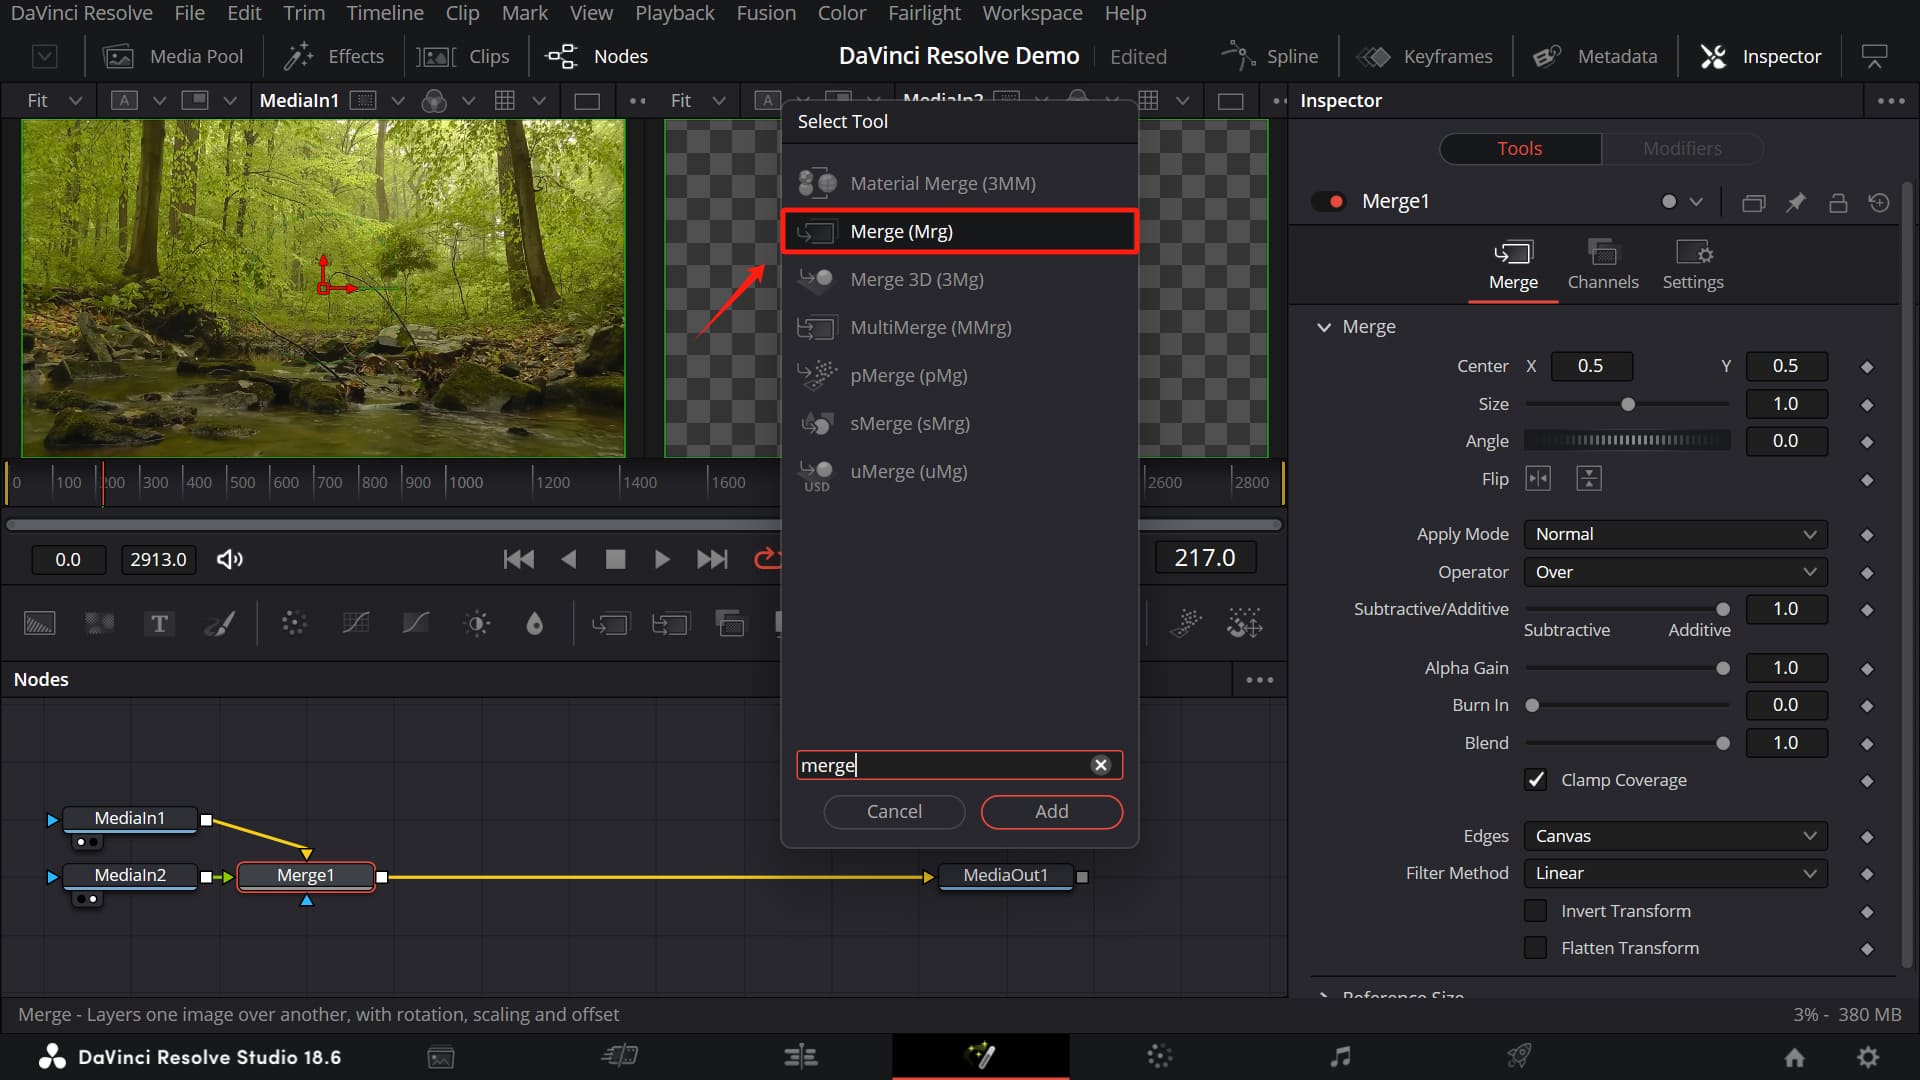
Method 5:
- Select the "Merge 1" node (it will be highlighted with a red border). Once you are more familiar with the tools in the Fusion page, you can hold down "Shift + Spacebar" to bring up the "Select Tool" dialog box.
- In the search bar, directly input the node name, for example, type "Merge". As you type, different search results will appear above the search bar until you see the "Merge" tool you want to create.
- Click on it, and it will automatically populate in the search bar. Then select "Add" and close the dialog box.
- The new "Merge 2" node will be added directly after the selected "Merge 1" node in the node panel.
3.2. Add Clips from the Media Pool and Establish Connections
- Click on the "Media Pool" button in the top left corner of the Fusion page.
- Select the clip from the "Media Pool" and drag it into the blank area of the Node panel. This action will automatically create a "MediaIn 3" node to represent this clip.
- While holding the "Alt/Opt" key, drag a connection line from the output port of "MediaIn 3" node to the "Merge 2" node. Release the mouse, and three options will appear on the "Merge 2" node: Background / Foreground / Effect Mask (options vary based on the node).
- Choose the "Foreground" option, and the connection will automatically link to the (green) foreground input port.
- Select the "MediaIn 3" node, and press the number "1" key to view the image of this node in Viewer 1.
Let's try a different approach. When you place these three video clips on three separate video tracks on the timeline in the Edit page and select all of them.
Right-click → "New Fusion Clip." Then, select the newly created Fusion clip, right-click → "Open in Fusion Page." You will see a node graph similar to what we had when adding media clips in the Fusion page above.
The reason for this demonstration is to help you deepen your understanding of the node-based workflow on the Fusion page.
Nodes visually represent the workflow from one node to the next: one node applies a certain effect to the image and then passes it on to the next node for further processing or output.
With this tree-like structure of nodes, you can easily view the entire composition and make quick modifications.
FAQ About DaVinci Resolve Fusion Page
1. Viewer Panel
Question: How to Zoom in or Out on the Viewer?
Plus (+) or minus (-) key.
Question: How to Scale the Viewer to Fit the Screen?
Ctrl/Command + F.
Question: How to Navigate to the Previous Frame and Next Frame?
[ ] or ← → arrow keys.
Question: How to Quickly Jump to the Start Frame and End Frame of the Render Range?
Ctrl/Command + [ , Ctrl/Command + ].
2. Nodes Panel
Question: How to Rename a Node?
Press F2. If it conflicts with system shortcuts, you can right-click the node, select "Rename," and type in the new name in the pop-up tab.
Question: How to Quickly Show or Hide Nodes?
Ctrl/Command+P.
Question: How to Zoom in/Out on the Nodes?
Plus (+) or minus (-) key.
Question: How to Reset the Nodes Zoom to the Default Size?
Ctrl/Command+1
3. Product Recommendation
You can actually map all the common keyboard shortcuts mentioned above onto the buttons of the TourBox. No need to remember any keyboard shortcuts anymore — TourBox allows you to perform various complex operations with fewer actions.

TourBox is more than a hotkey mapper. It has lots of built-in features that make your creative work faster and easier. For example, HoverAdjust — built for DaVinci Resolve — gives you a feel similar to using a pro color-grading console.
TourBox makes your video post-production work more streamlined and efficient, and you'll surely appreciate the excellent operational experience that TourBox provides. Explore our video editing page for more information.
Final Thoughts About DaVinci Resolve Fusion Page
In this tutorial, we've shared introductory knowledge about the Fusion page in DaVinci Resolve. We've covered the layout of the Fusion page and its core Nodes panel.
Due to space limitations, we couldn't delve deeper into this article. However, armed with the knowledge we've shared, you're now ready to start some exciting experiments.
Try combining nodes on the Fusion page to add some cool effects to your projects!
Keep an eye on us for updates. Stay tuned for more tutorials on the Fusion page in DaVinci Resolve in the future.
Lastly, if you're intrigued by TourBox, why not give it a try and see how it can enhance your creative journey?