How to Use Lightroom Classic: A Beginner's Guide to Photo Editing
When starting out in photography, beginners often face the challenge of importing photos into Lightroom Classic and not knowing where to begin with adjustments or having no concept of how to use Lightroom.
In this tutorial, we will guide you through the workflow sequence using Lightroom Classic. We aim to help you understand the methods and steps for post-processing your photography using Lightroom, allowing you to quickly master this classic photo editing tool in no time.
Without further ado, let's dive right in and get started.

In this article, you will learn:
- Workflow Sequence for Post-Processing: How to Use Lightroom?
- Frequently Asked Questions About How to Use Lightroom?
Workflow Sequence for Post-Processing: How to Use Lightroom?
When it comes to making adjustments to your photos, it's time to switch to the Develop module in Lightroom Classic.
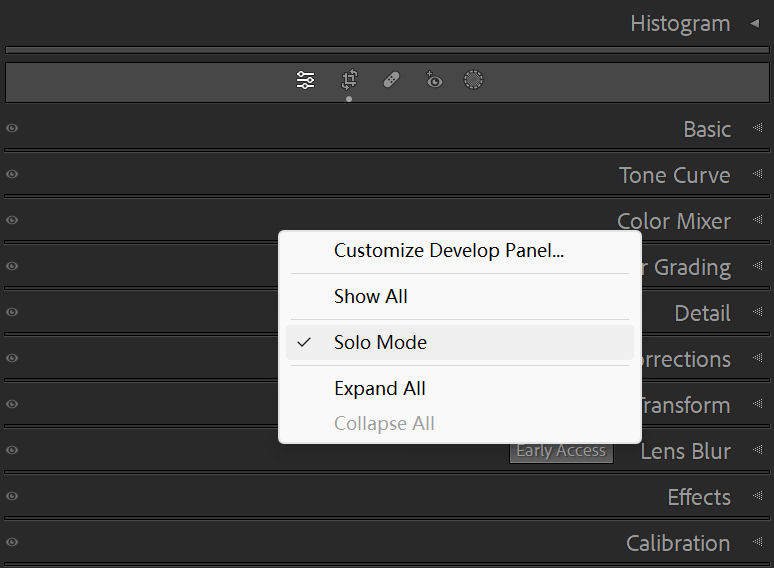
Here's a handy tip: in the editing menu on the right side, right-click anywhere in the blank space and select "Solo Mode" from the pop-up menu.
This setting ensures that only one tool is open at a time, automatically collapsing the others. It keeps things clean and organized, especially for users with smaller screens.
Now let's delve into the workflow sequence of how to use Lightroom.
You Might Be Interested in:
We've shared some tutorials on how to use Lightroom Classic. If you're interested, you can click to view them.
Step 1: Resizing and Aspect Ratio
Typically, we recommend starting with adjustments related to resizing and aspect ratio in Lightroom. For example, correcting perspective distortion in architectural shots.
When taking photos of buildings from the street, you will likely encounter a distortion where the buildings appear to tilt upwards, forming a trapezoid shape. This can be corrected in post-processing.
In the Transform panel, you can manually or automatically correct the vertical lines, altering the original size and aspect ratio of the photo.

Additionally, if the photo appears cluttered due to shooting from a distance or has an unfavorable composition, you may need to crop and recompose the image.
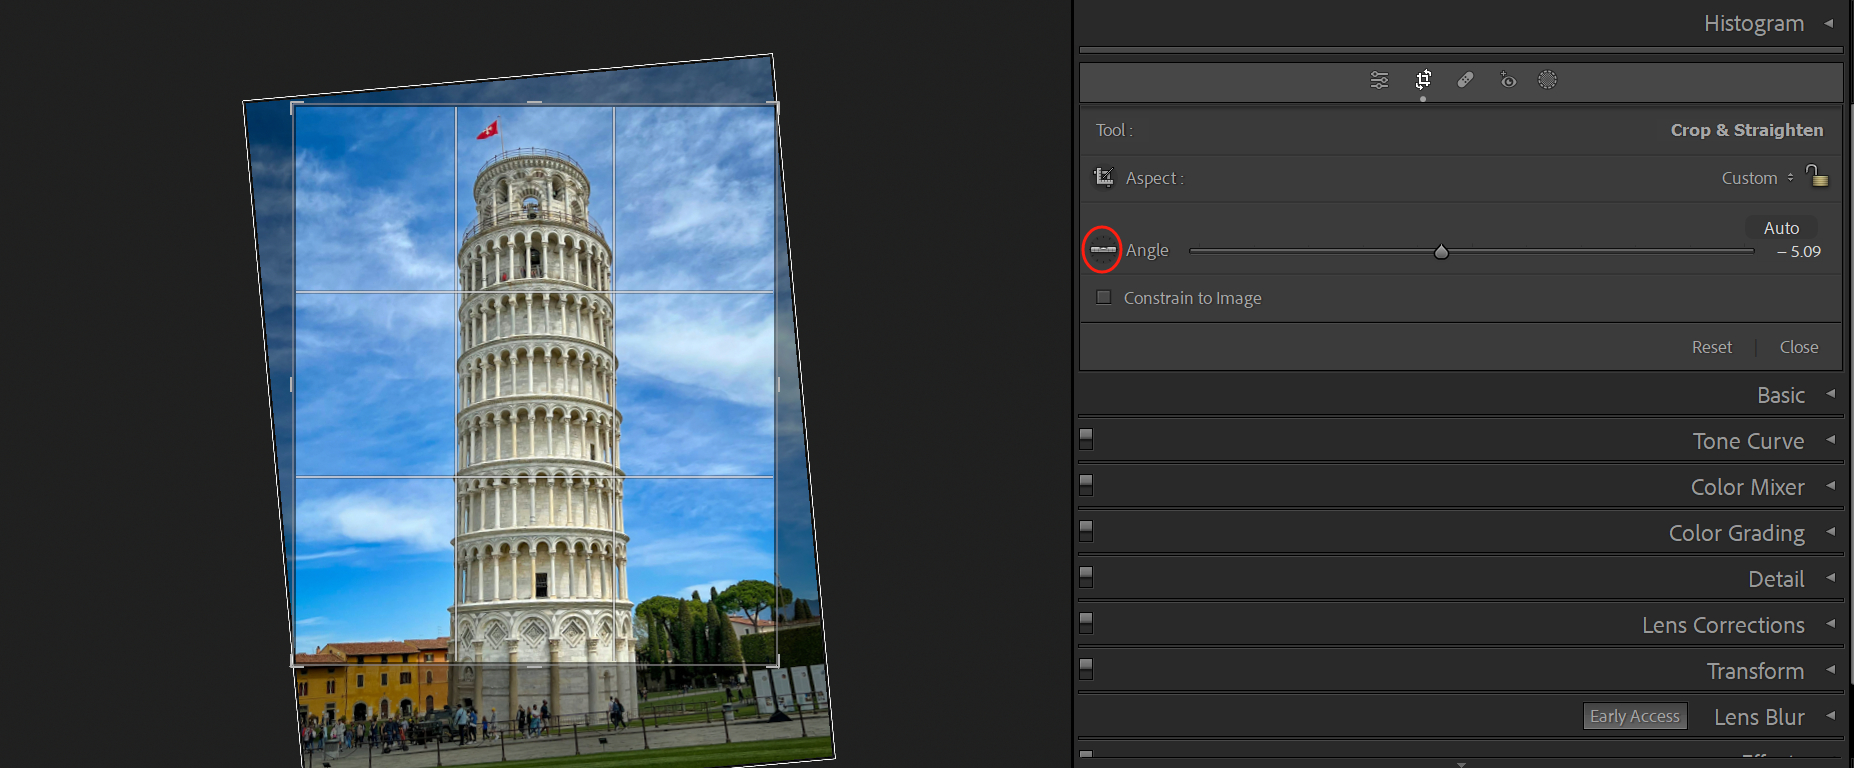
Lightroom's "Crop Overlay" tool can assist with this. Within the crop overlay, there is a useful feature called angle adjustment. When the horizon line is clearly visible in the photo, simply click the "Auto" button to automatically correct it.
There may be times when the photo appears level to the naked eye but has a slight tilt. The automatic adjustment works wonders in such cases.
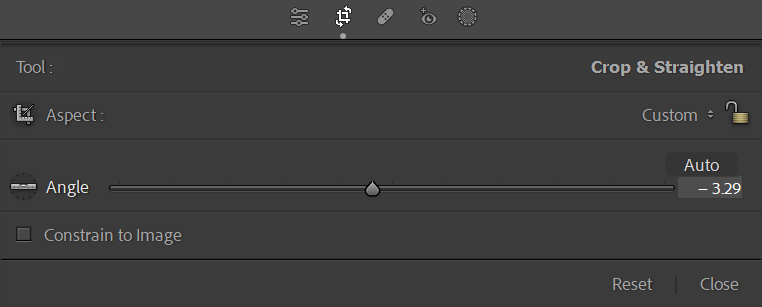
Sometimes, it's not easy to identify the horizon line in the photo, requiring manual adjustments. Click on the "Straighten Tool" (the icon resembling a small ruler) and draw a horizontal line in the photo to indicate where the horizon should be. Once everything is set, you can lock the image.
Photos of the Leaning Tower of Pisa can also be easily straightened using Lightroom.
All of the above adjustments will change the original size or aspect ratio of the photo. To avoid unnecessary further editing, we recommend adjusting them first.
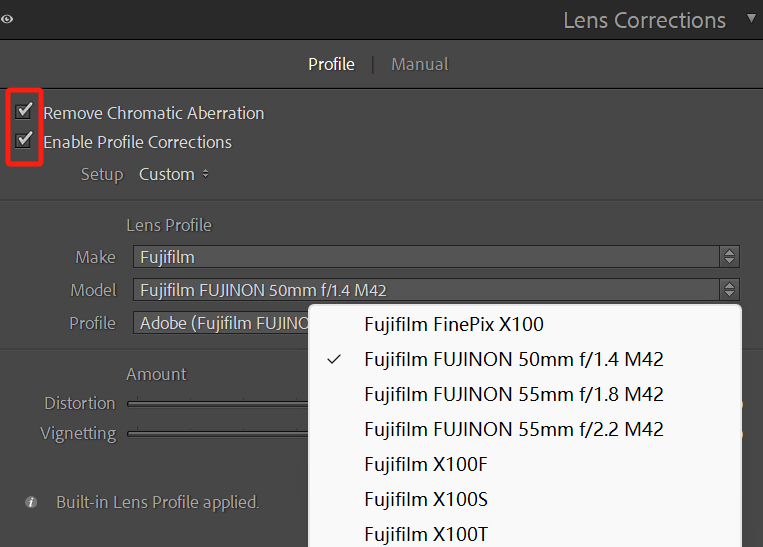
In addition, there's a panel called "Lens Correction" that also needs to be adjusted at this stage. Check the options for "Remove Chromatic Aberration" and "Enable Profile Corrections." These are essential adjustments for every photo.
Of course, you can still manually correct the distortions caused by wide-angle lenses and eliminate chromatic aberration and vignetting. If your camera is on the list, be sure to apply these corrections to every photo. You'll notice a significant difference after the corrections.
Extra Tip:
For Fujifilm camera users, this option is not used frequently because you will find that it cannot automatically detect any Fujifilm lenses. If you manually select Fujifilm, the drop-down menu only includes old Fujifilm lenses, compact cameras, and the X100 series with F/S/T models.
So, if you are a Fujifilm camera user, you can simply skip this step.
Step 2: Adjusting Exposure and Restoring Colors
After correcting the horizontal and vertical aspects of the photo and adjusting the size, the next step is to fix the exposure and restore the colors.
You can think of this as the foundation work. Any further adjustments are built upon the foundation, so this step is quite important.
The foundation work mainly focuses on the "Basic" panel. The first thing you need to do is correct the White Balance. The purpose of this step is to restore the colors in the photo to their true appearance when you took the shot.
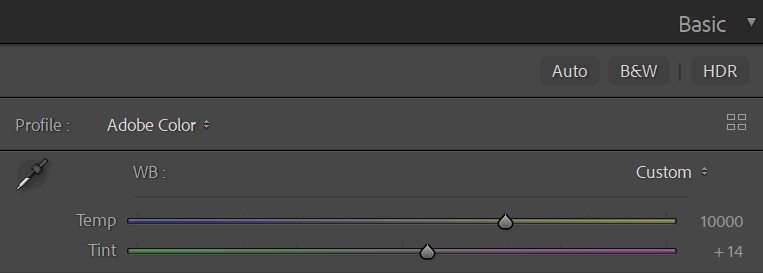
Significant color casts can make the image look less pleasing to the eye. Of course, there may be special cases where adjusting the white balance lays the groundwork for later color grading.
Next, you'll adjust the Tone in the photo, which includes those six options that can be confusing and seem similar: Exposure and Contrast, Highlights and Shadows, as well as Blacks and Whites.
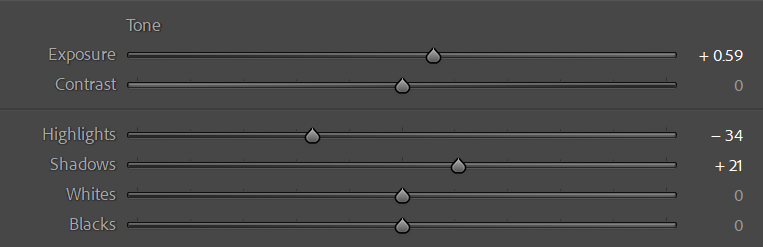
Actually, for any photo, you can confidently click the "Auto" button and let Lightroom make the judgment. Most of the time, the results are pretty good, and it automatically adds vibrance to make the colors pop.
If the result deviates from your preference, you can manually fine-tune these values. The highlights and shadows sliders can have a significant impact.
For example, when the sunlight or artificial lights are too bright, reducing the highlights can lower the brightness in those areas. And the shadows slider can brighten up areas that lack light. Don't hesitate to use these two sliders. It's quite common to drag the highlights slider all the way to -100.
If you find it cumbersome to drag and adjust the parameters, you can actually use the up and down arrow keys on your keyboard to make adjustments.
However, each press of the arrow keys will change the value by a floating increment of 5. Using the keyboard, it's difficult to balance between efficiency and precise parameter adjustments.
But with the Tourbox controller, you can achieve precise adjustments with increments of 1. And with various custom settings on the Tourbox, such as combination action, TourMenu, and macro, you can easily make tonal adjustments in Lightroom with just one hand.

The best part is that you can also use Tourbox for other image, video editing, digital painting, and office software. Based on our tests, Tourbox can improve user efficiency by 270%.
Step 3: Adding Depth and Detail
After completing the foundation work, it's time to add the finishing touches. Details are often overlooked but they play a crucial role.
Many people tend to ignore the details in a photo because they can't see them clearly or they don't zoom in. However, it is these countless tiny details that contribute to the overall beauty of a photo.
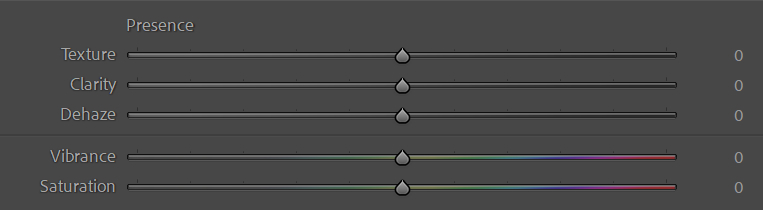
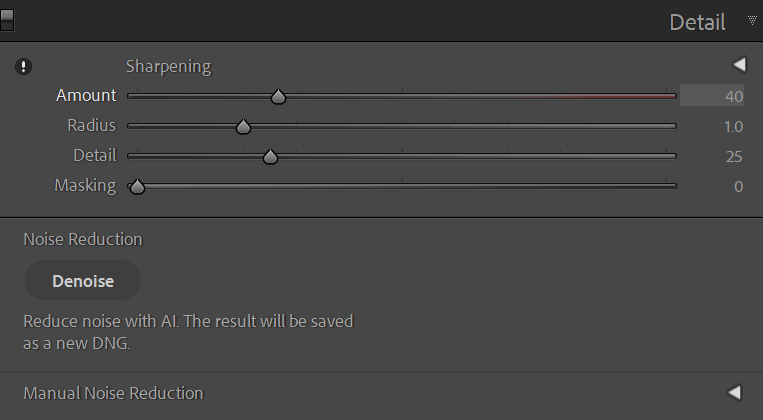
Some tools can help enhance the depth and details in your photo, and they are mainly found in three locations.
The first is in the Presence section of the Basic panel, where you can adjust the Texture and Clarity parameters to effectively increase the details and texture.
The second is in the Tone Curve panel, where you can simultaneously adjust the exposure and contrast of the photo. Changing the tones can alter the sense of depth in the photo, highlighting the power of the curve tool.

The third is in the Detail panel, where you can sharpen and enhance the details of the photo. This can be a highly effective adjustment.
By using these settings and comparing the before and after effects, you may feel like you're looking at photos taken by two different cameras. At first glance, the sharpness and texture may appear completely different, but in reality, it's the same photo.
Step 4: Color Grading and Adding Effects
After the adjustments in the previous three steps, a photo has already been restored with beautiful colors, capturing that original and natural beauty.
At this point, you can choose to keep it as it is, preserving its originality, or you can further fine-tune or enhance the colors in the photo.
The purpose of this color grading step could be to achieve your own color grading style or to make the colors in the original photo more striking.
Due to limited conditions during the time of shooting, such as unfavorable weather or lighting, color grading can change or elevate the original photo to a higher level.
Take the example of a sunset photo. The sunset on the day of the shoot was not perfect as it was cloudy and there was no clear sunset.

Through post-processing color grading, the photo can be transformed into a completely new image. This is not considered fakery or excessive post-processing, but rather an enhancement based on the existing colors.

Since Lightroom software doesn't have fancy features like sky replacement or advanced photo manipulation like Photoshop, all adjustments are made as subtle tweaks based on the original photo. The goal is simply to enhance the atmosphere and bring out the hidden colors in the photo.
So, it's not that there are no colors in the photo, they're just faint. Through post-processing color grading, those subtle colors can be brought to the forefront.
The tools available to achieve this kind of color grading and enhancement include the white balance, vibrance, and saturation in the Basic panel, the HSL color tools in the Color Mixer, Color Grading, and more.
Choose a color grading tool that you like and are comfortable with, and add your own style to the photo!
Step 5: Removing Blemishes and Unwanted Objects
The final step is to remove blemishes and any unwanted objects from the photo, such as sensor spots, which can be a common issue with every camera.
Additionally, you may need to remove elements that significantly affect the overall effect of the photo, like fire hydrants on the roadside or trash on the ground. Lightroom's Content-Aware Remove tool is excellent for this task.
It can not only remove small dots but also complex-shaped objects. You simply need to drag the mouse to cover the area you want to remove, and Lightroom will automatically analyze and find similar content to replace it.
Sometimes, the automatic analysis may not produce the desired result, so you can manually use the Clone tool to select the appropriate content to fill in.
In conclusion, while Lightroom's Healing tool may not be as powerful as Photoshop's, it is still sufficient for most needs as long as they are not too complex.
With this workflow overview, you should now have a rough understanding of how to use Lightroom for post-processing your photos. Of course, the specific process may vary depending on your preferences.
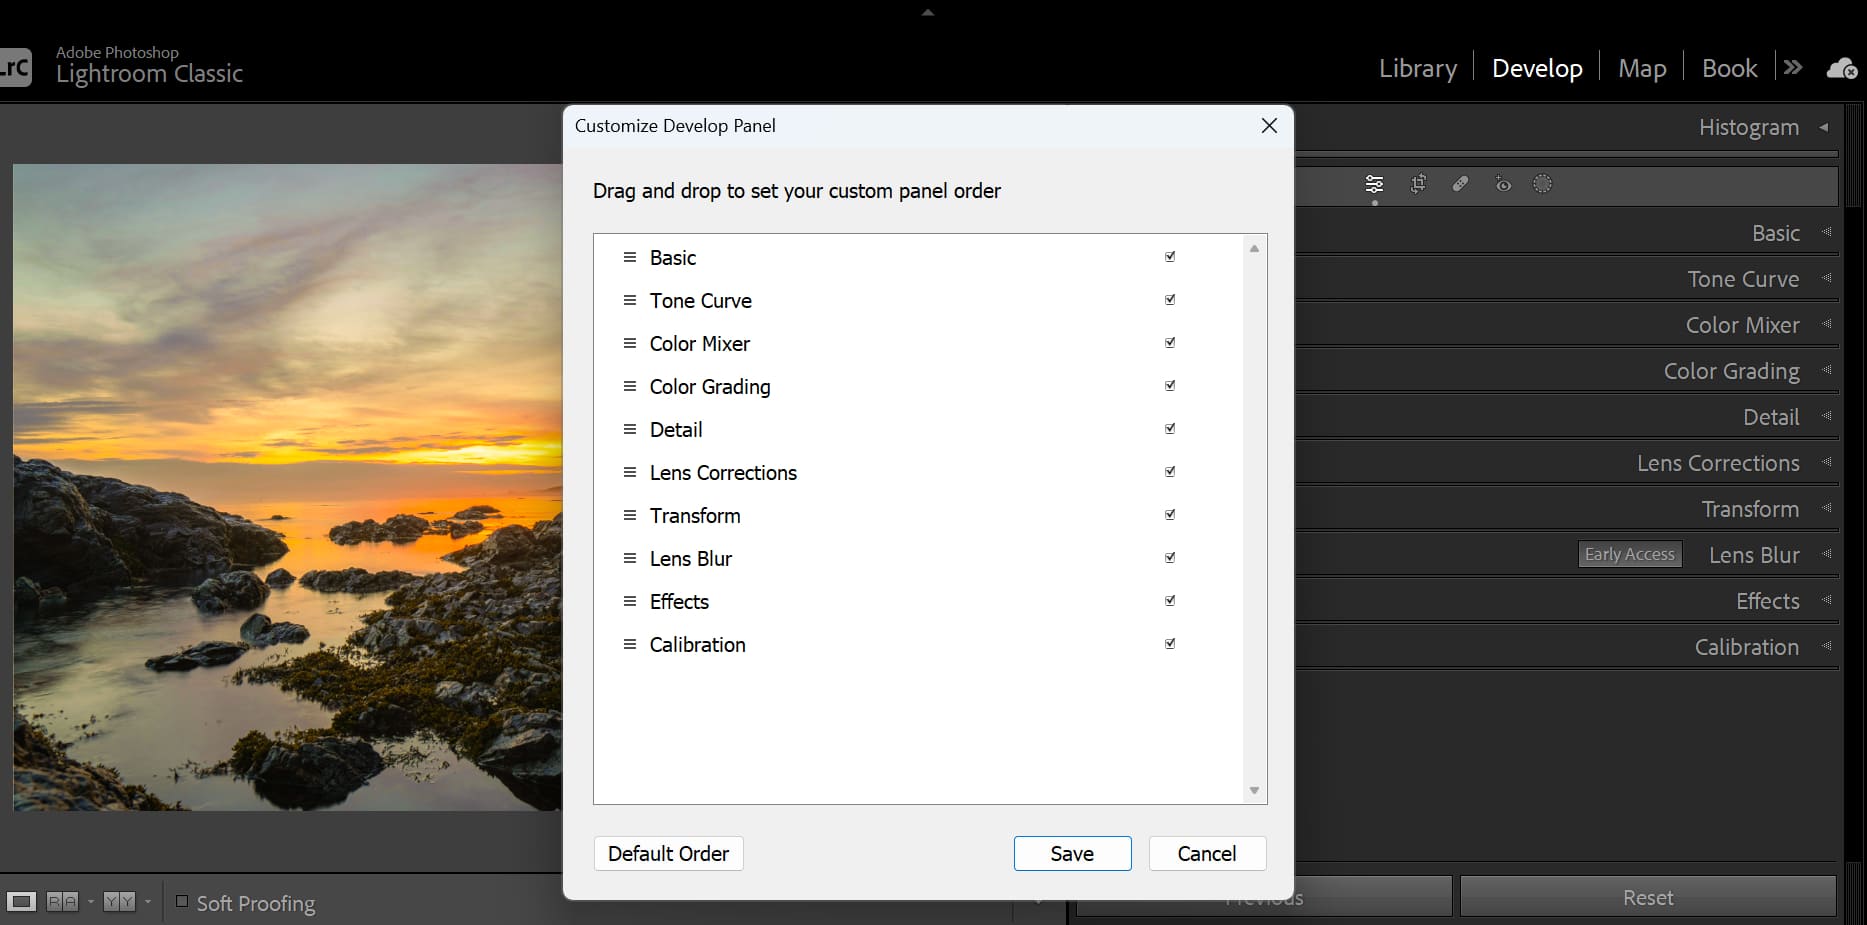
Lightroom offers a "Customize Develop Panel" feature, which allows you to customize the order of various editing tool panels to your liking.
To access this feature, simply go to the Develop module, right-click anywhere in the editing menu on the right side, and select "Customize Develop Panel" from the pop-up menu.
This feature is quite convenient as it enables you to rearrange the order of Lightroom's various tool panels according to your own editing workflow and logic. You can personalize it to match your own preferences and streamline your editing process.
Frequently Asked Questions About How to Use Lightroom?
Question: How to Import Photos Into Lightroom Classic?
In Lightroom Classic, go to "File" > "Import Photos and Videos". In the import window, select the photos or folders you want to import, then choose import options. Alternatively, you can refer to our tutorial on how to import photos.
Question: How to Edit Photos in Lightroom Classic?
In the "Develop" module, you can use various tools and sliders to adjust the colors, brightness, contrast, and more of your photos.
Question: How to Export Photos in Lightroom Classic?
Select the photos you want to export, then choose "File" > "Export". In the export window, select export options, including file type, quality, and location.
Question: How to Use Lightroom Presets?
We have prepared two tutorials below on how to add Lightroom presets and make the most of them in Lightroom Classic. If you're interested, feel free to check them out:
Question: What to Do If Encounter Issues While Using Lightroom Classic?
You can refer to Adobe's online help documentation or participate in the Adobe community forums for assistance. If the issue still persists, you can contact Adobe customer support.
Product Recommendation:
If you haven't experienced the convenience that TourBox brings to your creative journey, why not give our latest product, TourBox Lite, a try? TourBox Lite has a lower price and is easier to get started with, making it perfect for first-time TourBox users.

That concludes our tutorial on how to use Lightroom. Thank you for reading, and we hope it has been helpful to you.