How to Vectorize an Image in Photoshop?
In this tutorial, we will share how to vectorize an image in Photoshop. It's a highly practical skill that can be beneficial for designers, artists, or anyone looking to enhance their Photoshop abilities.
The main steps to vectorize an image in Photoshop include selecting the image, using the appropriate tools for vectorization, and then adjusting and optimizing the results. We will go through each step in detail to ensure a comprehensive understanding. Let's get started!

In this article, you will learn:
- What Is a Vector?
- How to Vectorize an Image in Photoshop?
- Frequently Asked Questions About Vectorizing an Image in Photoshop
What Is a Vector?
A vector graphic is an image composed of paths or lines (also known as vectors) that are defined by their starting and ending points (also called control points) and other specific points.
One major advantage of vector graphics is that they remain crisp and sharp no matter how much you scale or distort them. This is because vector graphics are created based on mathematical formulas, rather than pixels.
As a result, they are well-suited for designs that require large-size outputs, such as logos and posters.
In contrast, bitmap (or raster) graphics are composed of individual pixels, each with its own color. An example of a bitmap is a photograph. When you zoom in on a bitmap, you start to see the individual pixels that make up the image, resulting in a blurry or pixelated appearance.
Further Reading:
If you're interested in learning more about vector and bitmap, you might want to explore these topics:
In summary, vector graphics and bitmap graphics each have their own advantages. The choice of which type of graphic to use depends on your specific needs and goals. In the following sections, we will share the detailed steps on how to vectorize an image in Photoshop.
How to Vectorize an Image in Photoshop?
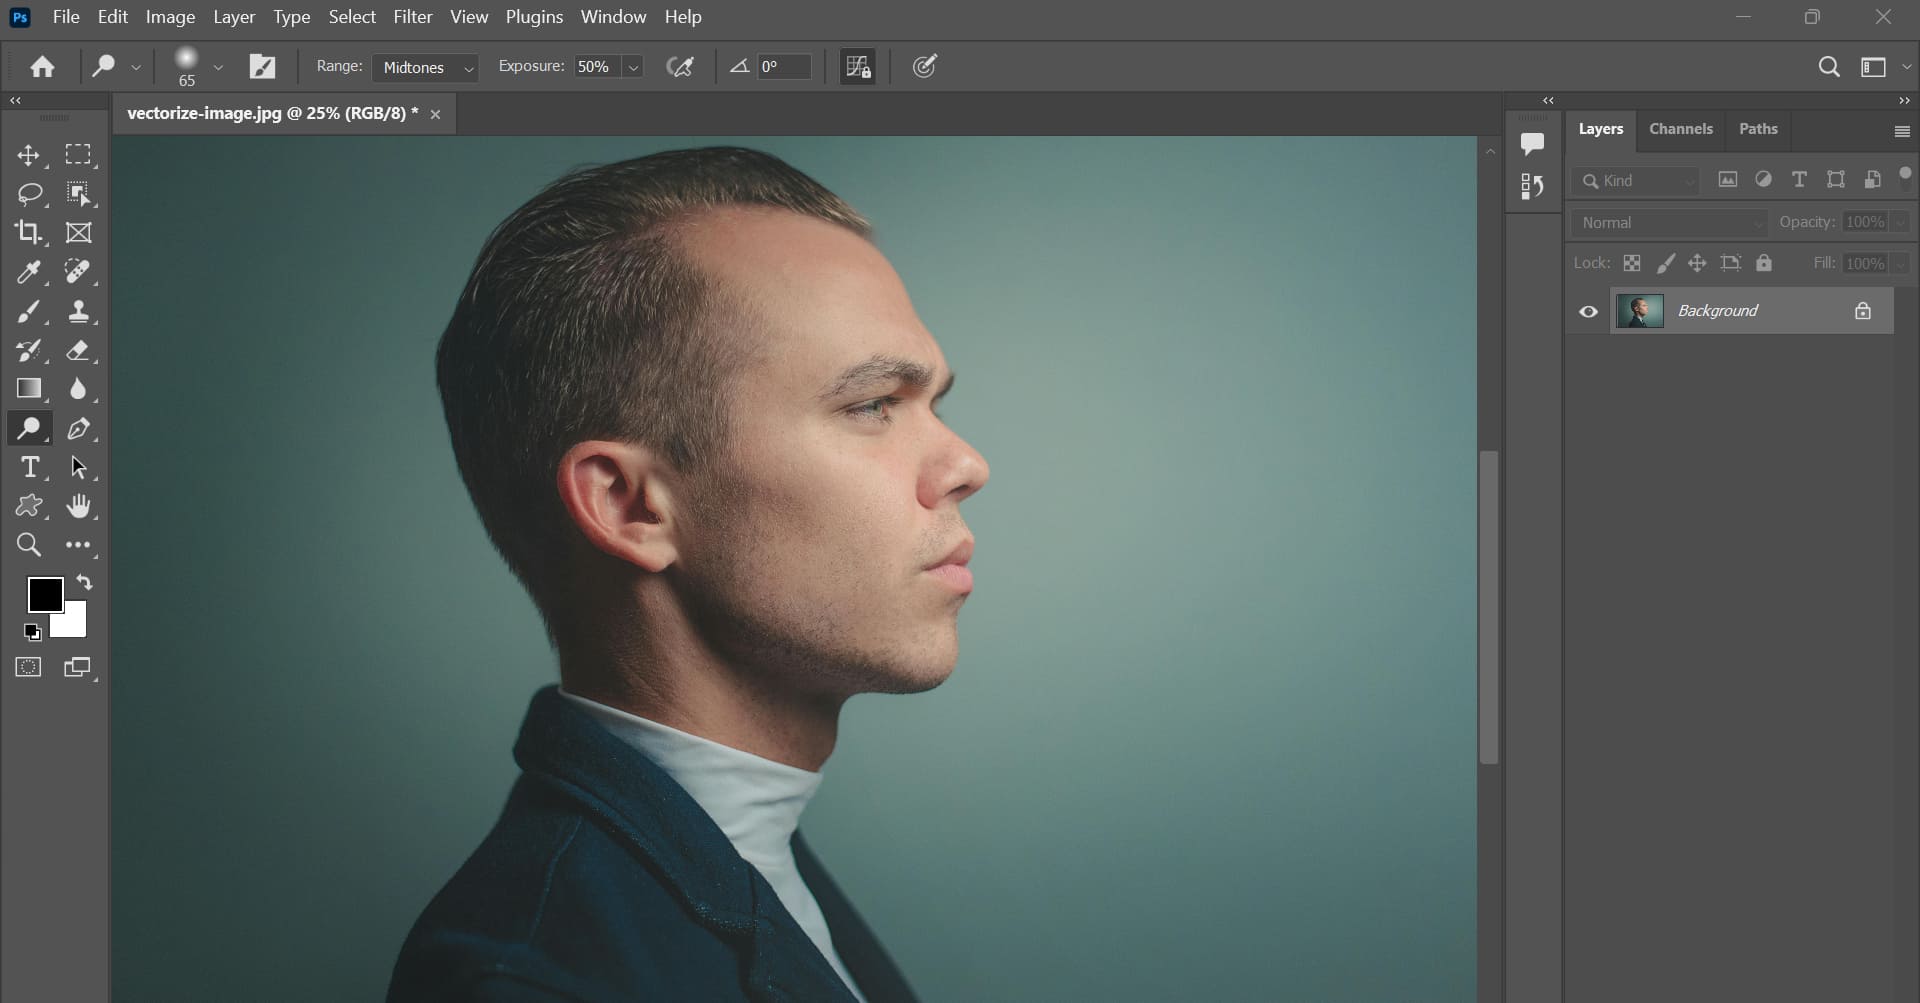
To begin with, you need to import the image you want to vectorize into Photoshop. The image has no specific requirements: it can be black and white or in color.
However, to highlight the details of the subject and achieve the best results in the vectorization process, it's ideal to choose an image with a simple background (or a solid color background, or even a transparent background).
Let's take the example of the image below. We imported a photo of a person with a solid color background. Our goal is to convert the person in the photo into a vector graphic, so the first step is to remove the solid color background.
As mentioned earlier, vector graphics are created based on mathematical formulas, not pixels. Therefore, converting complex landscape photos into vector images is not practical.
That's why images with simple elements and backgrounds are the best choice for vectorization in Photoshop.
Further Reading:
We have two tutorials below that explain how to remove backgrounds in Photoshop. If you're interested, feel free to check them out:
After removing the background, you'll need to sharpen the subject to enhance the image and bring out the details. There are various ways to sharpen an image in Photoshop, but we recommend using the High Pass filter.
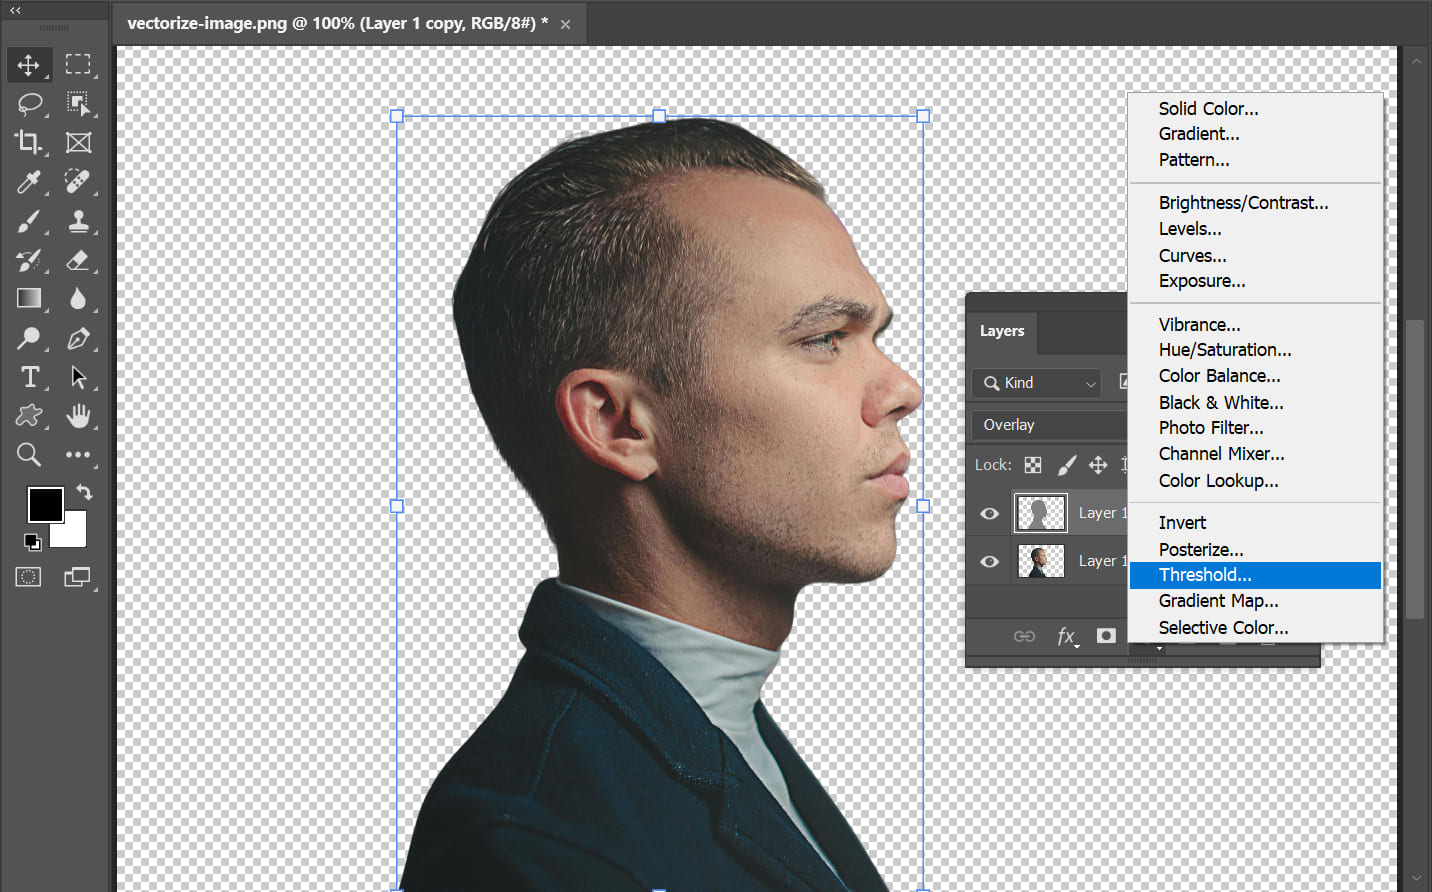
Next, go to the Layers panel and create a new Threshold adjustment layer.
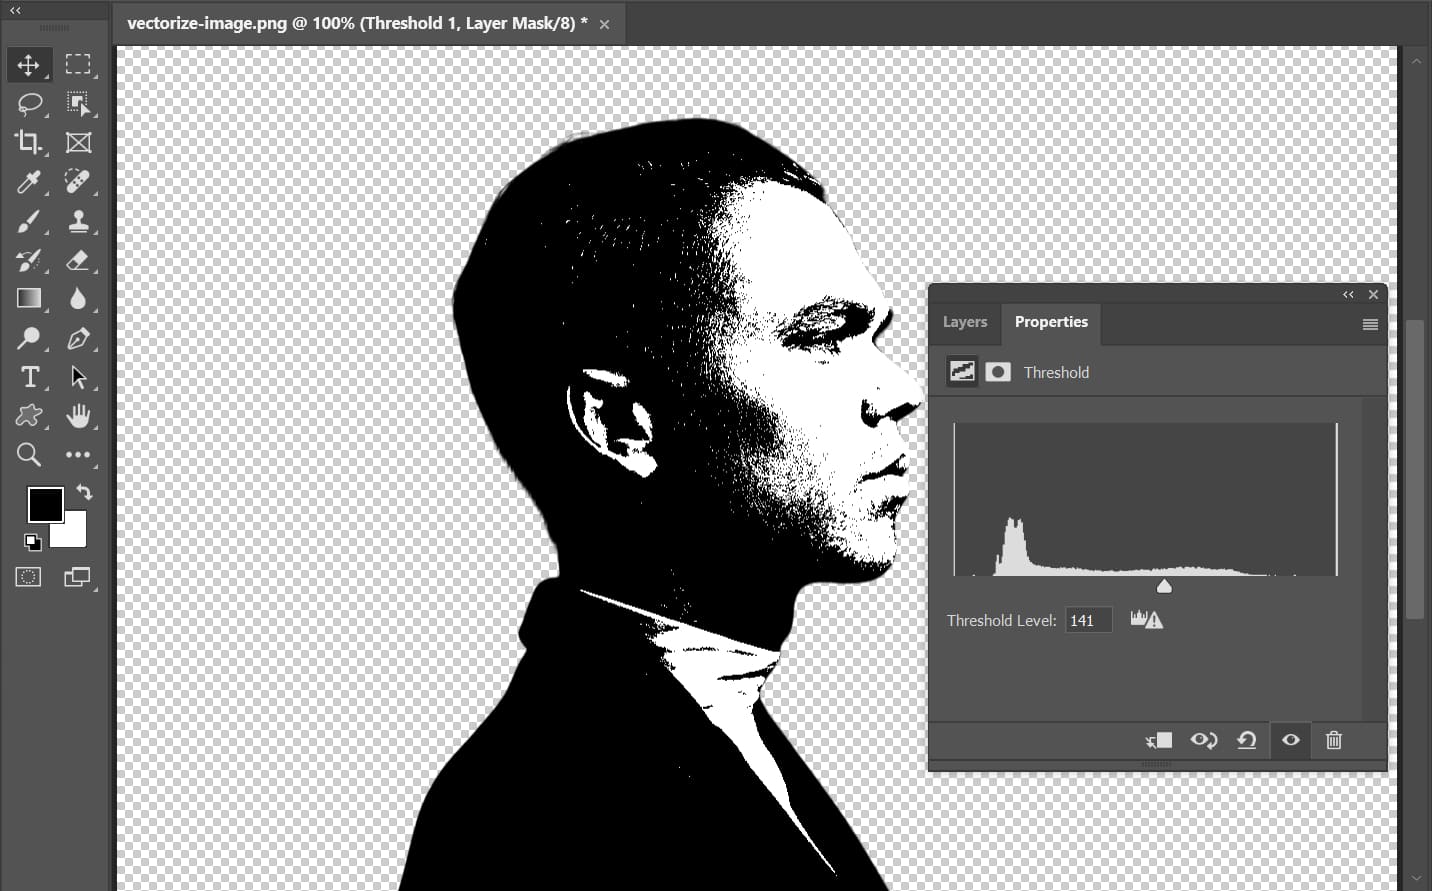
Adjust the threshold level based on your image, ensuring that the key details of the image are preserved.
Once you're satisfied with the threshold result, go to the Layers panel and merge the visible layers.
Additional Tip:
The steps mentioned above should be sufficient for vectorizing simple images. However, if your original image is more complex, you may need to make additional adjustments. You can try using the Sharpen tool, Curve, or any other tools you prefer to increase the contrast of the image.
Now that you have a fully black-and-white image, you can still use the Brush tool (shortcut B) with black-and-white colors to remove any unnecessary details if needed.
The Brush tool is an important tool in Photoshop, not only for digital drawing but also for post-processing and editing images. In addition to configuring a drawing tablet for more flexible use of the Brush tool, TourBox is also an option worth considering.

TourBox is a tool designed to improve work efficiency for photographers, creatives, and content creators, seamlessly integrating with various image editing, video editing, digital drawing, and office software, including Photoshop.
You can control TourBox with one hand, adjusting brush size, opacity, and other parameters using its Knobs, switching brush angle with the Dial Switch Brush Angle, and selecting parameters using the Scroll. The process is incredibly smooth, making you feel like a DJ in full control.
TourBox has simple key settings and comes with built-in presets and a wide range of downloadable resources. Its custom actions, TourMenu, and macro operations further expand your freedom and choices, allowing you to experience the dance of your fingertips during the editing process.
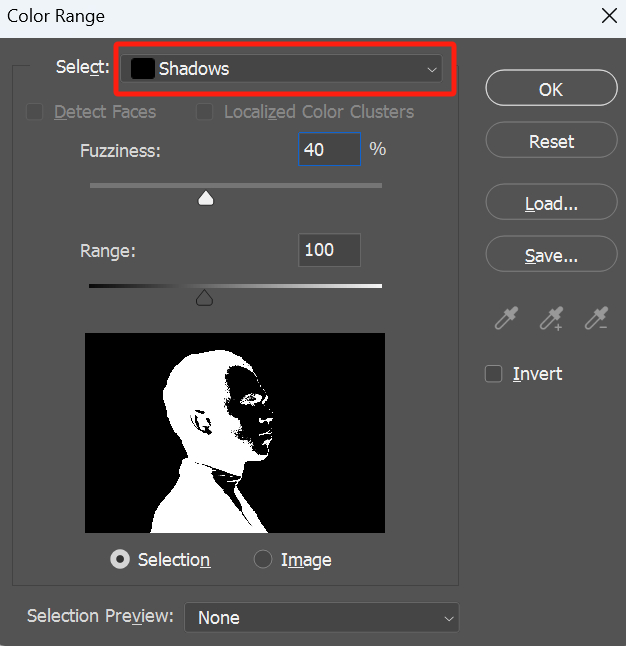
Once you've completed the previous steps, you're now at the final stage of converting your image into a vector graphic. In the Photoshop menu at the top, click on "Select" and then "Color Range".
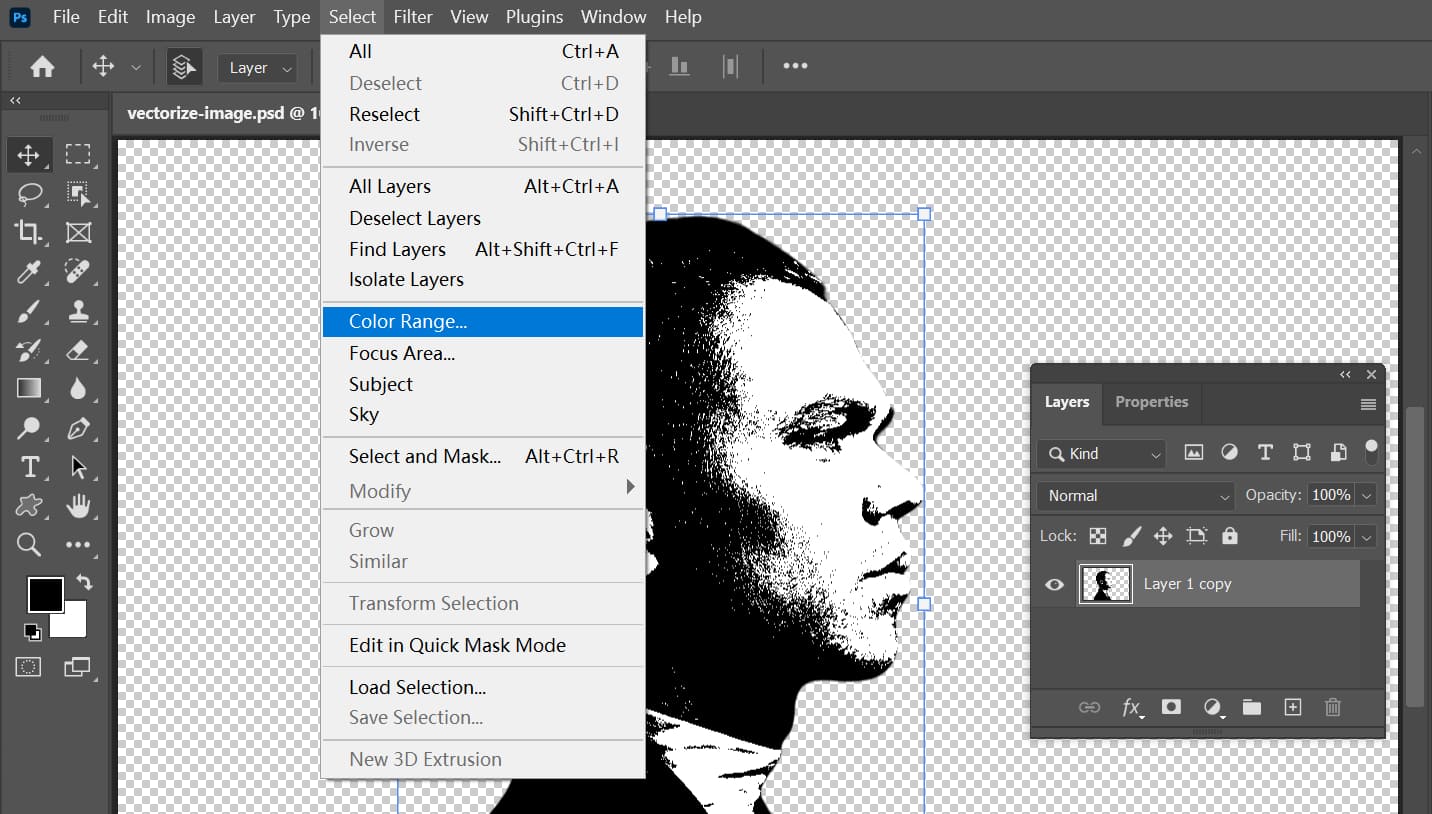
In the Color Range panel that pops up, select the Shadows option. You can adjust the fuzziness and range according to your preference, and then click "OK".
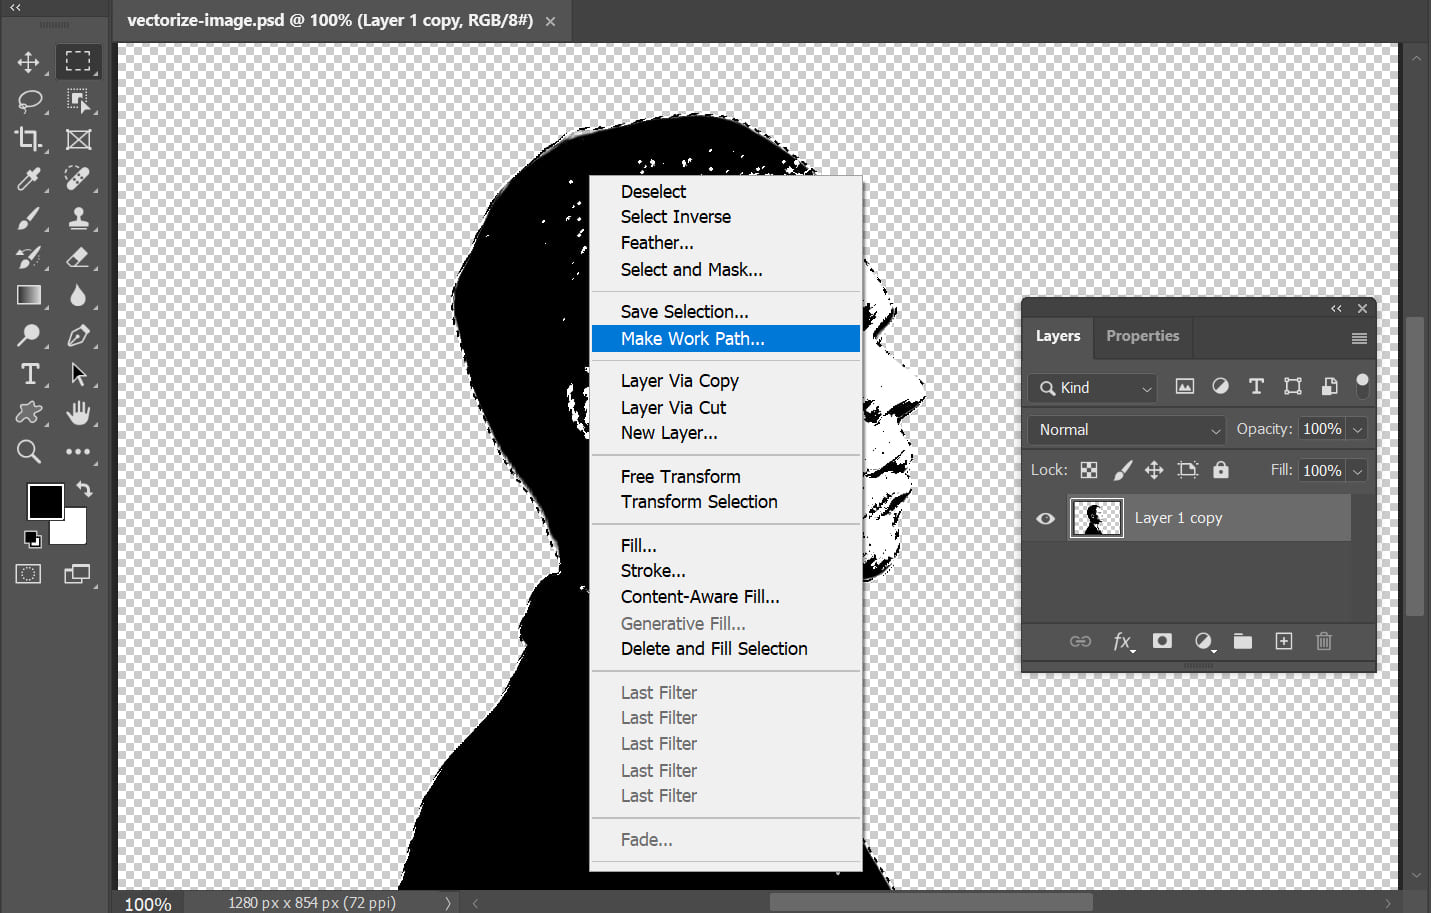
At this point, you will see flashing dotted lines indicating that the selection is active on your design. In the left toolbar, select the Rectangular Marquee tool (shortcut M) or any other selection tool.
You don't need to make a selection around the design. You can directly right-click on the design itself. From the dropdown menu, choose "Make Work Path".
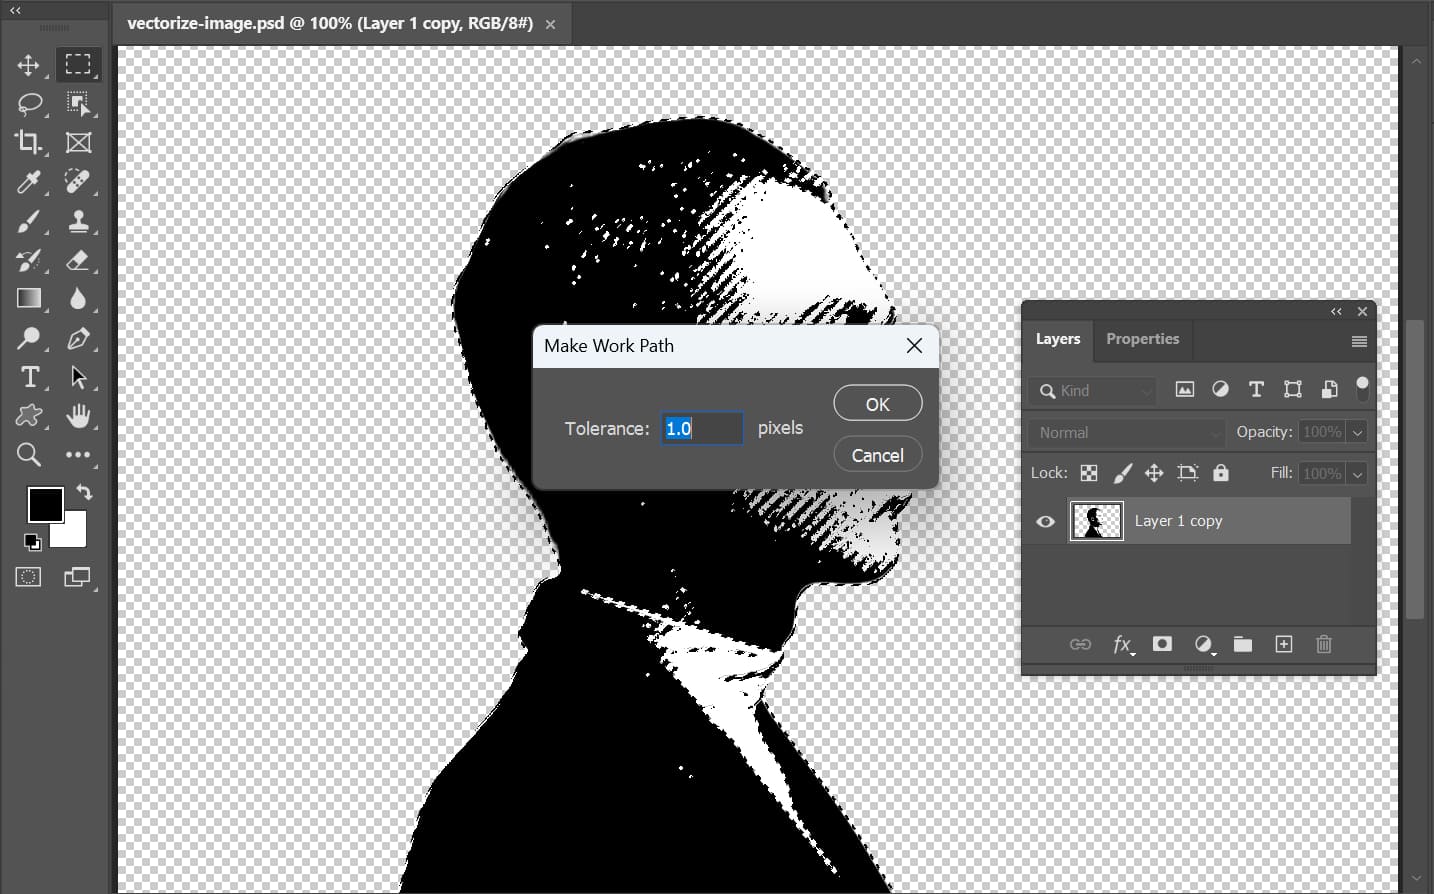
In the "Make Work Path" window, set the "Tolerance" to 1 or 1.5 pixels, and then click "OK". This step creates your drawing path. You can go to the "Paths" panel to find it, double-click to name it, and save the path.
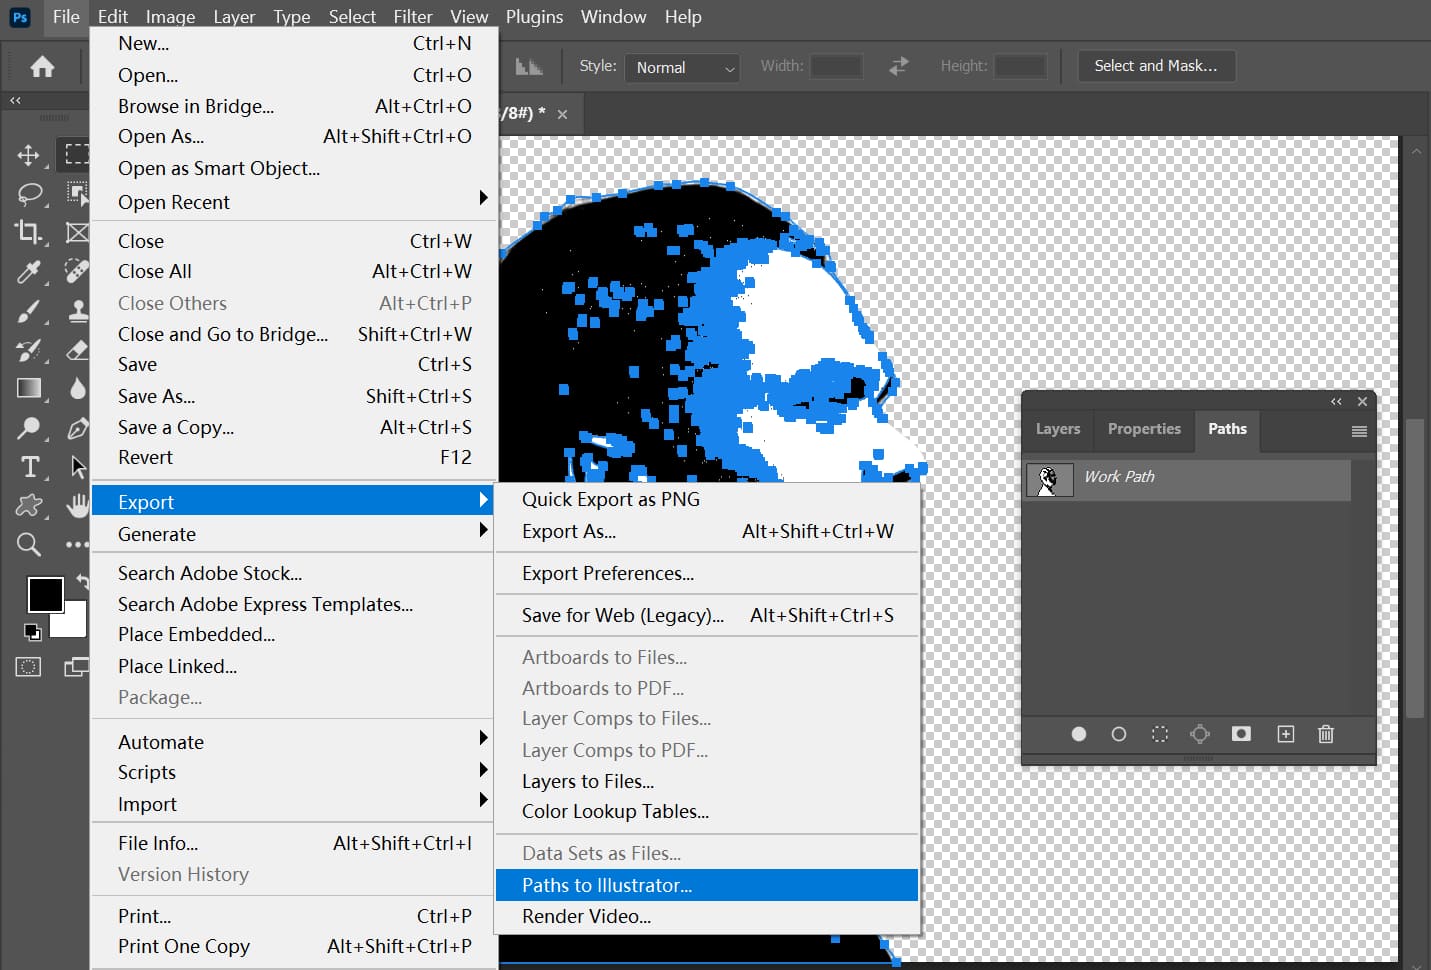
At this point, your image's path should be active (you can go to the "Paths" panel and click on the path to reactivate it). Then, you can go to "File" > "Export" > "Paths to Illustrator" to successfully export the path as an Illustrator path.
Why Is Illustrator More Suitable for Handling Vector Images?
Vector images and graphics are based on mathematical formulas rather than pixels, consisting of points, lines, shapes, and curves. Illustrator is primarily used for creating vector graphics. In contrast, images in Photoshop are pixel-based, making it more suitable for photo editing.
If you need to work with vector images, Illustrator is the better choice. However, since both Illustrator and Photoshop are part of Adobe Creative Cloud, they are designed to work together and complement each other.
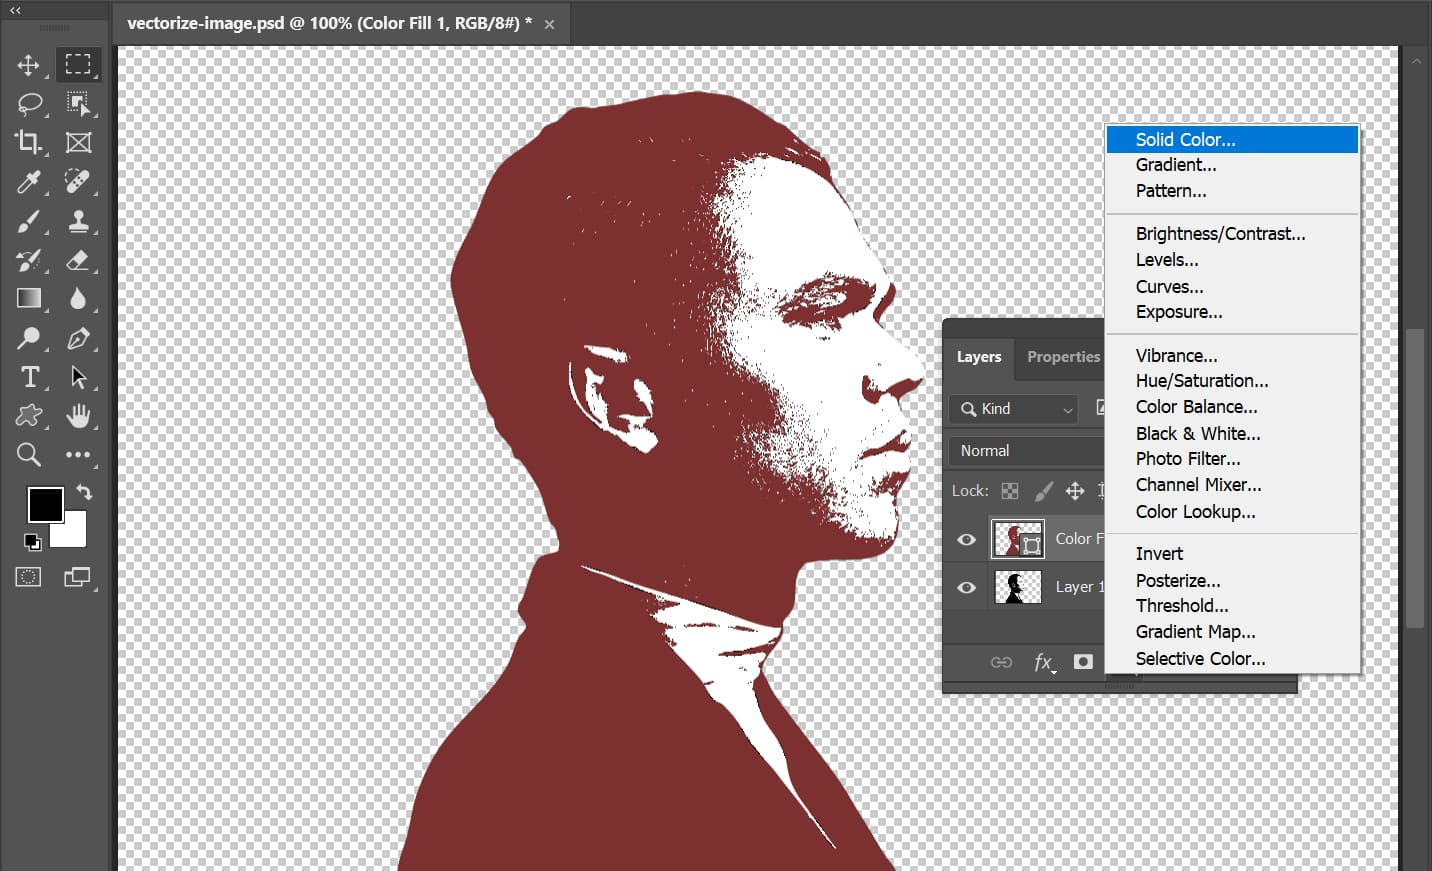
You can also add color effects to your vector graphics. With the path active, create a new Solid Color adjustment layer. In the "Color Picker" window that appears, choose any color you like, and then click OK.
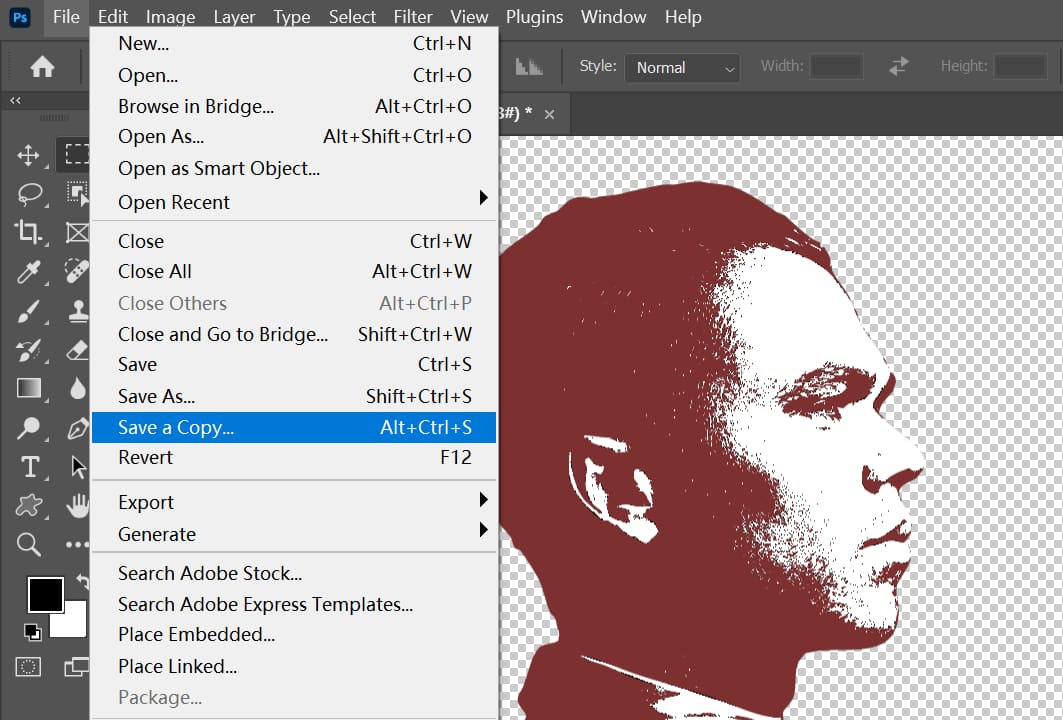
The final step to vectorize an image in Photoshop is to export it as a vector graphic. Click on "File" in the menu bar at the top of Photoshop, then select "Save a Copy". Choose the Photoshop EPS format in the export options and save your file.
Mission accomplished! Following the steps above, you have successfully converted the image into a vector graphic in Photoshop.
Frequently Asked Questions About Vectorizing an Image in Photoshop
Question: What Is a Vector Image?
A vector image is made up of paths or line segments defined by mathematical formulas. It can be scaled infinitely without losing any clarity.
Question: Why Vectorize Images in Photoshop?
Vectorizing images allows your designs to remain crisp at any size. It's especially useful for designs that require large-scale output, such as posters or banners.
Question: Can Any Image Be Vectorized?
In theory, any image can be vectorized, but complex images may require more time and skill to achieve the desired result.
Question: How to Tell If an Image Has Been Successfully Vectorized?
You can check by zooming in on the image. If it remains clear and doesn't lose any quality when zoomed in, it has been successfully vectorized.
Product Recommendation:
If you're interested in how TourBox can improve your workflow, consider checking out our TourBox Lite.
With a lower price and simpler setup, TourBox Lite is perfect for first-time users of TourBox. You'll be amazed at how much it can transform your creative process.

That concludes our tutorial on how to vectorize an image in Photoshop. Thank you for reading, and we hope it has been helpful for your creative journey.