Photoshop Adjustment Layers: Ultimate Tutorial to Master in 5 Minutes
Photoshop adjustment layers are powerful tools that allow you to make non-destructive edits to images. Whether you want to tweak colors, brightness, or create intricate effects, adjustment layers are incredibly useful.
In this tutorial, we'll delve into the fundamental concepts and usage techniques of the Photoshop adjustment layer, helping you enhance your image editing skills. Are you ready to explore more possibilities? Let's get started!

In this article, you will learn:
- Layout of Photoshop Adjustments
- How to Use Photoshop Adjustment Layers?
- How to Make an Adjustment Layer Only Affect the Layer Below It?
- How to Control the Range and Intensity of Adjustment Layer?
- How to Adjust Adjustment Layer Parameters?
- How to Delete an Adjustment Layer?
- Tutorial on Commonly Used Photoshop Adjustment Layers
Layout of Photoshop Adjustments
In Photoshop, the primary locations for adjusting photos are:
- Clicking Image → Adjustments in the top menu bar
- Adjustments panel (or creating an adjustment layer)
Many tools are duplicated between these two locations, but they differ significantly in how adjustments are made.
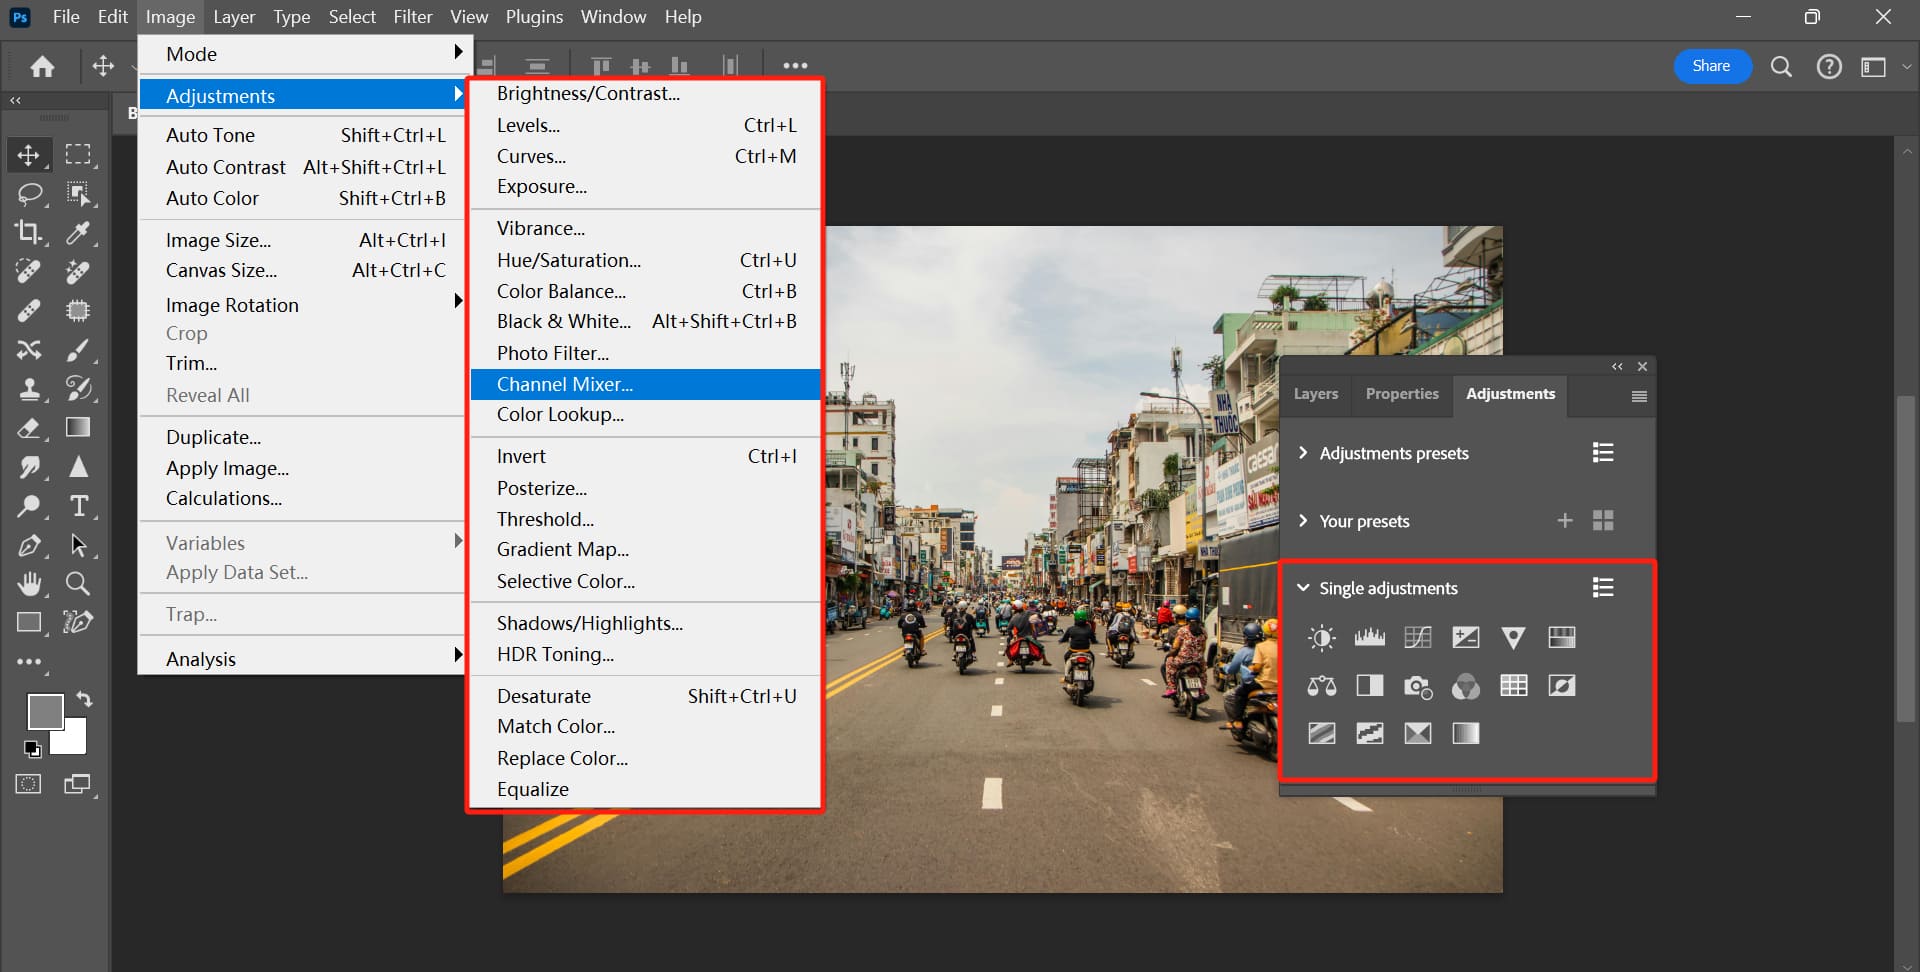
In the image below, the red box on the left indicates the position of the "Image → Adjustments" command, while the one on the right shows the "Adjustments panel."
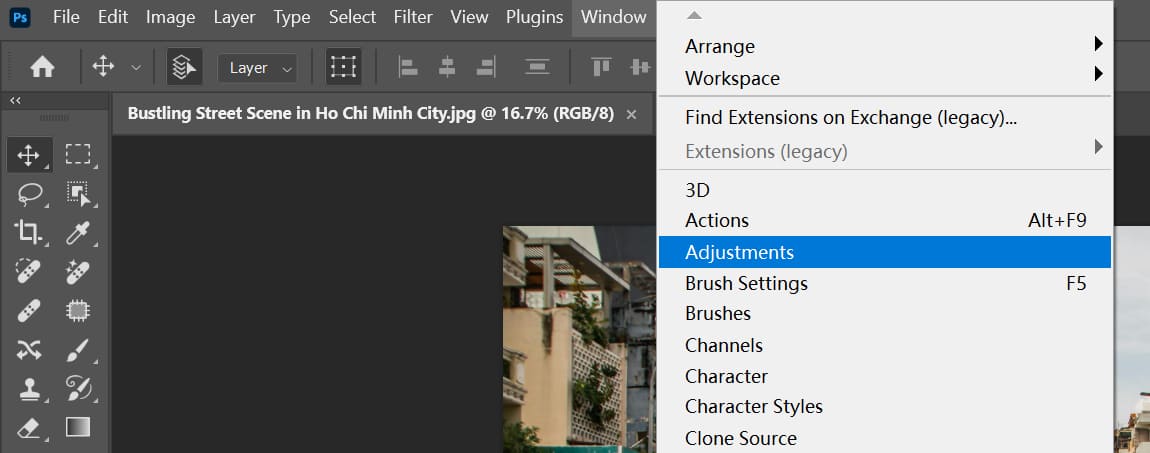
If you can't see the Adjustments panel in the Photoshop interface, you can display it by clicking "Window > Adjustments" in the top menu bar.
However, in general, it is often more convenient to create an adjustment layer directly in the Layers panel rather than in the Adjustments panel.
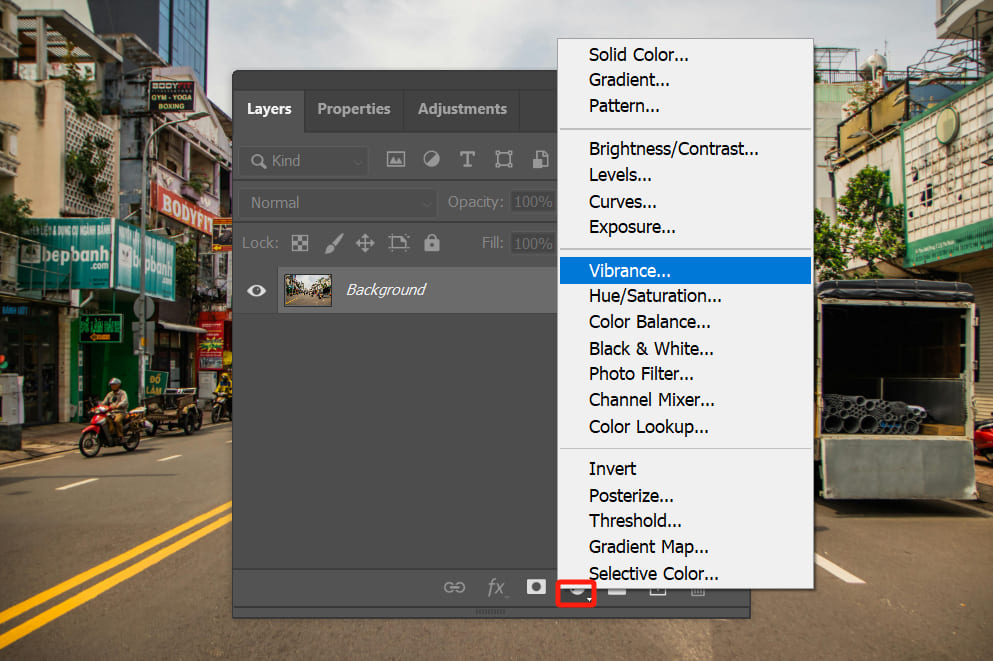
To do this, in the icon bar below the Layers panel, click on the "Create new fill or adjustment layer" icon. This will bring up a menu for creating fill (solid color, pattern, gradient) layers and adjustment layers.
In this "Create new fill or adjustment layer" menu, apart from the first three options, the rest are all options for creating adjustment layers. Simply click on the text to create one.
Whether in the Adjustments panel or in the menu for creating adjustment layers, both serve as methods to create adjustment layers—it's simply a matter of personal preference.
1. Image → Adjustments
This menu contains various settings, most of which are related to color adjustments.
The adjustments made in this menu will directly affect the image itself and will not create an adjustment layer.
Therefore, if you aim for non-destructive editing in image manipulation, consider using Smart Object in conjunction with these adjustments.
2. Adjustment Layer
An adjustment layer is a special type of layer that allows you to apply color and tone adjustments to an image without altering the original pixels, thereby avoiding substantial damage to the image.
If you have some experience with post-processing, this is the recommended way to use Photoshop. You can create adjustment layers for your photos, making full use of Photoshop's layer and mask features to edit images non-destructively.
In the adjustment layer menu or the Adjustments panel, you will see names of adjustment layers like Brightness/Contrast, Levels, and more. You'll notice that these are actually the first 16 options from the "Image → Adjustments" menu!
The main difference between the "Image → Adjustments" command and adjustment layers is the ability to work on separate layers. By using adjustment layers, you can combine masks and settings like opacity to have greater flexibility in your edits.
How to Use Photoshop Adjustment Layers?
The adjustment commands under "Image > Adjustments" directly modify the pixel data in the selected layer. However, adjustment layers can achieve the same adjustments without altering the pixels.
The best part is that adjustment layers allow you to modify parameters at any time. On the other hand, once you apply a command from the "Image > Adjustments" menu, if you close the file, you won't be able to revert the image to its original state.
Moreover, simply by hiding or deleting an adjustment layer, you can revert the image back to its original state.
After creating an adjustment layer, any color or tone adjustments we make to the image are stored in this adjustment layer, affecting all layers below it.
If you need to apply the same adjustments to multiple layers, you can create an adjustment layer above these layers. This way, you can affect these layers through the adjustment layer without having to adjust each one individually.
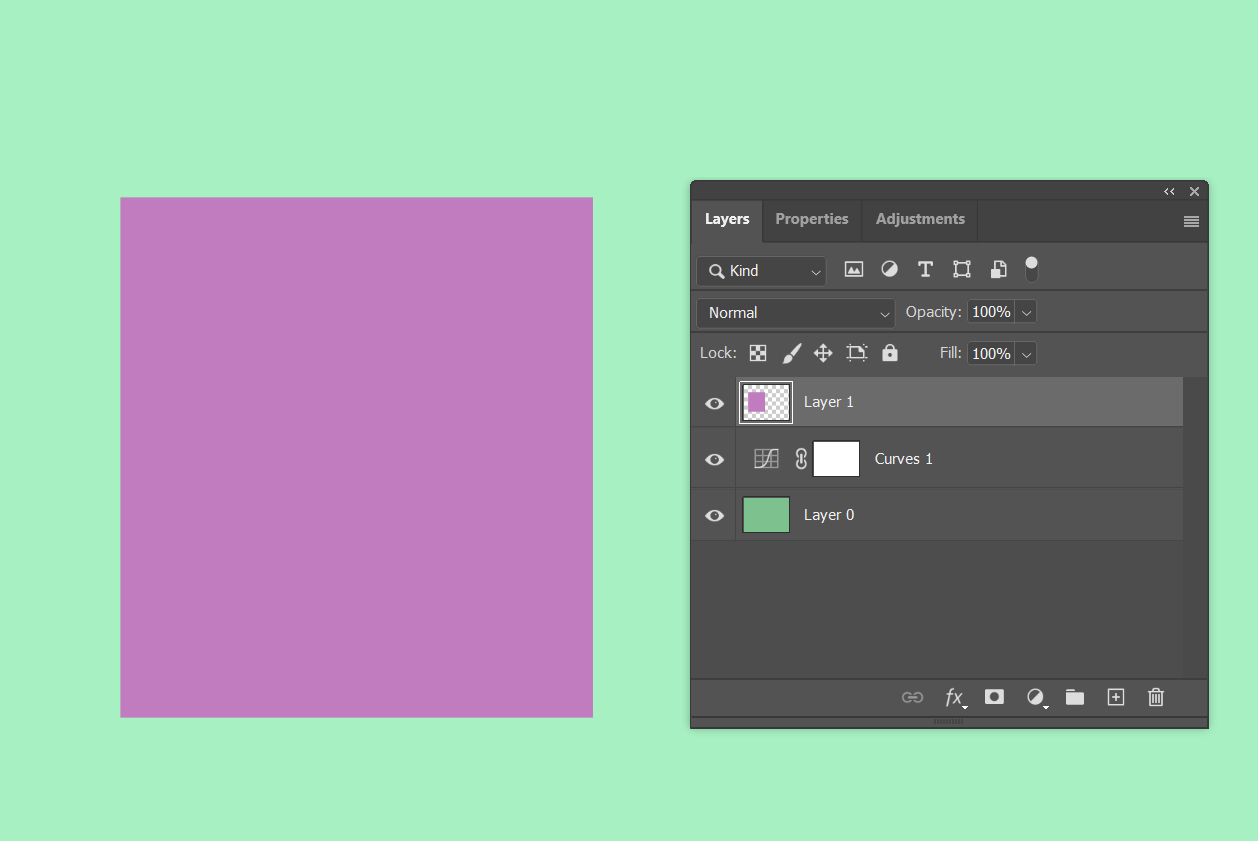
Regular layers placed below an adjustment layer will be influenced by the adjustment layer, as shown in the image below.

By rearranging the order of layers (moving a layer from below the adjustment layer to above it), you can remove its influence, as illustrated in the image below.
How to Make an Adjustment Layer Only Affect the Layer Below It?
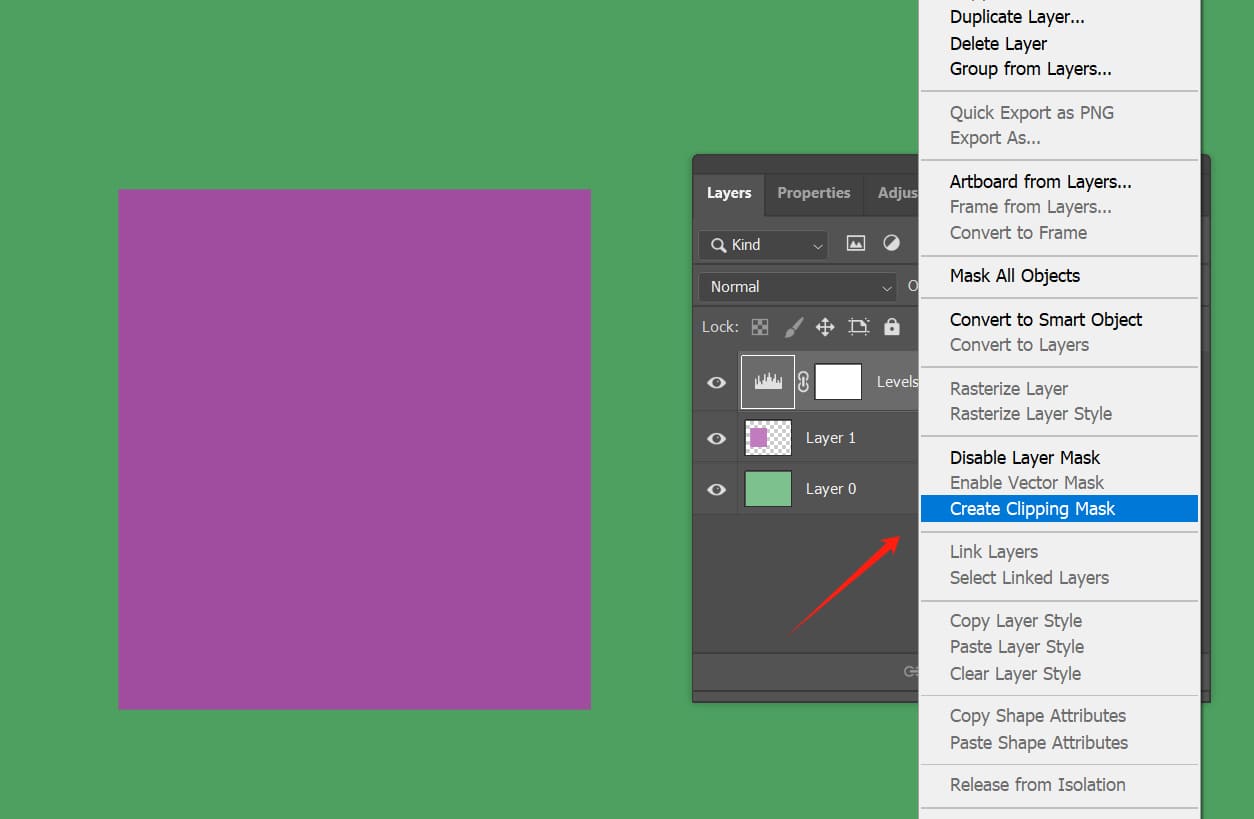
If you don't want an adjustment layer to impact all the layers below it but just the one directly beneath it, you can achieve this by creating a clipping mask.
A clipping mask allows an adjustment layer to affect only the layer directly below it. After creating an adjustment layer, you can right-click on the adjustment layer and choose "Create Clipping Mask" from the menu that appears.
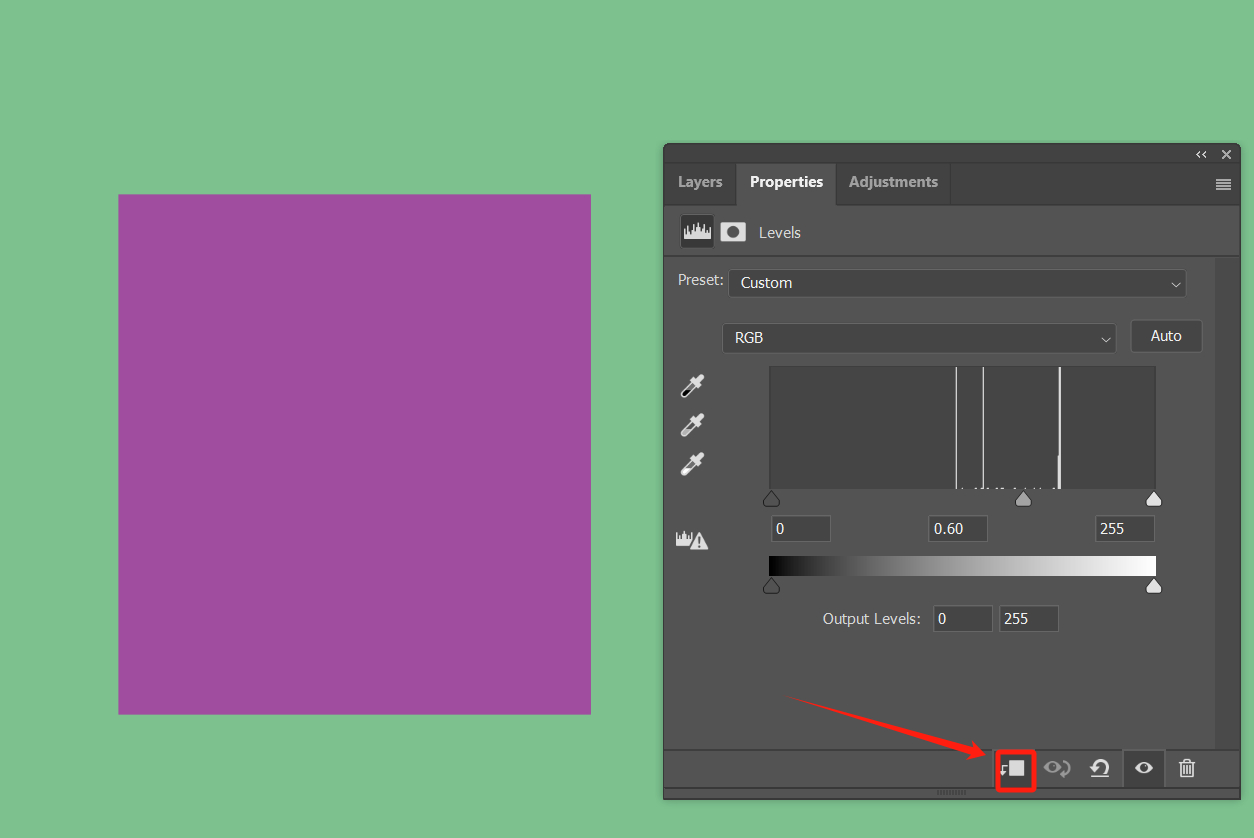
Alternatively, you can click on the first small button at the bottom of the adjustment layer's Properties panel, to toggle whether the clipping mask affects only a single layer or all layers.
Further Reading:
How to Control the Range and Intensity of Adjustment Layer?
When you create an adjustment layer in Photoshop, a layer mask is automatically added to it.
In the layer mask, white indicates the areas affected by the adjustment layer, gray reduces the intensity of the adjustment, and black hides the adjustment layer.
By using tools like brushes, gradients, and others to paint black and gray on the image, you can define the areas impacted by the adjustment layer and adjust the strength of the effect.
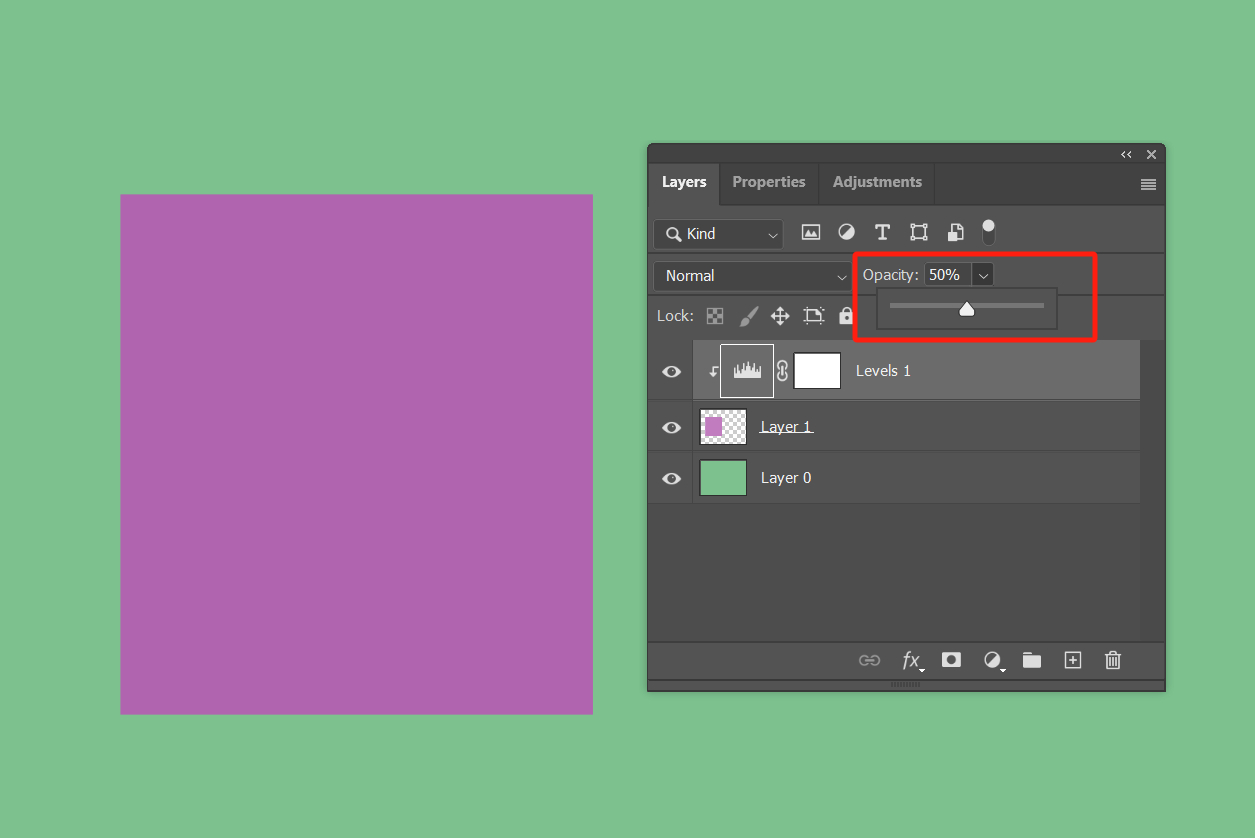
Additionally, if you want to reduce the intensity of an adjustment layer, you can lower the layer's opacity.
For example, setting it to 50% will weaken the adjustment effect by half, as shown in the image below. The lower the opacity value, the weaker the adjustment intensity.
How to Adjust Adjustment Layer Parameters?
After creating an adjustment layer in Photoshop, you can modify the adjustment parameters at any time.
Simply double-click on the adjustment layer in the Layers panel to switch to the Properties panel, where you can make further adjustments to the parameters of the adjustment layer.
How to Delete an Adjustment Layer?
To delete an adjustment layer, select the layer and press the Delete key or drag it to the "Delete layer" button at the bottom of the Layers panel.
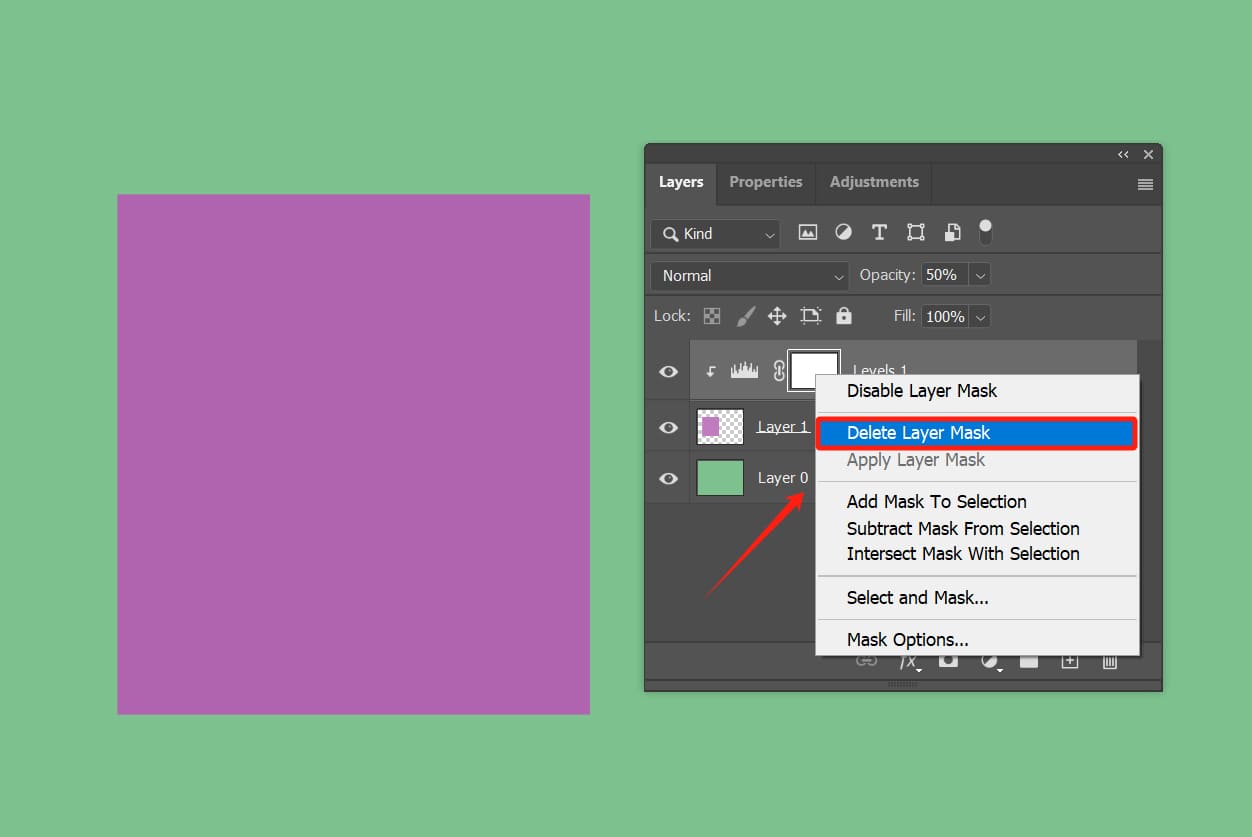
If you only want to remove the mask and keep the adjustment layer, you can right-click on the mask of the adjustment layer and choose the "Delete Layer Mask" command from the contextual menu.
Tutorial on Commonly Used Photoshop Adjustment Layers
We have created detailed and user-friendly tutorials on commonly used Photoshop adjustment layers. If you are interested, you can click on the tutorial link below to view them.
Further Reading:
- Photoshop Curves: How to Harness the Power of the Color Grading King?
- Mastering Levels in Photoshop: Enhance Your Editing Skills
- Photoshop Gradient Map: A Simple and Efficient Color Grading Tool
- Color Lookup: How to Create Unique Color Grading Presets in Photoshop?
- How to Use Selective Color in Photoshop to Control RGB Values?
- Photoshop Channel Mixer: A Guide to Advanced Color Adjustments
- How to Use the Color Balance Tool in Photoshop?
Product Recommendation:
If you find the process of creating adjustment layers in Photoshop repetitive and adjusting them cumbersome and inefficient, you might appreciate TourBox, a controller loved by many digital artists and photographers.

With TourBox, you can swiftly create the adjustment layers you need with the press of a button. Moreover, you can use TourBox's Dial to precisely adjust parameters with increments of +1 or -1.

The precision and efficiency that TourBox offers are beyond what you can achieve with just a keyboard. Explore our photo editing and digital painting page to learn more about the versatility of TourBox.